One last post!
Good luck everyone with next semester, and congratulations to those who are wrapping MET up!
ETEC 533 – Technology in the Mathematics and Science Classroom
One last post!
Good luck everyone with next semester, and congratulations to those who are wrapping MET up!
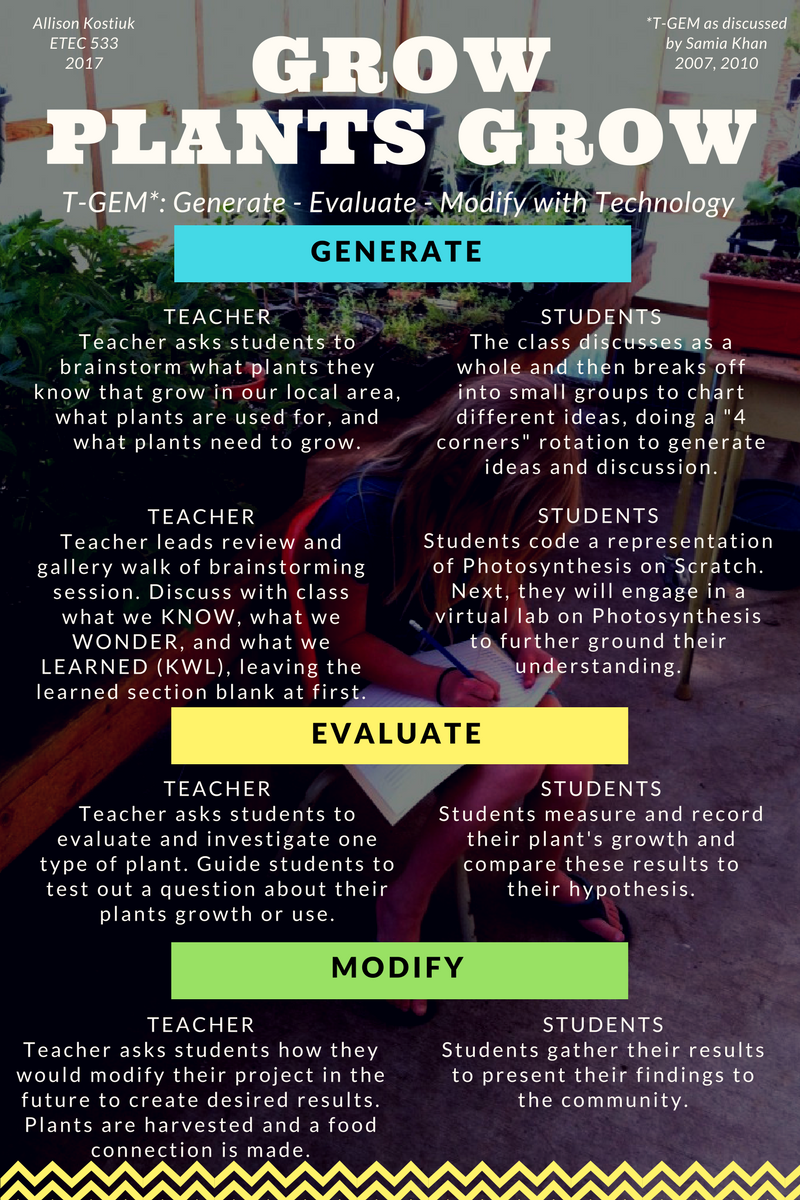
For my TELE final project I chose to do an inquiry on plants with my grade 3’s integrating the T-GEM theory. I posted a link to my project in the Student Café and received some awesome feedback from some classmates (thank you!). If you would like to take a look at my project, here is the link: https://etec533.wixsite.com/growplantsgrow
I chose to create a graphic outlining my steps using the T-GEM learning theory.
The virtual lab I would integrate into the generate phase would be this virtual lab on Light and Plant Growth to encourage students to think about possible hypotheses and questions for their own projects.
My fifth and final step is to incorporate a sharing aspect to showcase student learning. With this project the sharing would be in the form of a science fair with information on the project, a display of the plant(s) used, and a food connection sample for visitors to try.
As another technology connection, as Catherine suggested to me, I may also incorporate the creation of a digital story for students to showcase their observations made throughout the project in a creative way. Technology integration is a great way to enhance learning and offers additional ways for students to share and document their learning.
Khan, S. (2007). Model-based inquiries in chemistry. Science Education, 91(6), 877-905.
Khan, S. (2010). New pedagogies for teaching with computer simulations. Journal of Science Education and Technology, 20(3), 215-232.
I have come to recognize that many of my senior math students do not make a connection between transformations and algebraic processes. They struggle to make the connection between physical movement and algebraic effect. This activity is intended to assist these students in building connections in this area.
Dixon, J. K. (1997). Computer use and visualization in students’ construction of reflection and rotation concepts.School Science and Mathematics, 97(7), 352-358.
Throughout this MET533 course, the instructor, Dr. Samia Khan, has diligently commented on student blog postings by affirming student thinking, offering further guidance, and posing questions for deeper inquiry. Several of Dr. Khan’s comments to my own posts were intentionally written, I believe, to spur me on to more thoroughly consider model-based learning and its purposes. Using prior knowledge and previous perceptions I attempted to ponder the use of models within instruction and teaching, yet it was not until the T-GEM lesson during Module B that I began to see more clearly the direction which Dr. Khan was gently pointing.
For interest’s sake, samples from Dr. Khan’s comment prompts on model-based instruction and learning are posted below:
From “Conceptualizing Misconceptions”:
Your careful comparison of the role of visual representations in fostering partial or incorrect conceptions leads one to wonder in what ways can children’s drawings contribute to understanding in math and science and our assessment of what they know?
From “Plate Tectonics: Reshaping the Ground Below Us”
I wanted to focus in on the process of modeling for this post, which lends itself nicely to the area of plate tectonics. Gobert et al. in their paper that students can engage in model-based reasoning with models, be they dynamic, runnable visual models in WISE or ones created from physical materials such as that of the plates or the Earth. For example, one of the first activities is for students to draw a model of how mountains are formed and then explain within WISE what happens to each of the layers when a mountain is formed. Students then critique peer models using prompts in WISE such as, what do you think should be added to this model that would make it better for someone who does not know geology. Peers then revised their models by examining and considering these recommendations.
The Geology Book is currently being used to support the construction of models, and I was wondering in what ways some of these model construction, reconsideration processes be fostered in some of the activities that you already have (eg. with WISE) or with hands on-materials?
From “Staying Afloat: Sink and Float Density T-GEM”
In the modification phase, asking students to design a pictorial representation (model) of the data is one way to begin to inspect their conceptual understanding. it will be interesting to see how students represent heaver objects in these pictorial models.
By investigating varied information visualizations, specifically NetLogo, further understanding of model-based instruction and learning has developed. NetLogo contains similar features to some of the instructional frameworks studied in Module B i.e. WISE/ SKI and T-GEM. These similarities offer rich inquiry opportunities for learners and include: being overseen by experts, allowing for teacher collaboration and authoring, offering exploration of micro and macro phenomena, and student modification of models to observe patterns and anomalies. Other affordances evident in NetLogo are similar to PhET as described in the study conducted by Finkelstein, Adams, Keller, Kohl, Perkins, Podolefsky and Reid (2005). Key characteristics of inquiry simulations include an emphasis on discovery rather than verification and allow for the exploration of microscopic behaviors or patterns that are not physically observable in real-life scenarios. As described by Finkelstein et al. (2005), “[a] variety of visual cues in … computer simulations make concepts visible that are otherwise invisible to students” (p.6). Students are able to make meaning of observable global activity by viewing localized patterns. Resnick and Wilensky (1998) refer to this type of modelling as an exploratory model “start[ing] with rules for the individual parts of a system, and … observ[ing] the group-wide patterns that arise from the interactions” (p. 162). Another feature described by Finkelstein et al. (2005) is the limited nature of simulations when each simulation is designed around a focused topic. This aspect of limitation is evident in NetLogo as specific models are available across a breadth of domains, including sciences {biology, physics, chemistry, social,} mathematics, computer science, and art. Interestingly, rather than inhibiting learning, the limitations tend to result in enhancing learning by minimizing distractions caused by excessive choices. Finkelstein et al. (2005) describe this enhanced productivity in the following way:
[B]ecause the system under investigation is constrained in particular ways, students are able to make progress they cannot in an unconstrained environment… Simulations provide the instructor considerably more freedom in designing and applying constraints to ensure that students’ messing about leads to productive learning. Constraints are also valuable as students mimic real scientists and mathematicians by isolating individual variables. This isolation of variables supports student understanding “by focusing attention to relevant details… [that can be] effectively applied to physical “real world” applications. (p.7)
As a distance learning teacher working with elementary students within a range of grade levels, I have concluded that NetLogo simulations are a better fit for upper level elementary learning (i.e. grades 4-7). Browsing through the model library does takes time, yet even within my own limited exploration several models were found that could effectively be incorporated into student elementary programs i.e. Biology/Autumn (Wilensky, 2005), Biology/Sunflower (Wilensky, 2003) and Mathematics/Color Fractions (Wilensky, 2005). This latter model is quite interesting as students decide upon and view a connection between fractions, decimals and visual box patterns. This model is simple enough for a grade 4 student to modify when beginning to learn how to correlate fractions and decimals through curriculum. Each NetLogo model contains a “Model Info” section which is an invaluable feature providing teachers and students with an explanation of the model, what to pay attention to when modifying, ideas for modification, and extension ideas. This “Model Info” is an asset for successful understanding and implementation.
In conclusion, NetLogo is one example of a simulation exemplifying theoretical research through a model-based learning experience. Students are provided the opportunity to explore and discover patterns determined by their choice of modifications and scaffolding is provided within the “Model Info” section to help direct students through guided inquiry. It is necessary for both teachers and students to understand the need for invested time to become familiar with the limited variables, as this is essential in building connections. Viewing phenomena in a new and meaningful way is highly probable through NetLogo and this affordance is something, that I believe, Dr. Khan’s guided inquiry was helping lead me to see.
Finkelstein, N.D., Perkins, K.K., Adams, W., Kohl, P., Podolefsky, N., & Reid, S. (2005). When learning about the real world is better done virtually: A study of substituting computer simulations for laboratory equipment. Physics Education Research,1(1), 1-8.
Holder, J. (January 12, 2017). Conceptualizing misconceptions [Web log message]. Retrieved from https://blogs.ubc.ca/stem2017/2017/01/12/conceptualizing-misconceptions/
Holder J. (February 20, 2017). Plate tectonics: Reshaping the ground below us [Web log message]. Retrieved from https://blogs.ubc.ca/stem2017/2017/02/20/plate-tectonics-reshaping-the-ground-below-us/
Holder, J. (March 3, 2017). Staying afloat: Sink and float density t-gem [Web log message]. Retrieved from https://blogs.ubc.ca/stem2017/2017/03/03/staying-afloat-sink-and-float-density-t-gem/
Resnick, M. & Wilensky, U. (1998). Diving into complexity: Developing probabilistic decentralized thinking through role-playing activities, Journal of the Learning Sciences, 7(2), 153-172. DOI: 10.1207/s15327809jls0702_1
Wilensky, U. (2005). NetLogo Autumn model. http://ccl.northwestern.edu/netlogo/models/Autumn. Center for Connected Learning and Computer-Based Modeling, Northwestern University, Evanston, IL.
Wilensky, U. (2005). NetLogo Color Fractions model. http://ccl.northwestern.edu/netlogo/models/ColorFractions. Center for Connected Learning and Computer-Based Modeling, Northwestern University, Evanston, IL.
Wilensky, U. (2003). NetLogo Sunflower model. http://ccl.northwestern.edu/netlogo/models/Sunflower. Center for Connected Learning and Computer-Based Modeling, Northwestern University, Evanston, IL.
How can learning be distributed and accelerated with access to digital resources and specialized tools and what are several implications of learning of math and science just in time and on demand?
I found the study by Carreher et al. very interesting. I have travelled to many countries around the world and I am always impressed with the Math skill (English skills also) of children that have none or little formal schooling. The children used in this paper, “tended to be accomplished by strategies involving the mental manipulation of quantities while in the school-type situation the manipulation of symbols carried the burden of computation, thereby making the operations ‘in a very real sense divorced from reality’” (pg.28) This proves that knowledge can be constructed in informal ways.
As for learning being distributed ad accelerated, access to digital resources and specialized tools allow students to explore regions of the world as well as phenomena that would never be accessible to them in real life. GLOBE allows students to interact with scientists as well as analyze data from various locations around the world. All my students know are deserts, so to open teir minds to other regions of the world with other topographies would be great to accelerate and deepen their learning.
His’s paper explores informal learning institutions; such as, museums and zoos, that are creating freely available educational resources accessible over computer networks and the Web to create extended learning opportunities outside of formal schooling. Once again, these networked communities allow students to explore areas and topics that may be limited by costs and/or geographic location. They increase the possible ways that learning can be distributed and accelerate learning.
I remember taking my Grade 9 Biology class in Montreal to the Bodies exhibit many years ago. I let the students walk around freely and explore the space. I overheard conversations about anatomy and physiology that we had studied in class, I remember being full of pride and joy that my students could apply the items we had learned to the exhibits they were seeing.
Butler, D.M., & MacGregor, I.D. (2003). GLOBE: Science and education. Journal of Geoscience Education, 51(1), 9-20.
Carraher, T. N., Carraher, D. W., & Schliemann, A. D. (1985). Mathematics in the streets and in schools. British journal of developmental psychology, 3(1), 21-29.
Hsi, S. (2008). Information technologies for informal learning in museums and out-of-school settings. International handbook of information technology in primary and secondary education, 20(9), 891-899.
Elementary Science
Topic: Mass
Misconception: That the size and shape of (an) object(s) affects the balance on a scale even if the weight is the same
Students can sometimes get confused between the type of objects you may put on both sides of a scale and its impact on balance. Some students think that if you put 1 pound of paper clips on one side of a scale and a 1 pound cube, the scale will not balance out.
Materials:
Lesson:
This lesson draws upon the T-GEM model. According to Khan (2007) this model focuses on three important steps: Generate, Evaluate, and Modify. In this lesson students are asked to generate their own ideas around mass /weight and how different objects will influence the balance of the scale. The students compare their predictions with their partners and then test out their theories that they have come up with. After testing their hypothesis various times, the students then come up with some scenarios why different objects and lengths of arms will influence the balance scale. This is the ‘evaluate’ portion of the T-GEM. The last stage of the lesson allows students to modify their original beliefs about weight and mass. They are able to gain an new understanding regarding the relation of weight and mass to balance. The extension part of the lesson is meant to give students further time to experiment with the ideas that they toyed with in the lesson. As Stieff et al (2003) discusses, it’s important to give students opportunities to give students virtually unlimited opportunities to experiment with real world objects. Using visualizations allows students to understand the differences between physical variables and the equilibrium posting (Stieff et al, 2003). Students have the opportunity to test what they’ve learned about balance and make predictions about how different objects will make the plank balance.
References:
Khan, S. (2007). Model-based inquiries in chemistry. Science Education, 91(6), 877-905
Stieff, M., & Wilensky, U. (2003). Connected chemistry – Incorporating interactive simulations into the chemistry classroom. Journal of Science Education and Technology, 12(3), 285-302.
Mathematics
Targeted Group: Grade 7
Format: Number Sense and Numeration – Adding Fractions
Misconception: Adding fractions without finding common denominators or equivalent fractions.
Rationale:
Students have a great deal of difficulty with fractions and understanding why they need a common denominator in order to add them. As this seems to be an issue each year with grade 7 students I thought it would be a good idea to find new ways to address the concept.
Goals:
Students will be able to add fractions competently with like and unlike denominators, finding equivalent fractions in authentic problems.
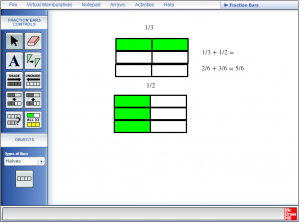
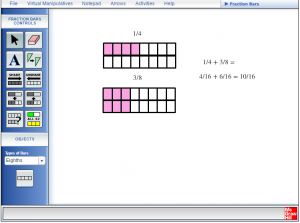
Materials: Virtual fraction manipulatives
http://www.mhhe.com/math/ltbmath/bennett_nelson8e/VMK.html?initManip=fractionBars
Smartboard notebook software – Specific lesson plans
Authentic addition of fractions questions.
Process: This can be done individually or in pairs.
Step 1:
Give students a step by step adding fractions task sheet with three different tasks. The step by step process allows the students to see how the common denominator is found and how to add the fractions.
Step 2:
Direct students to the virtual manipulatives at the above URL. This would be in their Edmodo folder already so they just have to click on the link.
Step 3:
Direct students to create the model shown on the task sheet on the virtual page using fraction blocks. Students should write the addition statements on the virtual page, and then transfer them to their task sheet. They should continue to do this for all the questions on the task sheet.
Step 5:
Ask the students to create their own addition problem using the fraction bars for the other students in the class to try. Students should be sure to draw this on their task sheet including the correct addition statements.
Consolidation Activity: Smartboard Notebook Lesson
Task:
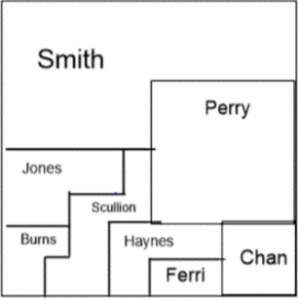
Introduce students to the Land Ownership task. Show them the picture of the land split into various areas for different owners in SmartNotebook. Students can use this software on the laptop computers using the mouse.
Work with a partner.
The map shows land owned by 8 families.
Determine what fraction of the land each family owns.
Four families sold land to the other four families.
Use the first map clues to help you draw the new map. You can use the back of the sheet to do this.
Write the addition to show each of the transactions.
CLUES
Students use the tools in SmartNotebook to colour in the areas owned by each family and manipulate the shapes to find the smallest piece in order to determine the common denominator. Once they have done this, students find the equivalent fractions for each of the owners property showing the fraction in equivalent form and simplest form. For example: Perry = 1/4 or 16/64.
When they have found all the equivalent fractions it should be easier for them to rearrange the fractions for the four families to own all the land according to the clues. They need to show the new configuration on their screen or paper, and show the addition statements that go with their solutions.
Education Theories:
The educational theories that are associated with this lesson plan are Learning for Use and Anchored Instruction.
Learning for Use framework is a pedagogical framework that integrates the content with the processes of the subject matter. Using the virtual manipulatives allows the students to visualize the process of creating the equivalent fractions, how a common denominator is determined, and then how the two fractions are added together. Since the content is being able to add fractions with unlike denominators, the manipulatives allow the students to try a lot of different combinations of fractions to find their equivalents and add them. The virtual manipulatives also allow the students to discover these concepts for themselves, and build upon that understanding using the tiles to create a number of different combinations.
Anchored instruction is the process of presenting instruction in the context of an authentic environment with problems or issues which learners must resolve. The problems or issues which are presented to learners in the authentic environment are “anchors” which link learning of content and skills to authentic tasks and activities in which the learning must be used (Gittens, Thompson, & Carter). Although this is not a true representation of anchored instruction, the concept of buying and selling parcels of land is a real world connection. It is difficult to find authentic problems using fractions that the students would recognize. This problem could be related to their history or geography lessons particularly with New France and Seigneurial Systems or land use changes.
Using the virtual manipulatives aids the students in consolidating their understanding of equivalent fractions and common denominators, then transfer that understanding to a different task, using a different medium which demonstrates their understanding in environments other than those directly related to the specific learning environment (Dixon). Using a variety of mediums (virtual manipulatives, Smartboard tools, pencil and paper) students can consolidate their knowledge using anchored instruction and specific technology to augment their knowledge and increase their conceptual understanding.
Anne
References:
Dixon, Juli K, 1997. Computer use and visualization in students’ construction of reflection and rotation concepts. School Science and Mathematics, Volume 97(7), University of Nevada, Las Vegas.
Kathy-Ann Daniel-Gittens , Kelvin Thompson and Philip Carter (2014). Anchored instruction. In K. Thompson and B. Chen (Eds.), Teaching Online Pedagogical Repository. Orlando, FL: University of Central Florida Center for Distributed Learning. Retrieved April 3, 2017 from https://topr.online.ucf.edu/index.php?title=Anchored_instruction&oldid=3577
One of the major advantages to using digital simulation is the ability to aid students in visualising the invisible. In the Science 10 unit, balancing chemical equations is something that many of my students have had difficulty with. In the past, I have always fallen back on drawing and counting molecules before transitioning to more abstract calculating of number of atoms when helping students. But the process of balancing chemical equations also lends itself to a T-GEM process using PhET simulations that both help students understand the process with analogies and also to provide them a visual reference of the atoms. Moore, Chamberlain, Parson, & Perkins (2014) found benefits in using simulations in chemistry classes, noting that “students can engage with and discuss dynamic systems that provide feedback specifically designed to support student learning.” This fits neatly with the T-GEM process which plans a series of lessons that support individual learning by encouraging students to explore scientific concepts and generate theories about their relationships, then evaluate their newly constructed knowledge, and finally modify their knowledge based on the feedback from their evaluation. (Khan, 2007)
The lessons utilize three PhET simulations to start students on the concept of balancing, analogies of balanced processes, and finally the act of balancing chemical equations.
Lesson 1: Initiate Ideas – Balancing Simulation (Balance Lab)
The goal of this lesson is to prime students on the concepts of balancing. While the simulation is not strictly related to chemistry, it does visually demonstrate the concept of two parts of a single system being in balance. This will be revisited in a few lessons when students are to balance reactants and products in a chemical equation. In addition, it will serve as a starting point of a brainstorm/discussion on what other common everyday events require “balancing” and the beginning and end of the process have some quantifiable link.
Lesson 2: Generating A Theory – Reactants & Products (First with Sandwiches, then with Molecules); Additional activity – Law of Conservation of Mass Undemo
The next lesson will take the concepts of balancing and start to connect them with chemistry concepts. In particular, the simulation allows students to change the number of sandwich ingredients (reactants) and see the number of complete sandwiches (products) that can be made. During this activity, the discussion will lead towards the ideas of the ratio of reactants to products. Once students feel they have a grasp of the sandwich analogy, they can move to the molecule simulation to transfer their thinking to atoms and molecules. In addition, a live demonstration of the Law of Conservation of Mass using chemical reactants will be shown and, using the results from all three activities, students will start to formulate for themselves a concept of balanced chemical reactions.
Lesson 3: Evaluating Their Knowledge – Intro to Balancing (Introduction activity only)
As a way of evaluating their knowledge, the students will balance the three chemical equations provided in the Introduction activity. For each equation, they will first predict the adjustments necessary to balance the chemical equation. They are encouraged to using the knowledge generated from the lesson prior to complete the equations. After their prediction, they can explore both visualization tools (scale and bar graph) as well as the actual molecular diagrams as they adjust the number of each molecule to balance the equations. As part of their individualized learning, they are encourage to pick one of the three visualisation methods to use regularly. The class will finish with a sharing of various balancing strategies in order to highlight general processes used to tackle the problems.
Lesson 4: Modify Their Knowledge – Continue with Balancing (Game activity)
The Game activity has 3 difficulty levels, each with 5 questions. The students are to work through all 15 questions from Level 1-1 to Level 3-5, utilizing the strategy from Lesson 3. They are free to choose whether they want their attempts to be timed or not as a personal challenge. During this process, the teacher should be circulating and guiding students as they work through these problems, helping them re-formulate their processes as necessary if they answer a question incorrectly.
Lesson 5: Extension Of Knowledge – Working with Balanced Equations (Game activity)
The Reactants & Products simulation from Lesson 2 has a Game activity that can be used to assess and challenge student understanding. The Game provides students with a balanced equation and a specific number of either reactants or products. Using the ratio given in the balanced equation, the students have to determine the number of molecules required to complete the equation. This will challenge students to consider balanced equations from a different perspective from Lesson 4. Student understanding can be assessed formatively by engaging in discussion with them as they answer the 15 challenge questions.
References
Khan, S. (2007). Model-based inquiries in chemistry. Science Education, 91(6), 877-905.
Moore, E.B., Chamberlain, J.M., Parson, R., Perkins, K.K. (2014). PhET Interactive Simulations: Transformative Tools for Teaching Chemistry. Journal of Chemical Education, 91(8), 1191-1197
How to turn Roadblocks into Catalysts for Change?
In all of MET, one of the most important quotes I have learned is by Mishra and Koehler (2006) “merely knowing how to use technology is not the same as knowing how to teach with it” (p.1033). During the course of ETEC 533 I have been very focused on the following components: The importance of students constructing their own knowledge in the classroom and beyond through technology; Collaboration and improved assessment methods; The need for improved teacher professional development and release time to learn and implement technology in the classroom; and the need for easily accessible technological devices and sufficient bandwidth in schools.
When I embarked on my MET journey I had very little understanding of what technology was available for me to use in my classroom. I chose MET because I knew I needed to change what was happening with my students and my teaching. As a grade 5-8 educator for the past 26 years I felt like I was losing my students. Each day I entered my class with the plan to invigorate and “wow” my students, and each day I felt disappointed.
When I first began teaching I remember being proud of myself if my classroom was a silent hub, where students worked quietly on their own finishing the work I had assigned. Of course, this was after I had spent half the lesson nattering at them, dazzling them with my brilliance. Patting myself on the back for creating a room full of disengaged bored students is shameful in retrospect. At the time, I followed what I knew–good teachers had quiet students, good teachers’ students asked few questions because the lesson had been so amazing no questions were necessary, and good teachers did what has always been done.
As my career progressed I realized that silence meant nothing was happening: No noise, but no learning as well. My students had learned to play the game–stay quiet and no one knows that you have no idea what is happening in class. Change came about because my students were flunking test after test. Originally, I chalked that up to them not studying, not that I hadn’t really taught them anything. My students fell into three basic categories. Group 1 were the students who could regurgitate facts, group 2 were those who learned in spite of me, and group 3 were those who had learned nothing and were not motivated to study to do well on a rote paper and pencil test. While I had assumed the check marks and x’s on their assignments and tests were feedback, they were really nothing more than judgments on the student’s ability or willingness to play the assessment game.
It was at this point I really started talking to my students. I started speaking to them during lessons, during seatwork, during group work. I started assessing them during these conversations, really beginning to understand who knew what and how well. The more I spoke to my students the more engaged they became–maybe because I was actually paying attention to them, not trying to keep them quiet. Seatwork evolved into collaboration time. Students started talking more and more with each other. They began to see each other as sources of information and support. The more they relied on each other the more they brought out the best in each other. They wanted to succeed so they drew on each others’ strengths.
As stated by Kozma (2003), “Designers should provide students with environments that restructure the discourse of …classrooms around collaborative knowledge building and the social construction of meaning” (p.9). I was finally starting to design the classroom I had envisioned.
I won’t pretend it was all sunshine and roses, but things started improving. Now I knew when learning was occurring as partner and group talk got heated and excited as they discovered new facts or wanted to prove their theory. It was noisy and it was going well. I found that math and science became learning labs. Kids were not used to talking about math and science, they were just expected to do it.
During the readings, I found this quote by Hattie and Timperly (2007) especially enlightening and a good reminder of what feedback needs to be: “feedback needs to provide information specifically relating to the task or process of learning that fills a gap between what is understood and what is aimed to be understood” (p.82).
As for assessments, my students learned that hiding their struggles from me did no good. At random times, anyone could be expected to come sit with me and show me what they knew. The showing could be talking, drawing, explaining, using manipulatives or props. Students knew I was not there to judge them, rather I really wanted to help them learn. I evolved from a math and science teacher that said “today we will learn this…do it this way, because I said so”, to a teacher who said, “ok you don’t get this, let’s find another way, can anyone else think of a way we could do this?” It was actually really hard work to get my students to accept there is more than one way to solve a math or science problem. For some this is frustrating–they want the quick answer “show me how to do it so I can get it done”, while I want them to explore and understand.
I was happy that a change had occurred in my teaching and classroom but I still knew something was missing. My basic teaching strategy had not changed. I still chalked and talked a lot. I babbled incessantly about concepts and ideas. I had no idea how to change this. Thank goodness for MET courses like ETEC 533. Math and Science are perhaps the hardest subjects to change your teaching methods for. We are so used to following rules and formulas that we forget about understanding what is happening. I have been searching for ways to create a constructivist classroom. My initial steps included introducing a makerspace and allowing students to direct some of their own learning.
This worked well for some units but, in general, students and I as the teacher do not have enough experience to make self-directed learning successful as a full-time learning tool. What I learned was there is a difference between self-directed and constructivist learning. In constructivist learning all students explore the same math or science concept but construct their knowledge as they see fit. Module B was an excellent in-depth introduction for me regarding different constructivist techniques.
Anchored Instructions, SKI and Wise, Lfu and T-Gem all have appealing characteristics about them–whether it be the video modules of Jasper Woodley, the scaffolding used in the WISE module, the Global Information systems used to support Learning for Understanding or the T-GEM format using Chemland as an example. When I first started exploring these TELE’s I thought I would end up choosing one as my favourite and leaving the rest behind. What I learned was they all have valuable facets and they can all be used in different modules. I myself was stuck in the thinking of “What’s best? Let’s throw out the rest”. Perhaps it was just engrained in me that we cannot simultaneously use different constructivist teaching methods in the same year. I am used to the Board administration bringing in a new program and throwing out the rest. I was always frustrated by this approach but found myself doing the same thing. My thinking is changing over to “keep what is good, change what doesn’t work”.
Linn et al. (2003) hit the nail on the head for me in their article Wise design for knowledge integration stating, “we align professional development, knowledge integration, and flexibly adaptive curricula to build on the commitments and talents of teachers as well as the constraints and opportunities of their classroom contexts rather than imposing new practices without concern for past successes” (p. 518). I can see myself using each of these TELE’s in the coming years.
Moving beyond the methodology I was enlightened by the variety of simulations, software and interactive sites we investigated in ETEC 533. Finklestein et al (2005) reported that “results indicate that properly designed simulations used in the right contexts can be more effective educational tools than real laboratory equipment, both in developing student facility with real equipment and at fostering student conceptual understanding” (p. 2). They further state that “in an inquiry-based laboratory, students using the simulations learned more content than did students using real equipment” (p. 6).
As I teach elementary students, some of the information was too advanced for my students but many of the websites we looked at were perfect. I can easily see my students enjoying the scaffolded learning afforded by the WISE program. The simulations provided by the pHet site from the University of Colorado will become a staple in my classroom. I enjoyed looking at the examples provided in the course and wondering how I could expand on them with other technologies. The example of the pHet simulation on geometry and the use of the leap motion technology were the perfect combination of simulation and embodied learning.
As a kinesiologist, I have always known that learning with just our brains is not enough. We need to incorporate movement, rehearsal and building new kinesthetic and neural pathways. The more methods we can use to integrate learning the more easily our students will be able to recall and use the information they have learned in new situations. Rote memorization has a tremendous failure rate for recall, whereas embodied learning and simulations with gestures are much more effective. I noticed this in my classroom when students tried the leap motion app with 3D geometry. “When my students tried the leap motion 3-d geometry app in groups (taking turns to be the hands) I watched as almost all of them, even when observing and guiding others, used their hands or whole bodies (at times my class looked like an introduction to interpretive dance) to try and move in three-dimensional space to understand how to manipulate the blocks” (Sverko, 2017).
Retrieved from Livefromlockdown.com
After synthesizing all of the learning in this course and previous MET courses I feel I am ready to take the next step and begin constructivist lessons in my class using technology. Unfortunately, this is where I encounter the scourge of technology implementation in the classroom. I do not have devices in my classroom that I can use when they are most valuable, rather I must look ahead in my lessons and try to guess when they will be most helpful. When I have identified the time, I have to try and sign out devices to my classroom. Of course, there are never enough devices for each student, not to mention that often the previous class forgot to plug in the individual Chromebook or the entire cart and I have twenty dead batteries.
If I am lucky enough to sign out the Chromebook, at a time that is beneficial, I then must cross my fingers that I will be able to access the simulations I want to demonstrate. Often the bandwidth in our schools prevents us from using all Chromebooks at the same time. (Another frustration with devices in our school board is that we are not allowed to install apps without approval. Even more frustrating is that often our requests for specific apps are denied by the administration.)
Given all of the hurdles teachers must jump to use technology in their classes is it any wonder that the majority avoid using it? Avoidance of using what is provided further leads to an apathy at learning anything new. Most feel they do not want to waste time learning and implementing something that will flop during their lesson. Even if devices and broadband worked well we still would have the difficulty of teacher training on technology and the time to learn how to use the programs effectively. As highlighted in our interviews, many teachers see this as a barrier to proper implementation.
Retrieved from Pinterest.com
Teachers who do want to pilot technology in their classroom often become overwhelmed with the time, energy and money it takes to do a good job. Not to mention that many of these lead teachers quickly burn out because they are being asked to help more and more staff members. Although I recognize and have provided a case for how the barriers to the use of technology in the classroom seem to be insurmountable, I am still optimistic there is way to proceed. What is needed is a mandate in each province making technology and the implementation of the ISTE standards a priority in every classroom. We need to look to boards that are leading the way in technology. An example is the Edmonton Catholic District School Board. They have an emergent technology department that leads the way in showing teachers from K-12 how to implement technology successfully. Boards and administration need to be accountable for making the changes and bringing our schools into the 21st Century.
I look forward to being a catalyst for change in education, bringing technology to the forefront and leading by example. As colleagues see what can be done with constructivist techniques and simulations and software, hopefully they will become inspired to try at least one activity. I will continue to provide examples of Boards that are getting technology right to my administration in the hopes that they will move ahead in the right direction.
The Journey of a Thousand Miles Begins with a single step.

Retrieved from picturequotes.com
Upon reflection, I still feel my definition provided earlier in the course holds true:
The ideal pedagogical design of a technology-enhanced learning experience for math and science must first and foremost see students as constructors of their knowledge. Allowing students to use technology to effectively assist in the construction of their knowledge could include, but not be limited to: simulations (often with equipment unavailable in science and math classrooms), collaboration (with peers, mentors and outside experts), design (planning their learning and pathways), coding, exploration of various concepts (perhaps outside of the realm of the current curriculum mandate), testing hypotheses (trying their ideas; seeing what works and what doesn’t). Technology is a tool for students to use in the construction of their knowledge, aided by a supportive, knowledgeable teacher who can help push the boundaries of the students understanding. Students learn with, not are taught by technology (Sverko, 2017).
I now, thankfully, feel that I am better prepared to make this a reality in my classroom.

Retrieved from deidresanborn.com
References:
Finkelstein, N.D., Perkins, K.K., Adams, W., Kohl, P., & Podolefsky, N. (2005). When learning
about the real world is better done virtually: A study of substituting computer
simulations for laboratory equipment. Physics Education Research,1(1), 1-8.
Hattie, H. & Timperly, H. (2007). The power of feedback. Review of Educational Research, 77(1),
81-112
Kozma, R., & Robert B Kozma. (10/01/2003). Journal of research on technology in education:
Technology and classroom practices: An international study International Society forTechnology in Education.
Linn, M., Clark, D., & Slotta, J. (2003). Wise design for knowledge integration. Science Education,
87(4), 517-538.
Mishra, P., & Koehler, M. (2006). Technological pedagogical content knowledge: A framework
for teacher knowledge. The Teachers College Record, 108(6), 1017-1054
https://blogs.ubc.ca/stem2017/2017/01/28/effective-design-of-teles/
Background:
Financial literacy is highlighted throughout the elementary grade levels in the Content area of BC’s New Curriculum. Most paper-pencil curricula address money identification, counting coin and dollar amounts, and one or two step word problems connected to money. However, these paper-pencil activities minimally equip students for financial literacy skills and applications. While exploring the information visualization simulators during this past week, the elementary and middle school simulations from Illuminations were easy to understand and seemed quite plausible to implement into already developed curriculum.
Literature Support for Lesson Cornerstones:
In a study conducted by Srinivasan, Pérez, Palmer, Brooks, Wilson and Fowler (2006), engineering freshman students who completed learning using MATLAB did not experience what they perceive as an authentic experience. The students felt that their experience was disconnected from real expert experience because they manipulated a simulated system rather than a real-life system. The researchers conclude that a probable reason for this disconnect is that the students “need/want authenticity to be able to make connections the experts make with the simulation” (Srinivasan, 2006, p.140). This perception from the students leads educators to consider the value of real-life experiences in connection with simulated experiences.
Transferring simulated experiences to real-life experiences is supported through the study completed by Finkelstein, Adams, Keller, Kohl, Perkins, Podolefsky and Reid (2005). In their study, students in a second semester introductory physics course, who had used a simulation first to design a circuit system, were more successful later in designing real-life models. These same students also achieved greater success on related exam material that was completed two months after the simulated and real-life circuit building experience (Finkelstein, 2005). Due to these findings, authenticity of learning through the transferring of knowledge from simulation to real-life experience is a main cornerstone of the following lesson design.
In addition to authenticity, two lesser cornerstones, rich content and goal challenge motivation, are also incorporated into the lesson design as supported through the writings of Srinivasan et al. (2006). A pre-test assessment begins the lesson in order to determine prior knowledge and the optimal area of learning for the individual student. As well, this pre-test assessment can be used to determine pairings/groupings throughout the lesson activities. By providing rich content within the lesson plan, this affords opportunity for students with less prior knowledge to acquire new knowledge before exploring the simulated and real-life experiences. Building prior knowledge within students is critical for their success as Srinivasan et al. (2006) state, “Prior knowledge accounts for the largest amount of variance when predicting the likelihood of success with learning new material” (p.138). In regards to gaining knowledge of the student’s optimal area of learning, this connects closely to Vygotsky’s zone of proximal development, but is also supported by goal oriented motivation when learning goals are neither too steep, nor too simple: “If learning goals are too steep for a learner’s current context, learning is not successful. On the other hand, when learning is simple for the learner, the instruction can become over-designed and lead to diminished performance” (Srinivasan, 2006, p. 139).
Lesson Overview:
The following lesson incorporates the instructional framework of anchored instruction. This has been accomplished through a narrative multi-step problem solving feature. The three cornerstones highlighted in the section above are evident within the lesson: goal challenge motivation {decided by pre-test assessment}, content-rich material, and authenticity through real-life application.
LESSON
Pre-test Assessment:
Provide paper-pencil assessment including photos of Canadian coins asking students to identify individual coins.
Addition questions for pre-test assessment may include:
Include two ‘making change’ questions that require student to calculate amount of change from $1.
Content-rich Material:
Read and discuss Dave Ramsay’s book entitled, My Fantastic Fieldtrip on saving money.
Provide pairs of students with real sets of Canadian coins with accompanying anchored money solving problems. Problems may require students to interact with other students in the class or with the teacher. An example of an anchored money problem solving scenario follows:
Macey has been saving her allowance for seven weeks. She has a saving goal of $20.00. Each week she receives $1.50. Three weeks ago, Macey decided to buy her sister a rubber ball for her birthday which cost $1.00. She used a loony from her savings . After seven weeks, Macey wanted to exchange all of her quarters for loonies, but she also wanted to keep half a dozen quarters for when she visited the candy machine at the grocery store when she went shopping with her mom. She knew that several of her classmates had loonies that they could exchange for her quarters. (At this time, go around to your classmates and exchange your quarters for loonies just like Macey wanted to.) Once Macey exchanged her quarters for loonies with her classmates, how many loonies does Macey have? How much money does Macey have all together? How much more money will Macey need to save to reach her saving goal?
Simulation Activity:
Illuminations – Coin Box {elementary level}: Initially, direct instruction is required to demonstrate how by clicking on the cent icon in the bottom right corner, the student can see the amount of each coin as they are US coins and difficult to decipher visually. Direct instruction should also be provided to guide the student to the “Instructions” tab and show the subtitled areas “Modes”. Student can then have time exploring the “Activity” section using the dropdown menu in the top left corner. Student should have ample time to explore all five activities including: “Count”, “Collect”, “Exchange”, “Change from Coins”, and “Change from Value”.
Transfer to ‘Real-Life’ Context: Students should have opportunity to transfer the simulated learning to a real-life context. An example of a real-life context is provided below, however adapting this to uniqueness of the learning community is recommended:
Cookie Sale – Each student bakes one dozen cookies to sell to classmates and other students at the school. Pricing: 1 cookie = $0.40, 2 cookies = $0.75, 3 cookies = $1.00, 4 cookies = $1.25, 5 cookies = $1.45, 6 cookies = $1.70. This activity allows for assessment by the teacher through observation. Student’s accuracy and ease of providing change could be assessed using a simple checklist. Students should work in pairs or small groups to help ensure that change to buyer is accurate.
Self Assessment/Reflection: A reflection activity is to be completed by each student. This activity requires the student to reflect on and share about growth and relevancy of learning. A self assessment printable is here:
Finkelstein, N.D., Perkins, K.K., Adams, W., Kohl, P., Podolefsky, N., & Reid, S. (2005). When learning about the real world is better done virtually: A study of substituting computer simulations for laboratory equipment. Physics Education Research,1(1), 1-8.
Srinivasan, S., Pérez, L.C., Palmer, R.D., Brooks, D.W., Wilson, K., & Fowler, D. (2006). Reality versus simulation. Journal of Science Education and Technology, 15(2), 137-141. doi: 10.1007/sl0956-006-9007-5