Author Archives: bma7
School Discipline and Self-Discipline – George G. Bear
 I had been waiting a long time to read this book, as it was recommended by my classroom environment professor at UBC. The book first outlines what Social and Emotional Learning (SEL) is and the benefits and drawbacks of using this exclusively for school discipline, and it does the same for Positive Behaviour Support (PBS). Bear addresses how a marriage of the two will result in better student self-management and overall better student behaviour.
This book shed light on a lot of practical challenges for me, such as reasons students have poor behaviour and the difference between authoritarian, authoritative and permissive classroom management. The book also includes practical approaches and strategies to implement the steps required to develop SEL competencies, and develop self-discipline. This includes but is not limited to recommendations on how to strategically use praise/rewards, detailed outlines on how to dialogue and problem solve during behavioural infractions, recommendations on how and when to contact parents, and specific strategies to manage behaviour in a more authoritative manner.
Importantly, the book gave me many ideas on how to set up the routines in my classroom, systems to have in place when students are not meeting expectations, how to monitor behaviour, and what to include in monthly class surveys. Based on the readings, I created a monthly survey (from which I will create visual charts/graphs to show progress), and several reflection forms for key areas of concern: missed homework, misbehaviour, and poor performance. Based on student need, the forms are not required to be filled out in writing, they can be done through dialogue. What is important about having them is to guide their reflection.
“Your environment may influence your behaviour, but it is your choices which determine your behaviour.” – George Bear
2016-2017 Professional Goals and Reflections
Interdisciplinary Irrigation Project: Social Studies and Science in the Makerspace
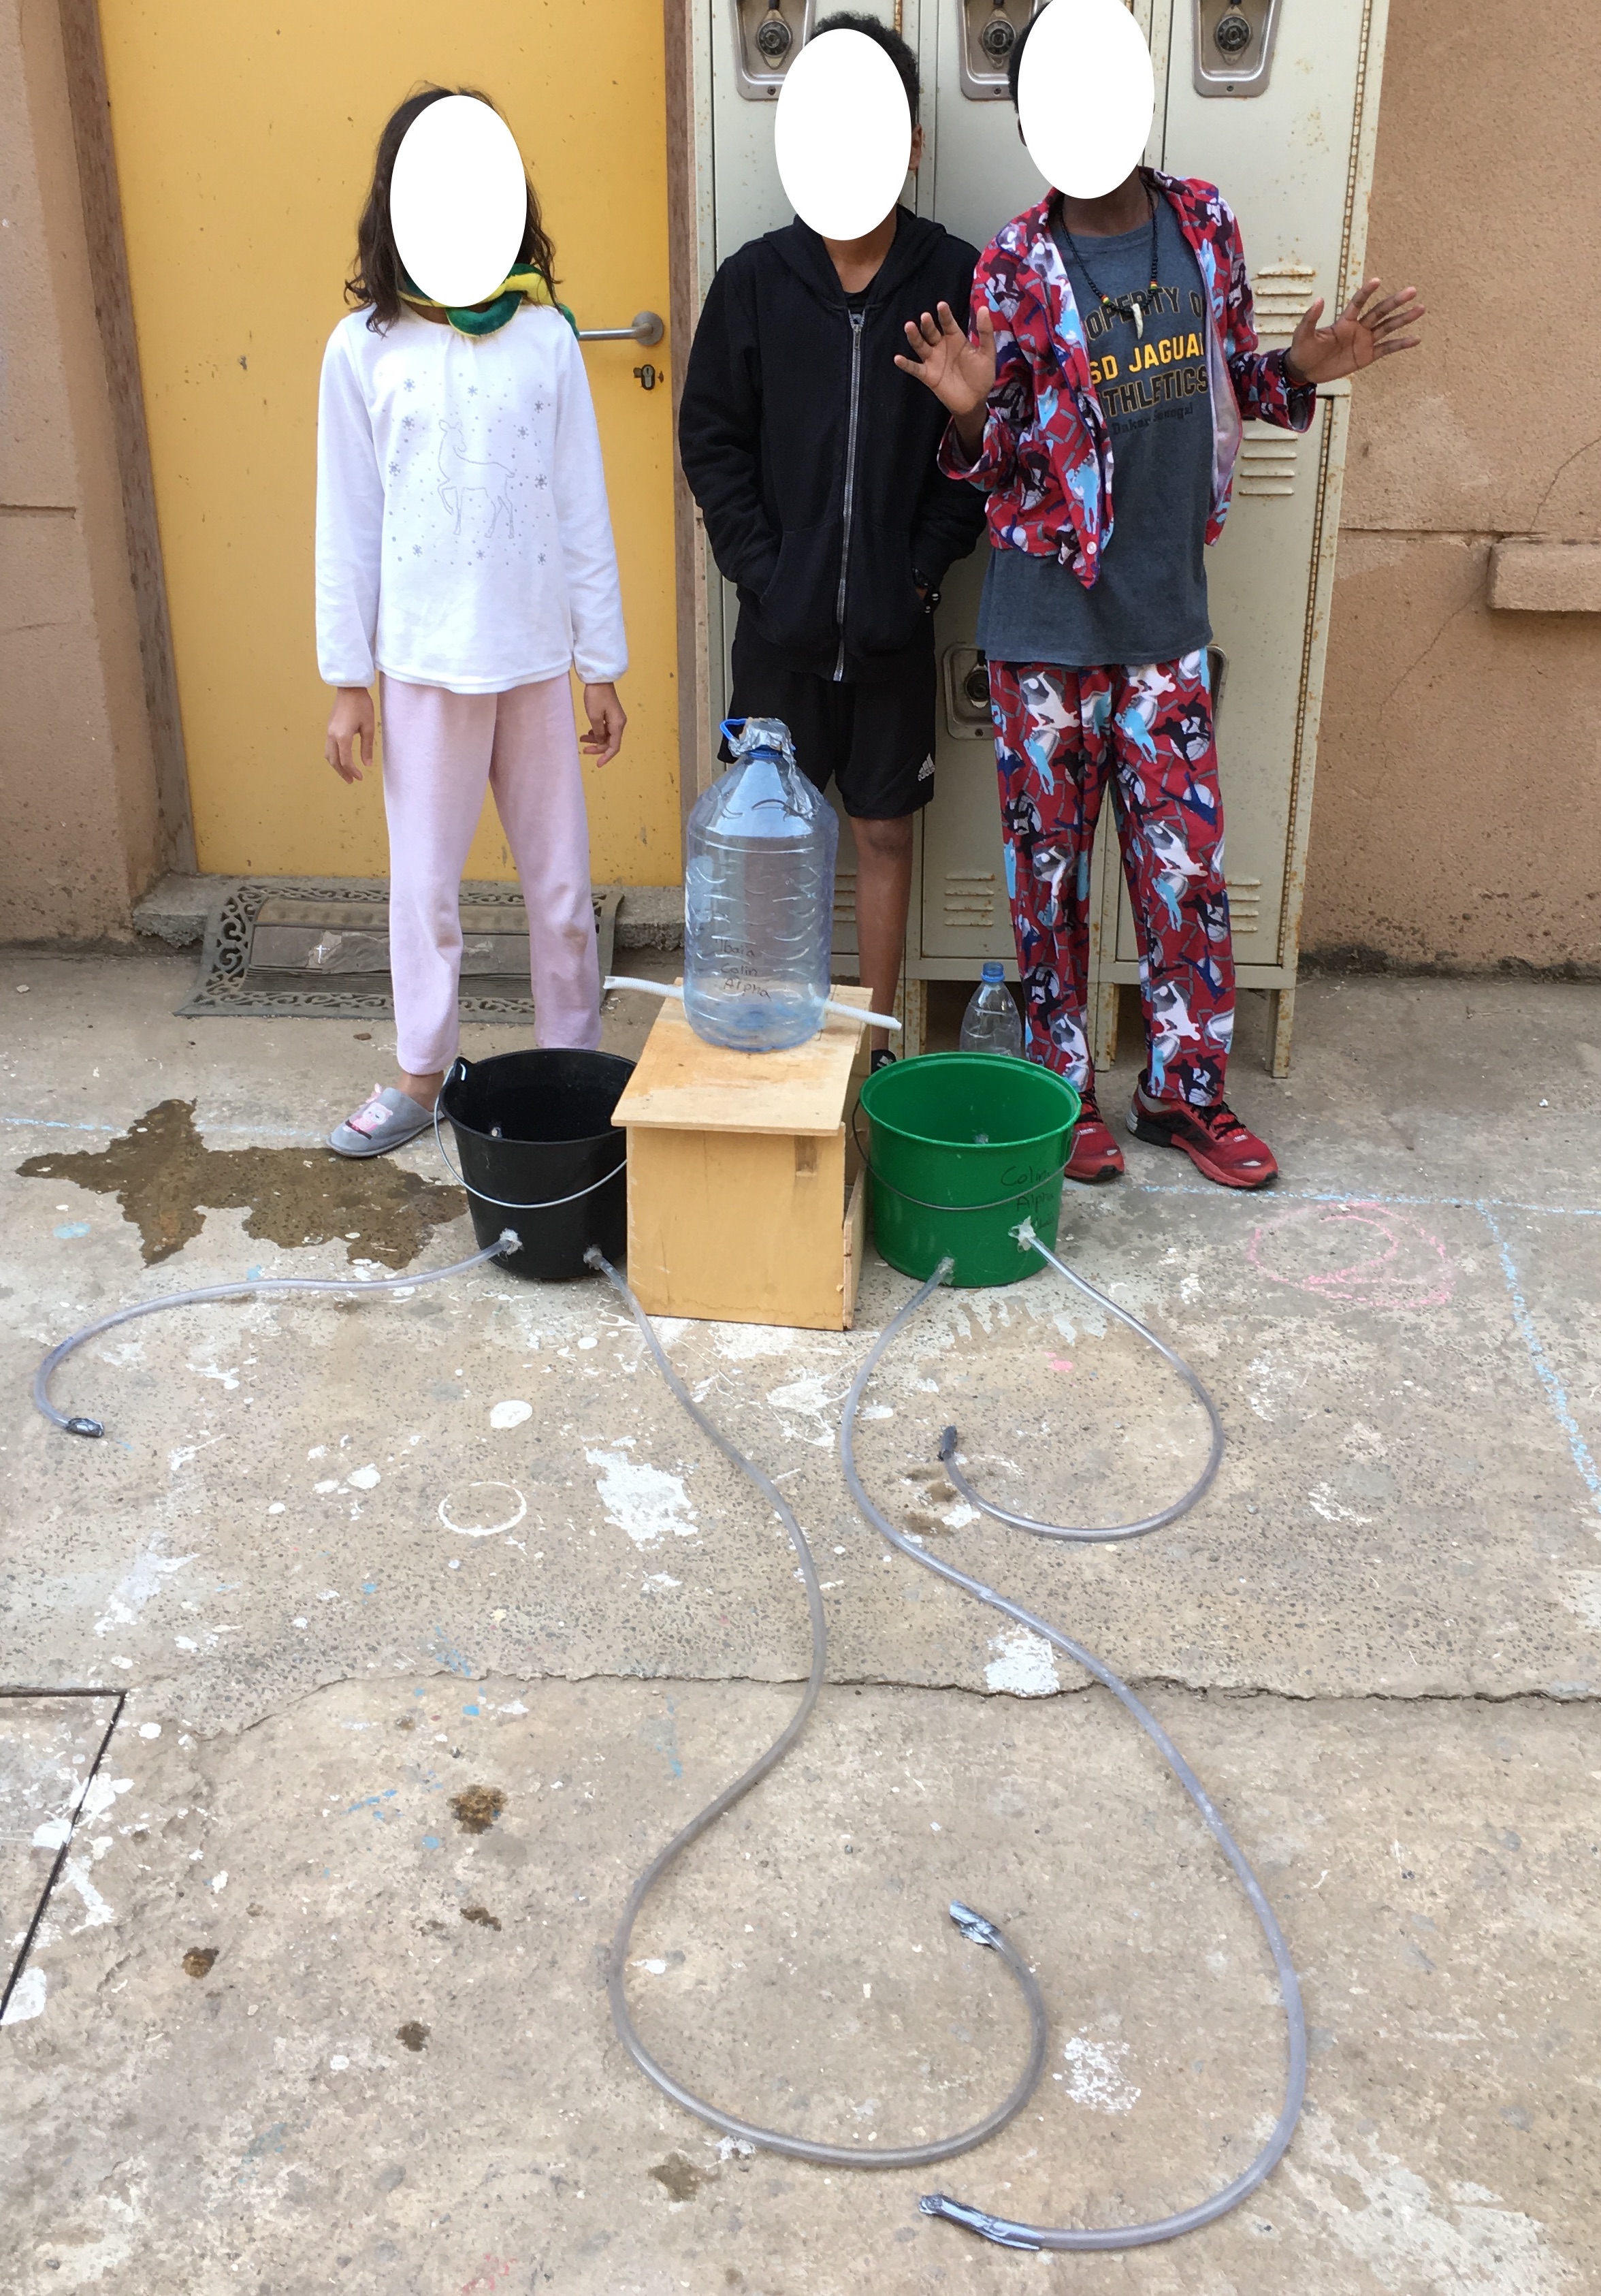
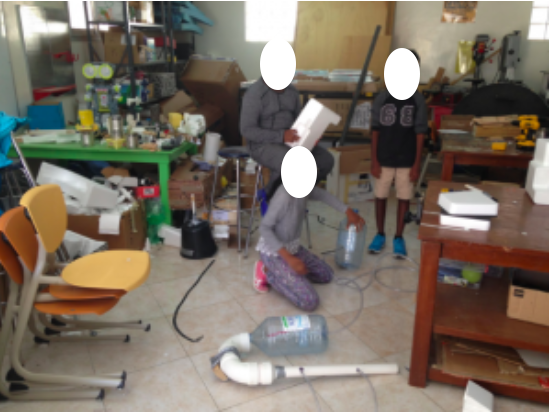
While teaching about early civilizations in grade 6 social studies, our students learned the importance of rivers, silt, and irrigation in our societal shift towards farming and sedentary lives. As we live in the Sahel, where fresh water is scarce and droughts are common, irrigation is also an important practice in our communities.
Using our school Makerspace, some specific materials, and a little background research, students were required to build a small-scale irrigation system that would provide small amounts of water continuously to our school garden without needing a person to do something each day (outline of the challenge).
The students were required to plan out their design, work together as a team to build the system, test it, make changes as necessary (part of the design process), and then demonstrate their creation. Each class then voted on the irrigation system they believed worked best, and that was the one we installed in the garden. The students were required to write a reflection, tying in what we learned in class to their experiences, and reflect on their learning process during the assignment (checklist and outline for the reflection).
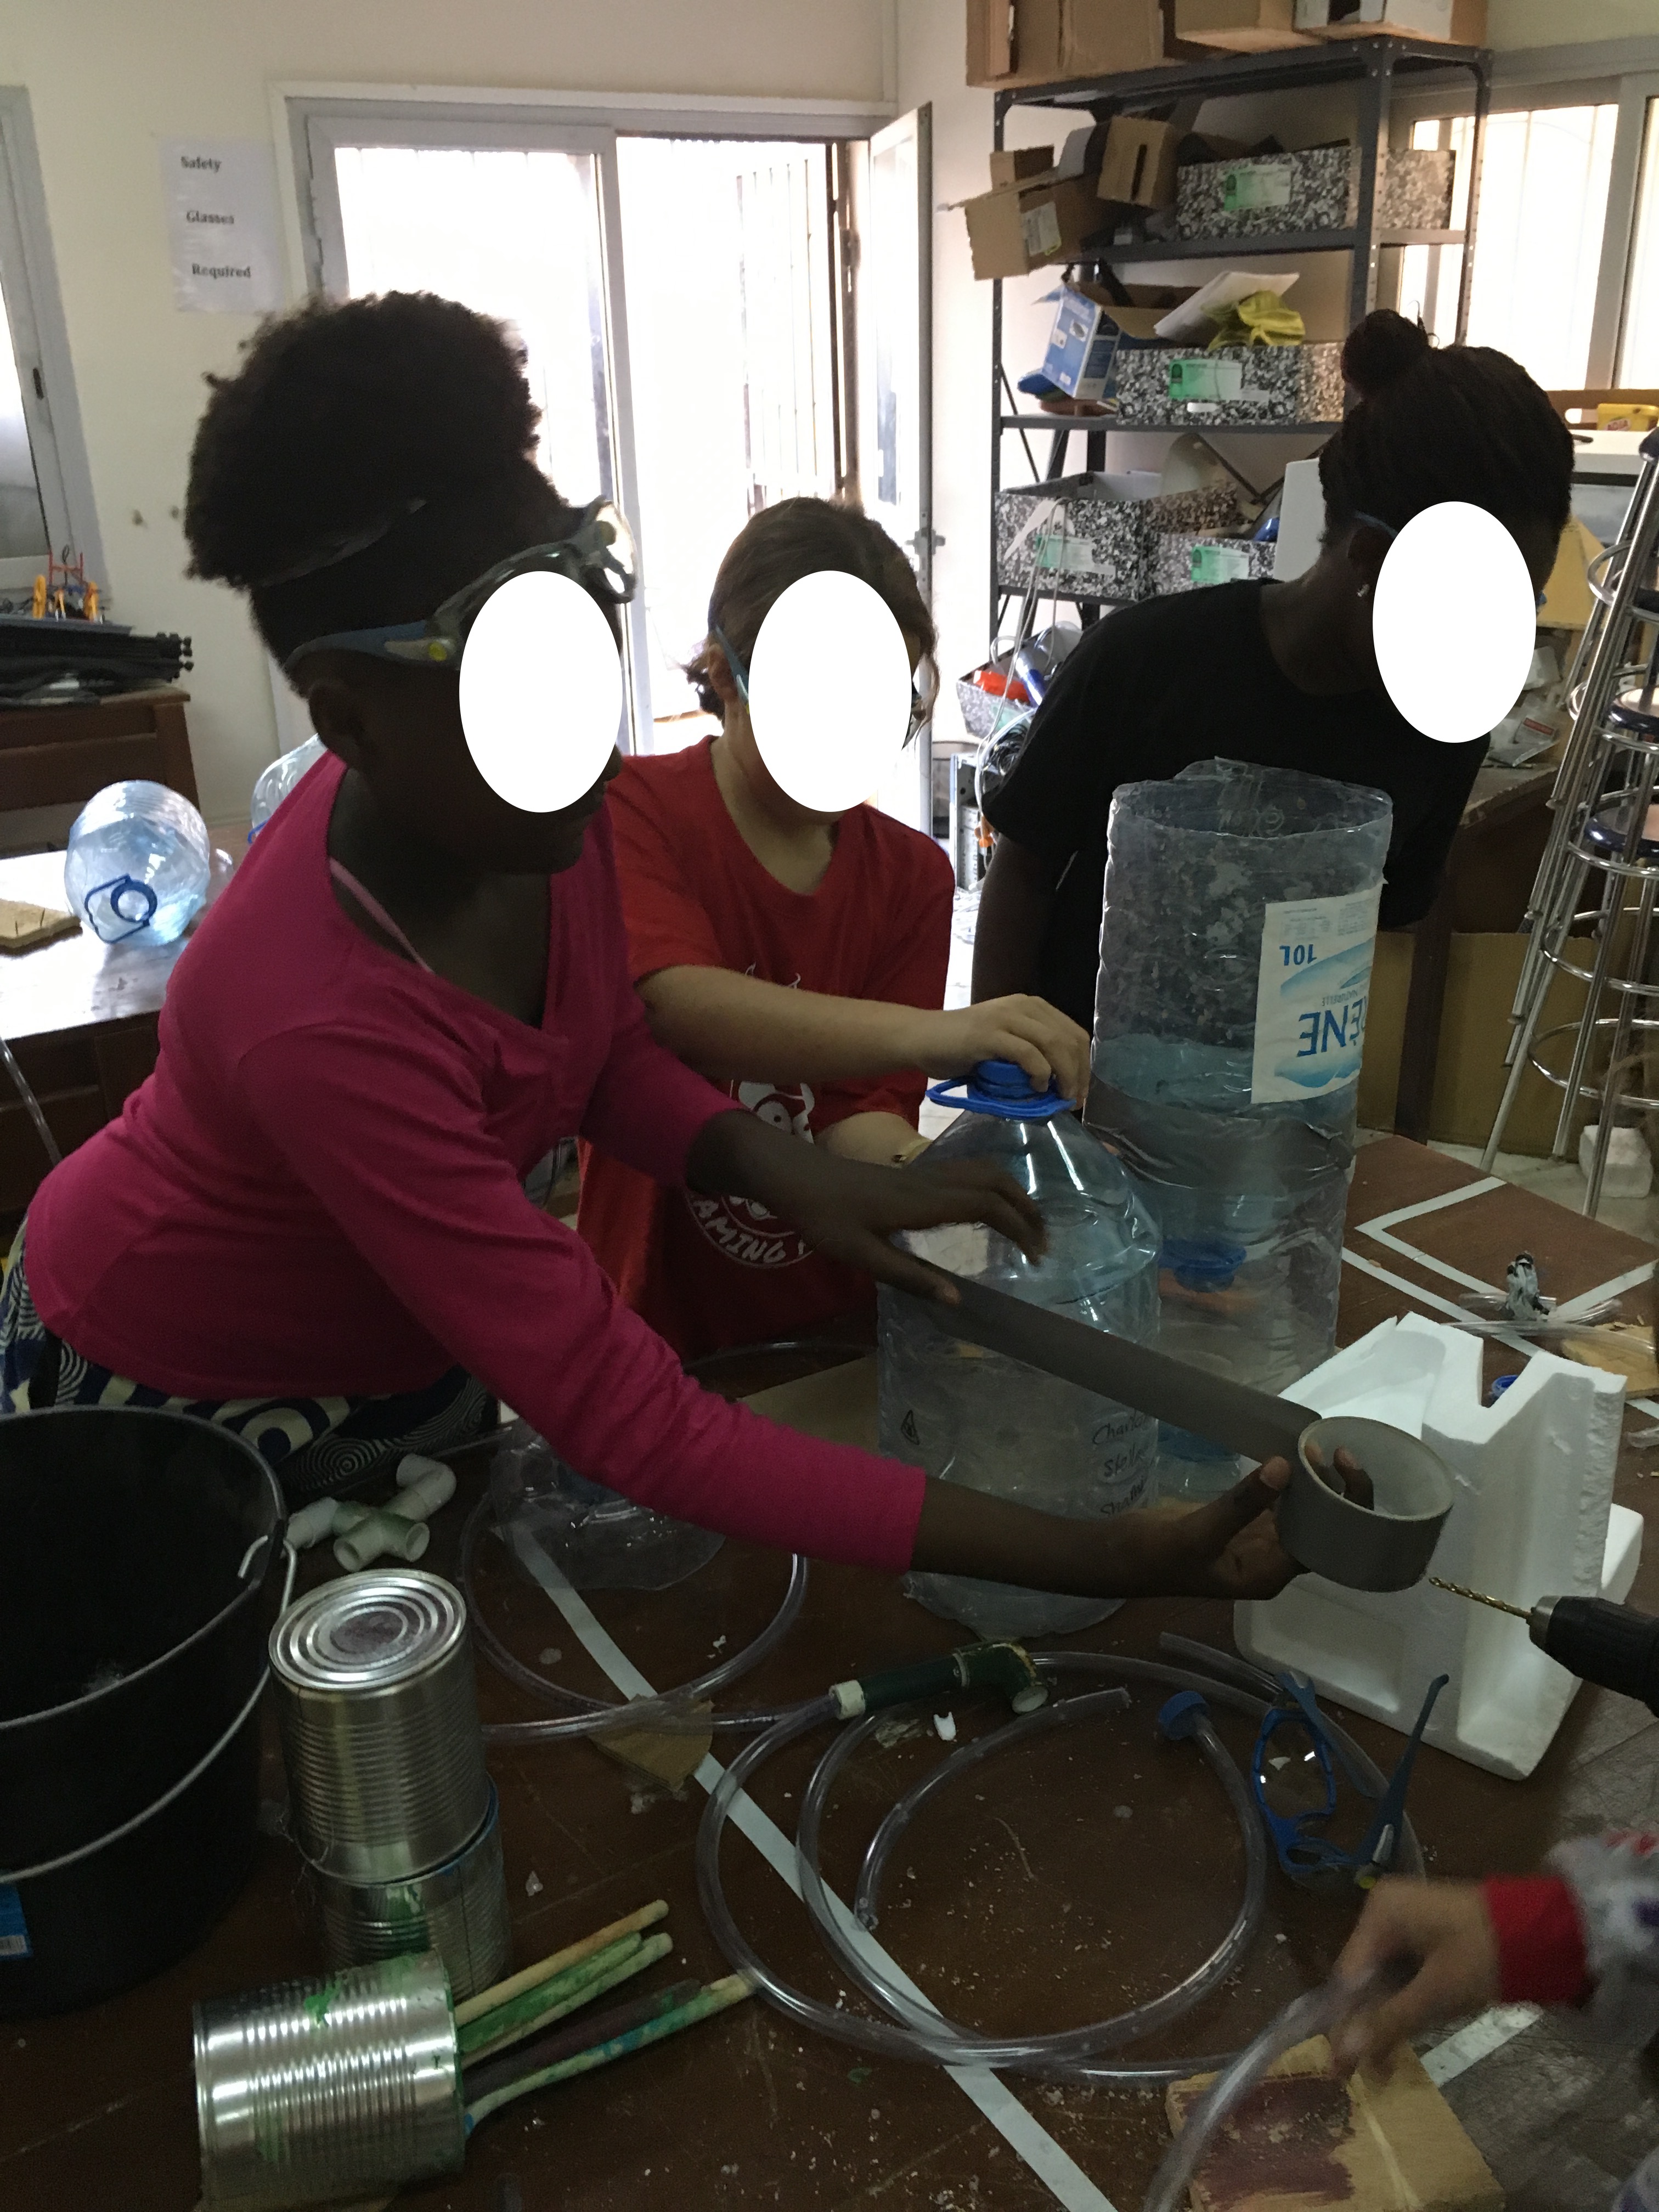
Working together to construct an irrigation system.
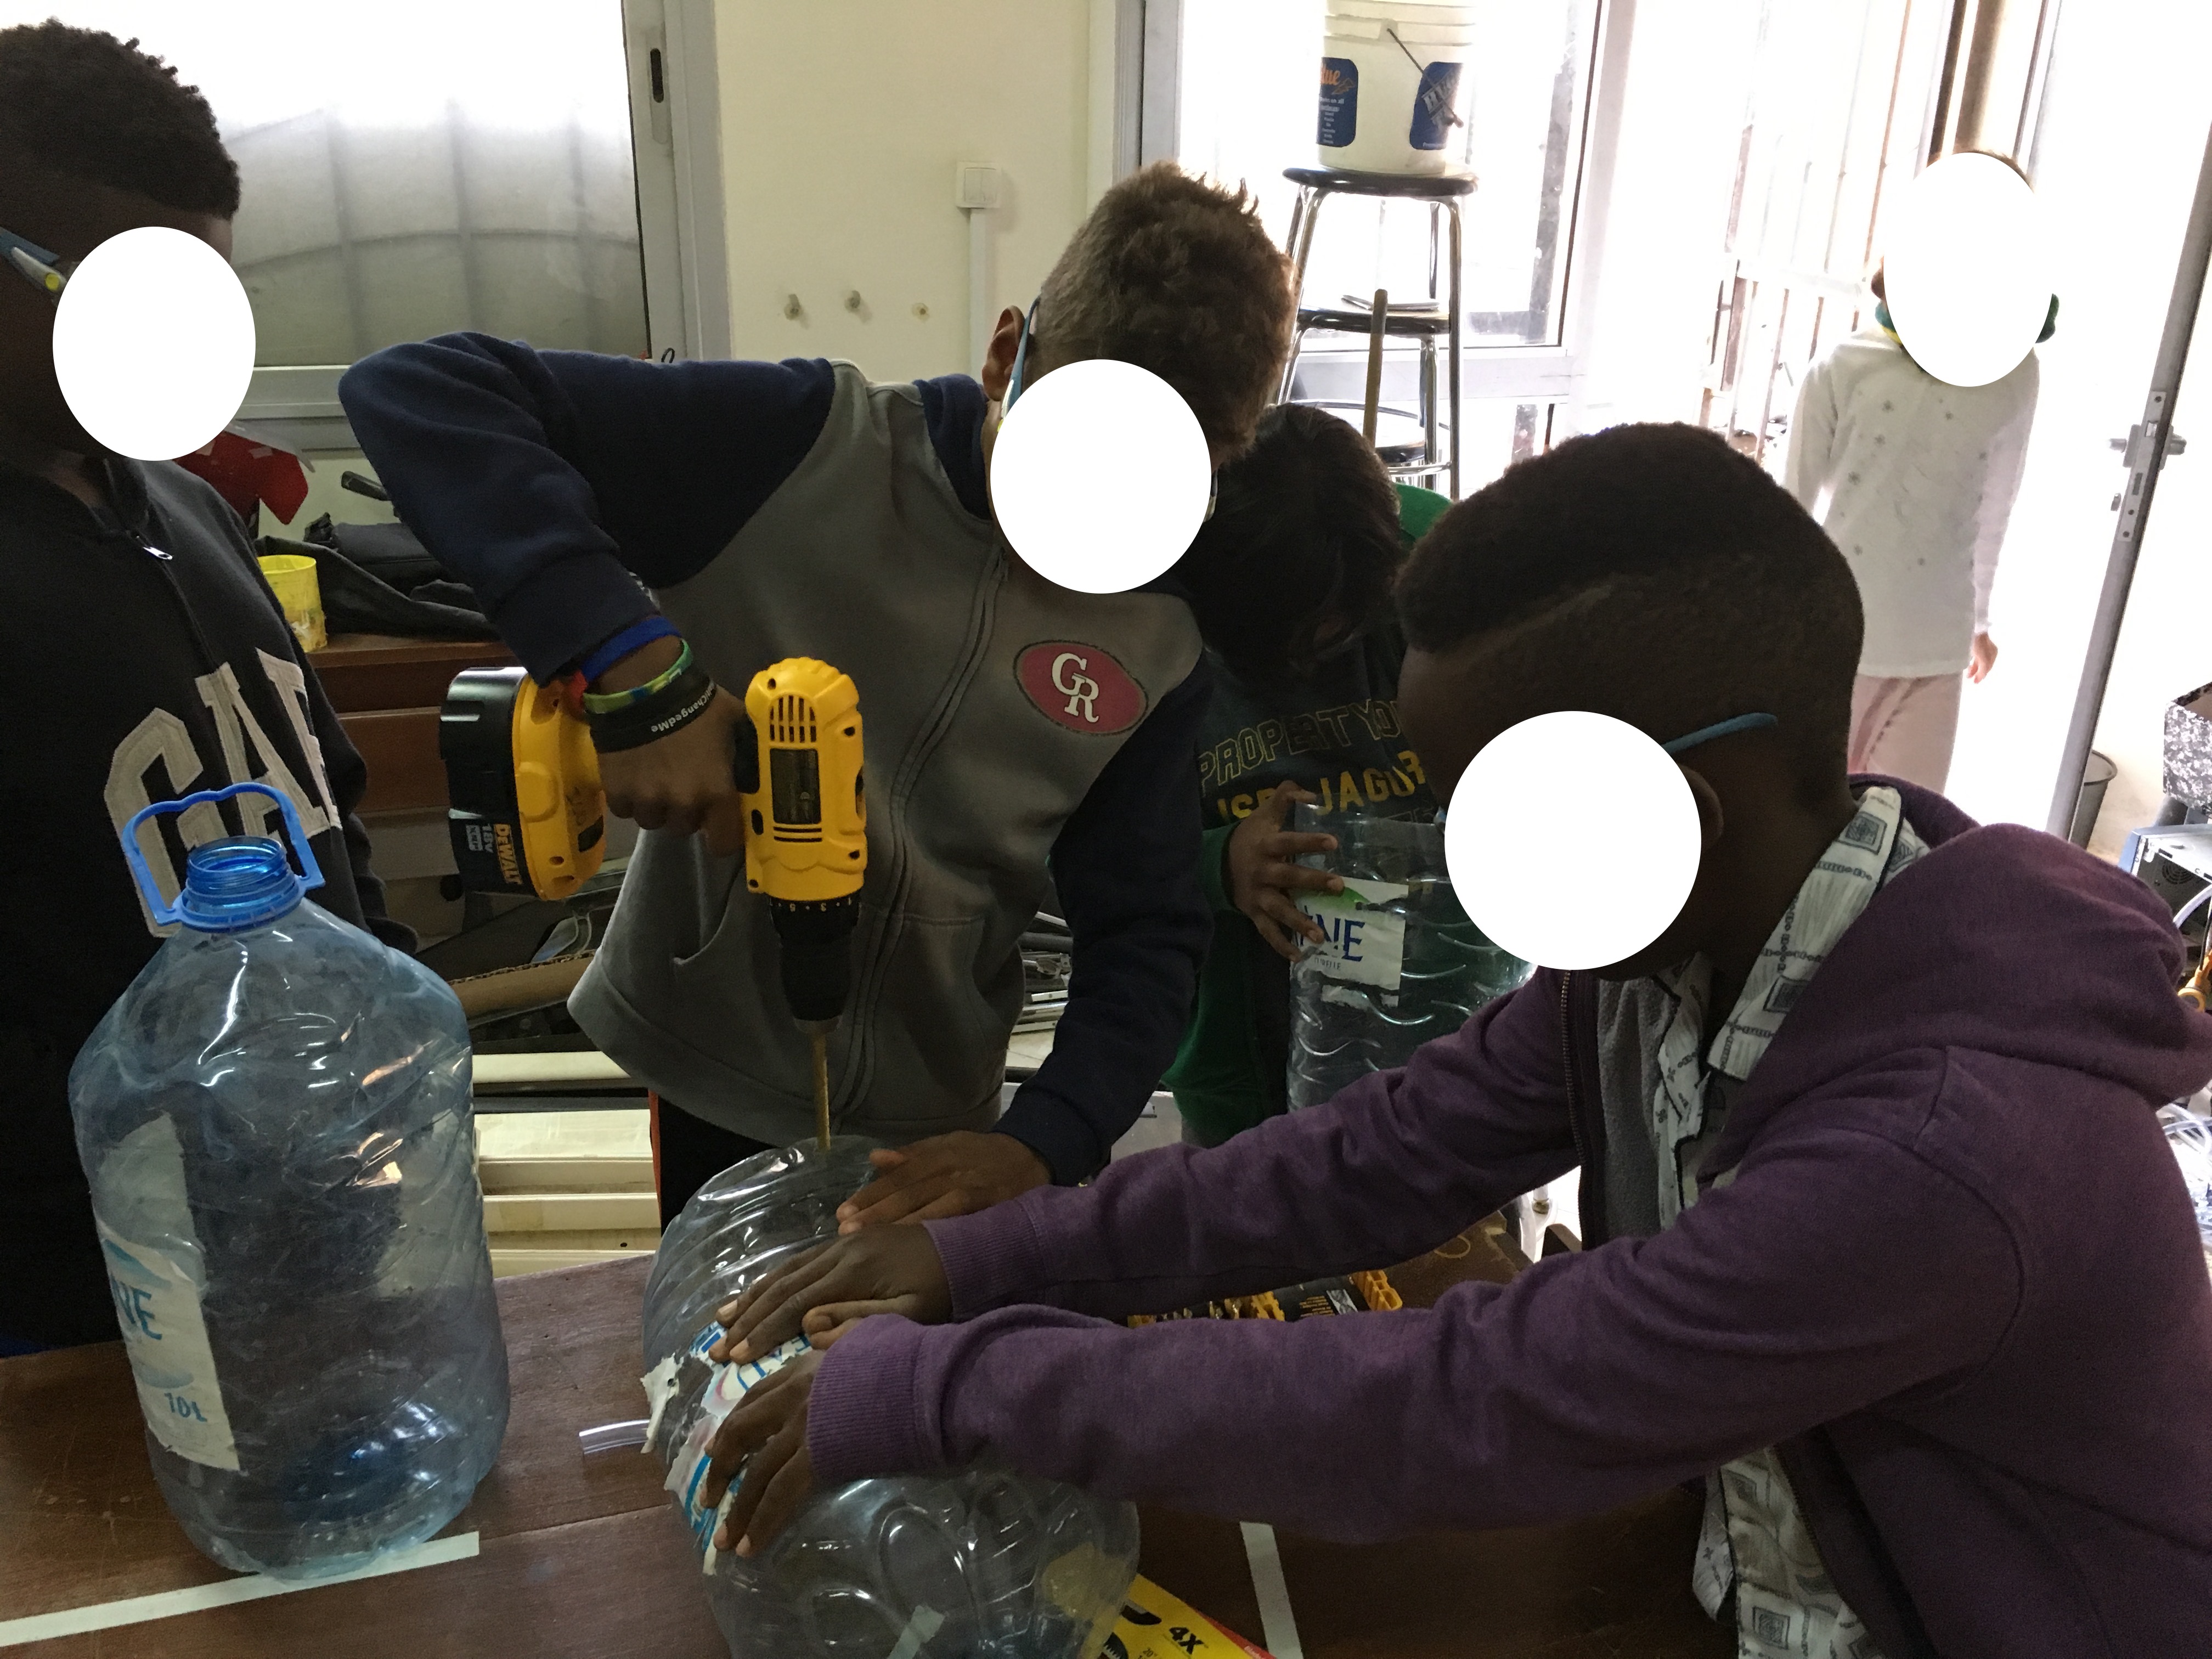
Using equipment safely, and cooperating.
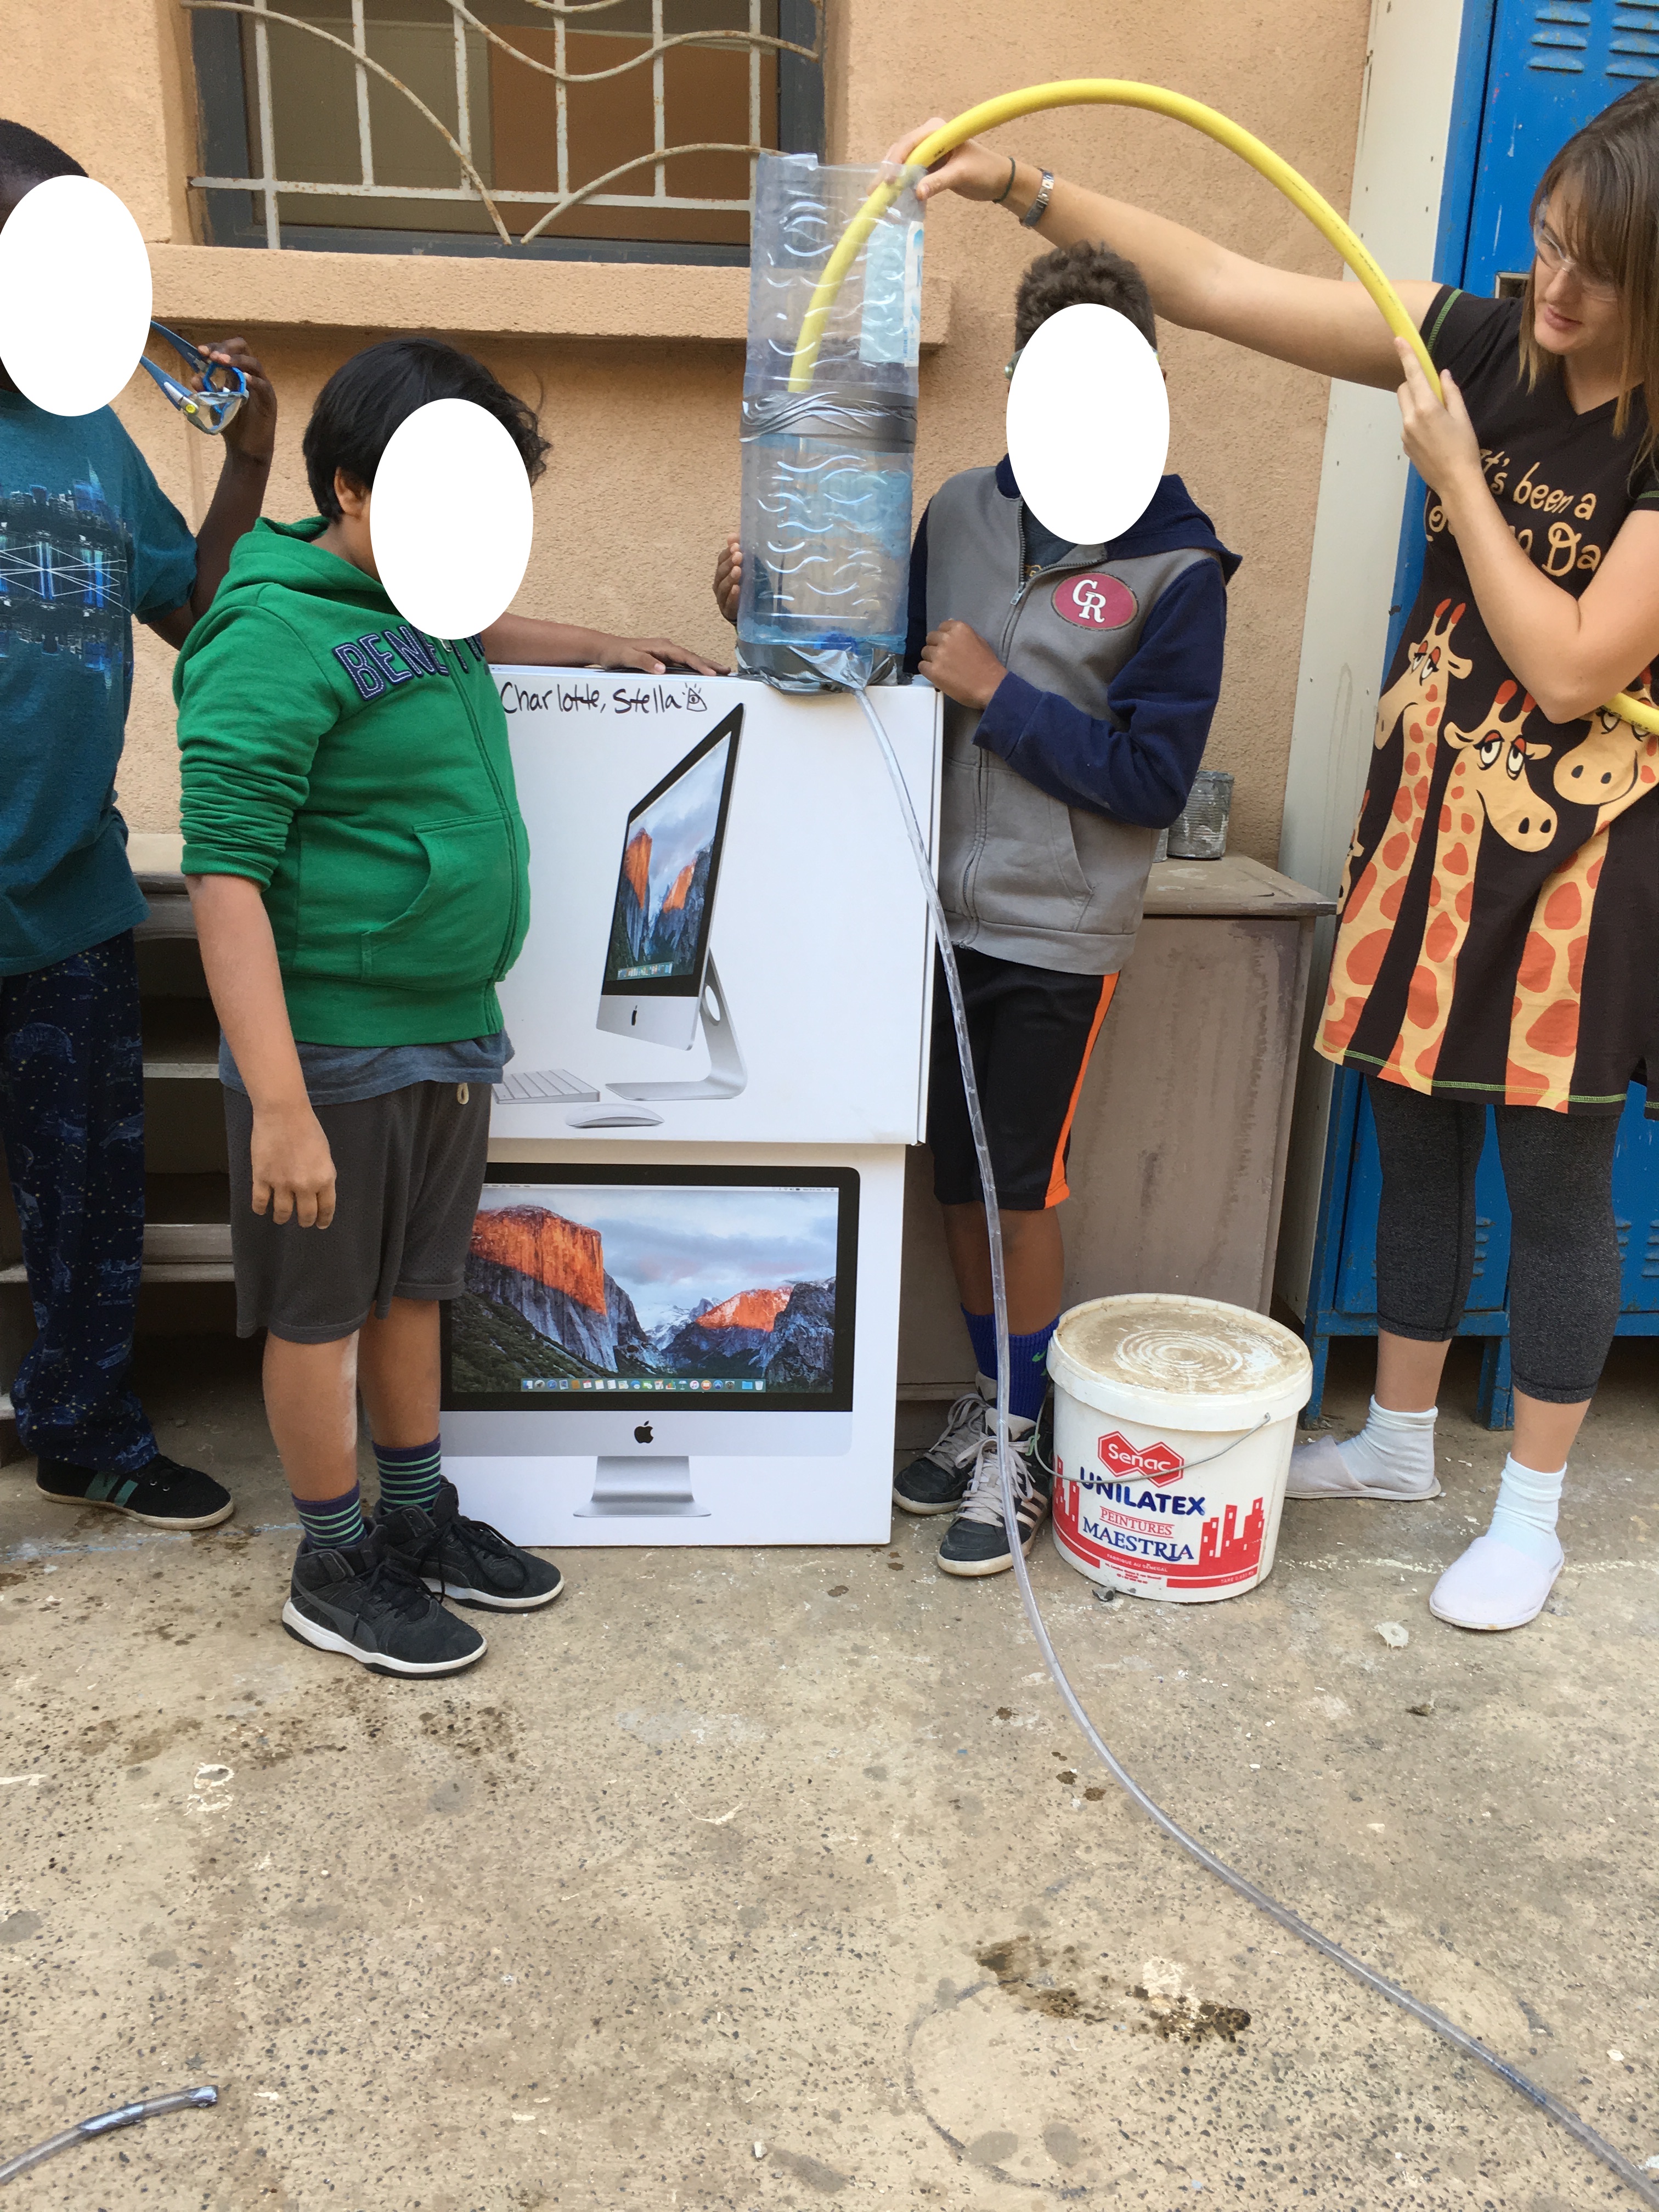
Final product applying potential energy and the force of gravity with increased height
One of the winning products
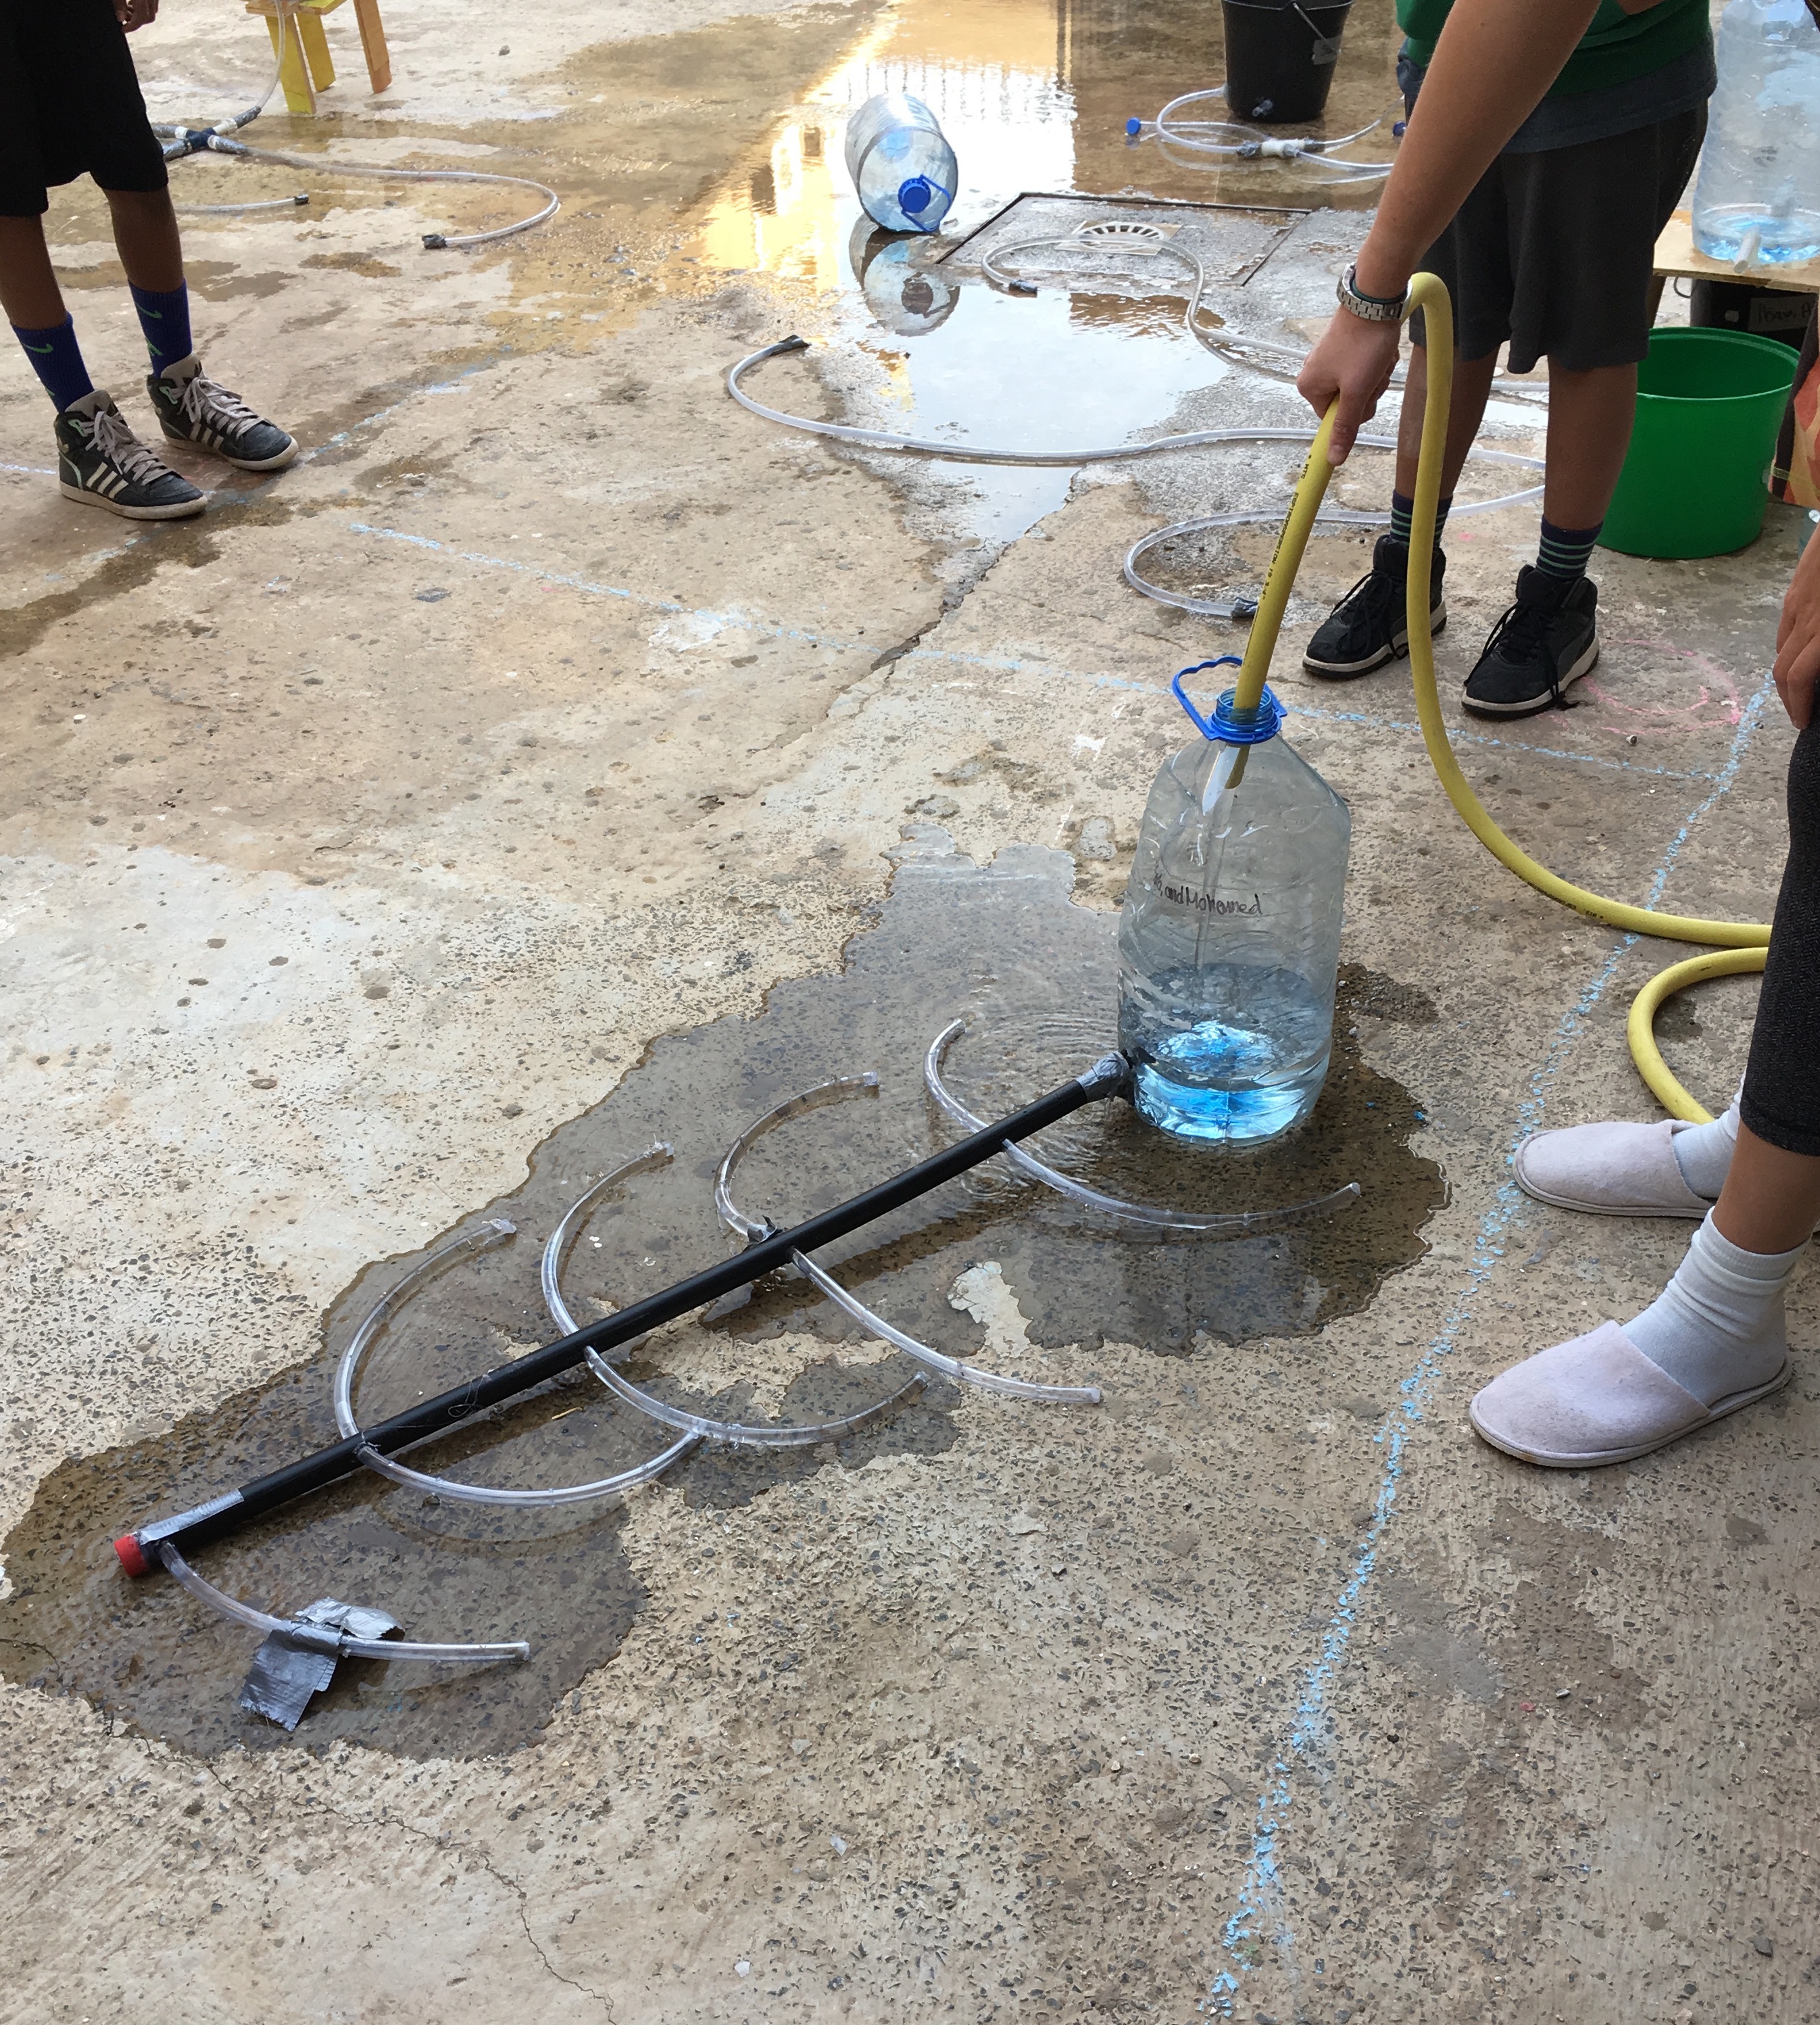
A testing phase
The students loved the assignment, though they struggled with using their time effectively, working collaboratively, and brainstorming ideas. The next time I do a large construction assignment like this, I will make sure to show them examples of how to brainstorm ideas, and how to design and test prototypes (smaller examples of what they are trying to do, before the larger final product). Additionally, before construction, I will help the students practice communicating during disputes, and help the students assign roles during the project.
Some of the reflections created by the students were excellent. Here is an example reflection created by a student, where all identifying information has been removed: student exemplar.
Student Exemplar- Irrigation Reflection
The following is a redacted version of a student created reflection. This was posted on our school blog website. For reposting here, I have removed all student identifying information:
In this assignment we went to the makerspace to build irrigation systems. We were assigned to build the irrigation system in pairs of 3 or 4 people. The groups would draw a sketch of an irrigation system and then build the sketch. When we had finished our irrigation system we would decide as a class which one was the best and we continue working on that irrigation system.
The purpose of this assignment was not only to help Mr. Abdoulaye (the gardner) from watering the entire garden by himself, but also to understand the purpose of an irrigation system and why ancient civilizations benefited from it. Ancient civilizations used irrigation systems as an easier way of watering crops. Not only as an easier way, but a more efficient way to. It was also necessary for them to water their crops for food
During the reign of ancient civilizations, irrigation was a “revolution” in agriculture. (Irrigation means the domestication of water- learning how to control water). Irrigation systems can help prevent the damage of floods, depending on how the system is built. For ex: if there are big walls with holes in it (*Mesopotamia*), the walls keep the water within the walls, which partly stops the flooding unless the walls are not tall enough and the water floods outside the wall. Today we still use irrigation systems to water crops or bring us water. Our modern irrigation systems are basically the pipes that bring us water for us to wash clothes, cook food, drink water, shower or even flush our toilets. Another example of a modern irrigation system is a sprinkler. A sprinkler (it’s basically the name) sprinkles water onto plants and into the soil. With this tool gardeners don’t have to walk around an entire the whole day with a hose.
In this assignment I did very well in participating in my group. I used the time we had very responsibly by trying to do as many things as possible. I tried to include everyone in the assignment by asking if they wanted to use the drill, or if they wanted to use the hot glue gun. When we had finished one part of the project we would quickly move on to another part of the project. I respected my group mates and their ideas, by actively listening and taking heri ideas into consideration and gave them feedback and how we could build on that idea
The beginning of class when we had show our sketches to each other. Only **** and I had made them, ***** forgot or just did not want to or did not have time, I don’t know. When I showed my group the sketches I had made, they said they were pretty interesting, however it would be hard to make.
Our design had two big kiren bottles which were like two big water station that had propellers. The propellers were to push the water threw the rest of the tubes. One of the tubes was connected to a bottle and from the bottle it went into a “toilet tube” and from there to a styrofoam “box” which then led into another kiren bottle. The original idea was not like this though, it actually looked like this:

We had to find out how to get the motor to work, where to get a solar panel, and how to build a propeller.
Along the way I learnt about new tools and how to use the tools in the makerspace:
- Electric drill : when drilling you have to drill straight up, and down, or else it will go sideways and maybe not even drill thru the object and you can hurt yourself or someone else. For the actual drilling bit to fit into the machine you have to twist the “chuck” so it tightens the grip of the drill
- Saw: when sawing you have to saw on an angle so the saw saw’s faster. It saw’s faster because
- Glue gun: NEVER hold the glue gun in the front or you will burn your fingers because it is SUPER hot in the front
the description of a drill for you to understand what a “chuck” is and so you can learn more about the parts of a drill.

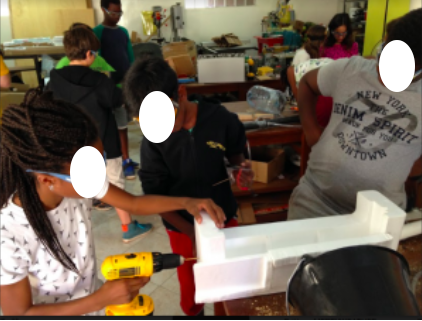
picture of me using a drill (the drill is the main point. For you to see how I am using the drill properly- hold it straight! And also I want to show the “styrofoam box” is) the white bow that I am drilling a hole in is the “styrofoam” box

picture of my partner using a hot glue gun (the hot glue gun is the main point)
For the very first lesson in the makerspace, we tended to find many materials and tools we could use along with the things that had been bought for us for our project. I think that our irrigation project was difficult because we needed many additional supplies like:
- two big Kiren bottles
- two propellers
- two motors
- two power sources (solar panels)
- lots of tubes
- And some other things
A lot of these supplies were very hard to find, like the solar panels. We had to find the right solar panel: one which was the right fit, had the right amount of volts and one that actually worked with the motors we had. So the batteries had to be right for the motor or else it would not start.
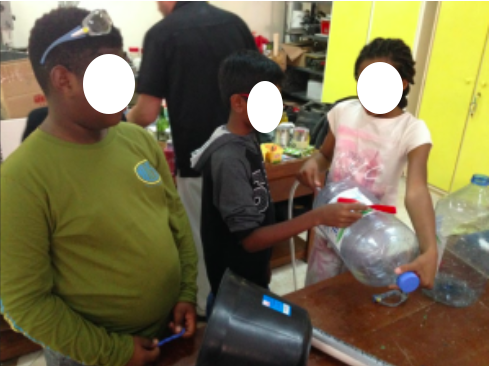
pictures of how we put the propeller and the stick in the bottle and picture of the kiren bottles
The most irritating thing that happened was when we tried to attach the stick onto the propeller because the we did not last we figured out how to put the propeller into the bottle (with some help of ms. Merryweather of course!). First we drilled a small hole into the bottle, then we took a pair of pincers and clipped them onto the propeller. Held the pincers into the bottle, hot glued a grilling stick, put the grilling threw the hole and then put it on the propeller.
Here is a visual for you to understand better-

This comic shows step by step how we put the propeller and the stick in the bottle and also how we attached the stick and the propeller together.
I think that our group had a very hard time focusing on the task and I think that is one of the reasons we did not finish our project. Sometimes some of the group mates did not exactly know what to do In our group **** did not really participate in everything, instead he wandered off and talked to **** or some of his friends. That must have distracted his friends as they joined in talking about stuff. He did take part in building the irrigation system and helped us sometimes, but not as much as he would have appreciated. We did remind him to come and help us, though it is also his responsibility to know when it is time to work and when it is time to play. That could be something for him to reflect on.
What went wrong with our design is that there was no point of putting the stick on the propeller, because it kept on falling of. Maybe to fix that we could have taped it, but then it would not spin on the motor as well (we glued the stick onto the top of the motor). We did not have time to drill a hole in the styrofoam “box”, so we could put toilet pipe through .
The white pipe connected to the bottle is the “toilet pipe” (though during this time we had not made the styrofoam box yet)
We did not have time to make a stand for the kirene bottle. Making a stand for the bottle we realized we had to do when we saw the project was almost complete. The water would flow down from the bottle into the tubes and into the irrigation system. But we did not have time to make it and it was one of those last-minute-realizations. This is something we could reflect on and take time into consideration when making another project in the makerspace.
Next time we have a project in the makerspace I am going to choose a simpler design, like for ex-

However, what did go well was that we finished most of our project and that we got to present it, but not demonstrate it with water. We got the tubes figured out, we almost got the bottle taped to the toilet pipe and we got the styrofoam box fixed. (I understand this is a little complicated to understand so her is a visual):

(The bottle is supposed to be at the end of the tube, but the wind blew it away)
The project would basically look like this-

THE END
Jefferson/Overseas Science and Technology Institute (JOSTI)
The JOSTI conference was held in Washington, DC from June 27th to July 1st 2016
Keynote Speaker
Meg Wilson, the K-12 Education Development Executive at Apple spoke of how the term “technology” is relative, and that today’s students were born into a world of instant, expansive, and portable access to information and individuals/communities around the world. She stressed the need to meet our students in their world and use it to redefine education. Some great examples of using social media, publishing applications, and interactive web platforms were introduced to illustrate a learning environment which focuses on personalized discovery, world-wide audiences, global collaboration, dynamic information acquisition, intrinsic motivation, and skills/expertise development.
It was inspiring and reassuring to hear one of the leading innovation engines discuss education as a student-centered process. What was presented aligned with my instructional philosophies, and I am excited to see the products and applications being created in collaboration with educators to enhance education in the 21st century. I plan to explore iBooks, iTunesU, and other applications to help expand the walls of the classroom, promote independent learning, and help students create work they are proud of.
Workshops
The workshops for educators addressed a wide range of topics including Maker Education, Research and Development, Computer Science, Digital Citizenship, and several applications to support learning, assessment, distribution of information, and blended learning. Many of the workshops focused too much on web application functionality, and too little on classroom use of the application as modification and redefinition of learning (SAMR). However, some of the workshops provided detailed information on rationale, research, challenges, and how the web applications could solve those challenges in meaningful ways.
In particular, the sessions on applications to support executive functioning, visualizing the world with geo projects, and the hour of code were very informative and applicable to me.
The executive functioning (EF) presentation began with the introduction of a website that simulates the challenges students with EF deficits have. The website, Through Your Child’s Eyes, contains a substantial amount of information about differently abled learners, which can be used to help parents, teachers, and students understand the specific challenges these struggling learners face, and how to best support them.
The presentation divided EF into four main categories where deficits/challenges may arise. Each category was then broken down into identification of a student with the challenge through common behaviours, background information and research about the challenges, and specific and detailed tools and strategies to help the students build the skills to overcome the difficulties. The presentation was saturated with information and resources about support for students with EF deficits, and I look forward to exploring these resources to expand my understanding of the challenges faced by my students and the ways I can help all of my students improve their EF skills. In particular, I look forward to reading the WATI guide to assistive technology for organization.
The geo projects presentation had some great information about how to use Google Maps, Google MyMaps, and Google Earth to redefine the exploration of a topic spatially. Much of the information was familiar to me from working with Torie Leinbach on her class’ IB History project, though several other great applications were explored in the session. Some of the ideas I plan to integrate into my future lessons are the use of Street View History, GeoGuessr, Google Earth, and creating/uploading 360 degree photos. I think the tools presented are a great way to visualize information from the class, the school, and the world which can be integrated into every single subject matter.
The hour of code workshop presented coding through a teaching lens, which was incredibly useful. I now feel as though I have adequate resources to participate in an hour of code and I know where to go and what to do. Particularly, I loved the Blockly Games website (which doesn’t require the installation of any programs), and being introduced to Karel the Robot (where students can write in raw code and simulate a robot). I feel confident introducing the hour of code to my students, demonstrating the possibilities of code, and providing resources for extended learning.
I’ve composed an annotated list of apps, from the conference, indicating what each app does and how I plan to use it in the future. I will continue to organize and add to list as I become exposed to additional apps.
The presentation on Maker Education by John Kilbane validated a lot of the work I had done to initiate the Maker Space at ISD. An important point stressed by John was the initial and early involvement of parents, as well as various ways to remove the barriers to Maker Education (such as Maker Faires, Maker PDs, and a student Maker team to generate Maker ideas). I had focused predominantly on teacher involvement and student exposure, but now realize that in order to have Maker Education as a staple in my future classrooms/schools, I will need to get the parents on board from the beginning of the year and help support the parents with bringing the Making culture home. The American School of Bombay Research and Development (R&D) team wrote and published a step-by-step guide to initiating a Maker Space in schools. I have purchased the book and look forward to reading it to learn even more!
Maker Education
From September 2015 until December 2015, I was a substitute for the Technology Integration Specialist at the International School of Dakar. During this time, I helped research and set up the MakerSpace.
I created an introductory letter for our teachers to begin their involvement in the space. Below is the letter, which includes links to ideas on how to use the space, and ideas on how to incorporate the use of the space into their existing curriculum.
Why use the Makerspace?
“The maker movement in education is built upon the foundation of constructionism, which is the philosophy of hands-on learning through building things” (Kurti, Kurti & Fleming, 2014)
- “Constructionism” is an application of constructivist learning principles
- The primary objective of the teacher in the case of Maker Education is to facilitate the acquisition of concepts by building a specific project
- Encouraging deep questioning during construction is a crucial component of Maker Education
- Innovation naturally arises from students being challenged to find a solution to a particular problem
- One of the most important considerations in the educational makerspace environment is how to invite curiosity
“There is no right or wrong way to use a Makerspace. From simple craft projects that allow students to explore their creativity, to advanced electronics, it can all happen in a Makerspace.” (MakerSpaces Australia)
MakerSpaces can be used to build from set instructions, build from own designs, or build based on a loose idea from someone else. The students can have restrictions on their materials, or no restrictions at all. Students should be encouraged to ask questions and solve problems that can be extended beyond the classroom walls.
How to incorporate the Makerspace into your curriculum?
The Elementary school examples below can (and probably should) be modified to meet the needs of your classroom. Ideally, students should be coming up with their own designs as often as possible to create something new, or to redesign something existing in a new way.
Master List of Ideas for the MakerSpace: Click to view and add!
| Grade Level | Example Curricular Component | MakerSpace project idea |
| Grade 1 | Insects unit | The “create an insect” project can be modified so the students design an insect that has regular or modified insect components to live in a certain environment, or eat a certain type of food, or survive a certain challenge, etc. |
| Grade 2 | Geography unit | Have students design and build a model of their own city, state, or country. Problematize it by saying that students must design their layout to maximize access to water, or give students limiting factors such as space, resources, tools, etc. |
| Grade 3 | Musical Matters | Have students design and build a one-person musical instrument/band set that makes various sounds. Use as a launching pad to discuss the Essential Questions (How can I make music? Who can make music? Why do people make music? Why do people write down music? How can music be written?) |
| Grade 4 | Electricity | Have students Design and build a mini robot that accomplishes a task: eg. make a robot that draws a picture (coffee bot) (candy tin robot) (toothbrush robots) or Design and create Design wearable circuits (eg. a light up or flickering broach or a wearable safety device) or design and create an LED paper flower or greeting cards |
| Grade 5 | Science Club | Students can make their own Rube Goldberg machines to explore the scientific process and scientific inquiry |
| Grade 6 | Social Studies | While learning about the importance of irrigation in ancient civilizations, students can research modern day irrigation systems, and try to design and build an irrigation system that will water continuously for 3 days. |
| Grade 7 | Language Arts | Students can design and build marketing displays for their stories, or design and sew/make t-shirts that reflect the stories they have written |
| Grade 9 | Math Radicals | Students can design/build a game board about what they have learned in the previous radicals unit.
(Example board game, Totally Radical, can be viewed and improved upon, or students can create and design their own game depending on ability) |
| Grade 10 | Grade 10, Human geography of the Middle East | Topographical Tapigami: Historical maps of Israel/Palestine (independence, modern, settlements, topography) |
These are only a few potential examples. There are many many many more ways you can use the MakerSpace to create, explore, discover, and build. If you use the space, don’t forget to include it in our Makerspace Classroom experiences page!
To help with the use of the space, I created grade-dependent safety protocols (Elementary, Middle, High) and a list of recommended tool use per grade. I used the Makerspace quite a bit with my classes after that, as can be seen from the Irrigation project and Solar Lamps to name a couple.
Inquiry and Innovation in the classroom- By A.J. Juliani
 Providing students with autonomy and ownership over their learning enhances motivation, and encourages innovation through purposeful and passion-driven goal setting. A.J. Juliani (@ajjuliani) outlines the importance of preparing students to become independent, creative, open-minded, innovative, resourceful,resilient, and growth-minded risk-takers who take ownership over what they do. He believes this will best equip students for the heuristic, evolving and contracted nature of future available jobs.
Inquiry-driven practices integrated throughout the curriculum are necessary for helping students ask questions about their learning, instead of simply looking for the required answers. 20% Time (Genius Hour, Passion Projects, etc.) provides an opportunity for students to practice self-chosen inquiry and exploration while developing core skills and competencies. The book walks teachers through the steps of creating the appropriate classroom environment, approaching parents and administration, and implementing the structured unstructured class time for inquiry-based learning. A.J. Juliani provides useful handouts, a plethora of additional resources, sample rubrics and letters, and examples of final projects.
Innovators meet frustration not with complaints- but with a commitment to devise more effective solutions” –Charles Leadbetter
Mindset- Carol Dweck, Ph.D.
 Carol Dweck’s research on mindsets has huge implications for schooling and education. Dr. Dweck has identified and defined two contrasting mindsets. A ‘fixed mindset’ is one where people believe their innate abilities are fixed, and they are unable to improve significantly with effort. Therefore those with the fixed mindset feel they must prove their abilities to be considered special. In contrast, a ‘growth mindset’ is one that believes that effort and hard work can contribute to the growth and improvement of abilities, and therefore those with the growth mindset feel motivated and empowered to learn and grow.
A growth minded approach should be considered when designing curriculum and lessons, assessing student progress, and providing praise. Students need to be actively taught about the growth mindset, to help them perceive education as an opportunity for growth and self-development and not a judgement on their ability. It needs to be made clear to students that with effort, training, the use of appropriate strategies, and the understanding that skills and intelligence can be developed, they can and will reach higher levels of achievement. Furthermore, it must be taught and modeled to students that failure is an important and natural part of the learning process, and not an indication of one’s ability, but instead an opportunity to reflect and grow.
“What any person in the world can learn, almost all persons can learn, if they are provided with the appropriate prior and current conditions of learning.” -Benjamin Bloom
Student Portfolios and Student-led Conferences
In my initial practicum experience, the administration had asked teachers to conduct student-led conferences. I had never heard of this practice, and thought it was an interesting concept that was in line with my belief in the importance of empowering students with ownership over their own learning. The subject was brought up again at an end of year meeting during my second practicum, where several teachers were advocating for a change towards student-led conferences, and away from teacher-led conferences.
I began searching for resources on the value of student led conferences, and how to conduct them. According to Bailey and Guskey (2001), student-led conferences promote and enhance three important elements that improve student performance. Student-led conferences increase student responsibility, relevance of learning, and effectiveness of reporting. They argue that when students are aware that they must report to their parents on their progress, students see the importance of completing their assignments, focussing on learning outcomes, keeping track of work, completing tasks to a high standard, and monitoring their improvements and struggles through reflection. Furthermore, Hebert (1998) noted that the child-centered qualitative approach of student-selected work enhances student involvement, sense of connectedness with learning, and self-discovery.
I found a great article from edutopia that provides a detailed account of how to set students up for successful student-led conferences. A key take away being that both students and parents must be aware of the process well in advance. Active and deliberate instruction about the value of student portfolios and how to effectively participate in student led conferences is crucial (Hebert, 1998). In my future classroom, I would like to introduce the idea of student self-reporting during the initial few weeks when focusing on personalizing student learning. As we discuss the various ways in which students learn, we can begin to discuss how they can monitor their progress over time, and lead the discussion with their parents. Specifically, helping students identify where they came from, where they are now, and where they want to be with their learning. The preparation for student-led conferences will tie in nicely to instruction on goal setting and metacognition. During this time, I will also include parents on the dialogue about the benefits of this process for improved student learning, and what to expect from their child during these conferences.