Monthly Archives: February 2018

Body Design (Sean, Week 5)

This week, I finished creating a first body model in Solidworks. This model has slots in the rear to accommodate the four control motors, as well as a groove in the front where I will be able to attach the ears. I was hoping to attach an additional groove to the rear section of the model, but was not able to create it in Solidworks before the end of the week, and wanted to have a print ready before our week long break.

I’m not super happy with the shape I ended up with, since it doesn’t look very natural. Given the time restraints though, I think it will be important to print this body now and learn from my mistakes so that a future body will (hopefully) look more natural and compelling, and have a more thought out internal mechanism.

Week 6 – Mold design, casting

Week 6 (Feb 19-25)
Designed and printed a smaller-scale prototype version of a mold, and started a cast in it.

Mold design
Decided against the one-size-fits-all mold, so this final design is a lot neater and easier to use. It only has two pieces, and also includes points at which to screw the pieces together (to properly center the two pieces, relative to one another, and to keep the silicone from pushing the pieces apart when pouring).

[pictures to come]

The mold in particular that we printed was for design 1) from week 3.

A few issues we encountered/ things we noticed with the print:

1) Forgot to design an overflow valve for excess material to escape during casting. Ended up drilling a hole manually, which worked fine, but in the future it would be a good idea to include it in the design.

2) Holes don’t tend to get printed out at the design size. The holes we had in our design for the screws partially filled in by excess/overflow plastic from the printing process. Also ended up drilling holes manually, but it would be nice if we could find a way to avoid that.

3) Flat surfaces aren’t very flat. The way they are printed makes them quite bumpy (with the exception of the side printed against the table). This made it difficult to press the mold pieces together the way they were designed to, and we ended up manually planing the pieces in order to fit them together better. While that worked for this particular design, I imagine future designs might not be so easy to plane, so one might need to keep this in mind while designing and printing their designs.

Casting
Tested this mold by trying a cast in it. Went much more smoothly than last time (I could actually pour the material this time) – seems like material age might actually be a bigger factor than I thought. Tested with the highest viscosity material we have on hand.

Testing scaled-down version of mold with new silicone material

Motor issues
The purring motor started having sputtering issues – if interrupted in mid-motion, it would be unable to start up again. Sometimes it would also cut out by itself (although I suspect that’s mostly due to poor connection, as I haven’t yet soldered the wires to the motor), and also be unable to start up again. A quick measurement on a voltmeter showed that the output from the Arduino to the motor is only about 1 V, although the input to the Arduino is 12. Currently investigating.

Weeks 4 + 5 – Combined DOF, Mold design

Weeks 4 (Feb 5-11) and 5 (Feb 12-18)
Began some exploratory prototyping for combined DOF (breathing-purring hybrid). Embarked on a design marathon for a mold. (Also, I got sick. Much fun.)

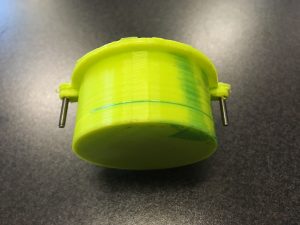
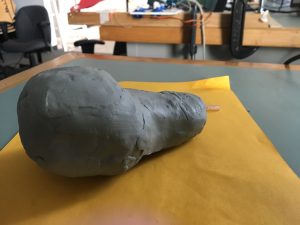
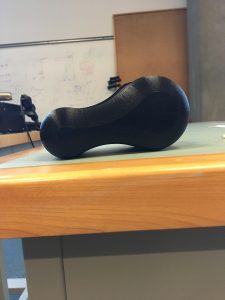
Results of first pass at silicone cast
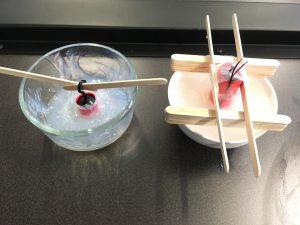
Lesson of the day: liquid rubber sticks to glass and ceramic like crazy (but easily peels off plastic).
The bottom didn’t turn out as well as I would’ve liked, mainly because I had run out of material partway through casting and didn’t have enough to finish the bottom. The top came out quite well though, despite not fully curing (likely due to my difficulty mixing), so while it’s a little sticky in some places, the texture is nice, and carries vibrations quite well.

For now, I am using the top as a bottom piece for testing hybrid design ideas.

IMG_0935
The first-pass “top” in use as the “purring bottom” for testing purposes.

Breathing-purring hybrid
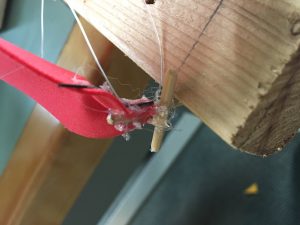
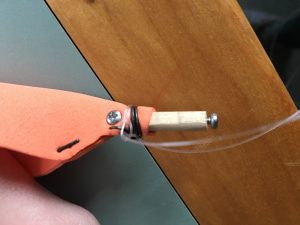
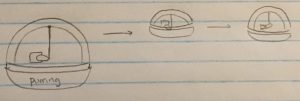
Started a physical prototype of a hybrid design (design 3 from week 3 post). The idea is to create a dome-shaped plastic “rib cage” that also serves as the overall body shape, and compress/loosen the rib cage via a string attached to the top of the dome to mimic breathing motions.

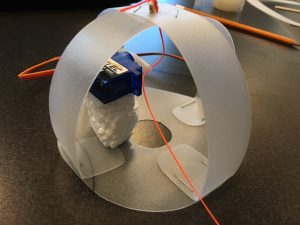
The servo will pull/loosen the string, alternatively compressing/decompressing the dome to mimic breathing motions.

[will take a demo video later]

At this point, I had stumbled into the issue of needing the ability to control multiple separate motors with one Arduino (the purring motor + the servo-string combination serving as the “breathing motor”). It was mentioned that this problem had been solved before for the CuddleBot, so I will look into that.
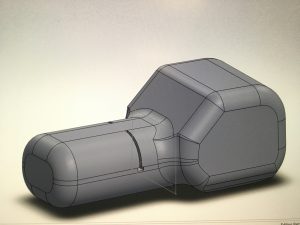
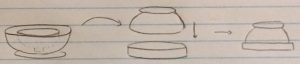
Designs for mold
It took a surprising amount of time and trials to settle on a reasonable design. I think I finally understand the cartoons of inventors surrounded by piles of crumpled paper. Anyways.

The design I finally settled on, and hope to have approved for printing, is a multi-piece multi-purpose mold that can be used to cast almost all of the different designs we have thus far for purring and hybrid CuddleBits:

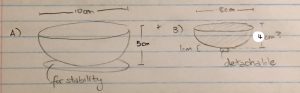
Bottom half (the “purring half”):

The overall mold for the “purring bottom”. Consists of two pieces, A and B.

A) A rounded dish with diameter of 10cm and a height of ~4cm (need to adjust depending on motor size).
B) A “solid” (i.e. enclosed on all sides) cylinder of the same dimensions as the motor.

To cast the bottom, simply fill A with liquid rubber and insert B in the center as it starts to set (so that B “floats” on the liquid rubber). This would result in a silicone piece with a chamber for the motor.

Top half (the “breathing (or not) half”):

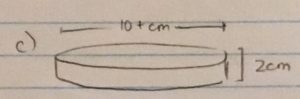
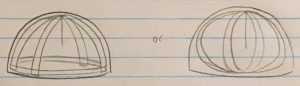
A) A simple bowl in the shape of half a sphere with a diameter of about 10cm (slightly smaller than the bowl I had used in the first pass, which I thought was a nice shape and size).
B) A “solid” (i.e. enclosed on all sides) half-sphere shape with a diameter of 8cm. Also, a separate, solid cylinder (height ~1cm and diameter ~1cm) that can be attached to the half-sphere.
c) A “Petri dish”-shaped… dish… that is just large enough to allow piece A to fit snugly into it upside-down.

The purpose for the multiple movable pieces is to allow this mold to be used in casting a variety of different CuddleBit bodies:

1) For a solid top (purring-only CuddleBit): fill A with liquid rubber.

2) For an “air bubble” top (hybrid CuddleBit, design 1 from week 3 post), attach the two pieces of B, and center B inside A. Pour liquid rubber to brim and allow to cure. Fill C to about halfway (so liquid is at about 1cm) with liquid rubber, and put the previously-cast piece on top, upside down. This would (theoretically) result in a hollow, dome-shaped silicone bubble. We can then use pneumatics or a servo motor to simulate breathing motions.

2b) For a “water bubble” top (purring-only): same steps as 2), but instead of using the top for breathing, can fill the bubble with water. Perhaps this can achieve a similar outcome as the water balloon CuddleBit?

3) For a “reinforced skeleton” top (hybrid CuddleBit, design 2 from week 3 post), create the skeleton first, and carefully cast using a combination of pieces A and B, in a similar manner as 2). This would result in a skeleton embedded in the dome part of the silicone air bubble. (Alternatively, piece C may not even be necessary – if the dome can hold its shape no problem, we can directly attach the dome to the CuddleBit bottom.)

In this way, this mold will cover all three designs that we came up with during the week 3 brainstorming.

Ear Improvements (Sean, Week 4)

Before beginning with the 3D modelling, I spent this week thinking more about how the ears will be incorporated into the body. The previous design had the ears wrapped around and hot glued into a BBQ skewer, which was placed in a hole drilled into a block of wood.

For the next version, I modified the skewer so that the ear attached to a flat area, helping to create a more natural ear shape when attached. The ears are now attached by a screw through the skewer, much sturdier than the hot glue. The bottom of the skewer is also attached to a screw. The plan is to design a body that has a series of channels that I can slide the screw and attached ear into. This would allow for easy switching between ear prototypes, and ideally even allow for adjustment of the angle the ears at which the ears are attached to the body.

After finishing with the next version of the ears, I crafted a model of the body I hope to make next week out of clay. This new body narrows at one end, maintaining the general shape of my original model which I hope will be able to model both a large animal’s head and a small animal’s body. For next week, I will likely start working in Solidworks to create a body that I can test the ear attachments to. After that, I will try to incorporate the servos into the design of the body, which should bring the prototype close to completion.


Week 3 – Purring, Combined DOF

Week 3 – Jan 29-Feb 4
Further material/design exploration for purring CuddleBit.

Silicone body
First pass at attempting to cast a silicone body. Used some bowls scavenged from my house as a mold (that stuff’s not toxic, right…?).

Ran into some trouble with the liquid rubber material – it was a little difficult to mix and pour, and as a result the cast did not seem to be terribly successful. Some parts still haven’t cured yet (it has now been almost a week), and it seems that it will likely remain this way. Will try again with new material.

First pass at casting with liquid rubber.

Motor adjustments
Minor tweaks to the frequency of the purring motor. As previously noted, in designs where the motor is entirely encased in a quasi-fluid (as opposed to on top of a water cushion), lower frequencies transmit better.
IMG_0928

Combined design
Toyed with the idea of mixing DOFs – in particular, breathing and purring.

Two particular designs that came to mind were 1) silicone air “bubble” with the purring motor embedded in a thick silicone base, with hydraulics/pneumatics for breathing motions 2) same base, but a skeleton ribcage embedded in a thin layer of silicon for breathing motions.

1)

2)

Another design that we briefly considered was 3) to have the same purring bottom, but a skeleton-only top.

Early Behavior Design (Sean, Week 3)

Building on the wood block model I created last week, I attached a series of Arduino controlled servos to the ears. Ear ear is has two attached servos: one controlling left/right rotation, and one controlling forward/backward motion. With this mechanism in place, I started to design a few simple behaviors to see how effectively my current system could communicate them.


I was fairly happy with the mechanism and the range of emotion it allowed me for designing behaviors. I wanted to spend more time working on behavior creation, but given that this was still a fairly low fidelity prototype, I decided to work on the actual body as a next stage.

This prototype body was created in Solidworks and 3D by my supervisor just to introduce me to 3D modelling. This body has no space for the inclusion of servos or ear attachment, but was really just a way for my supervisor to help introduce me to 3D modelling. Next week will most likely be spent in Solidworks, creating a better body.