Week 12 (April 2-8)
Assembled the robot (finally!) – water included. Started brainstorming tentative design adjustments/improvements, including for the hardware side.
Robot assembly
I am now 1 for 3 in terms of successful mold designs… apparently, larger air channels plus release agent still isn’t enough to allow the dome mold to come apart without breakage. The bottom half of the cast came out really smoothly, so the takeaway here is that these types of molds should definitely be designed to come apart in pieces for easy (and non-destructive) removal.
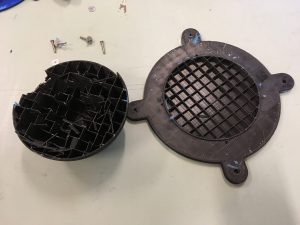
Lesson of the day: molds need to be made in several pieces.
Since the water channel was missing from the top of the dome due to the mold issue during printing, I had planned to cut it by hand – which turned out to be far more challenging than anticipated. The silicone is too soft and malleable, so attempts at drilling only led to a small pinhole in the silicone. Same with manual cutting with a knife – I could only cut a small slit, which definitely would not have qualified as a water channel on its own.
In the end, I settled for leaving it as a slit, and having a piece of rubber tubing inserted for the purposes of pumping in water.
Gluing the two parts of the robot (using more silicone – see Week 7) together without the overlapping part did turn out to be quite a challenge, but still doable (albeit taking about half an hour), as predicted, which was a relief.
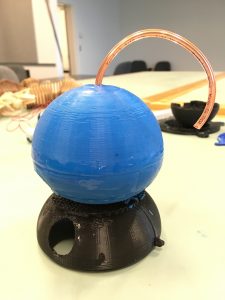
Gluing the two robot halves together.
Adding water
After the (silicone) glue had cured, the next challenge was to get water into the robot. The initial plan of using the rubber tubing for this purpose quickly proved fruitless, as the straw was so thin (out of necessity, in order to fit into the slit in the robot) that even getting water into the tube was a challenge in itself.
The method that ended up working the best was removing the straw and pushing the tip of a squeeze bottle into the slit instead. Seredipitously, the slit I had arbitrarily cut was just the right size to 1) allow the bottle head to fit just right so that the water could be easily squeezed into the robot without to much spilling, 2) allow easy insertion and removal of the plug. (Of course, in future designs, I can’t rely on being so lucky; I definitely need to come up with a new design for getting water in and out of the robot.)
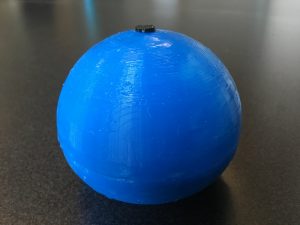
Robot body, after being filled with water and plugged.
Purring adjustments
Because the purring motor’s previous settings had been calibrated to work with a completely different robot body, we had to toy with the purring patterns and intensities to see what worked for this particular robot body. Still a work in progress, but overall, the robot is quite tactily satisfying.
(The purring is so subtle that it can’t be seen on video, so… just take our word for it that it feels pretty cool!)
[photo to come]
Design changes
We’re hoping to increase the illusion of the robot being a sort of living entity, and it seems a large step towards that goal would be to hide the hardware parts. As such, I’m hoping to be able to program the motor on a smaller controller, one that could also be tucked into the motor channel.
Taking home an Arduino Micro and another microcontroller; hopefully I can figure out how to get one of them to work.
As well, now that a prototype body has been made, I plan to try to get an accelerometer (see Week 8) working as well.