Week 7 (Feb 26-March 4)
Learning more from the molding process, and some testing on the scaled-down prototype. My first foray into storyboarding.
Mold design
Removed last week’s cast from the mold. Or, rather, attempted to. I appear to have a terrible track record with these things.
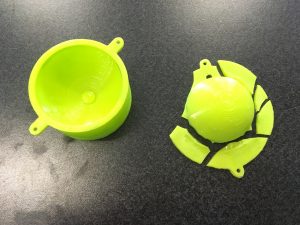
Oops…
The resulting silicone piece.
Several issues we noticed during the process:
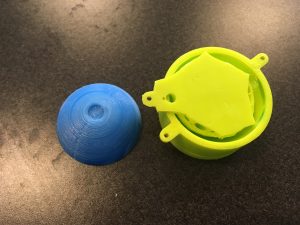
1) The suction between the mold pieces made it essentially impossible to take them apart. We attempted several solutions, including running the mold under hot water to soften the silicone, using a knife to pry the pieces apart, and trying to twist the top off.
In the end, the only thing that actually worked was breaking the top piece.
Several potential solutions we thought of:
a) Designing the bottom in two pieces instead of 1, and screw them together for the molding process. I thought it might be easier to remove the “outside” of the mold instead of prying the inside out of it.
b) Designing air channels in the mold to make it easier to take the pieces apart (by decreasing the suction).
c) Applying a release agent to the mold pieces before casting. Although this may or may not work as the main problem appeared to be suction rather than stickiness, but it’s worth considering.
2) Button size to dome size ratio. The dome has a built-in depression in the top for a plastic “button” that was going to be used in applying an even downward pressure. This would, theoretically, compress the dome and simulate a breathing motion. After some testing, I have determined that the optimal button size, for the scaled-down test dome at least, is a little larger than the anticipated one, as any smaller would only create a dimple in the top of the dome, and any larger would lead to uneven compression. However, I am unsure how this would scale up – if this button size is a fixed thing, or if it’s a button:dome ratio.
IMG_1034 IMG_1038 IMG_1036
Testing of various different button sizes: small, medium, and large.
3) Air escapes for breathing. There was some initial concern about whether we needed to build separate channels for air to go in/out of the dome when compressing, but after some testing it seems that the hole used for the string to pass through the dome is sufficient for this purpose.
Gluing things to silicone
This was an unexpected problem. It turns out that there is no simple way to attach something to silicone, other than more silicone, or very specialized glue. We had also considered perhaps using hardware (e.g. screws) to attach pieces, but I think that would compromise the intended overall softness/uniformity of the robot body, so I would prefer using additional silicone to glue pieces together when needed (such as when attaching the robot top to the robot body).
Storyboarding
Began some storyboarding for the purring and hybrid CuddleBits, as we had decided that we were probably overdue for trying to nail down some of the design variables. This is my first encounter with storyboarding, so I’m not entirely sure if I’m on the right track with how this works, but it’s been an interesting exercise so far.