Author Archives: SeanFernandes

Final Possible Body Design (Sean, Week 11)

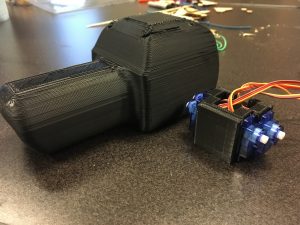
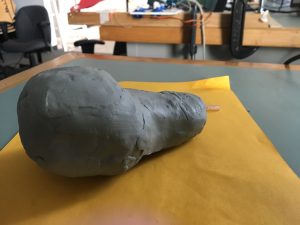
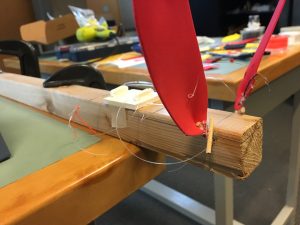
Since this was the week of our COGS 344 presentation, I spent most of it collecting past robot designs and preparing to present. The currently printed body is not able to display the behaviors I had hoped, so I’m planning on bringing it in without the motors and relying on my video of the wood-block prototype to illustrate the intended range of motion. I also spent a lot of time leading up to the presentation trying to finish a better 3D model to demonstrate in my presentation and hopefully use in the future.

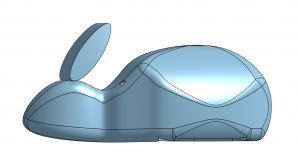
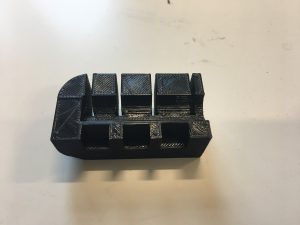
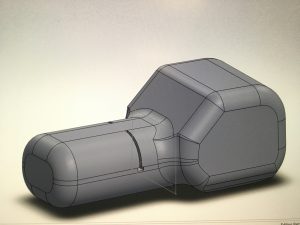
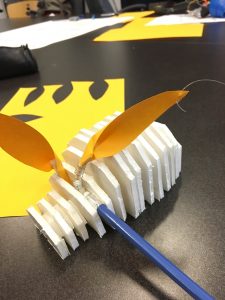
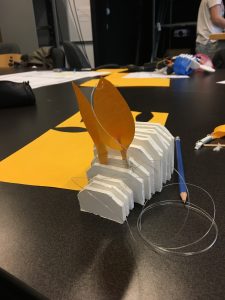
The “ears” in this image are there just to illustrate what this would look like if printed with attached ears.

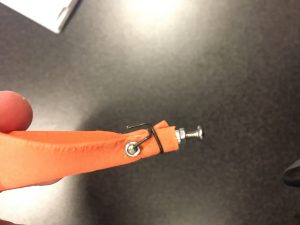
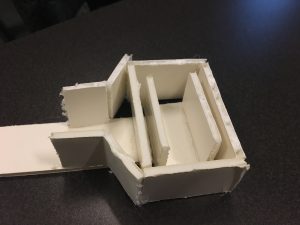
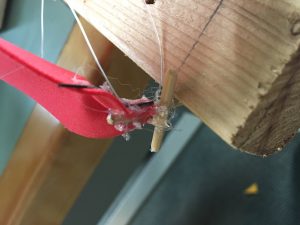
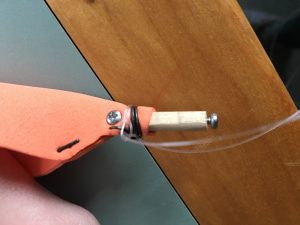
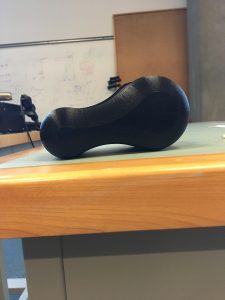
Despite the fact that most people I have asked have seen my prototypes as heads rather than bodies, I have chosen to commit to creating a body instead for several reasons. First, this design is more mechanically consistent with the wood-block prototype i created earlier. The strings that control the ears full backward rather than down as they did in my previous print. That downward motion meant that the ears did not behave as expected. Beyond that, using a head as a model presents difficulties in terms of later testing. A disembodied head on a table is weird, and would need to be incorporated into a body of some kind. Designing an entire body instead eliminates this problem.

At the time of my COGS 402 final deliverable, this is the most recent prototype I have, and the result of many weeks of constant sketching, prototyping, and failing across a number of physical and digital mediums. More than anything, I would say this experience has illustrated to me how important the “rapid” part of rapid prototyping is. The amount of time I spent struggling to learn to use 3D modelling tools to realize my ideas dramatically slowed my progress toward creating a usable robot. One of my personal goals for this project was to learn how to 3D model, and in that way I was successful, but I probably should have spent more time on lower fidelity prototypes before devoting so much time to learning an entirely new tool from scratch. Regardless, my time in SPIN Lab was an amazing and fun learning experience, and one which I would highly recommend to future 402 students.

Rebuilding the Ears (Sean, Week 10)

The temporary wooden base I was using to hold my model ear to the screw attaching it to the body has finally broken. This means I need to quickly build a new model so that I can continue making sure that my current model is viable before designing behaviors and potentially printing a final body. The new ears are built around a hollow aluminum tube attached to a screw. The fact that it’s hollow makes it much easier to achieve the flat shape i need than the wood, which I had to sand down by hand.

Reconstructing the ears has also given me the opportunity to reconsider the mechanism I’ve been using to attach them to my past body designs. Previous designs relied on a tightened bolt to hold the ears in place inside a channel along the top of the body. This worked at the start, but the constant rotation of the ears meant that the bolts would eventually loosen, relying instead on the tautness of my control strings to hold the ear in place. Crimping aluminum directly onto the screws means that the rotation shouldn’t have any effect on the tightness of their attachment to the body, which should make the ears more reliable. As always, I’m still working on body redesigns in my free time.

More Body Setup (Sean, Week 9)

At this point, I’ve printed the body and the internal case which will hold my servos in place. As a result, I’ve spent this week finally attaching the ears and their mechanism to the body. If I had it to do over again, I would have removed the rear wall of the body as well as the bottom. It’s been difficult to attach the servos to the strings that connect to the ears while inside the head, making sure that all of the strings are tight enough that the ear motion will be fully realized when the servos move.

I’m still not especially happy with the design of my head, and have been working on a redesign in my free time. I’m not sure that I will have enough time to to this before my 344 presentation, but for the future study, it would be nice to have a more complete and compelling model.

Final Body Design (Sean, Week 7-8)

For these two weeks, I’ve been working on incorporating the servos directly into the body of my robot. The servos will fit inside the larger rounded end of the body and control the ears through strings running through channels to the surface of the body. I started by quickly creating a model of the rear structure of the body to make sure that I leave enough space to accommodate the servos.

Based on this model’s measurements, I’m planning on creating an internal box that will hold the servos in place. The future body will have the bottom face of the body missing to allow me to put the servos in. Time and Solidworks abilities permitting, I will try to create a bottom that I can attach to the body which will make the body robust enough to be carried rather than only resting on the table.

Outside of body design, I’m starting to think about ways to redesign the ears to make them more robust, since the current version relies on barbecue skewers for attachment.

Ear Rework (Sean, Week 6)

The new model had some serious problems around measurements. The slots which the ears would have attached to were printed too small, either as a result of poor measurement or lower than expected printing resolution, probably a combination of the two. To fix this, I printed several variants of the ear slots to help me determine what size they will need to be in the final version.

In doing this, I also realized that the structure I created was not as reliable as I expected. The very circular internal chamber which the screw head rotates within makes it difficult  to lock the ears into place. Future versions of the body will incorporate a different attachment mechanism that should let the ears lock into place better.

Body Design (Sean, Week 5)

This week, I finished creating a first body model in Solidworks. This model has slots in the rear to accommodate the four control motors, as well as a groove in the front where I will be able to attach the ears. I was hoping to attach an additional groove to the rear section of the model, but was not able to create it in Solidworks before the end of the week, and wanted to have a print ready before our week long break.

I’m not super happy with the shape I ended up with, since it doesn’t look very natural. Given the time restraints though, I think it will be important to print this body now and learn from my mistakes so that a future body will (hopefully) look more natural and compelling, and have a more thought out internal mechanism.

Ear Improvements (Sean, Week 4)

Before beginning with the 3D modelling, I spent this week thinking more about how the ears will be incorporated into the body. The previous design had the ears wrapped around and hot glued into a BBQ skewer, which was placed in a hole drilled into a block of wood.

For the next version, I modified the skewer so that the ear attached to a flat area, helping to create a more natural ear shape when attached. The ears are now attached by a screw through the skewer, much sturdier than the hot glue. The bottom of the skewer is also attached to a screw. The plan is to design a body that has a series of channels that I can slide the screw and attached ear into. This would allow for easy switching between ear prototypes, and ideally even allow for adjustment of the angle the ears at which the ears are attached to the body.

After finishing with the next version of the ears, I crafted a model of the body I hope to make next week out of clay. This new body narrows at one end, maintaining the general shape of my original model which I hope will be able to model both a large animal’s head and a small animal’s body. For next week, I will likely start working in Solidworks to create a body that I can test the ear attachments to. After that, I will try to incorporate the servos into the design of the body, which should bring the prototype close to completion.


Early Behavior Design (Sean, Week 3)

Building on the wood block model I created last week, I attached a series of Arduino controlled servos to the ears. Ear ear is has two attached servos: one controlling left/right rotation, and one controlling forward/backward motion. With this mechanism in place, I started to design a few simple behaviors to see how effectively my current system could communicate them.


I was fairly happy with the mechanism and the range of emotion it allowed me for designing behaviors. I wanted to spend more time working on behavior creation, but given that this was still a fairly low fidelity prototype, I decided to work on the actual body as a next stage.

This prototype body was created in Solidworks and 3D by my supervisor just to introduce me to 3D modelling. This body has no space for the inclusion of servos or ear attachment, but was really just a way for my supervisor to help introduce me to 3D modelling. Next week will most likely be spent in Solidworks, creating a better body.

Ear Refinements (Sean, Week 2)

After further experimenting with me previous model, I decided to abandon the springs in favor of more rigid attachment using barbecue skewers, since the spring allowed too much freedom of movement to consistently control the ear’s position. With some further trial and error around the shape and materials used to construct the ears,  I arrived at a system that allowed me to control rotation and forward-backward motion with three strings.


However, I the flexibility of the frame has made it difficult to consistently test the impact my changes would have on ear motion, as pulling on the strings moved the entire body as well as the ears. To solve this problem, I created a new model.


I used this block of wood to set the ears at a more natural angle (70°) and finalize my control system. However, controlling two ears (six strings total) with only two hands is difficult, meaning that the next step in this process will be some automation. I’m planning on attaching four servos, two for each ear, to this model to control the ears. This should let me make sure that this model is giving me the range of motion I will need to prototype behaviors later on.

Early Ear Prototyping (Sean, Week 1)

For my first Cuddlebit prototype, I’ve decided to build a model that will allow me to experiment with ears, since they are a frequently used communication tool in mammal species, but not often considered in interactions with humans. I started by making a frame with a profile that I felt would be able to model both the entire body of a small animal (rabbit) and the head of a larger animal (dog) depending on where ears are attached to it. Right now I have rabbit ears that are attached to the frame by a spring, which allows for relatively free movement controlled by a string attached to the tip of the ear. Currently, the ears can be pulled in any direction, but lack rotational control, which will be the next thing I work on.

I’ve also started trying to create other types of ears, in particular a model similar to a German Shepard’s upright and slightly folded ear. So far, I’ve been unable to create a model that is able to fold when back in the same way as the dog’s ears. The folding motion of rabbit like ears is less mechanically complex than in a German Shepard’s ears, so I plan to move forward with the rabbit like ears for now. Ideally the final model will be capable of accommodating all sorts of ear shapes in the future, so I may have time in the future to come back to this.