Weeks 4 (Feb 5-11) and 5 (Feb 12-18)
Began some exploratory prototyping for combined DOF (breathing-purring hybrid). Embarked on a design marathon for a mold. (Also, I got sick. Much fun.)
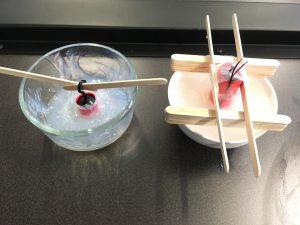
Results of first pass at silicone cast
Lesson of the day: liquid rubber sticks to glass and ceramic like crazy (but easily peels off plastic).
The bottom didn’t turn out as well as I would’ve liked, mainly because I had run out of material partway through casting and didn’t have enough to finish the bottom. The top came out quite well though, despite not fully curing (likely due to my difficulty mixing), so while it’s a little sticky in some places, the texture is nice, and carries vibrations quite well.
For now, I am using the top as a bottom piece for testing hybrid design ideas.
IMG_0935
The first-pass “top” in use as the “purring bottom” for testing purposes.
Breathing-purring hybrid
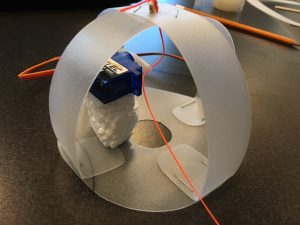
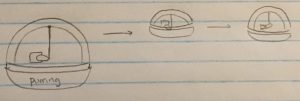
Started a physical prototype of a hybrid design (design 3 from week 3 post). The idea is to create a dome-shaped plastic “rib cage” that also serves as the overall body shape, and compress/loosen the rib cage via a string attached to the top of the dome to mimic breathing motions.

The servo will pull/loosen the string, alternatively compressing/decompressing the dome to mimic breathing motions.
[will take a demo video later]
At this point, I had stumbled into the issue of needing the ability to control multiple separate motors with one Arduino (the purring motor + the servo-string combination serving as the “breathing motor”). It was mentioned that this problem had been solved before for the CuddleBot, so I will look into that.
Designs for mold
It took a surprising amount of time and trials to settle on a reasonable design. I think I finally understand the cartoons of inventors surrounded by piles of crumpled paper. Anyways.
The design I finally settled on, and hope to have approved for printing, is a multi-piece multi-purpose mold that can be used to cast almost all of the different designs we have thus far for purring and hybrid CuddleBits:
Bottom half (the “purring half”):
The overall mold for the “purring bottom”. Consists of two pieces, A and B.
A) A rounded dish with diameter of 10cm and a height of ~4cm (need to adjust depending on motor size).
B) A “solid” (i.e. enclosed on all sides) cylinder of the same dimensions as the motor.
To cast the bottom, simply fill A with liquid rubber and insert B in the center as it starts to set (so that B “floats” on the liquid rubber). This would result in a silicone piece with a chamber for the motor.
Top half (the “breathing (or not) half”):


A) A simple bowl in the shape of half a sphere with a diameter of about 10cm (slightly smaller than the bowl I had used in the first pass, which I thought was a nice shape and size).
B) A “solid” (i.e. enclosed on all sides) half-sphere shape with a diameter of 8cm. Also, a separate, solid cylinder (height ~1cm and diameter ~1cm) that can be attached to the half-sphere.
c) A “Petri dish”-shaped… dish… that is just large enough to allow piece A to fit snugly into it upside-down.
The purpose for the multiple movable pieces is to allow this mold to be used in casting a variety of different CuddleBit bodies:
1) For a solid top (purring-only CuddleBit): fill A with liquid rubber.
2) For an “air bubble” top (hybrid CuddleBit, design 1 from week 3 post), attach the two pieces of B, and center B inside A. Pour liquid rubber to brim and allow to cure. Fill C to about halfway (so liquid is at about 1cm) with liquid rubber, and put the previously-cast piece on top, upside down. This would (theoretically) result in a hollow, dome-shaped silicone bubble. We can then use pneumatics or a servo motor to simulate breathing motions.

2b) For a “water bubble” top (purring-only): same steps as 2), but instead of using the top for breathing, can fill the bubble with water. Perhaps this can achieve a similar outcome as the water balloon CuddleBit?
3) For a “reinforced skeleton” top (hybrid CuddleBit, design 2 from week 3 post), create the skeleton first, and carefully cast using a combination of pieces A and B, in a similar manner as 2). This would result in a skeleton embedded in the dome part of the silicone air bubble. (Alternatively, piece C may not even be necessary – if the dome can hold its shape no problem, we can directly attach the dome to the CuddleBit bottom.)
In this way, this mold will cover all three designs that we came up with during the week 3 brainstorming.


