Week 8 (March 5-11)
Continuation of storyboarding, simple prototype work to select final robot shape(s).
Storyboarding
Continuing the storyboarding exercise, with the goal of exploring some important design variables. These variables included: size, shape, action/interaction, and “background story”.
I also revisited hybrid design, as I had a sudden vision that I thought would be really cool to bring to life, although it seems rather unrealistic.
Organizing ideas for storyboarding. (Is this how storyboarding works at all?)
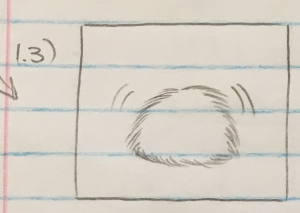
After considering several possibilities for the size and shape, I decided that as a first pass, I would make a palm-sized vaguely-round robot, as it would easily allow for quick and simple interaction with humans – petting, picking it up, etc.
Because I had the idea of a therapy-bot in mind, I think it would also be interesting to explore a lap-sized robot, like a small cat or dog. Of course, this would be for a future iteration of the robot, when the more important aspects of the robot (i.e. interaction, electronic parts) have been developed out.
Some ideas for shape and size, and how a human would interact with it.
One aspect I have yet to decide is whether the robot should have the traditional fur covering, or be left in just its silicone skin. Because it is a palm-sized robot made for picking up and handling, I think both designs are equally valid, and it would come down to personal preference as for which would “feel better” – do you prefer to play with it like a stress ball, or pet it like a small creature? Does the sensation of fur feel more calming, or would a smooth surface be better?
Ultimately, as with everything in this lab – the best solution is to just prototype and test!
Fuzzy or not fuzzy?
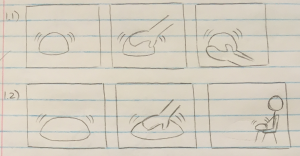
In terms of interaction, the robot currently only sits and purrs, regardless of environment and handling. However, in order to have anything worth studying, the robot would definitely need at least one simple degree of interaction (simple mainly for my benefit, to make sure that the hardware design is within my capabilities). We haven’t yet decided on what kind of study we want to do with this robot, but I have been thinking it might be interesting to design a very simple “action-reaction” mechanism into the robot, and see whether, without any instruction at all, humans can be “taught” how to best interact with the robot based solely on the robot’s reactions.
For instance, if the robot clearly gets agitated and trembles excessively when handled roughly (poked roughly, shaken, etc.), how quickly can its human partner realize that 1) the robot is upset, and 2) the robot doesn’t want to be handled roughly? Or if the robot purrs happily when softly petted, or gently picked up, how quickly can the human realize that they can calm down the agitated robot by being nice to it?
We have decided that the easiest first pass for doing this is to embed an accelerometer into the robot, as a basic measure of “handling roughness”.
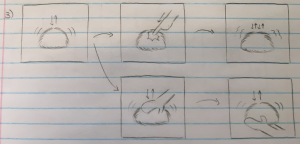
Possible ideas for building basic interactivity into the robot.
At some point during this storyboarding journey, I had a sudden idea: what if we made “Lego” hybrid CuddleBits? Would it ever be possible to make separate DOFs that can be exchanged and mixed almost like the character customization of a video game character?
As much as the ideal appeals to me though, I don’t really think it’s all that feasible, given how completely unrelated our various DOFs have been so far. (That being said, I would still really love for something like this to happen. Someone’s future grad thesis, perhaps?)
BYOCB (build your own CuddleBit)?
Robot Shape
Following the storyboarding exercise, we thought we had enough to work with for my next iteration – making the first full-size prototype.
That being said, in the storyboarding I had only really decided on a size, not a shape –> time to prototype!
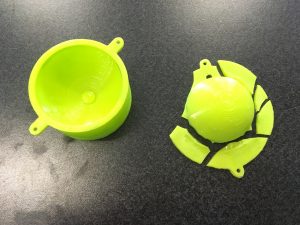
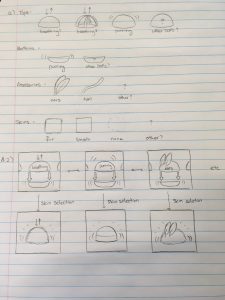
I made a series of small-scale robot shapes – spherical, dewdrop, flattened teardrop – and asked various members of the lab for their opinions.
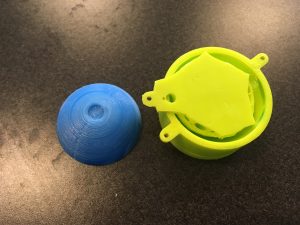
The overwhelming opinion was that spherical is definitely not ideal. Although it is a given that this CuddleBit is probably not going to resemble any existing common creature, taking on the shape of a perfect sphere would make it so unrealistic that people would likely have trouble connecting to it as a pet, or living thing.
Something rather amusing and unexpected occurred during these interviews. Two SPINners immediately gravitated towards the flattened teardrop shape and said “That. But upright.” – essentially like an egg. It was apparently an innate reaction for them that that particular shape was meant to be cradled in their hands in that specific manner. Definitely an interesting notion to keep in mind for designing the robot body.
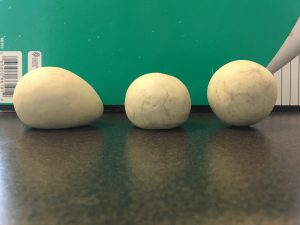
From L to R: Flattened teardrop, dewdrop, sphere.
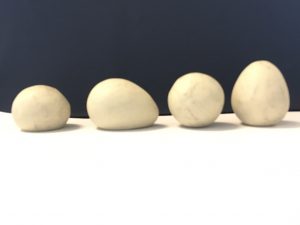
New shape: egg (very left).