On Tuesday , we had our 2nd prototype due. We presented our prototype in front of Cristian, Eric ( our client) and Navid. The presentation and live demo went well. After the presentation, Cristian, Navid and Eric has brought up a few points regarding our prototype and our plans to move forward with our final prototype. The following are the list of points raised during our discussion:
– The suggestion of building a Side Guard for the ramp for safety of the user.
– Connectors on the PCB to be re-positioned (to be placed at the edge).
– Further research needed to be done on the mobility and storage of the platform.
– Duane (our client) will make a final appearance in the final prototype. Maria will get him the video or pictures to Eric for our current prototype thus far.
-– Wheel gap on the platform to be designed so that the user can easily position his/her wheelchair when using the weigh scale.
On Thursday, we met up to discuss about the steps to be taken for our final prototype before reading break begins. We also discussed the parts to buy over the break. The following is our meeting agenda:
1. Fabricate PCB: we need to finalize our amplifier circuit, measure the current of our entire system, decide on an adapter, decide if we are using the small arduino chip, add reset functionality, finalize PCB design
2. Buy rest of parts (reset button, sealant spray, wood, pole, plastic box, bolts, screws, etc)
3. Build ramp
4. Build circuits enclosure
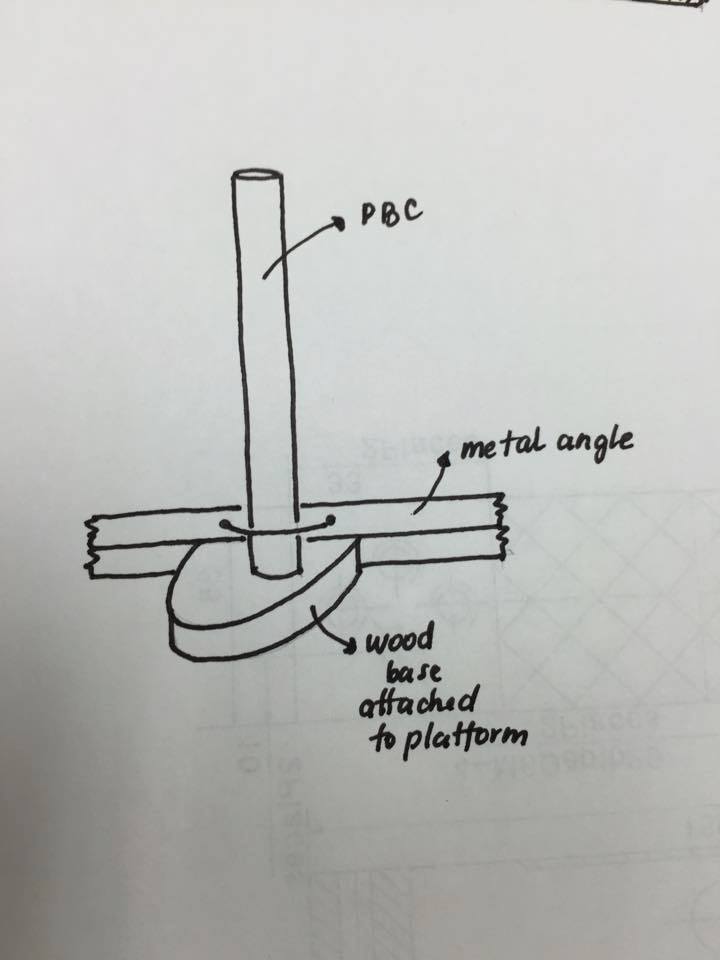
5. Figure out how we’re going to attach the pole to the platform
6. Cut out the grooves on the base for the back wheels
7. Spray sealant on the wood!
8. Get metal sheet (design it with side guards)
9. Bolt platform top to load cell
10. Bolt platform pieces together
After the meeting, we have agreed on certain solutions and steps needed to be taken:
-– We have finalized the parts needed to buy over the weekend.
-– PCB: we are leaving the option open for the implementation of the microcontroller chip as well as the connector for adruino for our PCB design. Oscar: provide connections for the chip and reset button.
-– Ramp Gap: We couldn’t really decide on the groove (ramp gap) because the groove needs to be done on the wood, then covered with metal. The main concern is that it may ruin the platform and make it hard to calibrate. We will discuss more about the matter in the coming meetings.
-– Sealant could be applied as soon as we get it; this weekend or during the break.
-– Bolting the load cell to the platform, bolting platform pieces together can be done only after break.
-– Building the ramp and enclosures is left for later since the height of the ramp will change depending on the metal sheet. As for the enclosures, it depends on the PCB size which is still not finalized at the moment.
4. PCB is still not finalized as we are not yet certain about the adapter and voltage regulators and how much voltage we need.
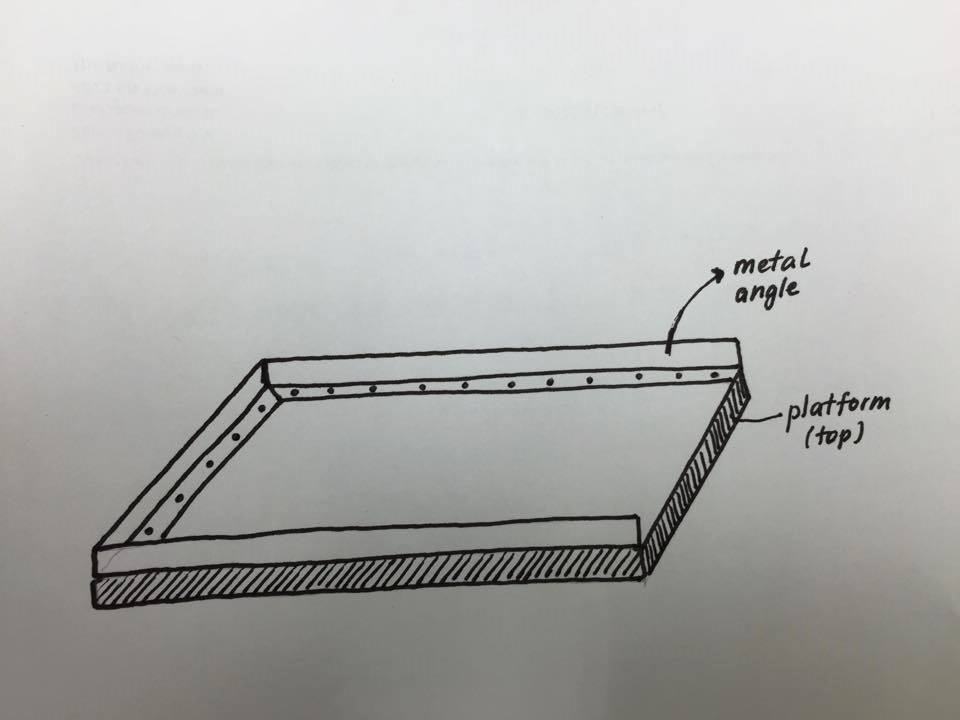
We have also came out with a rough sketch for our Safe guards for the platform and the pole for the circuit enclosures:
Over the weekend (Saturday and Sunday):
We met up to buy parts needed for our final prototype. We have manged to buy:
from Lee’s:
1. Adapter 9V
2. Reset Push Button
3. Voltage Regulator (LM317/LM7805)
4. 10 pin socket and screw terminal.
Hardware Store (Canadian Tire on Cambie & Kerrisdale Lumber)
1. Bolts for the load cell (M6 countersunk crew)
2. Wood sealant/stain for the platform;
List of items yet to buy:
4. Stands for the platform/legs;
5. Metal sheet (120cm x 80cm);
6. Metal angles for the guards (350 cm);
7. PVC pipe for the pole (150 cm);
8. A piece of wood for the pole;
(We gonna ask if Mark can provide us with 5,6,7,8 from the machine shop)