I decided to explore the Still Images portion of the eLearning toolkit next, keeping in mind the upcoming requirement of creating an icebreaker activity for my Moodle introductory module. Introductions prior to the creation of a community of practice is supported by bringing personality and humanity to the participants, and image authoring can be an excellent way to support this goal.
The eLearning toolkit activity for this section relates to image editing using Picasa, Google’s open-source, cross-platform, digital image software suite. I went to the Picasa website and saw that it is currently in version 3.9. According to Wikipedia, Picasa was born in 2002 and acquired by Google in 2004, and I believe I tried the service shortly after I signed up for Google in October 2004 – it has been a very long time since I used the software suite. To my surprise it was not an online service, but a program to download. While I was waiting for the download and installation, I looked into the online file hosting service, the Picasa Web Album. Looking at my online web album, I have one photo uploaded in January 2011:

This one photo in my Picasa web album was not an intentional use of the service, it is where my Google+ profile image is hosted. Google has a real knack for commingling all of their services.
I was surprised at the easily accessible, incredible array of statistical information pulled from image’s metadata. In reality, the photo was snapped using a cell phone with no particular setting choices of my own. I know very little about photography, so the comprehensive metadata available through Picasa’s photo analysis means little to me, but I can see how this information could be very useful and relevant to somebody who was more in-the-know about photos.
After Picasa 3.9 had downloaded, I began receiving prompts for scanning my hard drive for photos and syncing with my web album. The first option had no opt-out, I had to scan at least one folder, up to the my entire hard drive, for existent photos. I found this lack of choice surprising and it challenged my feeling of security with the program. This feeling of insecurity was intensified by a prompt to automatically sync with my online (public by default!) folder. This seems like a privacy accident waiting to happen, and I recall such events when Picasa was still new on the software scene.
Choosing to scan just the “My Documents” folder, the automatic scan organized the found image files by year, presumably according to the photo metadata. I had another surprise when I saw that the DVD playback software that came bundled with my computer, CyberLink, pulls random screenshots when I watch movies and saves them locally. What the heck??!
It was at this point that I noticed above the dated image folders, there was a section called “People” that said “Scanning, 44%.” Clicking on the section brought up this information:
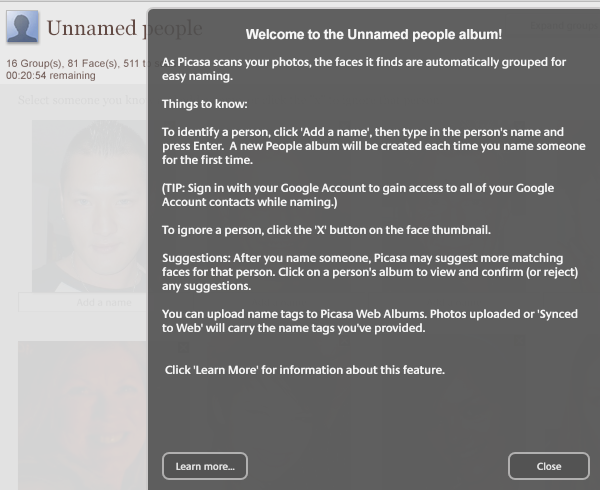
Picasa was scanning the photos in my My Documents folder, and pulling just the photos identified as having a person’s face. After the scan is complete, Picasa users are asked to tag and identify all of the people in the “Unnamed People” folder. I was feeling more and more unsettled by this invasive program. What the heck, Google?!
I made it through the install and followed the instructions in the eLearning toolkit, practicing with resizing and cropping, and saving copies to my desktop. I did have a few more surprises while experimenting with the actual image editing portion of this example– for example, I found that it is impossible to drag-and-drop images into the Picasa interface. I also played around with colour balance, automatic effects and filters, and adding text to photos. In short, Picasa is a powerful image editor that works well for image editing, and is relatively simple to use. Although the activities assigned in the eLearning toolkit were beginner-level, the program could handle a much wider scope of image authoring.
To sum up my reflection on this image authoring activity: The image authoring was simple and easy with this powerful program. However, the process of downloading and installing the program itself held many surprises, and I felt that my privacy was challenged to an potentially unacceptable level. I’m not sure I would recommend this program to technology neophytes without first discussing the issues of privacy and notably the online syncing portion of the program.
One final note regarding Still Images and Accessibility, from the eLearning toolkit – There is a note that each image uploaded should have an alt-description, so that if the image is not displayed, the audience still understands what was meant to be displayed. Using the alt-tab is a component of my own practice that I need to commit to; in the past I have not always considered the implications of images not displaying.
The alt-tab info is also what screen reader software uses for the blind or visually impaired. 🙂
I’ve combed the content of this blog and I’m happy to report that all photos now have alt-tab info! 🙂 … Except for the header, which I don’t know where the Alt-Tab info would go. I will continue to hunt around.