Categories
Wordpress Plugin Check

Upload Videos

8.0 Upload Videos

8.1 Introduction

One key feature that the WordPress plugin check has included is the ability to upload videos of different formats onto the page. The plugin that accomplishes this is TinyMCE Advanced. TinyMCE adds options to the visual editor toolbar. The feature that we are concerned with is the upload video option.

tinyMCE advance

Figure 15. TinyMCE Advanced

8.2 Instructions

To upload a video, just click the video upload button and a new menu will appear.

video upload button

Figure 16. Video Upload Button

video upload

Figure 17. Video Upload

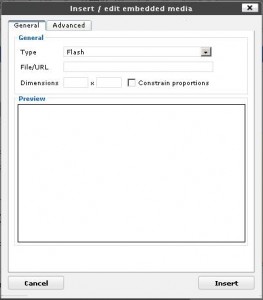
From the video upload menu, the user can choose from video types: Flash, QuickTime, Windows Media Player, Shockwave, and Real Player.

To upload a Windows Media Player file, for example, the user need to providesa URL of the file. If the Windows Media Player file is on the user’s computer, then they first need to upload the file onto WordPress using the Media option found on the sidebar:

Media

Figure 18. Add new Media

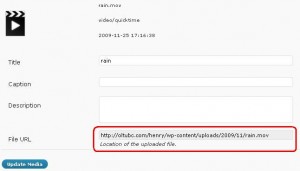
After the user uploads the video, they then copy the URL provided to the video upload menu to complete the upload. It is that simple.

Video URL

Figure 19. Video URL

Categories
Wordpress Plugin Check

Tabs

7.0 Tabs

7.1 Introduction

The Tabs Plugin gives users the ability to add content tabs. The tabs emulate a multi-page structure inside a single page. The purpose of using the tabs plugin is simple: to emulate a multi-page structure for plugins of the same category.

7.2 Instruction

Using and implementing the tabs is very simple, no programming is required. To create a tab, the user need only create the tag [tab: name] at the start of the specific plugin check.

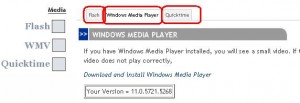
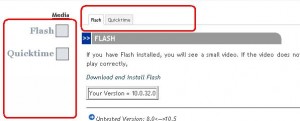
For example, to create the Flash tab, we add the tag [tab: Windows Media Player] in front of the plugin check content. As illustrated below:

tab

Figure 13. Tab

Once the tab is created in front of the plugin check content, creating the next tab will end the content. Like the above image, the windows media player content ends when the Quicktime tab is inserted. When we want to end the tabs for the post, we insert the tag [tab:END], like above.

tabs frontend

Figure 14. Tabs at front-end

Categories
Wordpress Plugin Check

Hide Posts/Plugins

6.0 Hide posts/plugins

6.1 Introduction

A key feature that has been implemented in the WordPress plugin check is the option to hide specific plugin checks. By doing this, we allow flexibility for back-end users to show only the plugins that they want to show to front-end users.

6.2 Instructions to hide plugin checks

To hide a specific plugin check, the user has to enter in [hidepost] and [/hidepost] around the plugin they do not want to include.

Example:

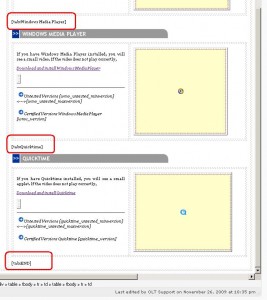
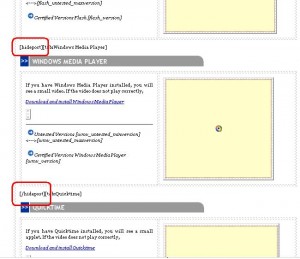
If the user wants to hide the Windows Media Player plugin check, they go to the edit post of “Media”. From here, in the Visual Editor, we add the [hidepost] tag to the front of Windows Media Player tab, and then add [/hidepost] into the end of the Windows Media Player table, in front of the next tab.

Below is an illustration of the process:

Hidepost

Figure 10. Hidepost Tags

Hide wma check

Figure 11. Hide Windows Media Player

Once the hidepost tags are added, the effect will take place when the user has logged out of the back-end and view the site as a normal user.

6.3 Instructions to posts

To hide a post, we can use the hide post option commonly found in every WordPress template.

Check private post

Figure 12. Hide Post – Check Private Post

Checking the “Private post” box will hide the post, in this case, “Media” from normal users.

Categories
Wordpress Plugin Check

Order Posts

5.0 Order Posts

5.1 Introduction

The Order Posts plugin serves the simple task of organizing the posts.

5.2 Instructions

To use the order posts, we only need to change the slug ID of each post. First, enter “Post” then “Quick Edit”. Once you click it, a new menu will appear, as illustrated below:

Quick Edit, Slug ID

Figure 9. Quick Edit, Slug ID

As shown by the image above, a Slug ID can be modified; this is the value you change to order the posts. First post is 1 and second post is 2, and so on. For example, if you want the first post to appear in the plugin check to be “Media”, then you would change Media slug ID to 1 and change the remaining posts from 2 and onwards.

Categories
Wordpress Plugin Check

Rotating Posts

4.0 Rotating Posts

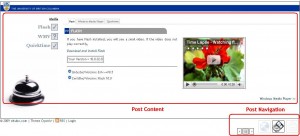
The purpose of using rotating posts for our Plugin Check website is to allow a simple and efficient navigation system between posts. The rotating posts creates a window that displays the full content of the post.

Here is a screenshot of the rotating post in action:

Rotating Posts

Figure 7. Rotating Posts

The Rotating Post plugin comes with a navigation bar and a display for the post content. Users can use the navigation bar to either go from post-to-post or skip to a specific post by clicking on their corresponding thumbnails.

Unlike many other post slideshow plugins found in WordPress which displays either a certain amount of the post content or only the excerpt, the rotating post plugin displays the post content as if the user is within the post’s link. However, the greatest asset of the rotating post plugin is its ability to maintain the options of the post template. What does this mean? It means that users who have no experience with HTML but wish to remove certain plugin checks from the website can simply use the hide option found in every post to remove it from a common user’s view. This, in return, allows maximum flexibly for administrators and editors to modify the plugin check to their own liking, without knowledge of HTML and Javascript coding.

4.1 Programming Description

Using this plugin did not require any manipulation of existing HTML code except for adding this code snippet:

<?php rotating_posts(); ?>

into the contents of your theme. Preferably, the code snippet should be placed in the Main Index Template (index.php) of your theme, like so:

<?php

/**

* @package WordPress

* @subpackage Gold_Pot_Theme

*/

get_header();

?>

<div <?php post_class() ?>>

<?php rotating_posts(); ?>

</div>

<?php get_footer(); ?>

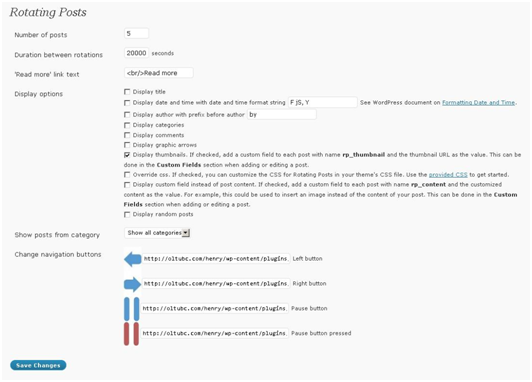
Once placed, the rotating posts plugin provides the user with an extensive list of options to modify its properties, all of which users inexperienced in HTML and Javascript can easily understand.

Rotating Posts Options

Figure 8. Rotating Posts Options

In conclusion, the purpose of the Rotating Post plugin is to provide a simple and efficient navigation system for users using the webpage. Its greatest strength is displaying the full contents of the post while keeping the posts template options.

Categories
Wordpress Plugin Check

Changeable untested version using AnyVar

3.0 Changeable untested version using AnyVar

3.1 Introduction

Similar to changing the certified version, users can change the range of untested plugin versions using AnyVar.

3.2 Instructions

Changing the untested range is as easy as changing the certified version. The only difference is that you need to change the untested_minversion and untest_maxversion.

For example, in the AnyVar variable list, there are the variables java_untested_minversion and java_untested_maxversion, as illustrated below:

AnyVar Untested Version Variables

Figure 5. AnyVar Untested Version Variables

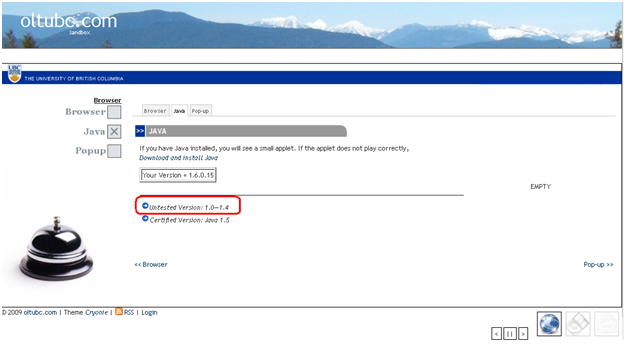
Changing the minversion variable to “1.0” and maxversion to “1.4” will correspond in the front-end as seen below:

Untested VersionFigure 6. Untested Version

If the user is using a java version that is within the untested range but do not have the certified version, a question mark will appear on the Java sidebar.

3.3 Programming Description

The programming of the untested range of plugins is implemented by simple if and else statements.

function javac() {

var version=parseFloat(PluginDetect.getVersion (“Java”));

if (version==[java_version])  {

document.getElementById(“javab1″).src  =”http://oltubc.com/sandbox/images/javacheck.bmp”;

} else {

if(version >=[java_untested_minversion]){

if(version <=[java_untested_maxversion]) {

document.getElementById(‘javab1’).src =”http://oltubc.com/sandbox/images/javaquestion.bmp”;                         }

else                  {                      document.getElementById(“javab1″).src  =”http://oltubc.com/sandbox/images/javacross.bmp”;              }

}

else      {          document.getElementById(“javab1″).src=”http://oltubc.com/sandbox/images/javacross.bmp”;           }

}

}

The start of the code is an if statement that checks if the plugin version equal to the certified version created by the user using AnyVar, if so a check mark will appear of the plugin sidebar. If not, if the plugin is in the untested range, then a question mark will appear. If not within the range, then a cross mark will appear indicating that the plugin version being used is not certified and untested.

Categories
Wordpress Plugin Check

Changeable certified plugin version using AnyVar

2.0 Changeable certified plugin version using AnyVar

2.1 Introduction

The back-end of the WordPress Plugin Check allows users to change the certified version of each plugin. This is accomplished using the AnyVar plugin. AnyVar can be accessed under “Tool” in the sidebar.
AnyVar interface

Figure 2. AnyVar Interface

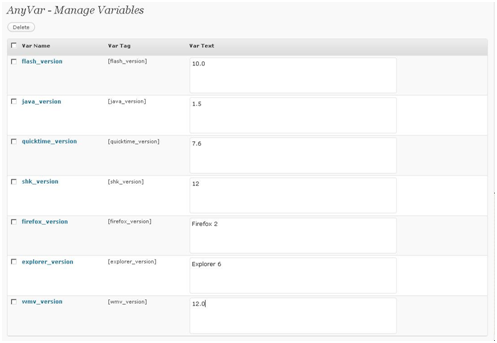
The image above shows the interface of AnyVar. To use AnyVar, we must first create a desired variable, for example [java_version], and place this tag within our HTML code. Luckily, the site developer has already done this, so we do not need to worry.

2.2 Instructions

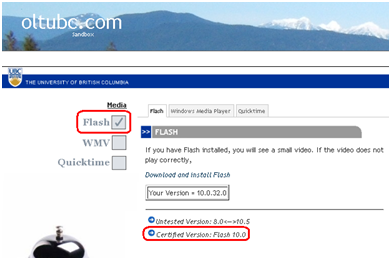
Each of the plugins are clearly listed: flash_version, java_version, etc. These variables each accompany with them a value displayed on the right textbox. This value is the certified version of the plugin. For example, flash_version has a “10.0”, this means that the certified version for the flash plugin check on the front end is “10.0”. If a user has Flash “10.0”, a check mark will appear on the front end like so:
Certified Version

Figure 3. Certified Version

This variable is completely changeable to any the user desires. If the user wants to change the certified flash_version to “9.8”, he/she needs only to click on the variable, and then a new page will show allowing them to enter in the new number. Similar to the image listed below:

Change certified version

Figure 4. Change certified version

Once changed, the front-end of the plugin check will also act accordingly, showing a check if the user has Flash 9.8 installed.

2.3 Programming Description

AnyVar is a plugin that allows the modification of user created tags. The greatest asset for this plugin is in the implementation of the plugin version. Developers can create a tag like [java_version] and insert it into the HTML page, then users can modify that variable to any number they want by using the intuitive interface provided by AnyVar.

Here is an example of the AnyVar plugin in action within the Plugin Check code:

<script type=”text/javascript”>

function flashc(){

if(PluginDetect.isMinVersion(“Flash”,[flash_version])==1) document.getElementById(“flashb1″).src =”http://oltubc.com/sandbox/images/flashcheck.bmp”; else document.getElementById(“flashb1″).src =”http://oltubc.com/sandbox/images/flashcross.bmp”;

}

</script>

As you can see within the “if” statement, we imbedded the tag [flash_version]. To explain in detail, if the flash version is not greater that the version stated in the tag [flash_version], and then the image id “flashb1” will show a cross, indicating that the version installed in your browser does not meet the minimum version required by the plugin check.

Therefore, in conclusion, the purpose of the AnyVar plugin is to allow modification of the required plugin version without the experience of any HTML or Javascript programming, that is its greatest asset, and the reason we use it.

Categories
Wordpress Plugin Check

Introduction

1.0 Introduction

The back-end of the WordPress plugin check allows users to customize the plugin check with the aid of some very intuitive plugins (explained in detail later). The benefit of using plugins allows users unfamiliar with HTML and Javascript programming to customize the features of the plugin check. Here is a list of features that allow modifications by users from the back-end.

1.1 Login

To login to the back-end of the WordPress plugin check, click the login as illustrated below:

Login

Figure 1. Login

1.2 Features

  1. Changeable certified plugin version using AnyVar
  2. Changeable untested version using AnyVar
  3. Rotating Posts
  4. Order the posts (Internet,Media,Contact) with quick edit (slug)
  5. Hide Posts/Plugins
  6. Tabs
  7. Easy upload of videos, TinyMCE
  8. Customizable contact form

Each feature listed above will be explained in detail in this report.

1.3 Limitation

  1. Mouseover to load plugin check
  2. Order of tabs require users to change arrangement of HTML code
  3. Browser Detect does not give detailed browser version

Spam prevention powered by Akismet