Week 9 (May 25th-28th)

I have completed my last week of full-time teaching! I still remember how overwhelmed and anxious the thought of a 10-week practicum sounded back in March, but it also feels like it went by within a blink of an eye. Lots of collaborative activities occurred this week. Continue reading to learn more!

Unit of Inquiry:

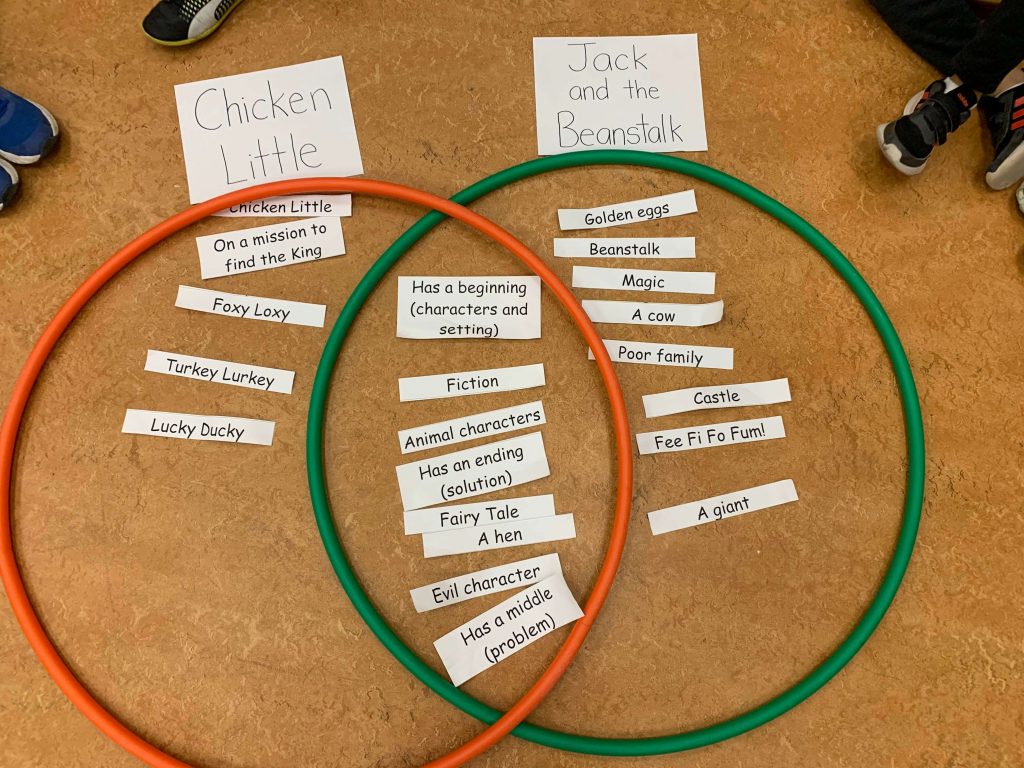
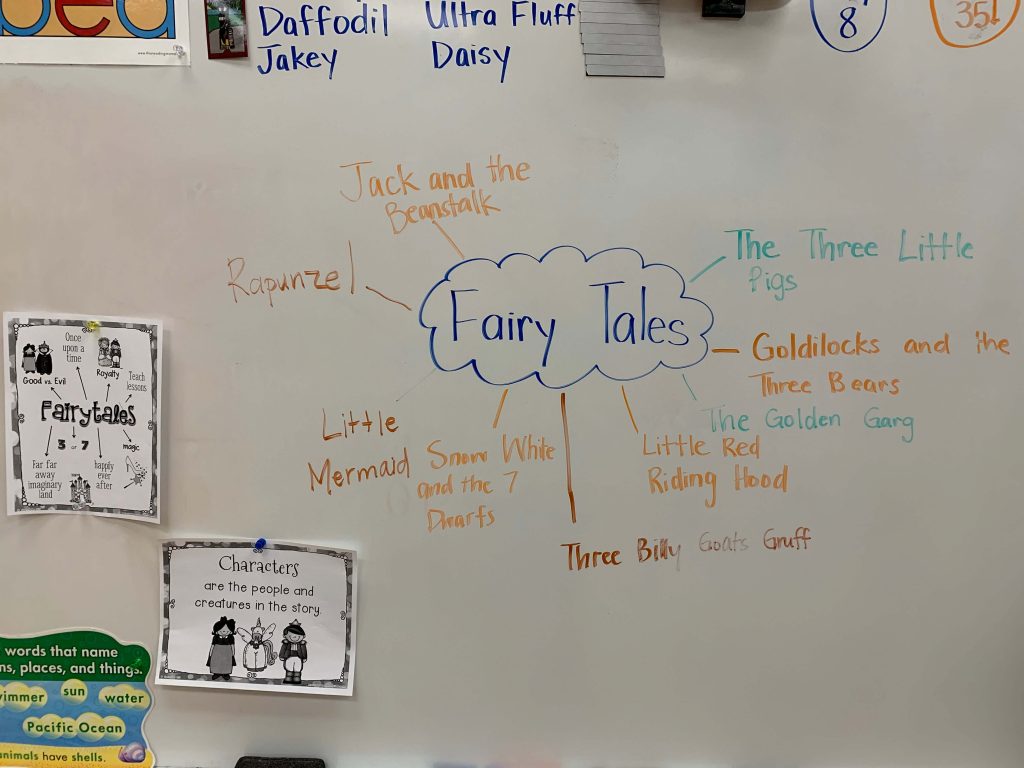
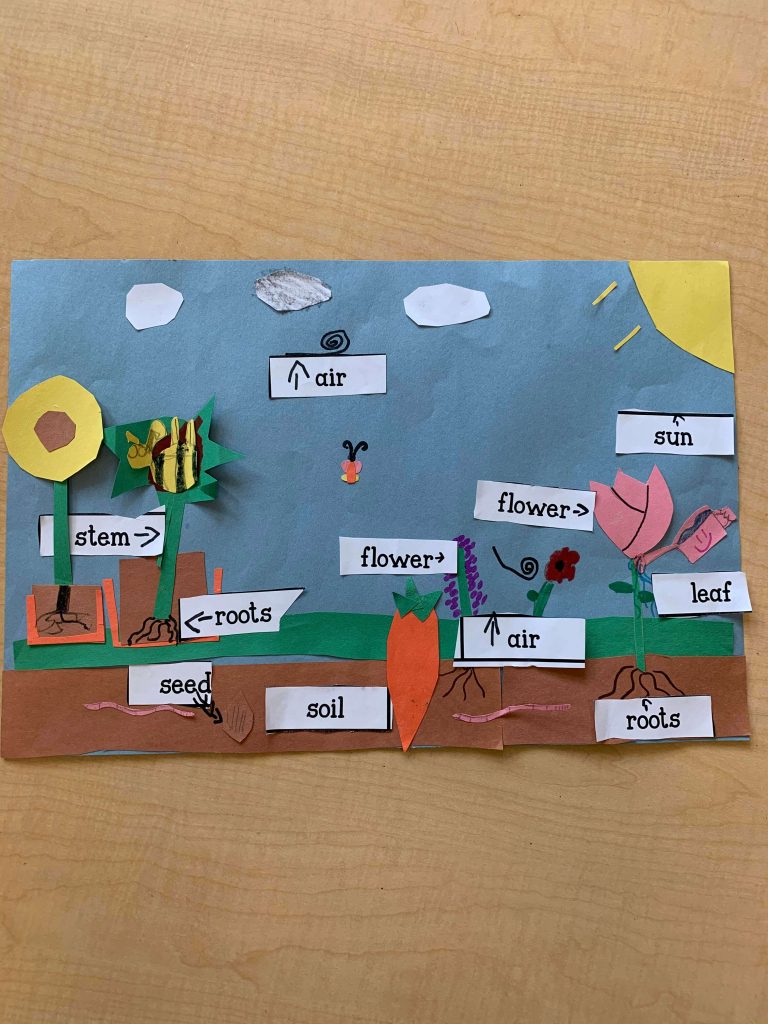
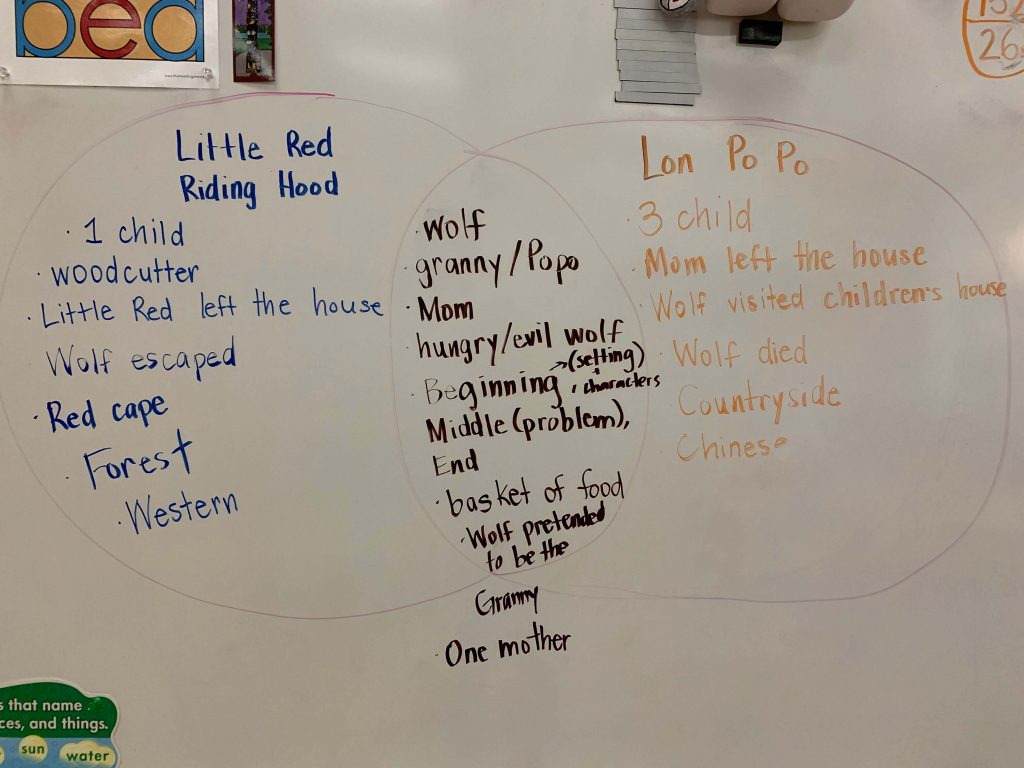
For our fairy tale of the week, we focused on Little Red Riding Hood. On Tuesday, I read the original fairy tale and Lon Po Po, a Chinese version of it. Students got to listen to the same fairy tale, but were written from two different cultures. After reading both stories, we engaged in a Venn Diagram on the white board. I organized a Think/Pair/Share as students paired up and got to share the similarities and differences between the two stories. This was a great example to demonstrate to students that traditional stories (fairy tales and legends) have been told for hundreds of years in every culture. This was the Big Idea for our current Unit of Inquiry. 

*Reading the words in the picture, I now see a spelling mistake. It should say 3 children, not 3 child. Teachers make mistakes, too!

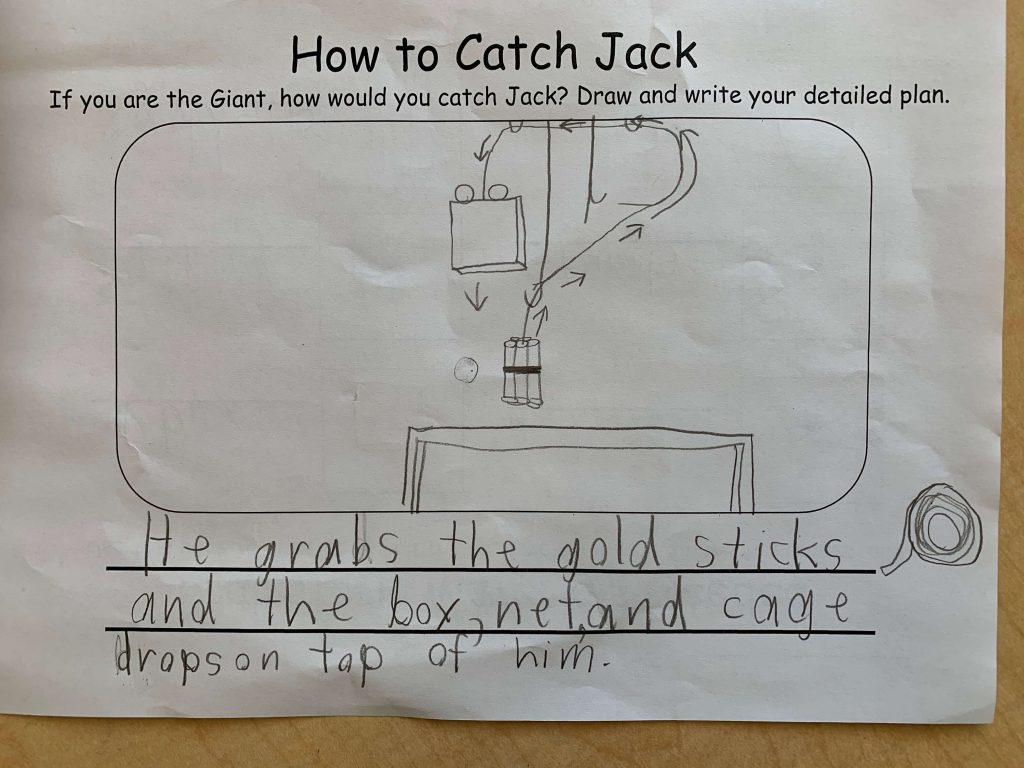
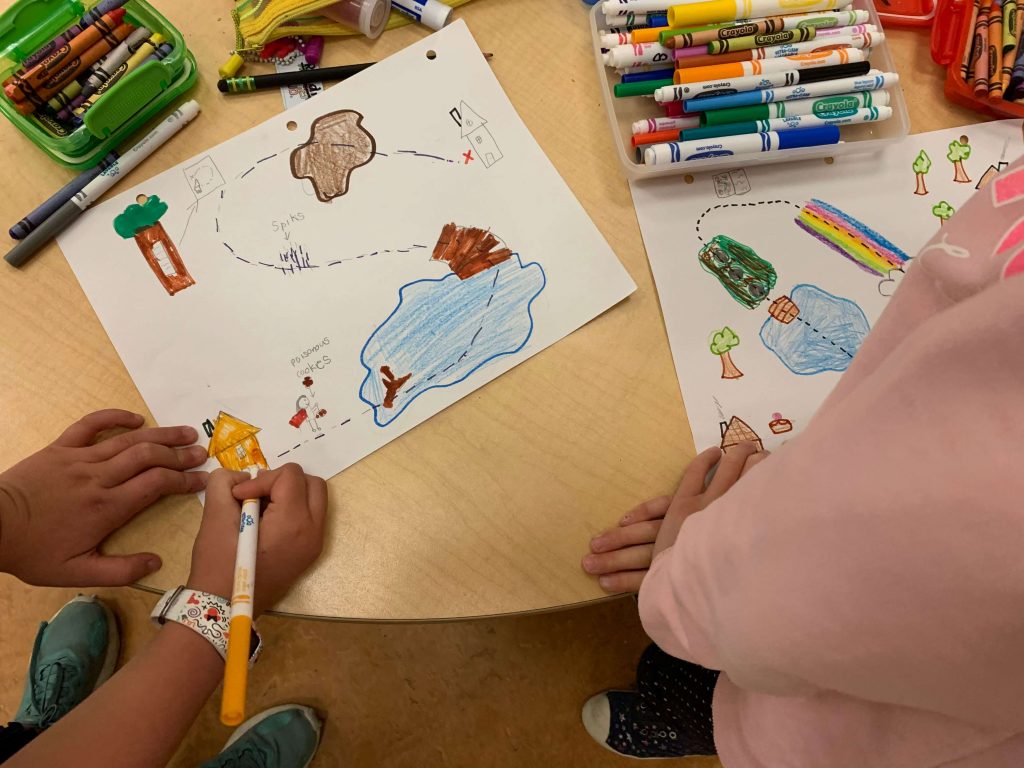
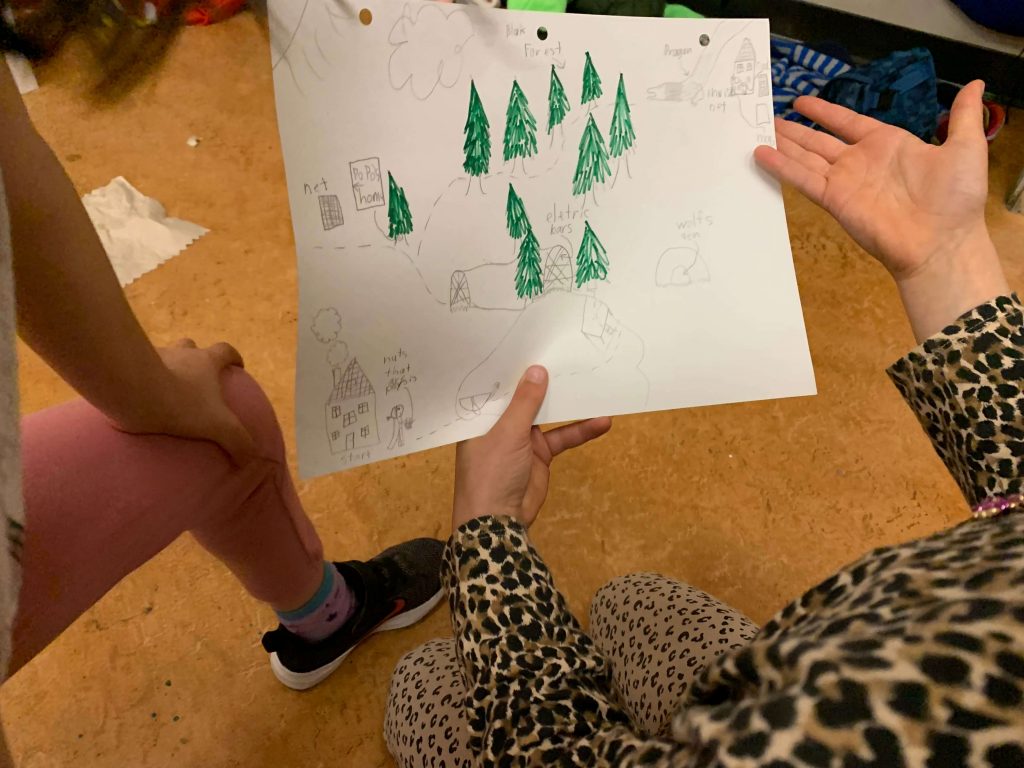
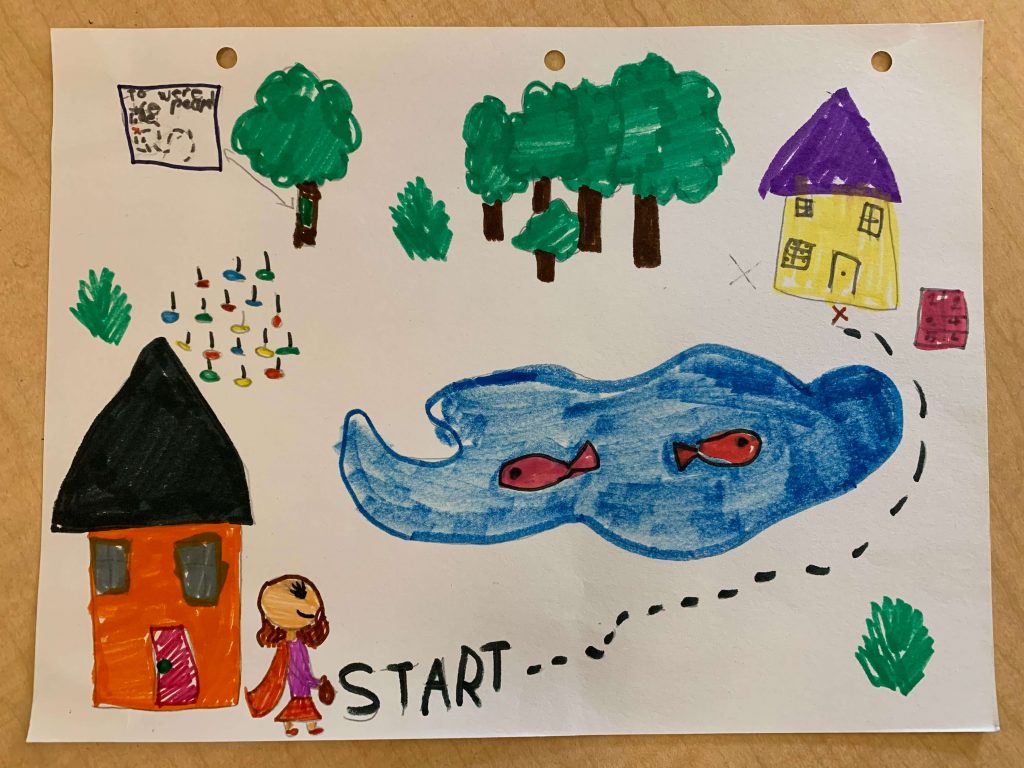
On Wednesday we played with our creativity and imagination. Students were required to create their own Map that started from Little Red Riding Hood’s home to Grandma’s home. However, they also had to develop at least 2 tools/gadgets that would help keep the wolf away from Little Red Riding Hood and Grandma’s home. I drew an example to show the students. On my map, I created 3 tools/gadgets:

  1. A poisonous cookie to give to the wolf that would make him fall asleep.
  2. If the wolf woke up and met Little Red Riding Hood later on down the trail, there would be a poster hammered to the trees in the forest. The poster would be an illustration of a false map to Grandma’s house! 
  3. A fingerprint scanner on Grandma’s door that only Little Red Riding Hood and Grandma know the code to.

The students were ready to create their own map after seeing my example. After they were given ~20 minutes to make their map and tools/gadgets, students got to pair up and present their work. Many of the students’ creativity exploded which is evident in their drawings. I definitely wouldn’t want to be the wolf in their story!

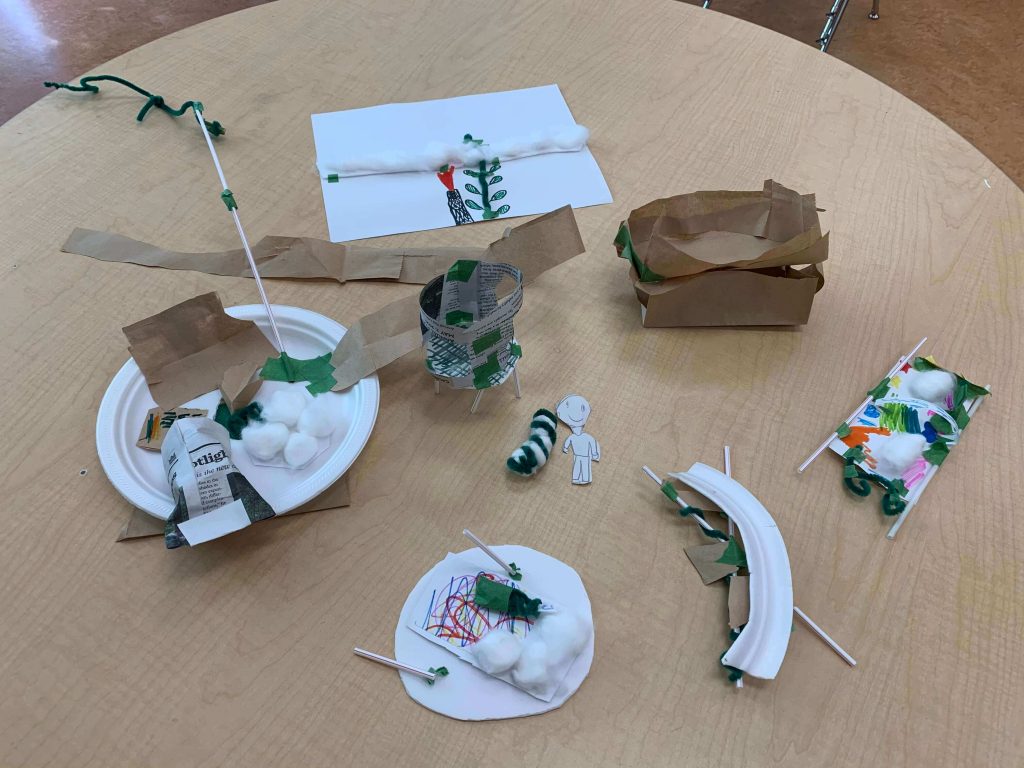
On Thursday the students engaged in a STEM activity connected to Little Red Riding Hood. Students had to work with their table group to create one object that would help get the basket of goods from Little Red Riding Hood’s home to Grandma and avoid the wolf. My example for the students was a flying robot. The robot stored the basket of goods in one of its compartment. There was also a button, if pressed, that releases a stinky odor and would make the wolf run the other way. I was very impressed at how engaged the students were. At the end, we sat in a community circle and each table group presented their creation.

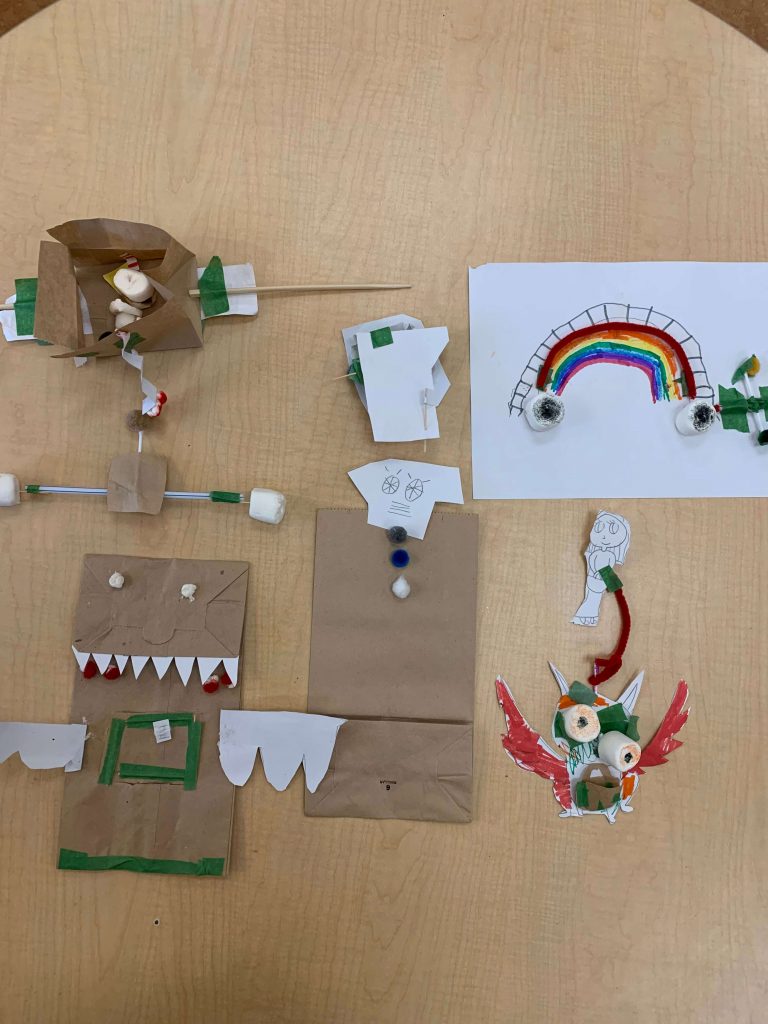
From the top left (clockwise): zip line, teleport and a back up robot (right below it), rainbow slide and catapult, flying dog with a leash (and Little Red Riding Hood), and a flying dragon with wings to fend off the wolf!

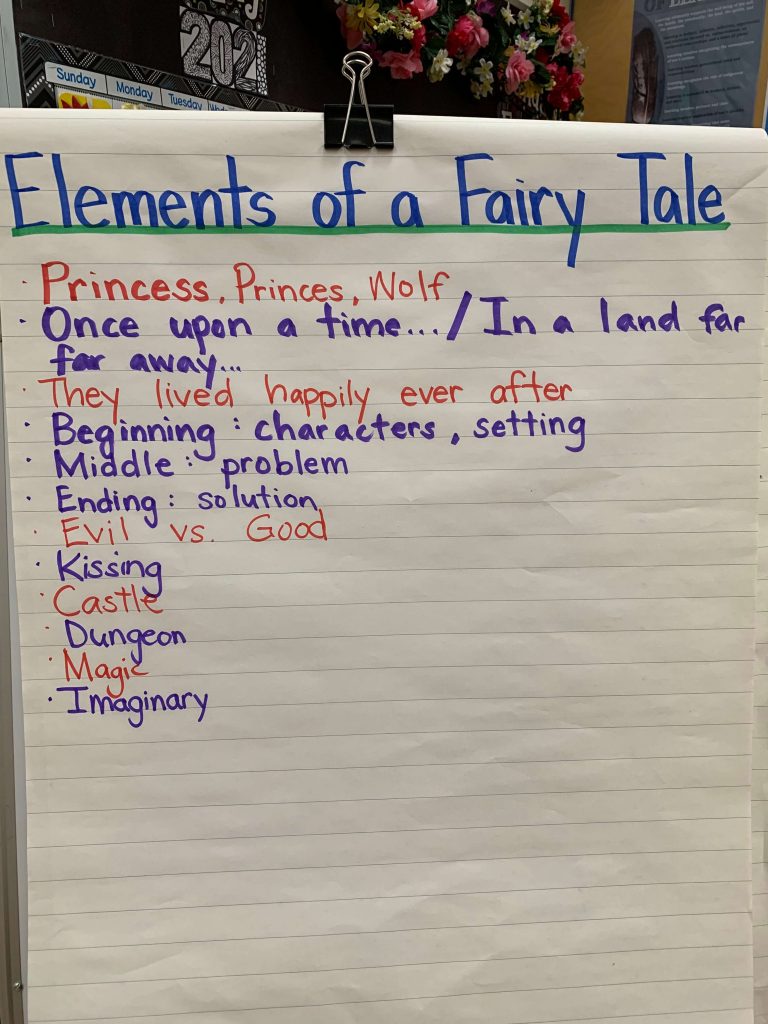
On Friday I shared two Coast Salish legends that were from Strong Nations, written by Celestine Aleck. They are called The Great Trade and The Great Blanket of Moss. After reading each story, students turned to a neighbour and discussed the beginning (characters and setting), middle (problem), and end (solution). We also shared the different messages and lessons that we interpreted from both stories. 

Art:

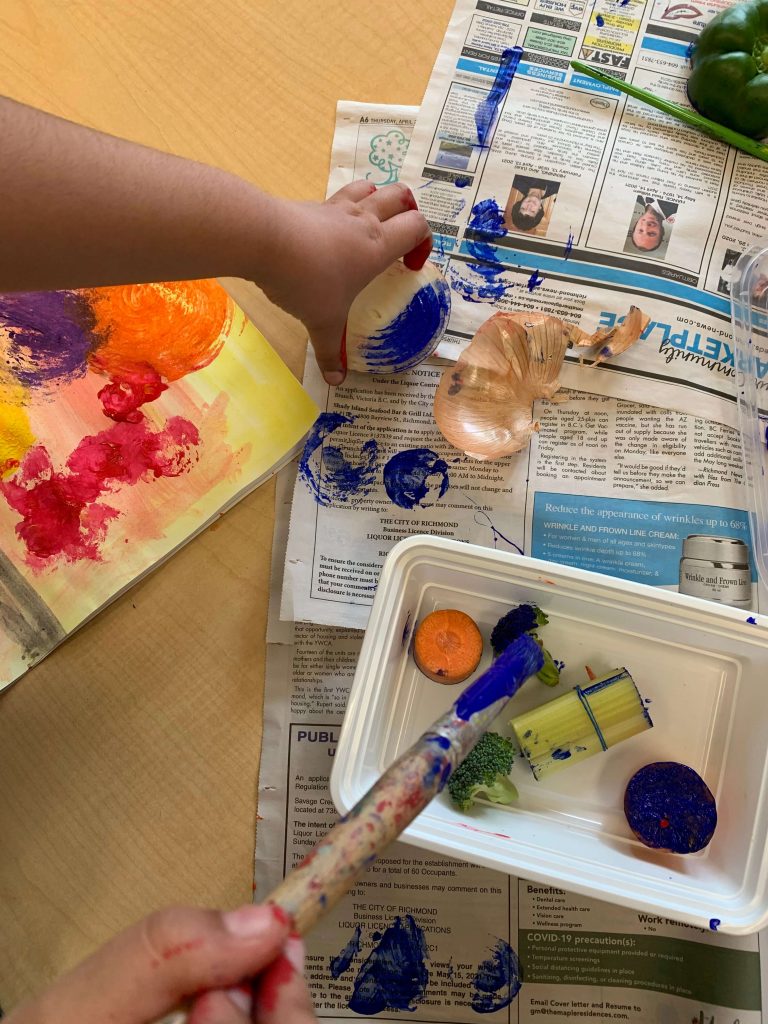
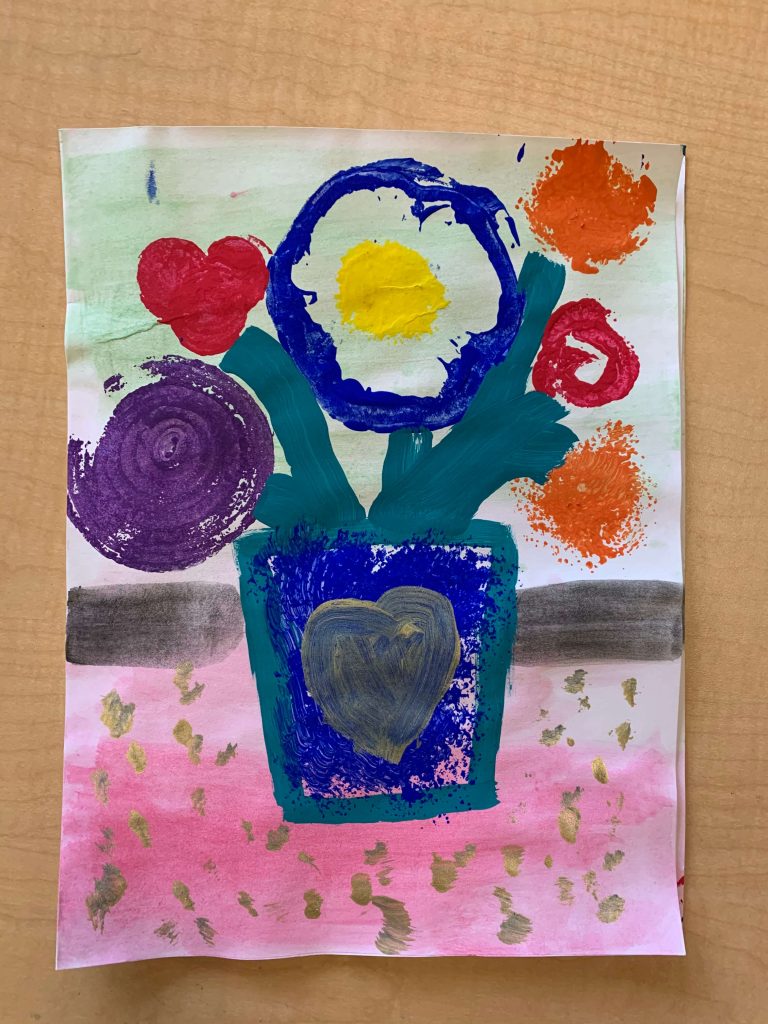
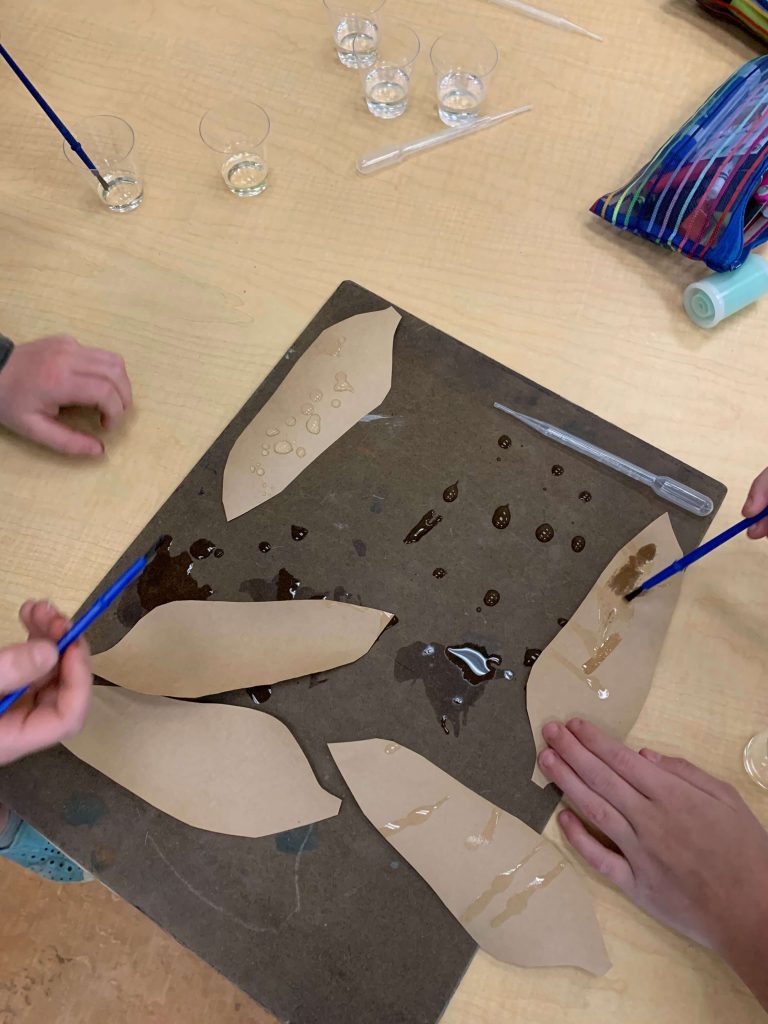
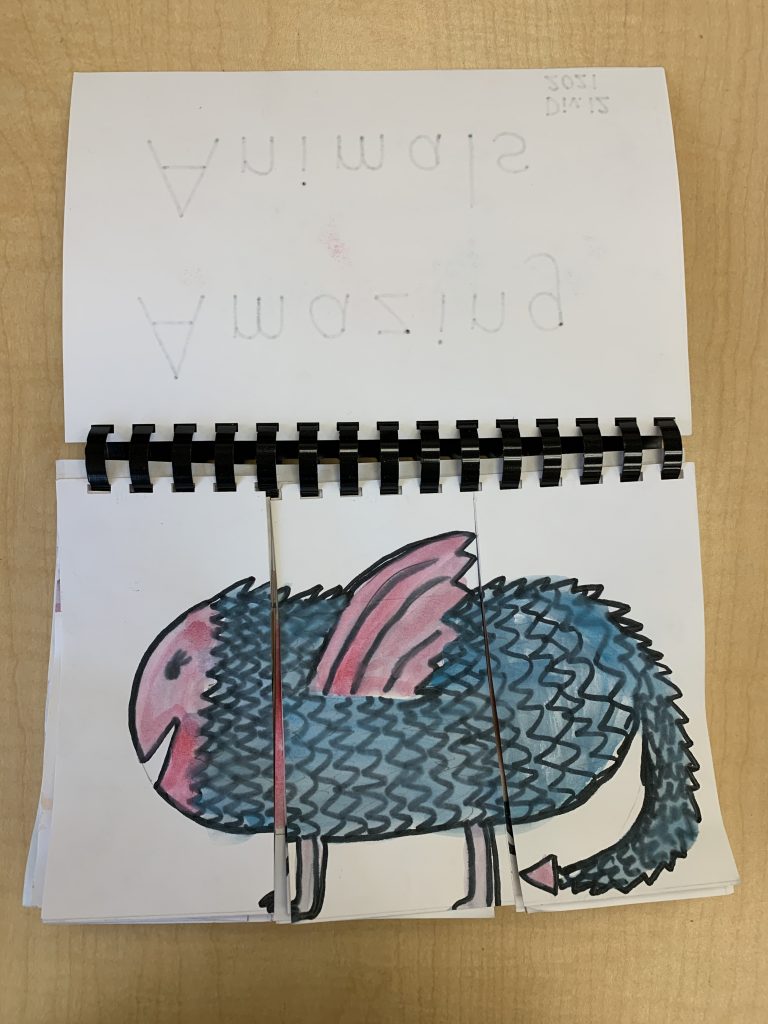
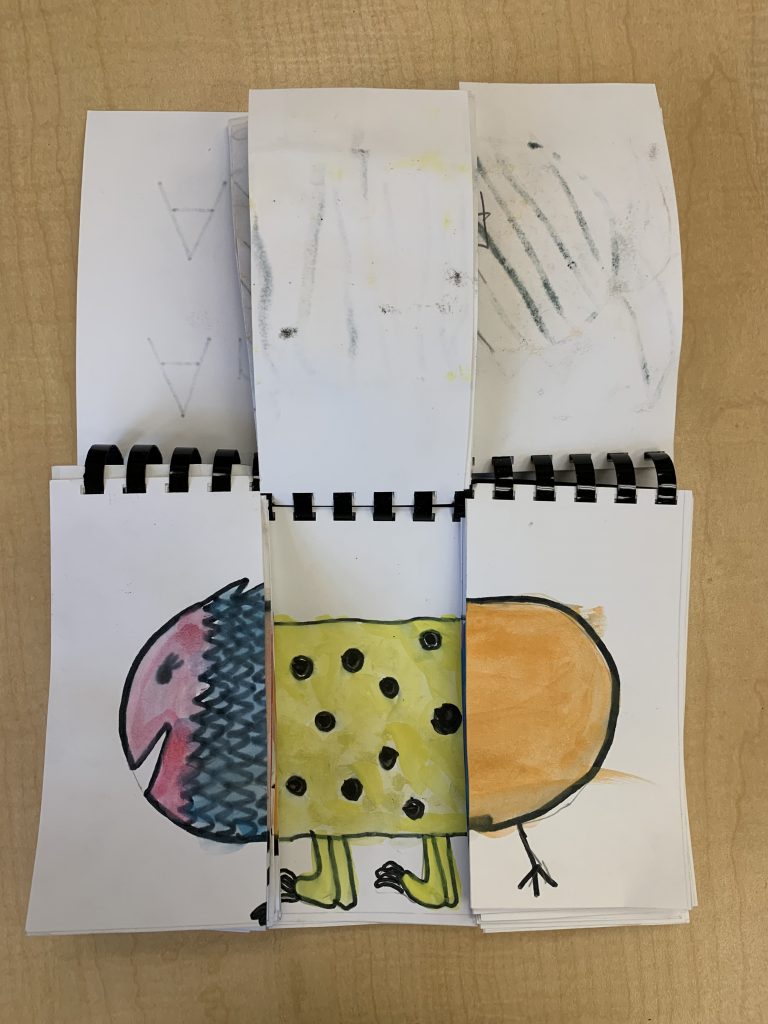
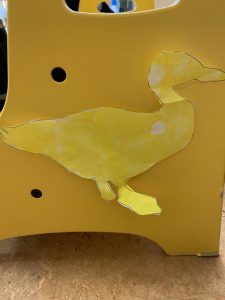
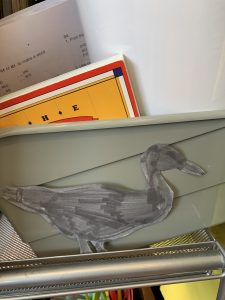
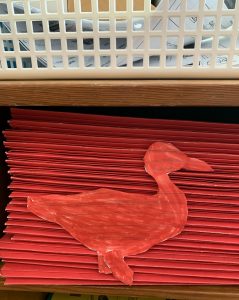
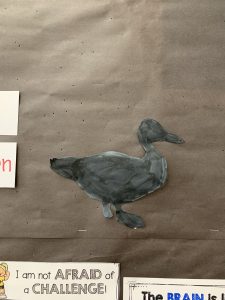
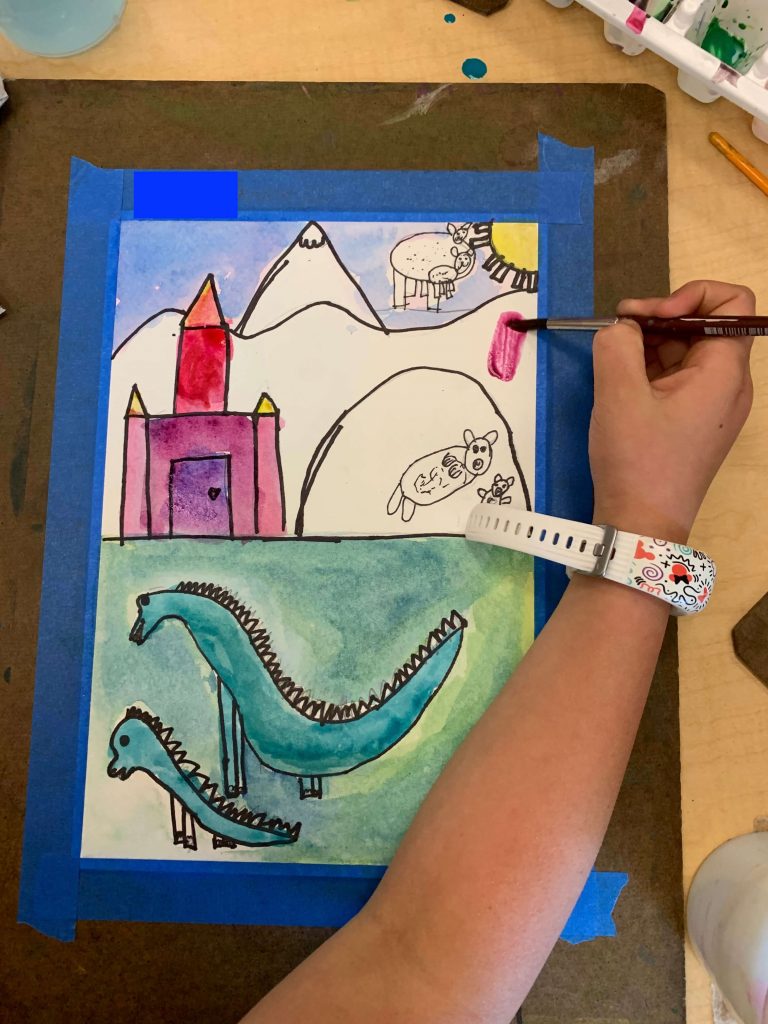
Students have been engaged with the Firefly Project, a program through the Presentation House Theatre that some primary classes got a grant from, for a few weeks now. Manami, Director of Applied Theatre Arts, works with each student one on one to create their own story. Each of their story will get printed and published and a copy of it will be taken home to them while a class book will be made for the teacher. Manami also organizes and leads two drama classes to each participating class. As well, Liz, an artist, leads two visual art classes. We had our visual art classes this week and the student used watercolour to illustrate their story cover on cardstock paper.

As my practicum in the classroom begins to wind down, I look forward to my community field experience opportunity within the next few weeks. I will be shadowing and helping the VP as a Learning Support Teacher (LST) to provide support to students. I will also be visiting other classrooms gathering insight in to how other teachers teach and create and maintain their classroom environment.

-Ms. Mah


Week 8 (May 17th-21st)

We had another great week that was filled with lots of engaging activities. Continue reading to learn more.

Art:

My SA suggested the idea of an animal mash-up art activity as she already had a lot of animal pictures and background cardstock that was available. As an introduction, I showed the students an example I made combining a geese’s head and wings with the body and legs of a cheetah. This art activity required students to justify why they created their animal mash-up as a way to focus on animals’ structural features. For example, I wanted to create an animal that could run away fast from predators, run fast to catch prey, and be able to fly and look from high above. Students were extremely engaged in this activity and their animal mash-ups were fantastic! Which ones make you smile?

Animal Mash-Up

This week’s main fairy tale was Jack and the Beanstalk. After reading one version of the fairy tale, the students engaged in a hula hoop Venn Diagram. We compared the fairy tale Chicken Little to Jack and the Beanstalk. Sitting in a community circle each student got one piece of paper that stated something that belonged somewhere in the Venn Diagram. I liked this format more than using paper and pencil because students were invited to engage in discussions regarding where they thought their piece of paper should go, building off of others, and making connections.

Unit of Inquiry:

It was a bittersweet week as we had to say good-bye to the ducklings. From receiving the duck eggs on April 7th to watching them hatch out of our their eggshell and taking care of them, we were sad to see them go because they have become part of our class community. For our last activity with the ducklings, we sat in a community circle on the grass field and let the ducklings roam around and eat the grass. So many of the students thoroughly enjoyed it!

The students made cards to give to the people from the farm where the ducklings went back to. They were very thoughtful in their messages and grateful to have had such an amazing and humbling experience. 

I introduced and retold the Squamish Flood Legend to the students while we sat in a community circle. As a follow-up activity, the students were instructed to work together in their table groups to create one part of the legend. We discussed the beginning, middle, and ending of the legend thus, reiterating elements of a story. Each table group was assigned one significant scene from the legend to illustrate. This was another successful collaborative activity!

After reviewing Jack and the Beanstalk, by reading the students another version of the fairy tale, the students pretended they were the giant or ogre and had to devise a plan to catch Jack. As this was an individualized activity, students had to write how they were going to catch him and accompany it with a picture. This activity invited lots of creativity and the use of imagination. As a wrap up, we sat in a community circle and each student got the opportunity to present their work.

The students engaged in a STEM activity. We pretended that Jack, from Jack and the Beanstalk, was scared of heights and was too afraid to climb the beanstalk. So, in table groups, students had to work together to create one object that would help Jack get to the top of the beanstalk without climbing. I made an example to show the students which was a rocket backpack. I made the backpack out of construction paper and tape and used two pipecleaners as the straps. I coloured and taped on fire that came out of the backpack and added four cotton balls to the sides of the backpack. The cotton balls were for if the rocket failed, they would make contact with the ground and serve as a soft landing and bounce him all the way to the top. The students were very created! Check out their creations below.

Clockwise from the top: Dragon transformer, 2-part rocket ship, a sled with a seatbelt, UFO, teleport, and trampoline.

Math:

As we wrapped up the unit on subtraction, we moved on to reviewing various math units. This week we focused on Measurement. Connecting it to our Unit of Inquiry, we created a height beanstalk. The students cut out a leaf template and paired up to measure each other’s height using a tape measure. Each student used the unit, centimetre, to measure their their partner’s height. Our beanstalk was made out of construction paper and we rolled it up and taped it to a wall. I forgot to take a picture of it and have taken it down from the wall as we are moving on to a different math topic next week.

We also engaged in a paper airplane activity whereby the Grade 1s made theirs with construction paper while the Grade 2s made theirs with newspaper. The students made a prediction on which material would fly the farthest. We went on the grass field and the students helped me make a baseline and benchmarks using cones. I used a tape measure to describe the importance of a baseline and on each side made benchmarks of 1 m starting from 1-10. Each student had four attempts and after each of them, they had to think of a way to change their airplane to improve their distance.

Next week will be my final week of full-time teaching before I start decreasing my teaching time and responsibilities. I’ve said it before but I’ll say it again, it’s crazy how fast time flies! 

-Ms. Mah

Week 7 (May 11th-14th)

This week we started our new Unit of Inquiry which is Storytelling! Although I am nearing the end of my full-time teaching, I am enjoying planning for this new unit. I will try to keep this week’s blog post short and sweet.

Unit of Inquiry:

As a provocation to our new Unit of Inquiry, Storytelling, I provided each table group with various pictures associated with fairy tales and legends. This included wizards, magic wands, step mother and step sisters, king, queen, princess, prince, witches, dungeons, castles, glass slipper, fairy godmother, raven, sun, and many more. Students were asked to work together to make inferences on what their next U of I would be. We then sat down and discussed that our new U of I is Storytelling. Students will continue to engage in two types of storytelling: fairy tales and legends. 

Each week, we will focus on one main fairy tale. This week we focused on Chicken Little! 

As a formative assessment, students brainstormed fairy tales they knew and what fairy tales have in common.

On another day, I read the original story of Chicken Little to the students. As a follow up activity, they worked in groups to identify the elements of the story: Beginning (characters and setting), Middle (problem), and Ending (solution). 

It was a very nice week, in terms of weather, as I took the students outside on our school ground to introduce legends. We discussed the importance of legends to Indigenous peoples and that traditionally they are retold and shared orally. I read Strong Stories Coast Salish: The Sun and the Moon by Celestine Aleck and illustrated by Cole Good. The students discussed how legends can be a way of explaining how something came to be or can provide a lesson. I also informed the students that Indigenous peoples legends are sacred to their culture and those who hold the power and responsibility of sharing a legend, most likely an elder, carries a lot of weight to not only make sure it is retold accurately but that it isn’t told by any who are not allowed. My SA informed me that any legends that are authentically sourced by Indigenous peoples that are published or shared orally can be retold orally to others.

My favourite lesson from last week was the students creating their own ending to Henny Penny, an alternative version to Chicken Little. I read Henny Penny to the students and then they were instructed to work in groups to draw and write what happened to Henny Penny and her friends after getting trapped in Foxy Loxy’s home. Students had the choice of either acting it out or retelling their ending in a community circle. Below are some of their creativity and imagination!

This past week the students were Duck Ambassadors which meant they presented to various classes in our school about duck and egg hatching facts. The students adore the ducklings and have enjoyed their time with them in our classroom. We will be saying good-bye to them this upcoming week. I’m planning on having the students create their own good-bye cards. A fun activity we engaged in was putting two ducklings in a tub of warm water at once and watching them dive to eat peas and mixed greens. So cute!

Thanks for reading my blog post!

-Ms. Mah

Week 6 (May 3rd-7th)

What an exciting Week 6! All six of our ducklings hatched and we even got to see one hatch with the students! They hatched on May 4th and 5th. I’m so glad that I decided and was able to take care of living things during my practicum because it provides a richer experience, both for the students and myself. After all of the ducklings hatched, the class got to share their name suggestions and we did several rounds of voting. In the end, we decided fairly upon Fluffy, Daffodil, Jakey, Fifi, Ultra Fluff, and Daisy.

Students sitting in a community circle watching a duckling hatch.

Students sitting in a community circle while the ducklings explored a bit outside of their brooder. We were firm that no students could touch the ducklings.

Art:

We explored vegetable printing to create our Mother’s Day cards! Students used a variety of vegetables and fruits such as bok choy, carrots, onions, peppers, broccoli, and celery.

Students had the choice of writing either a Haiku or Acrostic poem for their Mom. They glued it inside their Mother’s Day card.

Exploring with vegetable printing.

Mother’s Day Card with vegetable printing.

Unit of Inquiry:

As a summative assessment, students worked together in table groups to design their own garden. Each were required to design their own plant while also ensuring that each group included at least one root vegetable (something we’ve discussed previously). Students were provided labels they had to attach to their plant and garden. Once completed, students sat in a community circle and each group got to present their garden. It was a great collaborative activity!

A table group’s garden design.

This week students became scientists and engaged in several science experiments that examined different animals’ structural features and behavioural adaptations. Some experiments/stations included observing the difference between webbed and non-webbed feet, exploring the functions of different types of beaks (scoopers vs. pincers), how blubber plays a key role for animals that have it, animal coverings and how it helps them survive in their environment, and how water and oil interact on feathers (waterproof feathers!). 

Webbed feet vs. non-webbed feet.

Scooper vs. pincer beaks

Oil and water feathers.

Animal coverings and their environments.

Blubber vs. naked hand in cold water.

I organized another summative assessment, but this time it was individual. The students were instructed to cut, glue, and classify all the animal pictures under the correct classification. On the back of the Grade 1’s worksheet, they were instructed to choose an animal of their preference and write a structural feature they have that helps them survive in their environment. On the back of the Grade 2’s worksheet, they were instructed to choose an animal of their preference and draw and write the life cycle of that animal.

This was also the last week of our Unit of Inquiry on Living Things. To wrap it up, I thought it would be great to engage the students on the concept of pollination. This would invite students to make connections about how plants and animals are dependent upon each other. For this lesson, I made a PowerPoint and started off with introducing some arthropods like ladybugs, flies, moths, butterflies, and bees. We discussed what insects have in common (head, thorax, abdomen) and how many go through either complete or incomplete metamorphosis. To make a connection to pollination, I showed the students different insects and asked what is another thing they all have in common. One student was able to make the connection that they all pollinate! I introduced the concept of pollination, when a pollinator carries a pollen of grain from the male part of a plant to the female part of the same plant. We also examined the anatomy of a flower. I incorporated a movement-based learning activity to wrap up the lesson whereby each Grade 2 student was given a flower card with clues regarding what specific pollinator they prefer. This activity is called Pollinator Restaurant. While the Grade 2s were instructed to take their flower picture card and colour their petals accordingly, I sat down with the Grade 1s to review the different pollinator picture cards that would be handed out. I informed the class that the Grade 2s were the servers at the restaurants as they would be standing at a table holding up their flower card. The Grade 1s were the customers, pollinators, and mingled with the server(s) at each restaurant to determine which flower they matched best with! The students were engaged and had fun trying to figure out their match.

That completes my Week 6 blog post! I’ll be starting my 7th week of practicum. Crazy how time flies. Thanks for taking the time to read. 


-Ms. Mah

Week 5 (April 26th-30th)

This week flew by! It was my first week teaching full time and I enjoyed it, although there’s definitely an adjustment regarding an increase in responsibility and organization. I’m continuously thinking and planning two steps ahead, especially if an unexpected event occurs; being flexible and adaptable is key to successful teaching.

This week I took on the final unit, Language Arts. For our Unit of Inquiry, we explored similarities and differences between offspring and parent, extended our learning on living things by going on a nature walk to release salmon fry, and explored the concept of photosynthesis. Read on to learn more about what we engaged in.

Art:

The students created an animal flip book! This was an idea I got from my SA and wanted to reproduce with our students this year. Each student was given the same size rectangular piece of vellum paper. I drew an oval using a pencil and divided the paper into thirds. I then labelled each section, from left to right, as “Head”, “Body”, and “Tail.” The students were instructed to choose a different animal than everyone else and make sure their structural features were drawn in the appropriate sections (i.e., nose, ears, mouth, legs, wings, tail, etc.). They used a pencil to draw their animal and then outline it with a black marker. Once complete, they experimented with watercolour to paint their animal. A few days later, after they were completely dried, I used a cerlox machine to bind them. Then, I cut each students’ animal into thirds. Below is the finished product, whereby students are able to randomly flip each three sections to create a uniquely looking animal.

Math:

The bean bag math activity I engaged the students in a few weeks ago was a success. I wanted to bring math outdoors again and take advantage of the warmer and dry weather. For each grade I drew two separate boxes. The first box for each grade includes only minuend values. The second box for each grade includes only subtrahend values. This activity focuses on subtraction, as that is what we have been practicing for several weeks. In pairs within their grade, each partner would take a turn throwing a bean bag onto one of the grids. They would create a subtraction problem and have to solve it. Although it takes me approximately 10 minutes to set up, drawing the grids using chalk, it is definitely worthwhile in my opinion. 

Language Arts:

Taking on Language Arts for my first time this week went smoothly. For Language Arts, we have literacy stations from Monday to Thursday. There are seven stations and seven table groups, so it works out perfectly. Each group must complete each station by the end of the week. There will always be a phonics, journal, and guided reading station. I led guided reading and it’s been enjoyable thus far. As April is Poetry month, students were introduced to Acrostic poems. One of the stations required students to create their own Acrostic poem. At the beginning of the week, I discussed the format of an Acrostic poem and we collaborated as a class to create one. 

The left side shows students’ ideas of what they associated Winter with. On the right is our Acrostic poem.

Unit of Inquiry:

One of the Kindergarten classes at our school got salmon fry from a hatchery and was going to release them in the nearby creek. They kindly extended an invitation to our class to release some of the fry and we happily agreed! Since we explored the life cycle and journey of salmon, I thought this would be a rich hands-on opportunity for the students to participate in releasing salmon fry. In groups of 3 students released a salmon fry. We observed their Parr marks and how they camouflaged immediately once they went into the creek. We could barely see them! It’s amazing how much outdoor and hands-on opportunities there are when you’re surrounded by forests, water, and wildlife.

Salmon fry with Parr marks.

Releasing a salmon fry!

On our way to the creek, we stopped by our community garden. Usually a small group of students visit our community garden weekly with an EA to water the plants. This was my first time seeing our community garden and the students were excited to show me. 

Collard greens growing in our community garden.

This week we explored the similarities and differences between parent and offspring. As an interactive movement-based learning activity, half the class was given an orange card. The other half was given a yellow card. Each orange card stated an adult animal while each yellow card stated the baby animal of one of the adult animals. The objective of the activity, Find Your Family, was to identify the parent or baby of that animal. The first part of this activity included only the name. There were some students that had a difficult time trying to find their family. Once each student was paired up, I introduced the second part of the activity. Each student was given the same orange or yellow card but with a picture to accompany its name. This allowed them to assess if they found their correct family in the first part and affirm it in the second part. The students had a blast communicating with one another, trying to find their family. Once each family was found, we discussed how many offsprings looked similar to their parent. However, students noted how a tadpole didn’t look like their parent, an adult frog. This activity invited us to discuss the concept of metamorphosis; animals that go through four distinct life cycle stages and whose bodies physically change while developing into an adult.

Note that the picture of the Kangaroo (adult) and its baby is labelled incorrectly. I made that mistake and informed the students. It should be called a Kangaroo (adult) and Joey (baby).

We discovered the life cycle of a plant and discussed the importance of plants and what they need to grow. The concept of photosynthesis was explored and students were able to communicate that through it, plants absorb carbon dioxide, a gas in the air that is toxic for our environment, and release oxygen, a necessity for many living things. As well, plants need water, the sun’s energy, soil, and carbon dioxide to grow.

I’ll be heading into my 6th week of my 10-week long practicum! So far it has been an eye-opening and rewarding journey. I’m looking forward to what this week has in store for me. 

-Ms. Mah

Week 4 (April 19th-23rd)

What a fun week we had! This week emphasized global warming and ways we can protect our environment, engaging in and understanding Indigenous perspectives and knowledge systems, and behavioural adaptations of animals. Continue reading to learn more.

Unit of Inquiry:

We started the week off making polar bear salt dough! This art activity was part one as we used the polar bear models for the second part, in a science experiment. This art activity was centered upon the concept of global warming. While demonstrating how to make salt dough, I had the students brainstorm and share, through Think/Pair/Share and as a whole class, what global warming is. We discussed how global warming is when the Earth’s temperature rises at a faster rate than if it were to naturally. Then I asked, “What causes global warming?” Students were accurate in that various human activities increases global warming such as driving, using electricity, and cutting down trees (deforestation). Students made a connection that trees release oxygen and absorb carbon dioxide, a toxic gas that isn’t good for our environment, which helps to protect our environment. Trying to make a connection to our unit of inquiry, living things, I asked, “How are polar bears affected by global warming?” Students shared how global warming causes the ice in the Arctic to melt. We discussed how global warming not only affects polar bears but also the wildlife in that environment. Because global warming causes sea ice to melt at a faster rate, this affects the seals as well as crustaceans. Polar bears depend heavily on seals as one of their main food source. Seals depend heavily on small fish, crustaceans, and krill that are near the edge of sea ice. As sea ice is melting due to global warming, this results in less food source for seals and polar bears. 

As part of our science experiment, we placed a polar bear salt dough model on ice (sea ice) in a plastic container and made observations throughout the day on what happened. Since this experiment occurred on a very warm day, the (sea) ice started melting five minutes after taking it out of the freezer! Students made connections to our science experiment and what is happening around the world. We wrapped up our two-part lesson on how we, as individuals, can help protect our environment, such as by walking more and not driving.

A student making their polar bear salt dough model.

Finished product of salt dough polar bears.

A collection of our students’ salt dough polar bears!

Science experiment: salt dough polar bear on (melting) sea ice.

Weaving in Indigenous perspectives and knowledge system is crucial for me, as a beginning teacher, to incorporate into any of my lessons. This week, students learned about animals symbolic to Indigenous peoples. As an introduction to this lesson, I showed students a website, https://native-land.ca, that helps identify territories, languages, and treaties native to the land we are guests on. We searched up the school we are at and it informed us that we are on 5 different nations: Coast Salish, səl̓ilwətaɁɬ təməxʷ (Tsleil-Waututh), Skwxwú7mesh-ulh Temíx̱w (Squamish), S’ólh Téméxw (Stó:lō), and xʷməθkʷəy̓əm. Then, I read them a story called Sharing Our World: Animals of the Native Northwest Coast. Information provided in this book has been provided by Nuxalk, Namgis, Caost Salish, Kwakwaka’wakw, Haisla, Heiltsuk, Haida, Bella Bella, Tsimshian, Kwa Na Ki Nulth and Nuchatlaht Nations. https://www.strongnations.com/store/item_display.php?i=1957

Students were provided a worksheet with 12 boxes describing the meaning of different animals symbolic to Indigenous peoples. We worked together as a class to cut and glue the correct Indigenous animal to its symbolic description. 

Activity incorporating Indigenous perspectives and knowledge system.

As a follow up activity, I introduced the six basic Haida shapes as students were instructed to choose one Indigenous animal they resonated most with and try their best to draw it. It’s important that I introduce some simple Indigenous drawing shapes so students can identify them in any Indigenous art work. 

Six basic Haida shapes.

I encouraged the students to include at least one of the basic Haida shapes in their Indigenous animal drawing. Students took two days to outline the animal’s body with pencil and then marker, and add design on the animal. Below are some finished results.

Orca Indigenous animal drawings.

Bulletin board of each student’s Indigenous animal drawing.

We also learned about the life cycle and journey of salmon. Students were provided a mini booklet and they drew each stage of a salmon on the appropriate pages: egg, alevin, fry, smolt, adult salmon, and spawning salmon. In this lesson, students learned the importance of:

  • the yolk sac that an alevin carries during the first 6 weeks after hatching
  • how salmon fry imprint to remember the scent of their home stream
  • how smolts change their physical appearance by having Parr marks to camouflage in shadows and help them survive better in their environment
  • smolts swimming downstream to an estuary, where the river meets the ocean, as it contains rich source of nutrients and minerals to help salmon grow
  • the change of smolts’ physical appearance to an adult salmon by becoming a light silvery colour to help them better adapt to ocean life
  • the change of adult salmon’s physical appearance to a spawning salmon by turning bright red to attract a mate
  • the challenges of adult salmon swimming upstream to get to their home stream

Life cycle of a salmon booklet.

The life cycle of a salmon.

Students learned the importance of hibernation, migration, and adaptation. As a warm up activity, I drew three boxes on the white board of each concept and asked the students to draw an animal they think would go under each category.

We then gathered at the floor as a class to discuss what each concept meant and examples of animals that do it. We discussed how many cold-blooded animals hibernate because their body temperature is dependent upon the temperature outside. So, when the temperature is colder in the winter, cold-blooded animals bodies are colder, they move slower, and are more vulnerable to predators. That is why they hibernate. We also know that some bears hibernate because during the winter, they lack availability of food like berries and fish. We learned a couple weeks ago that berries and leaves fall down on Deciduous trees during the winter. We also learned from our salmon lesson that they migrate. So, bears don’t have as many food sources as they do during the summer so they hibernate to save energy and help them survive the winter. We also discussed how some animals adapt in the winter so they don’t need to hibernate or migrate. Students made a connection that we, humans, adapt as well as foxes and rabbits. Making a connection to the type of animal coverings mammals have, fur or hair, helps those animals keep warm in the winter so they can adapt and hunt for prey. After our discussion at the floor, the students were instructed to complete a worksheet that entailed cutting and gluing animals into the correct boxes.

Hibernation, migration, adaptation worksheet.

Our pumpkin sprouts have turned into plants! They were outgrowing our small pots in our classroom so we asked students who had a garden at home and enough room to plant one or two pumpkins to take them home. They were happy to take a pumpkin plant home and continue observing the stages of its growth.

Earth Day Art Workshop:

My School Advisor (SA) was able to organize a Zoom art workshop with artist Fei Guan to host a lantern workshop. Fei explained how she is an environmental artist who uses recycled plastic to create works of art. Students were asked weeks prior to bring in a clean 4L plastic milk jug. This was a whole day art activity and the students loved every minute of it! 

Materials needed:

  • 4L clean plastic milk jug
  • Black marker
  • Exacto knife
  • LED light from dollar store
  • acrylic paint
  • twig/bamboo stick and yarn
  • hot glue gun

Each student got to choose what animal they wanted to create. Some even made aquariums! Take a look at the awesome creations.

Aquarium

Dog

Dragon

Snake

Other:

During Centres, two Grade One students were working together to create a pattern out of blocks. They weren’t done when we had to clean up but they wanted to show me their progress thus far. It looked amazing and I had to snap a picture! 

Patterned design during Centres.

I hope you enjoyed reading about my fourth week of long practicum. I’ll be starting to teach 100% (full-time) this upcoming week and am looking forward to it (although there is much lesson planning to be done!)

Thank you for reading!

-Ms. Mah

Week 3 (April 12th-16th)

Hello! This week we were blessed with warm and bright days. It felt like the beginning days of summer even though it’s still Spring! We’re more than half way done our unit of inquiry on living things and I still have so many more things I need to cover! I bet all teachers can relate. Keep reading to learn about what our class engaged in this past week.

Art:

The students engaged in a camouflage hand art project and they turned out so well! Students were given a few options of different animal covering patterns (i.e., cheetah, jaguar, giraffe, lady bug, zebra, etc.) that they would sketch  and then paint onto a piece of paper using tempura paint. Immediately after painting, while the paint is still wet, they would stick their non-dominant hand onto their painting and camouflage their hand into it. The students had a great time getting painted and being creative with their patterns. After this art project, the students definitely understand the concept of camouflage!

Golden Retriever

Lady Bug

Zebra

Bulletin board outside our classroom.

Two weeks ago, my School Advisor (SA) made animal clay pots with the students. The clay had to harden for over a week and this past week the students painted them. Then they were glazed. My SA also bought different coloured marbles from the dollar store and after the paint dried, the students chose a few marbles to put in the middle of their pot. That way, when it’s in the kiln the marbles will melt and yield an awesome swirl/spiral pattern!

Animal clay pots.

Unit of Inquiry:

Since we’re learning about living things and more specifically, plants and animals, it’s important for the students to understand how we classify animals. As a provocation activity, each table group was given a bundle of animal pictures and seven categories: Mammals, Reptiles, Amphibians, Birds, Fish, Arthropods, and Other. After, we debriefed as a class how table groups sorted. Then, students were given a classification worksheet that had a word bank at the bottom describing different animal characteristics that they would have to write in the correct categories as well as providing animal examples under each. We worked as a class to complete it and I wrote it on the white board.

Classification of animals.

The students also learned about the parts of an egg as we have duck eggs in our class. I informed them that it is important to understand the function of each part of an egg. We labelled this in the morning and then the students got to colour theirs after. Students learned that the yolk (yellow) contains the fat to help the embryo grow, the albumen (white) contains the protein, the shell is porous so air can get in, the air sac helps the embryo breathe, and the inner and outer membranes are two layers that help keep bacteria out.

Parts of an egg.

On Thursday, the students became educated in local plants around their school community because on the following day they went on a scavenger hunt nature walk to identify them! I was very excited about this lesson and the students were too. I’m fortunate that I have a Cedar, Hemlock, Pine, and Spruce tree in my backyard. I brought a branch from each with their respective cones for the students to make and record their observations. Students were paired up and worked on a worksheet together to fill in the description of each plant. They were able to feel and smell each branch and share their observations. We also discussed the difference between Deciduous and Evergreen trees. We know that in the winter trees that are bare and naked are deciduous because their leaves fall down. (Deciduous trees = leaves fall down.) We know that trees that keep their needles stay on all year around. That is, evergreen trees’ needles stay on forever. (Evergreen trees = needles stay on forever). Below is what the students came up with.

Description of local plants.

On the following day, Friday, we went on a scavenger hunt nature walk. There’s a small forested trail/area a couple blocks from our school. I took the students there, with my SA and an Education Aide, and instructed them to stay with their pairs. I tried to make connections to the four local trees we discussed even before we got to the trail. Walking on the sidewalk, there were many Cedar trees and some Hemlock trees. The students were able to explore the area, within the stated boundaries, to try and identify the four local trees we discussed as well as new ones. It was a beautiful and sunny day and the students were engaged throughout the walk. The students were able to identify local trees and engage in small group discussions on how they were able to identify them. Our nature walk was 30 minutes and although I would have liked it to have been longer, I will try to find another opportunity to do a similar nature walk because it was such a success and we could even expand it to identifying different animals!

Scavenger hunt to identify local plants.

Captured during our scavenger hunt nature walk. 

The students engaged in a sorting activity to understand that animals can have different coverings (i.e., skin, fur, scales, shell, and feathers). For early finishers, they were instructed to add two additional animals under each covering column as an extension activity.

Cut and glue animal coverings.

Other:

It might be evident from the picture posted below that I am a novice gardener as I didn’t realize that planting five or six pumpkin seeds in a small pot would actually be successful in sprouting. Nonetheless, this was a great opportunity for the students to observe what they see and how seeds turn into sprouts, and eventually plants, right in front of them! We are planning on moving one pumpkin pot into our outdoor community garden and see how many students have gardens of their own at home to continue planting their pumpkins. There won’t be much room or more time for these sprouts to grow into plants!

Our pumpkin seeds are sprouting!

Remember the eggheads we drew and planted grass seeds in last week? Well, check out how cool they look now! The students can start cutting off their grass hair next week if they’d like. 

Our eggheads are growing (grass) hair!

During Centres this week, a couple students proudly showed me their designs. I was very impressed and wanted to share them here! 

Pattern making during Centres.

That’s a wrap for Week 3! It’s crazy how fast time flies. Check back next week for another weekly reflection. Thanks for reading!

-Ms. Mah

Week 2 (April 6th-9th)

Just like that, Week 2 is complete! It’s crazy how fast time is flying by for me. This week at school has been super eventful. Below I will cover these subjects in more detail: Math, Unit of Inquiry (Science), and Physical Health and Education.

Math:

We were very fortunate to have a couple sunny and dry days this week. I took advantage of the beautiful weather and brought math outdoors. The students engaged in a math bean bag game! We are still learning subtraction (currently without regrouping for Grade 2s). As this is a combined Grade 1/2 class, I paired students off within their grade. I drew two separate grids for each grade. Grid #1 represented the minuend numbers while Grid #2 represented the subtrahend numbers. In pairs, one teammate would throw their bean bag onto the grid. Where the bean bag landed provided the minuend for their subtraction equation. Then, they would shuffle over to Grid #2 to throw their bean bag. Where the bean bag landed provided the subtrahend for their subtraction equation. As Grade 2s have been practicing solving subtraction equations with a Place Value Mat and base-ten blocks, they were required to solve each of their subtraction equations with them as well. For Grade 1s, their minuend and subtrahend numbers on the grid were much smaller in value, of course. Once they created their equation, they had to work together to draw and solve it. The students were engaged and they seemed to have fun taking turns to throw the bean bag. I thought this was a hit and will most likely do this again in the near future.

Grid #2 subtrahend numbers for Grade 2s.

Grid #1 minuend numbers for Grade 1s.

Unit of Inquiry:

Our current unit of inquiry is Living Things. This week we got duck eggs! A very exciting opportunity for not only the students but also for myself! My School Advisor (SA) got duck eggs two years ago and has the equipment and experience. I decided to take this project on because having my SA as a mentor/guidance to support me in this amazing learning journey is such a privilege. I think taking care of a living thing within our own classroom, if that’s possible, is an opportunity I shouldn’t miss. We got six duck eggs on Wednesday, April 7th. They take 28 days to hatch. Since the incubator we have is small and intended for chick eggs, I have to manually rotate them four times per day. There is a required minimum humidity and temperature level to keep the eggs healthy. Hopefully all six will hatch (crosses fingers)! When my SA and I let the students in on the surprise, they were so excited.

Six duck eggs in the incubator.

We also learned about camouflage and why it is important for some animals to survive. As an activity, the students cut out an outline of a duck’s body. Then, I asked them to choose a spot in the classroom that they could tape their duck onto, while I stepped out of the classroom, to camouflage it. They would have to colour their duck accordingly and add any details, such as patterns and textures, if desired. The students were excited to choose a spot and kept telling me, “don’t look at mine, Ms. Mah!” when I was making my rounds to each table group as they were colouring. I still have yet to find all 21 students’ camouflaged ducks. The pictures I’ve posted below are some that I have found. Aren’t they creatively camouflaged?

Not only did we get duck eggs and learn about camouflage this week, but the students also planted pumpkin seeds and other types of seeds! Back in October 2020, we went on a walking field trip to a nearby grocery store to purchase one pumpkin per table group. As a math activity, the students took out all the pumpkin seeds and grouped them by 2s, 5s, 10s, etc. My SA thought in advance and kept some pumpkin seeds for me to plant with the students when I start my long practicum. Now that I’ve started my long practicum, I thought it was a great time to have the students plant them. Each table group got one pot to plant a handful of pumpkin seeds in. For our other planting activity, we used newsprint (compostable) and rolled it into an individual garden pot using a cylindrical container. The students had a choice of planting swiss chard, green onion, cucumber, or carrot seeds in their pot. We made a class terrarium and will eventually take them outside, once seeds have sprouted, to our community garden.

A table group’s pot of planted pumpkin seeds.

Our classroom terrarium.

This week we focused on learning about birds. Since we got duck eggs, I thought it would make sense to learn more about ducks. I made a PowerPoint presentation on duck parts, a duck’s life cycle, and interesting facts about them. This was a follow along activity as I created duck flip-books for each student to complete. Did you know ducks are known as waterfowls and are part of the Anatidae family of birds?

Student’s drawing and labelling of a duck’s life cycle.

Interesting facts about ducks.

We ended the week off by making Eggheads! This science experiment entails each student drawing a face on their eggshell and adding soil and planting grass seeds inside the eggshell. (Note that I had to begin collecting eggshells since February in order for me to execute this lesson! Lots of planning and thinking that goes into teaching.) Hopefully with the help of the sun’s energy, water, soil, and air the grass seeds can sprout into a plant. Then, it’ll act as hair for each student’s egghead. Since this was a science experiment, students exercised their ability to ask questions, share their wonders, make predictions, and draw observations. I’m excited to see how these eggheads will look in a few weeks! This was such a fun activity to do with the students; something you can do indoor or outdoor that invites multimodal learning.

Our eggheads!

Physical and Health Education:

This week I picked up a new unit, PE, to teach. I’ll be focusing on throwing and catching with them for the next few weeks at least. We are fortunate to not only have a gravel field but also a grass field. I usually like to use the grass field for PE because it’s a softer landing if someone falls or trips, for example. This week I organized a developing activity that involved pairs running to a cone, pausing, and making eye contact with your partner before throwing a ball to them. We went over how to throw a ball (knees bent, opposite leg stepping forward, arm holding the ball following through, etc.). As a culminating (main game) activity, we played Fire and Ice tag. Overall, I thought the students enjoyed my PE lesson. I always find PE goes by super fast. We allot 30 minutes twice a week for our PE schedule.


That concludes the second week of my long practicum! Thanks for stopping by and reading my blog post. Check back next week for my Week 3 reflection!


-Ms. Mah

Quarantine 101: Be Basic and Bake Banana Bread

Quarantine baking has commenced! Well… it actually started for me WEEKS ago. Probably since the first week of having to practice self-isolation at home. Since I finished my course very early (mid to late March) as my professor decided not to go through with our final exam, it wasn’t long until I had to try and find things I enjoyed doing to get through each day. 

As one may know, I enjoy baking. Regardless of this strange period in our lives, I’ve been baking for awhile. My annual baking moment is usually during the winter holidays when I’ll literally bake 4-5 different types of sweets for my family and friends. I try to find new recipes and if it makes the cut (aka if I can picture myself eating it again or if others, like my family members, go all heart eyes for it) then I just might bookmark it. 

Looking at the title you might think that I’m a basic gal who has only made #trendy banana bread during this quarantine. Well, I’d say yes and no to that. Yes, you can call me basic because of that BUT I’d like to point out that I’ve also made cupcakes, apple pie, pumpkin scones, chocolate chip cookies, apple crumble, and a chocolate cake during this time. And might I add that I’ve made banana bread (using different recipes each time) several times BEFORE this whole quarantine thing happened. Woah. Did you even think about that?

I’ve dabbled into the banana bread baking world for long enough to say that I 99% believe that this recipe that I will share down below with you is a very simple (with probably the least amount of baking materials used – yes, I’m here for anyone who wishes for quick clean ups), fail-proof, moist, and flavourful banana bread that will have you craving for ANOTHER BITE. A lot of banana recipes I’ve tried call for granulated sugar. I’ve tried this and also tried not adding any sugar or very little to the mix. Of course this is a healthier alternative, but none thus far have really made me crave one more bite if you know what I mean. 

So when I came across Bon Appétit’s Best Banana Bread, I was a little bit skeptical because they claim their banana bread to be the best which means it better be that and nothing less! I often modify any recipe I use from the internet mostly because I know my taste preferences. I also find that the banana recipes I do use and modify, the top of the bread when letting it cool from the oven actually deflates. I don’t know why but some type of scientific reasoning allows it to every time and I am not here for that. I like my bread tops to be plump, full, round.. pretty much the opposite of flat. Surprisingly, I didn’t alter the sugar amount this time. And also what got me to choose this recipe was the fact that it called for solely brown sugar (as the added sweetner besides bananas) and plain Greek yogurt. I felt like this combination would be good and holy heckin’ bob (yes I am a Whitney Simmons supporter) this banana bread is pretttty good. Like the kind that you can imagine yourself buying at Starbucks or see freshly displayed behind a bakery or cafe counter. Not only is this banana bread aesthetic and thiccc (depends how thicc you cccut it), but I have finally found one where I crave another bite. Something about banana bread just warms my tummy and fills me up. Also, the smell of banana bread baking in the oven is so heavenly and fills up the entire home (not just the kitchen). You can definitely include chocolate chips and/or any nuts or dried fruits you’d like however, I chose not to include the chocolate chips or walnuts it calls for because I know my ripened bananas acted as a natural sweetener and the added brown sugar was plenty for me. I’ve added chopped up medjool dates once before and they add a nice chewy texture but I just didn’t feel like doing so this time. Anyways, I encourage you to bake this banana bread for yourself, your family, or friends! And then you’ll agree with me that this is a pretty damn good banana bread. (You’re welcome in advance).

What You’ll Need:

  • Non-stick vegetable oil spray
  • Parchment paper
  • Loaf pan
  • 1 1/2 cups all-purpose flour
  • 1 1/4 tsp baking soda
  • 3/4 tsp salt
  • 1 cup light brown sugar
  • 1/3 cup plain greek yogurt
  • 1/2 stick (or 1/4 cup) of butter at room temperature
  • 2 eggs
  • 3 ripe bananas (mashed)
  • 1/2 tsp cinnamon


What To Do:

  1. Preheat oven to 350 degrees Fahrenheit. Coat non-stick spray inside loaf pan and place parchment paper down, ensuring an overhang on each side for easy take out.
  2. Whisk flour, baking soda and salt in a bowl.
  3. Beat brown sugar, greek yogurt and butter in a separate bowl until light and fluffy for 4 minutes.
  4. Add one egg at a time to the wet ingredients and beat to blend after each egg.
  5. Add in your flour mixture and mix until combined.
  6. Add mashed bananas and cinnamon and mix until combined.
  7. Scrape mixture into loaf pan and ensure it is evenly distributed.
  8. Bake banana bread for 60 minutes (mine came out a bit more brown than I’d like, so try for 55 minutes). Ensure tester comes out clean from the center. Let cool on counter for 30 minutes before cutting or taking it out of loaf pan.
  9. Cut THICCC slices for a delicious snacc :)

ENJOY!


Xoxo,

Ali

Vanilla Cupcakes with Buttercream Frosting


                         If this doesn’t scream Spring, I don’t know what does.


Happy first day of Spring! What better way to kick off the first day of a new season with a sweet treat? These sweet cakes aren’t just pretty to look at, they are delicious too. Light and moist, these are a perfect afternoon pick me up or late night craving fix. 

With the ongoing health advisories, social distancing isn’t something I find enjoyable for more than a couple days (much less weeks or months), especially if the weather is nice. But, I took this opportunity to bake more often. Like I’ve mentioned in my previous baking post, I enjoy baking. I find it stress-relieving and fun and see it as a craft. Yeah sure I’m not the world’s meticulous baker (sometimes I don’t measure out ingredients to a tee), but modifying recipes to my own liking and tasting my own creations excite me. 


                                       Light, fluffy and moist? Say no more.


I baked these cupcakes on St. Patrick’s Day (March 17th) and purposefully used green food colouring for the buttercream frosting. Although I don’t celebrate St. Patrick’s Day, I thought these cupcakes were fitting for the occasion as well as with the start of Spring. What inspired me to make these specific vanilla cupcakes was watching @erinireland instastory where she showed a step-by-step process of making vegan vanilla cupcakes from @itdoesnttastelikechicken cookbook. After watching her instastory, I immediately wanted to try to recreate it. I was a bit weary as I normally use eggs to make cupcake batter, but since these didn’t call for any (they’re vegan) I was curious as to whether @erinireland’s opinion on it being ‘so good’ would actually be the same in my mind. 

Okay so after making this, can I just say that the vanilla cupcakes alone were FAN FREAKING TASTIC. Betty Crocker cupcakes? Who is she? Eggs in the batter? Don’t know her. Yeah, these cupcakes were light, fluffy, moist and just wonderful. Simple and not too sweet. Honestly, you don’t even need the buttercream frosting. If you’re looking for a treat to satisfy your sweet tooth, I got you. The original recipe from @itdoesnttastelikechicken was for a vanilla cake and I’m sure I’ll be making a cake using this recipe in the future. Yummy!

The buttercream frosting, on the other hand, was just OK. I googled a generic recipe and picked the first decently rated and reviewed one online. I didn’t sift the confectioners’ sugar (because I didn’t read the instructions closely hence, I’m not VERY meticulous) and perhaps that’s why it turned out watery after combining all ingredients in a mixer… so I added a bit more (the recipe includes my modification of adding more sugar). In the end, the buttercream frosting was honestly just for aesthetics and presentation. In real life, I would be more happy to just devour the vanilla cupcake by itself. 

Well there you have it, folks. Probably one of the more simple recipes out there (aka you can’t really go wrong). This recipe is pretty versatile; you can make it anytime on any occasion. Change up the food colouring to match a holiday, a celebration or just your mood! All my family members have tried it and have shared nothing but positive reviews. If you give it a whirl, please tag me on Instagram @alison.mah or comment below! 


Vanilla Cupcakes Ingredients:

(yields 16 cupcakes)

Dry Ingredients:

  • 2 1/2 cups flour
  • 1 cups sugar
  • 2 tsps baking soda
  • 1 tsps salt

Wet Ingredients:

  • 1 1/2 cups almond milk
  • 1/4 cup canola oil
  • 1/4 apple cider vinegar OR 1/4 cups of freshly squeezed lemon juice (I used lemon juice because I didn’t have the former)
  • 1 Tbsp vanilla extract

Instructions:

  1. Preheat oven to 350 degrees.
  2. Mix all the dry ingredients in a bowl with a whisk.
  3. Mix all the wet ingredients in a separate bowl with a whisk.
  4. Pour wet ingredients into dry bowl mixture and then mix with whisk.
  5. Fill cupcake tin with 1/4 cup of batter.
  6. Bake in oven for 21 minutes.


Buttercream Frosting Ingredients (adapted from online recipe):

  • 1/2 cup butter, softened
  • 1 1/2 tsp vanilla extract
  • 2 1/2 cups confectioners’ sugar (sifted, but I forgot)
  • 2 Tbsp almond milk
  • Food colouring of your choice

Instructions:

  1. Cream butter in a mixer.
  2. Gradually add confectioners’ sugar to mixer.
  3. Pour in vanilla extract.
  4. Pour in almond milk and beat for 3 minutes.
  5. Add desired food colouring.


As always, thanks for stopping by and reading. I hope you stay healthy, strong and safe during this daunting time in the world. 


Xoxo,


Ali