
Onions

Onions are a cool season crop known for hardiness, but still require full sun. This crop is planted in the spring as soon as the soil is workable, and in regions with a mild winter, can also be planted in the fall 4 to 6 weeks before the first frost to harvest the next spring. Onions are planted from onion sets, which are small bulbs sold for gardening that grow into full onions in about 3.5 months. You can also simply buy starters from a local nursery. It’s possible to grow onions from seed, but they grow slower and have a lower success rate. If you are growing from seed, sow them 1cm (½”) deep 6 weeks before the last spring frost.
Otherwise, plant onion sets as soon as the ground is workable and temperatures are reliably above -2°C (28°F). Place them 15cm (6”) apart with the pointed end up and 2cm (1”) below the surface of the ground. You’ll want to check the day length and recommended latitude when choosing a cultivar. Short day onions will for bulbs when days reach 10 to 12 hours in length and are suitable only for southern regions. Long day onions require 13 to 16 hours of daylight and are used in the north. Onions make great companions to lettuce, carrots, beets, and parsnips by warding away pests, so plant them nearby. For best results, use a nitrogen rich fertilizer every few weeks and stop when the bulbs start to emerge from the soil. Working aged manure or compost into the soil before planting helps as well. The bulbs will begin to emerge from the soil as they grow; do not cover them with more soil. If any onions send up flower stalks, harvest them immediately. They won’t store well but they can be used for cooking in the following days.
You’ll know your onions are maturing when the leaves start to yellow and fall off. Bend the leaves down and crush them under foot to speed up the ripening process, while loosening the soil around the onions to encourage drying. When the tops are brown and dead, pull up the onions, and clip back the roots. Make sure you harvest in dry conditions because wet onions will rot in storage. Let the onion dry for a few days, then hang them from their tops or in a mesh bag in a cool, dry, well ventilated area. Avoid storing them in the refrigerator, which is too moist. Check periodically for sprouted or rotting onions and remove them to prevent the others from being contaminated. Do not store onions with apples, pears, or potatoes.
Garlic
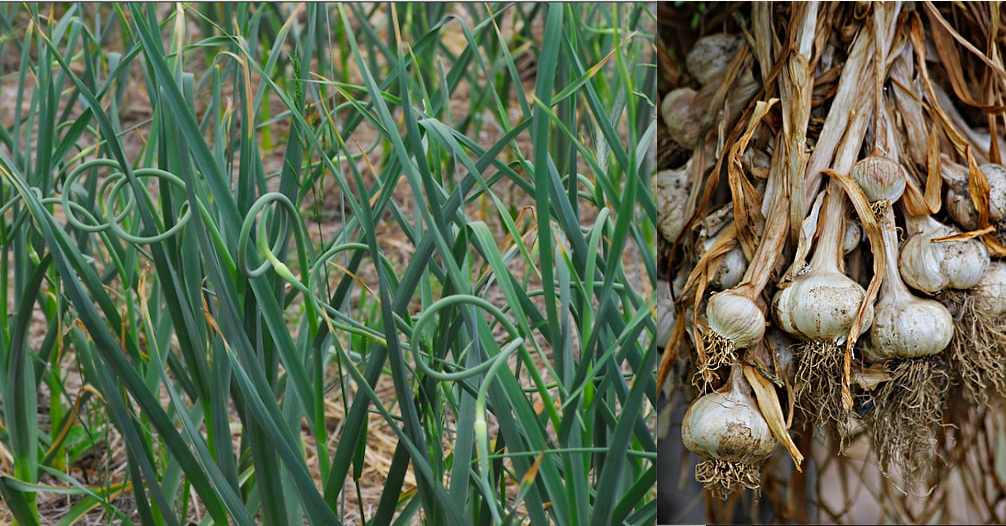
Choose softneck garlic in regions with a mild winter and hardneck garlic in regions with a severe Winter. Buy your garlic cloves (the sections within a bulb of garlic) from a seed catalogue or farm store rather than from the grocery store. Plant the cloves in the spring as soon as the ground can be worked pointed end up 2-5cm (1-2”) beneath the surface and 10-15cm (4-6”) away from other cloves. Loosen the dirt about 20cm (8”) deep and do not remove the papery skin from the cloves. For best results, fertilize garlic beds in the spring with a nitrogen rich fertilizer like blood meal, chicken manure, or a commercial fertilizer. If you notice the leaves are yellowing early, add more fertilizer.
Garlic can be planted in the spring for a fall crop or in the fall for a spring crop; the best method will depend of the climate zone, although over wintered garlic typically does better. For fall planting, plant 4 to 6 weeks before the first frost. Before the frost, cover with 10 to 15cm (4-6”) of straw to be removed in the spring after frosts are over. Cut any flower stalks that emerge in the spring to encourage bulb growth.
At the end of the season when the tops start to turn yellow, pull up the plant carefully using a trowel. Let the garlic dry for a few days, then hang them in a cool, dry, well ventilated area. We store our garlic in a shed. Avoid storing in the refrigerator, which is too moist. The curly green garlic shoots, also known as scapes, are also edible, and can be harvested for salads and stir fries. Garlic does well when planted with celery, brussel sprouts, beets, lettuce, potatoes, tomatoes, and strawberries.
Leeks

Like most vegetables, this cool season crop needs full sun and a soil pH between 6.0 and 7.0 to thrive. Leeks take from 90 to 150 days to mature, and can be planted either in the spring or fall, depending on the variety and climate zone. Summer leeks can be started indoors and then transplanted once the ground is workable and temperatures do not fall below 6°C (20°F). Sow the seeds 1cm (½”) deep 10 weeks before the last frost and allow 8 to 16 days for germination. Once they are 20cm (8”) tall harden them off by exposing them to outdoor conditions daily for increasing amounts of time and transplant them into narrow holes about 2cm (1”) in diameter and fill the holes with water instead of refilling with dirt. Space the plants by about 10-15cm (4-6”), in rows 45cm (18”) apart. You can also direct sow your seeds when temperatures are between 13°C and 25°C (55-77°F).
Winter leeks are left in the ground over the winter and harvested throughout the winter and spring. Leeks that have overwintered will bolt (send up flower stalks) come spring. Make sure to dig up and harvest leeks before the flower, otherwise they will taste bitter. If you want to collect seeds, allow the flowers to set and die back. Allow the seed pods to form then pluck them off when they begin to crack open. Place them in paper bags to dry, then shake the bags to jostle the seeds from their pods.
As your leeks grow, hill up the soil around their stems for blanching. This process will keep them white and tender. For the best results, work compost into the soil prior to planting and side dress the plants mid season. Once the leeks are 2cm (1”) in diameter or larger, dig them up to harvest. Cut off the tops to eat them, and if you want, leave an inch of stalk on the roots and place them in a cup of water with the top half of the remaining stalk above the water. New greens will begin shooting up, and once they are 5 to 8cm (2-3”) you can transplant them back into your garden.
Chives
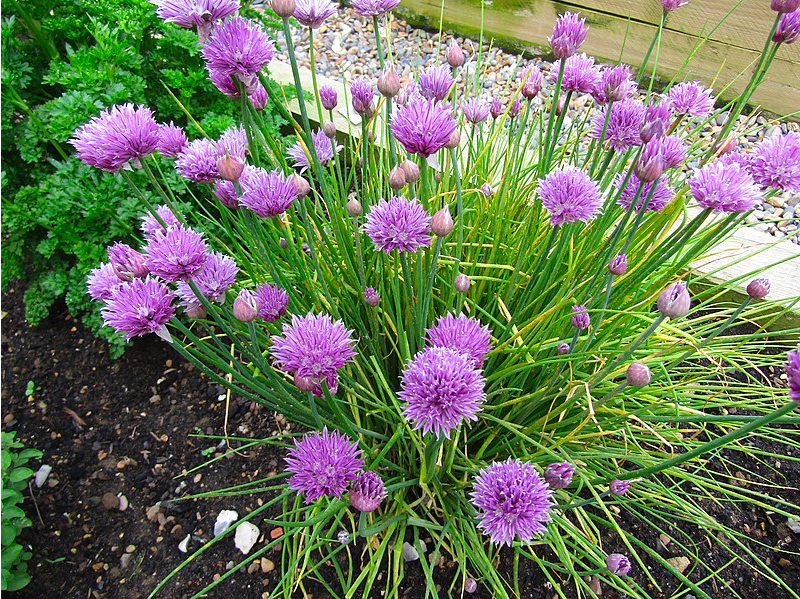
This cool season plant is a perennial, meaning you’ll only need to plant it once. You can plant from seed, but you likely won’t get a harvest until the following year. For that reason, most people choose to plant chive clumps instead, which will yield in about two months. To plant from seed, sow 5mm-1cm (¼-½”) deep in groups of 10 to 15 seeds either indoors 8 to 10 weeks before the last spring frost or directly outdoors once the soil thaws. Otherwise, ask a fellow gardener for a chive clump to start, or pick one up at your local nursery. Space clumps 28cm (8″) apart and add compost when transplanting for best results. Chives are tough and can tolerate partial shade, but will prefer full sun.
Once the chive clump grows to 30cm (12″) across dig it up, break it apart into smaller clumps, and replant them further apart. This should be done every 2 to 4 years and will help promote growth. Remove buds before they flower to increase foliage production, or leave them to attract pollinators and garnish salads. Once the flower dies, remove it to allow the plant to focus energy elsewhere, unless you want to save seeds. If you allow the flower to stay and dry to a tan color, you can snip off the dead flower and rub it between your fingers to release the seeds, which can be stored in an airtight container in a cool, dark place.
Chives will survive the winter by dying back and going dormant. If you would like to continue harvesting throughout the winter, cut a clump away from the main clump and transplant it to a container on your window sill or cold frame. If you’ve got a mild winter, chives may also stay green under a row cover.
Scallions
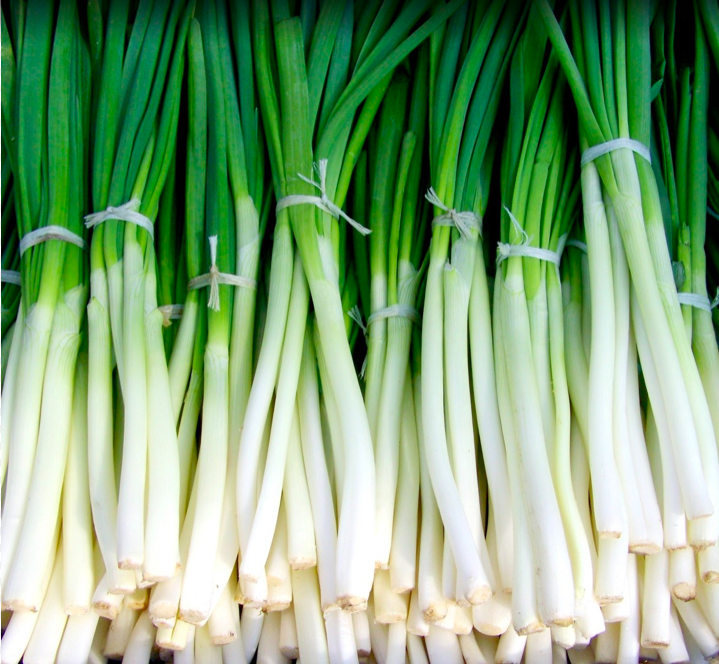
Given full sun and a soil pH between 6.0 and 7.0, scallions will be ready for harvest within 60 to 80 days of planting. Sow seeds 6mm (¼”) deep indoors 8 to 10 weeks before the last spring frost, and allow 7 to 14 days for germination. When your seedlings reach 8 to 10cm (3-4”) in height, transplant your seedlings into the garden 5 to 8cm (2-3”) apart in rows 1/2m (1-2′) apart. Make sure to harden them off for a week prior to transplanting. Work compost into the soil 12 to 20cm (6-8”) deep before transplanting for best results. You can also sow your seeds directly into the ground as soon as the soil is workable and all threat of frost has passed. For an amazing harvest, administer a nitrogen rich fertilizer monthly as your plants grow. Harvest when the plants are 12 to 20cm (6-8”) tall and about as wide as a pencil. Both the stalk and the bulb are edible, but are toxic to cats and dogs, so don’t feed them to your pets. Scallions have a shallow root system, to make sure to water them in periods without regular rainfall. If you choose to grow them in containers, choose a narrow but deep pot with good drainage holes. Excessive moisture will promote rot.
Scallions can also be propagated from kitchen scraps, including scraps from store bought scallions. The roots at the end that you likely trim off anyway for cooking can be placed in water with the top of the stalk above the surface. Place on a sunny window sill and before long green shoots will emerge and form a new plant. Once the shoots are 10 to 13cm (4-5”) inches tall transplant them into a container or your garden.
Shallots

Shallots are planted in the early spring for a late summer harvest in colder regions, and in the fall for a spring harvest in warm regions. As soon as the soil can be worked in the spring, plant the cloves 2cm (1”) deep so that the tip is pointing up and is barely covered by soil, and set the plants 5 to 8cm (2-3”) apart. Loosen the soil down to 20cm (8”) beneath your shallot bed because their roots like to grow deep. The bulbs mature in about 5 months, at which point the tops will turn brown and wither. Pull up the bulbs to harvest and leave them out to dry for a few days like onions. Hang them somewhere dry to store.