Categories
Assignment Grading

Adjust Your Grade Posting Policy

Adjust Your Grade Posting Policy

Hide Grades for the Entire Grade Centre (Do this prior to entering any grades)

If an instructor doesn’t want the grades they enter to be immediately visible to students, we recommend changing the course’s grade posting policy to Manually Post Grades. Instructors can change the grade posting policy for their course by following these steps:

  1. In Course Navigation, click the Grades link.
  2. Click the Settings (gear) icon.
  3. Click the Grade Posting Policy tab.
  4. Choose a grade posting policy for the course (Manually Post Grades or Automatically Post Grades).
  5. To apply the changes, click the Update button.

* Note that once the course’s grade posting policy is changed in this way, all of the columns in the gradebook will switch to Manually Post Grades. If there are quizzes in which the instructor wants students to be able to see their responses or correct answers right after each attempt, then you will need to remain the Grade Posting Policy automatically for those assignments. You can do so by clicking on the three dots next to the column name.

Make Grades Visible to Students

If an instructor has set the Manually Post Grades Policy, they will need to post grades before they will be visible to students. When grades are entered for students’ submissions and are hidden from them, there will be an orange eye. When students can see their grades, there will be a grey eye. The following steps show how to post grades for an individual assignment:

  1. Click on the three dots next to the Assignment name to open the assignment menu.
  2. Click Post grades. There will be the option to Post Grades to Everyone (all students) or to Graded (only students with graded submissions).
  3. Click Post to confirm.

Sort Gradebook by Section

Categories
Assignment Camtasia Canvas Featured Learning Technology My Media Gallery (Kaltura) Panopto Presentation Studio Teaching Teaching Activity Video

Recording Videos

, , , , , , , , , ,

Recording Video

You may wish to record videos to incorporate into your course. Videos could be created for weekly announcements, prep work, pre-recorded lectures, live lectures (i.e. Zoom recordings), guest presentations, homework explanations, student feedback, office hours, etc.

Video Recording Tools

ToolGreat for:Where to access:Great for:Automatic in CanvasEditing
CanvasWeekly video announcements; student-created videos, student feedback videosVia Canvas, in the text editor toolbarJust webcam and audioYesEditing
PanoptoPre-recorded lectures, Zoom recordings, Prep-work videos, videos with embedded quizzes, basic video editing
Can be accessed via web browser or downloaded for full-featured software capabilities.Allows recording of multiple sources including adding content after the fact or even including multiple recording devices (such as document camera or iPhone)Videos embed links can be created in advance. Videos can be embedded and/or shared both in Canvas and outside Canvas as required. You have complete control of how the videos are shared.Offers web-based editing tools for creating videos. Panopto also accepts uploads of many video and audio formats. Videos can also be created in Camtasia and can be uploaded and controlled with the sharing capabilities of Panopto. 
My Media (Kaltura)Student-created videos, videos with embedded quizzes,
Kaltura tools can be found in My Media in Canvas.Kaltura Capture allows for multiple inputs (video of self, screen, audio).Yes, My Media allows you to access almost all Kaltura functionality from Canvas.Very limited editing features. Closed captioning is available.
CamtasiaPre-recorded lectures, screen recordings, editing, brandingCamtasia can be downloaded.No, but media created in Camtasia can be uploaded to Kaltura’s media server in Canvas using My Media.Offers a rich suite of editing tools for creating professional looking videos.
Multiple inputs (video of self, screen, audio) are compacted into one video but can be edited separately.
Zoom RecordingsRecording live lectures
Recording presentations
Either via ubc.zoom.us, or via Panopto (Zoom can be connected to Panopto)No, but links can be shared in Canvas from the Panopto recording (if connected), or from the Zoom cloud feature.Very limited editing features. If connected with Panopto, editing features increase.

Where to record videos

Teaching SpaceThis is great for:Not suggested for:
Sauder Studios
(DL013, HA043A)
Creating professional grade videos where editing may be needed.
Conducting live online classes over Zoom using technologies like light boards, green screens, etc.
Videos that do not require a high-level of production quality (i.e. video announcements).
Learning Labs (DL005, DL009)Creating professional grade videos where editing may be needed.
Conducting live online classes over Zoom that do not require light boards or green screens.
A Sauder Office space
Your Home Office
Your Classroom

Branding your videos

There are two ways to brand your videos. One is using the automated branding service via Panopto that was developed by Sauder Learning Services. The other is for those who already edit your own videos, we have created Sauder branding templates for the two most popular video editing software suites (scroll towards the bottom for the templates. Note: you must be signed in to access the templates).

Automated branding service

Here is an example output of our automated branding service. The branding intro, watermark, and outro in this video were added automatically with our new software integration. This example is embedded using Panopto video platform:

https://ubc.ca.panopto.com/Panopto/Pages/Viewer.aspx?id=037915ab-4141-4802-bf4f-ac13017739dc

To use the automated branding tool, please follow these steps and prerequisites for your video:

  1. Record your video and edit content as usual using a technology outlined above. Please note: ensure you have at least 3 seconds of silence at the beginning and end of your video for the transitions between the branding slides.
  2. Upload your video to your personal folder in Panopto.
    • If you have a Panopto account and you use cloud recordings for your live Zoom classes, the cloud recordings will also get pushed to Panopto and placed in a folder named “Meeting Recordings” in your “My Folder”.
  3. Visit our web request form to tell us which video you would like branded and the text for the beginning titles.
  4. Once processed, we will upload the branded version to your folder where you can share and embed in Canvas as usual. The processing turnaround time is 24-hours.

Self-serve templates

Note: the template files are only available to signed in users.

Categories
Academic Integrity Assignment Feedback Grading Group Work iPeer Learning Technology Peer Review Teaching Activity

iPeer

, , , , , , , ,

iPeer

iPeer is a peer review platform which lets students evaluate their group members. It facilitates self-evaluations as well, and is integrated with Canvas.


Integrated with Canvas:

Yes


Use by UBC Sauder Instructors:

Frequent


Status Info:

Teaching Scenarios

iPeer helps collect feedback within student teams. This encourages accountability in group work, and provides students with opportunities to reflect and be heard by the instructor.

Any feedback given is anonymous, and instructors can choose whether they want the results to be released or not.

Evaluations can be created from scratch, with a variety of question types (Likert, Paragraph, Sentence, Dropdown) to choose from. These can be saved and re-used in future courses.

Grades can be synced to Canvas, or exported to a CSV for further analysis.

Instructors @ UBC Sauder

iPeer is used commonly at Sauder to get students to:

1 — Reflect

Students can be given a text box to write in.

How did this teammate contribute most when working working with others?

2 — Rate

Students can be given a Likert scale to click on.

Rate this person’s participation. A rating of “3” indicates that the team member’s contributions met your expectation. A rating of “4” means that the team member contributed slightly more than expected, and “5” reflects a contribution well above your expectation. Similarly, a “2” reflects a contribution slightly less than expected and a “1” is a contribution that was much below what was acceptable.

3 — Distribute

Students can be given a dynamic slider to adjust for each group member.

Example — Did each group member contribute equally? Rate your peer’s relative performance using the sliders below.

Categories
Assignment Grading iClicker Cloud Learning Technology Quiz Student Engagement Teaching Activity

iClicker Cloud

, , , , , ,

iClicker Cloud

iClicker Cloud is an online student response system that allows instructors to collect and grade responses to in-class questions that students answer individually using their own computer or mobile device. They receive the responses instantly, and can use these results to inform their teaching and/or share them with the class. Through the Canvas integration, iClicker Cloud poll and quiz results can automatically count toward student grades.

There is no cost for instructors or students to use iClicker Cloud. Unlike iClicker Classic, students do not need to purchase any special device and will instead respond in their web browser.

iClicker is useful for polling, quizzing and attendance in which instructors want to track student responses and/or grades. If there is interest in doing anonymous informal polling not for points, zoom polling is ideal.


Integrated with Canvas:

Yes


Use by UBC Sauder Instructors:

Frequent


Status Info:

Guides

iClicker Cloud Instructor Login

iClicker Cloud Student Login

Instructions for Sauder Instructors to set up an iClicker course and Connect to Canvas.

For more detailed information and instructions on how to use iClicker Cloud see Instructor Guide.

Instructions for students can be found in the Student Guide.

How to add a TA to your iClicker course

Students can sign up for iClicker Reef (the student iClicker Cloud application) accounts. Because the registration data is stored in the U.S., students can use a pseudonym and email address. As long as students are informed of the data residency, iClicker Cloud is FIPPA compliant. There is also an integration with Canvas that will allow the students to register their iClicker Reef account within their Canvas course in order to activate it for free. 

Once Sauder Instructors create the iClicker course in iClicker Cloud and activate iClicker Sync in a course, students will be able to register via the iClicker sync link and will automatically see the course in the iClicker application.

Students will also need to click the iClicker Sync navigation item in the Canvas course at least once, in order to properly connect their Canvas account with their iClicker Cloud account and sync their grades.

iClicker Resources for Synchronous Classes

Set up iClicker

These instructions will guide Sauder Instructors to set up an iClicker Cloud Course and connect it to their Canvas Course.

Here are the step by step instructions:

Enable iClicker Cloud in Canvas

  1. Go to your course in Canvas and click “Settings”
  2. Select the “Navigation” tab
  3. Find and enable “iClicker Cloud”
  4. Click “Save”

Download iClicker Cloud for your desktop

We recommend running iClicker Cloud from the desktop app and not from the web browser.

Go to the iClicker Cloud download page and select Windows or Mac to download the application. Once you do this, you can usually find the iClicker Cloud icon on your desktop.

Register / Sign Into iClicker Cloud

  1. In the iClicker Program, either Sign in or Create Account

Create an iClicker Cloud Course

  1. Within the iClicker Program Click “Create New Course” on the top left. Note that if you have multiple sections, you will need to create an iClicker course per section to prevent students from receiving “double credit” or being marked as absent in sessions they do not belong to
    • Even if you only want to use iClicker to take attendance, keep “Full Course” selected
    • “Course Name” should be the same as what it appears on your Canvas course page
    • Start and end dates should be teaching start and end dates
  2. Back on the iClicker homepage, select the three dots on the right hand side of your course > Settings
    • On the Polling tab, select:
      • “Do not send a picture of my screen” → Students cannot see and answer the question if they are not in class
      • “Do not send results” → This ensures that students will not automatically see the distribution of responses in the class. You can still share results manually from your end if needed
    • “Session Participation” is how you wish to grant participation marks
    • “Session Performance” is how you want to mark student answers

Integrating iClicker Cloud with your Canvas Course

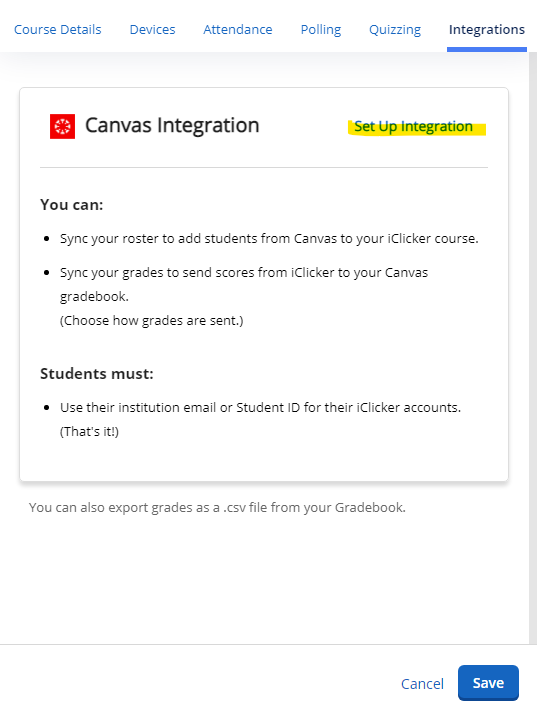
  1. In the “Integrations” tab of the settings, select “Set Up Integration”

2. A window will pop up that says “Setting up this integration requires the web application”. Click “Save and Continue” and a window will pop up leading you to the web application.

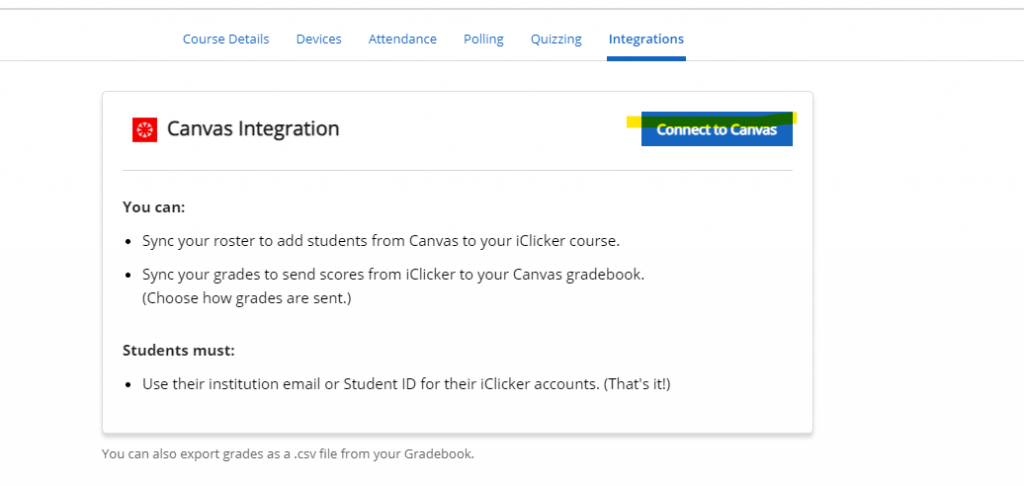
3. In this new window, select “Connect to Canvas” and then click “Go to Canvas”. If prompted, please log into Canvas with your UBC CWL.

4. iClicker will request Authorization. Select “Authorize” to proceed connecting iClicker with Canvas.

5. You will be brought back to the iClicker Cloud web page where you will see a list of the Canvas courses that you teach. Select the course that you wish to sync with iClicker and click Next.

  • *Note: By default, you will be shown a list of your published courses that you are teaching. If your course is currently unpublished, toggle the button on the top right side of the “Select Your Canvas Course” window to “Unpublished” and select the course you wish to sync with iClicker.

6. If your course has multiple sections, select the section you wish to add to your class and click “Connect”

7. Select “Sync Roster Now” and the Canvas integration is complete!

Get your students access to your course

Prior to your first iClicker class, we suggest sending an announcement to students to get them to sign up for your class. Here is an example:

Welcome to COMM 123 sec 234. Tomorrow we will be using iClicker in class. If you do not have an iClicker student account. please follow the instructions on the iClicker Student Guide. Once you have an account, you must access the course by going into the Canvas course and clicking ‘iClicker Cloud’ in the left hand navigation. You must access the iClicker course through the ‘iClicker Cloud’ link at least once for your points to be captured. Then add the iClicker course to your account. This course is called COMM 123 sec 234. Please make sure you join the correct section so your grades will be captured.

Suggested Settings

Within settings, under polling, instructors can set scoring for the course and what to share with students.  These are suggested settings.

  • Send a picture of my screen to student devices: Do not send a picture of my screen
  • Send class results to student devices: Do not send results
  • Participation: Instructors can select an amount of points to give students if they answer a certain percentage of questions. These points will be added on to the session performance points.
  • Session Performance: Instructors can select an amount of points for correct response and for just responding. Usually instructors will chose 1 point but it is up to each instructor.

Grades

You can choose to sync your iClicker grades with your Canvas Gradebook.

  • Log into iClicker Cloud and select your course
  • Select Gradebook on the left hand navigation
  • Select Sync Grades Button on the top right
  • Select the Sesssions that you want to move from iClicker to Canvas. ‘Sessions’ correspond to each of your classes.
  • Click ‘Sync’

If you run into an error:

-Ensure you have set up your Integration to Canvas via the settings area in iClicker.

-Have your students sync’d their accounts? If you are in your grades area in iClicker cloud and you do not see any green dots under Grade Sync column, that means that no students have sync’d their iClicker account with you specific course. Every student needs to go into your Canvas course and click on the iClicker Sync button once to enable this and get their grades.

FAQ’s

  • Why are some students grades not syncing from iClicker to Canvas?
    • If student have not accessed an iClicker course from your Canvas course at least once, the grades will not sync properly. Please relay the information below to students. it is also available in the UBC iClicker Student Guide.
      • Once an iClicker account has been set up, log in to the Canvas course and click iClicker Cloud in the Course Navigation.
      • If students don’t see the iClicker Cloud option in their Course Navigation, contact the instructor. iClicker Cloud needs to be enabled in the Canvas course by the instructor for students to see it.
      • Students must add each course that uses iClicker through the iClicker Cloud link in Canvas or else they will not receive grades for iClicker activities in the course. Students should not try to add courses in iClicker Reef directly, unless your instructor specifically tells you to.
      • Once the course has been added, students can participate directly through your web browser for the course activities by logging in at app.reef-education.com.
  • Is iClicker free for students?
  • Can students only use iClicker on a smartphone?
  • What should I do if I have multiple sections merged on Canvas?
    • Create a separate iClicker Cloud course for each section. Make sure you’re in the right one before starting a class activity!
    • Note that course sections in iClicker will all have separate columns in your Canvas Gradebook. For example, you are not able to automatically combine all ‘session 1’ marks for your section 101, 102 and 103 iclicker courses into one column in Canvas gradebook. If you want help organizing the iclicker grades, please contact Learning Services at Help@sauder.ubc.ca
  • I got an error message using iClicker Cloud and a MAC, what can I do?
  • iClicker is frozen and I cannot close the program
    • If the fatal error message appears and you are unable to quit, use force quit to close the application. The hotkey for force quit is Command+Option+Escape. Another option to force quit is to use your Activity Monitor. You can open your Activity Monitor by opening Spotlight Search (Command+Space), then type ‘Activity Monitor”
    • If force quitting the application does not fix the fatal error, you can try deleting and re-downloading the application.
  • How can I remove sessions and/or attendance from iClicker?
    1. Log into the iClickerCloud website.
    2. Select the course you are interested in.
    3. Navigate to the Class History tab.
    4. In the top right corner, select Delete.
      Image of iClicker dashboard on the Class History Tab, with the delete button highlighted in a red square.
    5. Check off the attendance and/or session dates you’d like to remove. Confirm that you’d like to delete the data.
      • Attendance and sessions are counted separately. If you remove the attendance for a class, it will not remove the poll results for that class, and vice versa.
      • If you have already synced grades, clicking “Sync Grades” again will not remove the grades for the deleted sessions from Canvas. You will have to remove them manually.
      • There is no way to retrieve deleted attendance/sessions.
        Pop-up screen in iClickerCloud for deleting session and/or attendance.

Instructional Video

Video instruction on how to set up iClicker Cloud Course

Categories
Academic Integrity Assignment Essay Exam Feedback Grading Learning Technology Peer Review Teaching Activity Turnitin

Turnitin

, , , , , , , , ,

Turnitin

Automatically check written work for plagiarism and provide individual feedback for each student on their submission.


Integrated with Canvas:

No


Use by UBC Sauder Instructors:

Frequent


Status Info:

Usage Scenarios

Turnitin has a suite of internal tools that includes:

  • OriginalityCheck: helps instructors check students’ work for improper citation or potential plagiarism by comparing it against Turnitin’s content databases which contain the current and archived web, student submitted papers, and content from Turnitin’s partnerships with leading publishers (including library databases, textbook publishers, digital reference collections, subscription-based publications, homework helper sites, and books).
  • PeerMark: allows for an online peer review environment for students to evaluate each other’s work.
  • GradeMark: provides a paperless, browser-based grading environment for instructors (and teaching assistants). The tool allows instructors to create custom rubrics and QuickMark (reusable comments).

User Guides & Links

Information for Instructors

If you have never used Turnitin as an instructor please request an account by emailing help@sauder.ubc.ca.

Once the account is set up, follow these steps:

  1. Review UBC’s Turnitin Policies and best practices
  2. Create a class (If you have a TA who needs access to your Tii account or you have multiple sections of the same course and want to keep them separate you will need to set up a master class and then create sections.)
    • If your students will be submitting papers directly to Turnitin, when you create the class/sections, make a note of the:
      • Class ID
      • Enrollment key – these need to be passed on to students so they can enroll in the class (see student enrollment)
  3. Set up an assignment
  4. If you have downloaded assignment files from Canvas (see instructions for downloading Canvas Assignment submissions), you can upload them to Turnitin as a ZIP file, see Zip-file upload on behalf of a student
  5. For Zip files generated from your online exams, you can refer to this guide, How to upload ZIP files in Turnitin, to see the more specific step-by-step instruction.

Please note: Information submitted to Turnitin is stored in the United States. Therefore your students should be advised to remove identifying information, such as their name and student number, from the text of any assignment submitted to Turnitin. They can also choose to use a pseudonym and/or anonymous email address to set up their accounts.

If you encounter any issues with Turnitin, please email help@sauder.ubc.ca.

Information for Students

Below is an example of how you can introduce Turnitin to students – to see how this information could be presented in Canvas see Turnitin – information for students.

COMM XXX written assignments are to be submitted using Turnitin, a web service that checks for content originality.

The Turnitin Student Guide provides step-by-step instructions on how to register for Turnitin and submit your assignments or you can use the information below:

  • To register for Turnitin account go directly to Turnitin New User Creation and choose “student.”
  • If you already have a Turnitin account, you will need to enroll in a class.
  • To set up your Turnitin user profile or enroll in a new class you will need the COMM XXX Class ID and Password (“enrollment key”):

Class ID: XXX
Password: XXX


Important Privacy Information
:
Information submitted to Turnitin is stored in the United States. If you don’t want your personal data to be stored in the US, please remove identifying information, such as your name and student number, from the text of any assignment submitted to Turnitin. You can use an alias or pseudonym but please remember to let your instructor know your alias.

Resources & Support

Resources for Instructors:

If you have challenges or questions about Turnitin, please email help@sauder.ubc.ca

Resources for Students:

Categories
Assignment Canvas Feedback Grading Learning Technology Teaching Activity

Rubrics

Rubrics for Course Assessment

A rubric is a tool to aid in marking by setting clear expectations in advance of receiving the work from students. Rubrics go beyond a marking guide by not just listing criteria to be judged, but also by providing clear examples of what each level of achievement looks like.

What is a rubric?

Put simply, a rubric is a tool that helps save time during marking and helps provide effective feedback to students. Rubrics are written alongside the assignment and lay out the criteria on which students will be assessed, and what each level of achievement looks like.

A rubric can be holistic or analytic depending on what is needed. Holistic rubrics consider the student work as a whole, while an analytic rubric breaks the marking down into independently assessed components.

Example: Analytic Rubric for Case Presentation

Example: Holistic Rubric for Case Presentation

More Information

A rubric helps ground the marking process in clear expectations for each aspect of the assignment. This requires an up-front time commitment in describing aspects, what success looks like for each aspect, and what score or marks will be attributed.

Remember! Rubrics should be written to speak to the student, rather than the instructor. (Though they are helpful for instructors!)

This up-front commitment pays off during the actual marking as the basic judgments have already been made. If TAs or Markers are assessing students’ work, or instructors are team-marking an assignment with colleagues, rubrics can help get everyone using the same language and standards on an assignment.

Rubrics can be a powerful part of the student learning process by creating a shared knowledge of expectations. When a student sees the rubric for an assignment, they can see precisely what dimensions require improvement, and what such improvement would look like. When used as part of formative assessments, this shows students paths to learning and success. 

Creating Rubrics

Canvas supports adding rubrics to your assignments. Mark using a rubric, and the total can push automatically to the gradebook as the assignment score. Students can see feedback that is listed in the rubric; this can help cut down on time spent on marking.

How to add a rubric to an assignment (Instructure Canvas Guide)

Alternatively, rubrics can be made in a word processing or spreadsheet program, printed out, and written on freehand. This technique is used by some instructors for live presentations so that there are no device distractions.

Get Support

Learning Services is pleased to offer dedicated support for rubrics as part of the assessment and course design process.

Additional information is available at the Self Serve Rubric Support page.

If you have questions, or would like to discuss further, please email help@sauder.ubc.ca.

References

Stevens, D, & Levi, A. (2013). Introduction to Rubrics. (2nd edition). Stylus.

Categories
Assignment Experiential Learning Learning Technology Riipen Teaching Activity

Experiential Learning – Riipen

Riipen

Hear from our Riipen Community Video

Interested in using real-life examples in class, and giving student industry-relevant experiences?
Riipen is a collaboration platform for project-based experiential learning between post-secondary institutions, educators, industry partners, and students. The platform allows all parties in the ecosystem to collaborate to co-create, manage, and assess meaningful experiential learning opportunities at scale.

The Riipen team will support educators through every step – from outlining the experience and matchmaking, to project management and feedback.

Testimonials

“Over the past 3 years, Riipen has provided me an opportunity to expand my network of clients in order to give students a broader range of companies and industries to work with. Students have been able to get exposure to a variety of different industries and partners all over Canada that we would not have been able to access in the past. As an educator, it has been incredibly helpful to have the support and expertise of the Riipen team to help source clients based on the specific learning objectives of the course”.Jenny Dickson, B2C Strategic Marketing Plan (F20)

“When posting a class project on Riipen, I’ve always received timely responses from interested industry partners.” David Hardisty, Marketing Outreach Consultancy (F19)

“I have used Riipen for my strategic management course for several years. It has provided students with valuable industry exposure and experiential learning which will no doubt benefit them as they start they careers. The platform is user friendly and support is readily available for staff needing assistance. I recommend it for courses looking for live business problems and cases.”Adam Pankratz, Strategic Management Consulting Project – W21

Learn More

Access

Categories
Academic Integrity Assignment Canvas Essay Exam Learning Technology Respondus LockDown Browser Teaching Activity Zoom

Academic Integrity

Academic Integrity

A culture of academic integrity at UBC Sauder is everyone’s responsibility – we all play a part. Here you will find information, resources, and links for faculty to learn more about academic integrity, understand its role, and learn what happens when it is breached. Included are strategies and tools that will help ensure student performance is authentic and reflects their own thoughts and work.

When we speak of academic integrity in relation to faculty, we are referring to strategies and tools that ensure student performance is accurate and reflective of their own work. Sound processes contribute to upholding the integrity of students, faculty, Sauder School of Business and its credentials, UBC, and the industries we serve.

Getting Started with Academic Integrity

This is your starting point for academic integrity: frequently asked questions and essential links for faculty members and students.

For Faculty

For Students

Academic Integrity in Teaching & Learning

Learning with integrity requires knowing the expectations for academic integrity in your courses and ethically collaborating with your classmates when appropriate.

Learn more

Academic Misconduct Regulation and Process

Understanding how the academic misconduct process works is vital for faculty and for students who may be impacted by an allegation or an investigation.

Learn more

Resources for an Educative Approach

Further proactive strategies and resources to help you with academic integrity may be found here.

Categories
Assignment Canvas Group Work Learning Technology Panopto Presentation Teaching Activity Zoom

Student Presentations

Student Presentations (Group/Individual)

Asking students to present their work to the class is a very effective, and often times authentic, way to assess students. Presentations can be conducted synchronously in class, asynchronously in the form of an assignment, or a combination (i.e. recorded presentation, synchronous question and answer period). In addition, presentations can be conducted offline or online, and individually or in groups.

Asynchronous Presentations

Photo by Matthew Henry from Burst

Asynchronous presentations are a way for students to take the time to develop and record a presentation and submit it via Canvas.

Individual Asynchronous Presentations

Asynchronous individual presentations are a way for students to take time to develop and record a presentation and submit it via Canvas. Sauder Instructors are recommended to use My Media in Canvas.

Group Asynchronous Presentations

Asynchronous group presentations are a way for students to have time to work as a group outside of class to develop and record a presentation and submit it via Canvas. Sauder Instructors are recommended to advise students to use ZOOM and submit in Canvas.

Synchronous Presentations (in Person/Online)

Photo by Matthew Henry from Burst

Synchronous presentations are a way for students to practice their presentation skills and create interaction with the rest of the class. For online, students can present using ZOOM as individuals or in groups. Hosts can allow students to share screens, videos, and audio. Students can identify one student to share their screen and navigate the slides if working in groups.

Online Individual Synchronous Presentations

Synchronous individual presentations are a way for students to take time to develop and record a presentation and submit it via Canvas. Sauder Instructors are recommended to use My Media in Canvas. Here are some instructions for this (insert link here).

Online Group Synchronous Presentations

Synchronous group presentations are a way for students to develop their presentation skills as well as gather experience working with teammates. Instructions coming soon.

  • Student Facing Instructions- ZOOM Synchronous Group Presentations: Here are student-facing instructions for student group presentations within an instructor’s ZOOM course room where student groups are sent to instructors’ breakout rooms and record their presentations.  Students are then shown how to access and upload their recorded video into the Canvas course Media Gallery.  The instructions are for 1 video of all students presenting and this video will be available to all students to see when in Media Gallery.
    • NOTE: Instructors will need to give all students co-host roles in ZOOM before sending students to breakout rooms and enable a media gallery in their course before students upload to the media gallery. 
    • Student Facing Instructions: Synchronous Group Presentations in ZOOM.  Please email help@sauder.ubc.ca so we can copy these instructions into the Canvas course for release to students.

Spam prevention powered by Akismet