
Electroacoustic Composition with Hyper-horn Output
A saga, or, as defined by Oxford Languages, a long, involved story, account, or series of incidents. My experience with 3D printing can accurately be summarized as a long series of incidents, although the incidents are what allowed some interesting discoveries along the way.
One of the primary ways I plan to augment my horn as part of ECHO is by adding force-sensitive resistors (FSRs) to the keys of my horn. This will allow me to track the amount of pressure applied to my keys. An additional goal I had for this project was to ensure that any augmentations I made to my horn could be easily (and safely) applied and removed. To be able to apply/remove the FSRs I’ve tested several different key clip designs over the past two weeks.
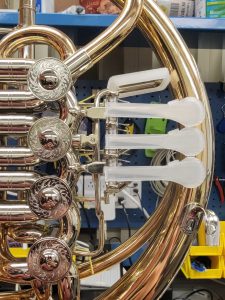
The horn that I am building ECHO to augment is a double horn and has four different keys. 3 identical keys which I will refer to as finger keys and the thumb trigger used to switch between the F and Bb side of the horn which I will refer to as the thumb key. Because of this, I needed to design two different key clip designs for the two different types of keys.
Finger Keys
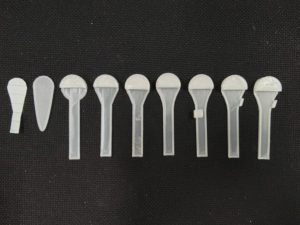
During the development of the key clip for the finger keys, I created 10 prototypes. Initially, I made a paper template for the key shape, measured its dimensions with a caliper, and designed the first prototype in Tinkercad as a teardrop shape. However, I realized the FSR tail needed support, so I based the key clip shape on the FSR, not my finger keys.
The next 5 prototypes involved adjusting the tapering of the key clip head into the tail and modifying the cap’s depth and wall thickness. The smallest wall thickness achievable with the filament was 1.5mm. Printing without supports led to cap sagging, so I increased the cavity depth to 4mm from 2mm. This allowed secure attachment to the finger key, but the tail could move slightly out of alignment. To fix this, I created 3 more designs creating different small clips as a stopper until I found one I was happy with.
After finalizing the design, I discovered a new issue: misaligned finger keys on the horn. The middle key slanted upwards, causing the key clips to rub against each other during performance. To solve this, I printed new key clips with numbers on the caps and used a Dremel to sand the friction points until they no longer touched, ensuring smooth performance.
Thumb Key
The thumb key clip required significantly more tinkering during development due to several unique challenges when compared to the finger key clip: the tight space it’s situated in, its convex shape, and the brace it’s attached to. Throughout developing the thumb key clip I created 17 prototypes before landing on my final design.
For my first design, I very carefully measured and calculated the curvature of the convex shape and created a design with two clips on one side as I knew there wasn’t enough room between the thumb trigger and my lead pipe to slide the clip head on like I did with the finger key clips. However, this approach didn’t work due to miscalculations. Removing the clips, the next 6 prototypes focused on adjusting the design to rest flush on the top of the thumb trigger.
Once satisfied with the fit, I once again addressed securing the clip to the key. The following two prototypes introduced a snap bottom, but it was challenging to apply and remove. I modified it into a sliding bottom through 6 more prototypes, ensuring a secure fit during performance while being easy to slide out.
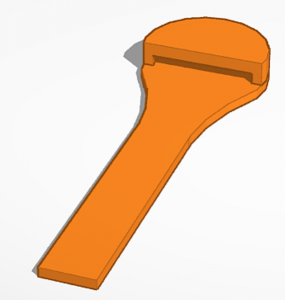
I discovered then that the sliding bottom wasn’t securing the key clip but the track it slid into. Cutting the design in half below the track proved to maintain it’s security. However, the rectangular edge was uncomfortable and hit against my leadpipe. Two more designs rounded the edges, creating an organic shape while preserving flat space for the FSR.

Onwards!
Who knew 3D printing could be so frustrating? Probably a lot of people other than me.
Week 2 of the ECHO project has been spent creating several prototypes of the clips that will eventually attach the FSR sensors to the keys of my horn.
Last week, I started this process by making paper templates of the shape and size of my keys. I then copied these templates onto an additional piece of paper to make precise measurements using a slide caliper. After getting measurements of all the dimensions I needed, I then worked on creating several 3D digital design prototypes of the 3 identical clips for the keys controlled by the player’s index, middle, and ring finger. With each prototype design, I then used PrusaSlicer to generate the G-code needed for the 3D printer.
After this process, I’ve been able to create a design that is the perfect size for the FSR sensors I will be using, but I am still adjusting the cap so that it will securely stay on and won’t over-crowd the other keys. I was also able to create an initial prototype for the thumb key, though designing a clip for this key has proven to be a unique challenge when compared to the other keys as it is convex instead of flat and has some welded supports I will have to design around.
Onwards!


A reflection of sound. This is fitting because the first week of the ECHO project so far has been a whole lot of preparation (we’ll get to the reverberation part later).
Alternatively, an ECHO is but Electroacoustic Composition with Hyper-horn Output of course! For this project, I will be creating an augmented French horn that allows the performer to control or trigger media elements without using movements natural to the average horn player. To accomplish this, I will design and fabricate a set of four removable 3D-printed force-sensing resistor (FSR) sensors for each key of the French horn. Additionally, a wearable gyroscopic-accelerometer sensor system will be used to monitor the player’s right-hand position, both inside and outside of the bell. To capture and interpret the sensor data, I will then develop a Max/MSP patch. This software will allow users to seamlessly integrate the sensor data into their compositional projects. For example, the data output could be used to control visuals, lighting, panning, and much more. The system’s flexibility will enable performers to not only switch between different modes of operation and thus independently execute electroacoustic works, but also easily remove or put on the system to perform with their standard horn.
This week I ordered (and received) the Arduino Nano 33 IoT and a rechargeable Li-Po Battery which I will eventually use to collect and wirelessly send the data from the FSR sensors and the gyroscopic-accelerometer sensor system to the Max/MSP software. I also created paper templates of my horn keys which we will use this upcoming week to start creating the 3D-printed clips for the FSR sensors.
Onwards!