Things are really starting to come together quickly, so here’s a quick overview of my progress this past week!
Flex Bend Sensor
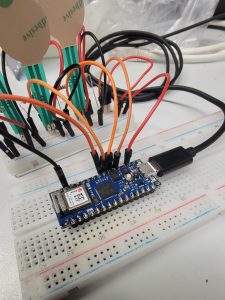
Firstly, the flex bend sensor I ordered last week finally arrived. I integrated it into my prototype electronic circuit and updated the Arduino IDE code for testing. Once I solder wires to the sensor pins, my next step will be sewing a channel on a glove to secure it. I plan to sew the channel from the cuff towards the palm to measure the bend of my inner wrist.
IMU Module
Initially, I considered using an accelerometer attached to my wrist to track movement. However, the Arduino Nano 33 IoT comes with a built-in IMU module. Intrigued by its capabilities, I decided to incorporate it into my project. While the flex bend sensor is ideal for measuring the hand’s position in the bell (open, 1/2 stopped, closed), the IMU module offers a unique opportunity to track performance gestures such as bells up, cues, or general movement within the performance space.
To integrate the IMU module, I followed Arduino’s documentation. Although I could read the incoming data from my analog pins without issues, I encountered problems when trying to use analogRead() and IMU.readAcceleration simultaneously. After systematically commenting out sections of my code, I determined that both the analog pins and the IMU module functioned correctly separately. A bit of research led me to discover that the Arduino_LSM6DS3 library uses I2C via pins A4 and A5 to communicate with the IMU module. By simply relocating my flex bend sensor from A4 to A6, everything started working smoothly!
Circuit Board
Additionally, Dr. Bob introduced me to Fritzing, an electronics and
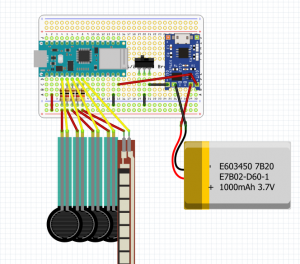
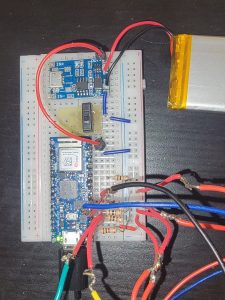
prototyping software. This helped me streamline my previous prototype circuit and devise a solution for integrating the TP-4056 Lithium Battery Charger and Protection Module, along with a switch. This setup allows my microcontroller to operate on a LiPo battery during performances, eliminating the need for a wired power source.
The transformation of my prototype electronic circuit board is remarkable! It’s becoming so much simpler. In fact, it might soon transition from a prototype to a final design. To organize the multiple components and wiring for ECHO’s final version, I plan to use Adafruit’s Perma-Proto 1/2 sized breadboard. Additionally, a smaller breadboard will be positioned underneath to accommodate JST connectors. This setup will enable me to easily attach and detach my sensors for storage and replacement, should any get damaged.
Onwards!