
Electroacoustic Composition with Hyper-horn Output
A saga, or, as defined by Oxford Languages, a long, involved story, account, or series of incidents. My experience with 3D printing can accurately be summarized as a long series of incidents, although the incidents are what allowed some interesting discoveries along the way.
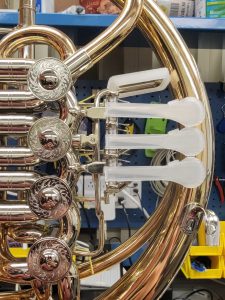
One of the primary ways I plan to augment my horn as part of ECHO is by adding force-sensitive resistors (FSRs) to the keys of my horn. This will allow me to track the amount of pressure applied to my keys. An additional goal I had for this project was to ensure that any augmentations I made to my horn could be easily (and safely) applied and removed. To be able to apply/remove the FSRs I’ve tested several different key clip designs over the past two weeks.
The horn that I am building ECHO to augment is a double horn and has four different keys. 3 identical keys which I will refer to as finger keys and the thumb trigger used to switch between the F and Bb side of the horn which I will refer to as the thumb key. Because of this, I needed to design two different key clip designs for the two different types of keys.
Finger Keys
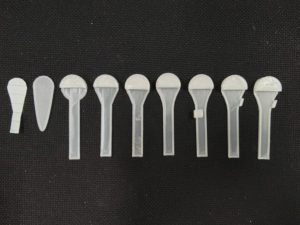
During the development of the key clip for the finger keys, I created 10 prototypes. Initially, I made a paper template for the key shape, measured its dimensions with a caliper, and designed the first prototype in Tinkercad as a teardrop shape. However, I realized the FSR tail needed support, so I based the key clip shape on the FSR, not my finger keys.
The next 5 prototypes involved adjusting the tapering of the key clip head into the tail and modifying the cap’s depth and wall thickness. The smallest wall thickness achievable with the filament was 1.5mm. Printing without supports led to cap sagging, so I increased the cavity depth to 4mm from 2mm. This allowed secure attachment to the finger key, but the tail could move slightly out of alignment. To fix this, I created 3 more designs creating different small clips as a stopper until I found one I was happy with.
After finalizing the design, I discovered a new issue: misaligned finger keys on the horn. The middle key slanted upwards, causing the key clips to rub against each other during performance. To solve this, I printed new key clips with numbers on the caps and used a Dremel to sand the friction points until they no longer touched, ensuring smooth performance.
Thumb Key
The thumb key clip required significantly more tinkering during development due to several unique challenges when compared to the finger key clip: the tight space it’s situated in, its convex shape, and the brace it’s attached to. Throughout developing the thumb key clip I created 17 prototypes before landing on my final design.
For my first design, I very carefully measured and calculated the curvature of the convex shape and created a design with two clips on one side as I knew there wasn’t enough room between the thumb trigger and my lead pipe to slide the clip head on like I did with the finger key clips. However, this approach didn’t work due to miscalculations. Removing the clips, the next 6 prototypes focused on adjusting the design to rest flush on the top of the thumb trigger.
Once satisfied with the fit, I once again addressed securing the clip to the key. The following two prototypes introduced a snap bottom, but it was challenging to apply and remove. I modified it into a sliding bottom through 6 more prototypes, ensuring a secure fit during performance while being easy to slide out.
I discovered then that the sliding bottom wasn’t securing the key clip but the track it slid into. Cutting the design in half below the track proved to maintain it’s security. However, the rectangular edge was uncomfortable and hit against my leadpipe. Two more designs rounded the edges, creating an organic shape while preserving flat space for the FSR.

Onwards!