
Maybe you haven’t used a multimeter in a long time. Maybe you’ve never used one! Lets go through the basic multimeter functions that you will need to understand to debug and repair most consumer electronics and household appliances.
Introduction
Typical multimeters can measure a number of different properties, including at a minumum voltage, current and resistance. Depending on the multimeter you have and its features you might also be able to measure temperature, capacitance, inductance, frequency and more.
Analog multimeters exist, but these days you are much more likely to come across digital multimeters.

Using a Multimeter
In general, to use a multimeter, you will set the dial depending on measurement type, and connect the probes to the multimeter ports and to your circuit.
The black probe always connected to the multimeter port labelled COM (common), while the red probe connects to either the VΩmA port or the 10ADC port (labels might be slightly different depending on the multimeter). For our purposes, we will almost always be using the VΩmA port, which is used for measuring voltage, resistance, and currents below 200mA, while the 10ADC port is only used for measuring higher currents.

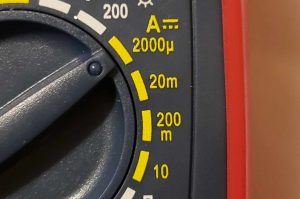
For autoranging multimeters, each measurement type only has one setting on the dial. Many multimeters are non-autoranging though, meaning the measurement range is selected manually. The value on the dial is the maximum value that can be measured in that setting. For example, if the expected current is 25mA, then in the case below the dial should be set to 200mA.
Testing Continuity
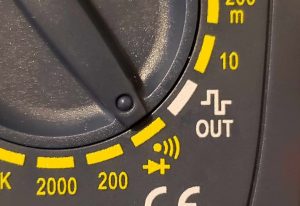
One of the most useful functions of a multimeter when it comes to electronic repair is performing continuity checks. Continuity checks can test whether two components are electrically connected, which can help you to find shorts, loose wires, blown fuses, bad solder joins and more. Essentially, in a continuity check the multimeter measures resistance (see more below) and checks whether the resistance is below some threshhold (often ten ohms), in which case it will beep. Performing a continuity check:
- Switch the device off, unplug, remove batteries. (This check won’t work if there is current running through the circuit)
- Turn the dial to continuity mode
- Touch the multimeter probes to the circuit, in parallel with the suspected short / loose connection / blown fuse.
- The multimeter reading reports whether the probes are electrically connected (displays 0 and beeps) or disconnected (displays 1 or OL)
Note: To check continuity the multimeter passes a small amount of current through the circuit, which might damage very sensitive circuits. If in doubt, try using a different approach.
Measuring DC Voltage
Measuring voltage can be useful to check the voltage of batteries and more. To measure voltage:
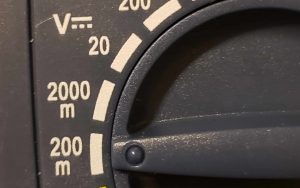
- Turn the dial to DC Voltage
- Touch the multimeter probes to the circuit – eg. to the two battery terminals.
- The multimeter reading reports the measured voltage.
Measuring Resistance
Measuring resistance is useful in a few different scenarios. If a solder join is cracked or wire is loose then a continuity check might pass, but the multimeter could measure some resistance. This would also be useful to check that resistance is within expected specifications, or to check that a diode is working properly (as discussed below).
To measure resistance:
- Turn the dial to resistance:

- Touch the multimeter probes to the circuit, in parallel with the resistor, or the section of the circuit to be measured.
- The multimeter reports the measured resistance.
Note: To check continuity the multimeter passes a small amount of current through the circuit, which might damage very sensitive circuits. If in doubt, try using a different approach.
Checking Capacitors
A common problem in broken electronics and appliances is burnt out capacitors. Capacitors store charges, so before you do anything else, ensure that the capacitor is discharged, or discharge it (see this safety post on how to discharge capacitors).
Then, to check capacitance:
- Turn the dial to Capacitance
- Touch multimeter probes across the capacitor
- The multimeter reports the measured capacitance
Some multimeters don’t have a capacitance setting. Not to worry, in that case, use the resistance setting to check whether the capacitor is behaving as expected:
- Turn the dial to Resistance
- Touch multimeter probes across the capacitor
- The multimeter will pass some current through the capacitor, which should gradually charge it. This means the multimeter reading should start at some low value and gradually increase, if the capacitor is working correctly. If there is a constant low value, that could indicate a short, while a constant high value, or OL, indicates an open capacitor. In both cases it would need to be replaced.
Checking Diodes
A multimeter can be used to check for a faulty diode (or LED) as follows:
- Turn the dial to diode mode.
- Touch the multimeter probes across the diode.
- The multimeter should display a voltage between 0.2 to 0.7 depending on the diode type.
- Switch the multimeter probes.
- The multimeter should read OL or 1.
This can also be done by setting the multimeter to check resistance and ensuring that it shows infinite resistance (open loop) in one direction, and a low resistance in the other direction.
Measuring DC Current
Measuring current using a multimeter is slightly more difficult, and often less useful than measuring resistance, voltage or continuity. These measurements are complicated by the fact that the multimeter needs to be connected to the circuit in series, so that the measured current passes through the multimeter. To measure current:
- Turn the dial to DC current
- Connect the multimeter to the circuit in series. This might be difficult if measuring an existing circuit, and might require some desoldering! If possible, use a different debugging strategy instead.
- The multimeter reading reports the measured current
AC Measurements
Household appliances and consumer electronics run on DC power. There should be no reason to use the AC measurement features of the multimeter! Things can also get more dangerous when it comes to measuring the AC power from wall outlets – there is no need to do this.