Copy content between your courses with just a few clicks
- As an instructor, you can copy items in a course (i.e. assignments, quizzes, pages, whole modules and discussions) directly into another course in which you are enrolled. When you copy an item, any assets within that item (images, files, etc.) will be included in the copy.
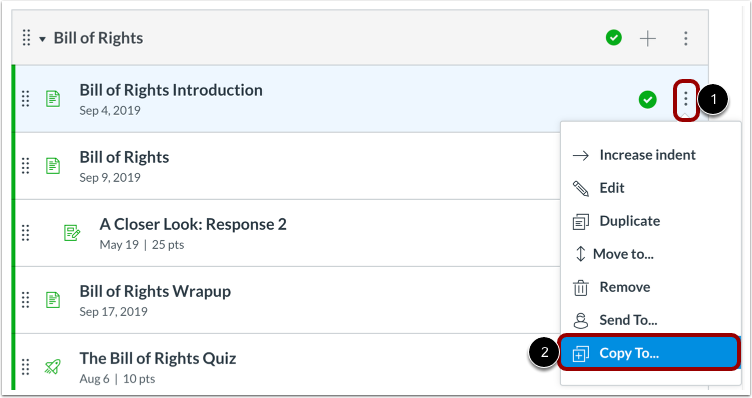
- To copy an item, navigate to the item you wish to copy and click the Options icon [1]. Select the “Copy To…” option [2].
- For more detailed instructions, see How do I copy an item to another course I’m enrolled in?
- Note: If you copy the same page to the same course more than once, the page you previously copied will be overwritten with the newly copied page. Likewise, if the target course has a page with the same name as the page you are trying to copy, it will be overwritten.
Easily share your Canvas content with other instructors
- As an instructor, you can share your Canvas course content with other instructors at UBC. You can share entire modules as well as individual assignments, quizzes, pages, and discussions.
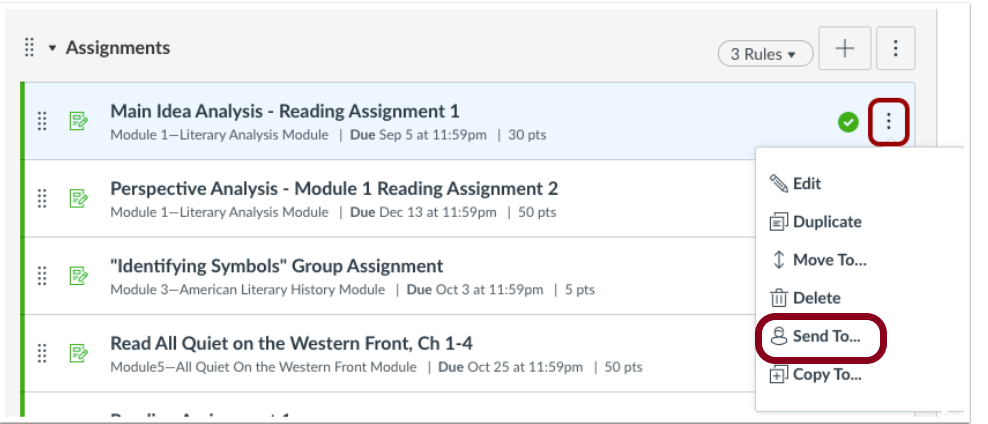
- To share an item, click on the 3 vertical dots beside the item you would like to send/share. From the drop-down menu, select “Send To…”.
- For more detailed instructions, see How do I send an item to another instructor? and How do I manage content shared to me from other users?
View the history of a page in a course and roll back the page content to a previous version of the page
- When you can edit course pages, you can view the page history and see the date, time, and author of any changes made to the page. Page editors can also roll back the page content to a previous version of the page.
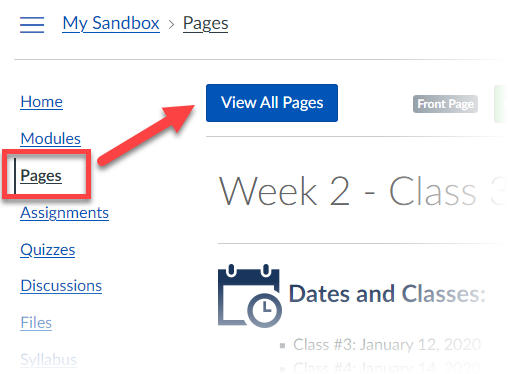
- In Course Navigation, click the Pages link. Pages is designed to open to the front page for the course, if there is a front page selected. To select a page from the Pages Index, click the View All Pages button and then click the page you want to view.
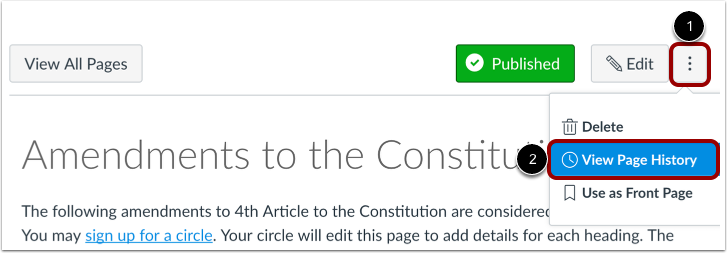
- Click the Options icon [1] and select the View Page History link [2].
- To open a prior version of your page, click the date you want to access [1] and then click the Restore this revision link [2].

For more information, see How do I view the history of a page in a course?
“Undelete” recently deleted items
- Have you ever (accidentally) deleted an item in Canvas and regretted it just a moment later? The “undelete” feature of Canvas is a “hack” but it can be a lifesaver so it’s worth knowing about.
- *WARNING* This function is not fully supported by Canvas. Therefore, it will not work 100% of the time. Moreover, it appears that only the last 25 items are available to restore.
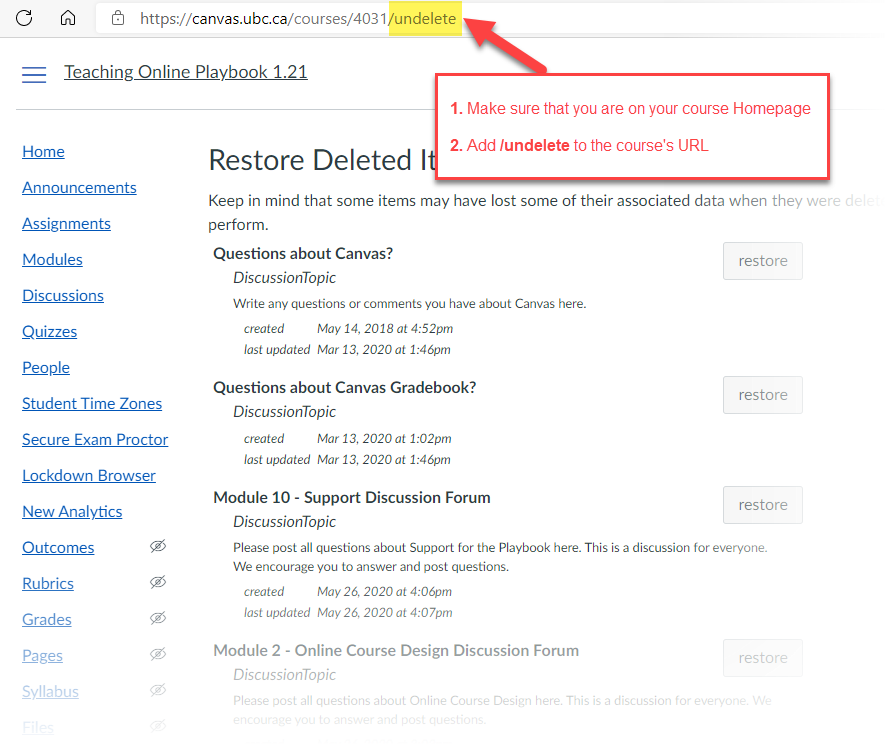
- From your Canvas homepage, type “/undelete” at the end of your URL. This will bring you to the “restore deleted items” page and you can opt to restore quizzes, assignments, and discussions you’ve recently deleted.
Quickly navigate back to a content area viewed recently
- As an instructor, you can view a list of your recent Canvas course page views from the History link in Global Navigation. Recent History displays a list of course content and content areas you have viewed (up to three weeks). Page views are listed in chronological order with the most recent page view listed first.
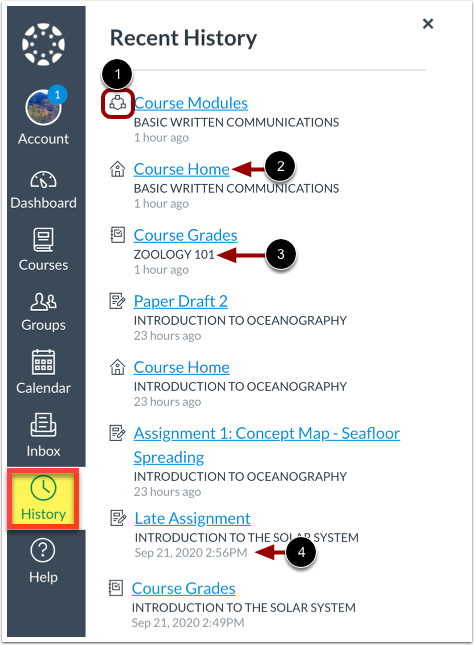
- In Global Navigation, click the History link. List items display the following information:
- Activity Icon [1]: the Canvas feature or course activity type
- Course Link [2]: the name of the course content area or content item name
- Course Name [3]: the name of the course in which you viewed the item; if set, the course nickname displays.
- Viewed Date [4]: the date and time when you viewed the page; if the page view occurred within the last 24 hours, a time stamp of [n] hours ago displays
Use the “Message Students Who” option in the Gradebook
- Canvas has a slick feature that allows you to message students from within the Gradebook based on specific assignment categories:
- Haven’t submitted yet—students who haven’t submitted the assignment.
- Haven’t been graded—students whose assignments have not yet been graded (submitted or unsubmitted).
- Scored less than [point value]
- Scored more than [point value]
- This is an easy way to send quick emails to groups of students who may need a reminder about due dates! Although one message most likely will be sent to multiple students at the same time, each student will receive an individual message.
- To use this feature, go to the Gradebook, hover over the assignment column header, click the Options icon [1] and click the Message Students Wholink [2].
Export your course content as an offline HTML file
- Did you ever wish you could create an offline version of your course? You may want to keep it for your records or perhaps share it with someone. It’s easy in Canvas! Course content export packages include all course files, pages, and embedded files added to a module. (Content items locked by modules or by date are not included in offline content and show that the content is not available.)
- Note: Offline content cannot be downloaded once a course is concluded.
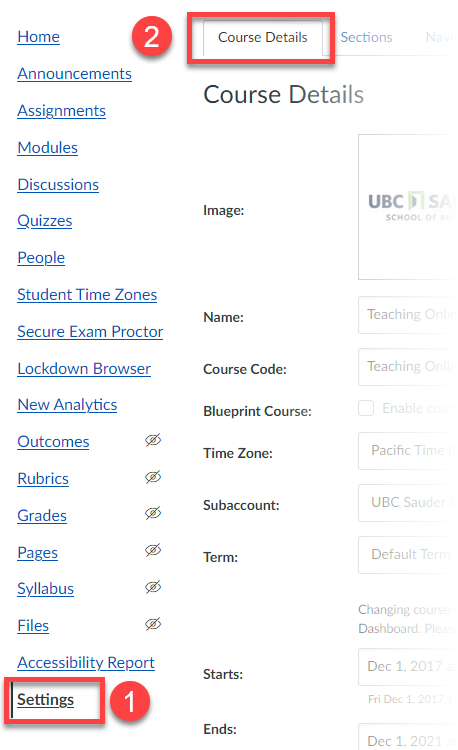
- To enable offline course content export, click the Settings link in Course Navigation [1] and click the Course Details tab [2]. Locate the Offline Course section and check the Allow course content to be downloaded and viewed offline box [3]. Click the Update Course Details button at the bottom.

- Go to your Modules page, and click the Export Course Content button. The course will download to your computer as a ZIP file.

- Once the file has been downloaded, locate the ZIP file on your computer, double click the file to open it (MAC users) or right-click the file and select Extract All (PC users). When the file expands, open the course folder and open the index.html file. The HTML file will open in your default browser.
- Note: If you don’t want your students to be able to download the package, make sure to reverse the steps above and disable the export.
- For more information, see How do I allow course content to be exported as an offline HTML file? and How do I view course content offline as an HTML file as an instructor?
- Note: You can also download your course content as an ePub file – see How do I view course content offline as an ePub file? to learn how.
Set documents to automatically open an in-line preview
- Inline viewing opens a document right on a page without a student having to click on a link or download the document. By default, embedded document links display an icon that allows users to download the file.

- What happens when a student clicks on the link depends on the Link Options which you can set. (If you are not sure how to link to a document, see How do I embed documents from Canvas in the Rich Content Editor?)
- To manage options for the link, in the Rich Content Editor, click the link title and click the Link Options link. A new menu will open. You can edit the link text in the Text field [1] or link URL in the Link field [2].
- You can choose to display a file preview in a pop-up window or in-line preview when the link is clicked. You can also choose to expand an in-line preview by default.

- To allow users to view a file preview in a pop-up window when the link is clicked, select the Preview in overlay option [3 above].
- To allow users to view an in-line preview when the link is clicked, click the Preview inline option [4 above]. To expand the in-line preview by default, click the Expand preview by Default checkbox [5 above]. To save link options, click the Done button [6 above].
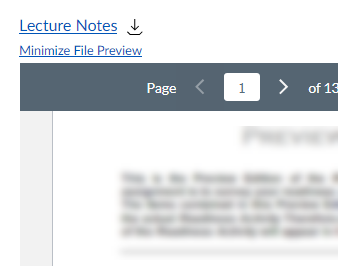
- The screenshot below illustrates the Expand preview by Default option.
Add a “Notes” column in the Gradebook
- You can use a Notes column in the Gradebook to keep track of extra information in your course, such as extra student information or general notes. The Notes column is not visible to students. The Notes column is included in the Gradebook export CSV file, and you can add notes via CSV import.
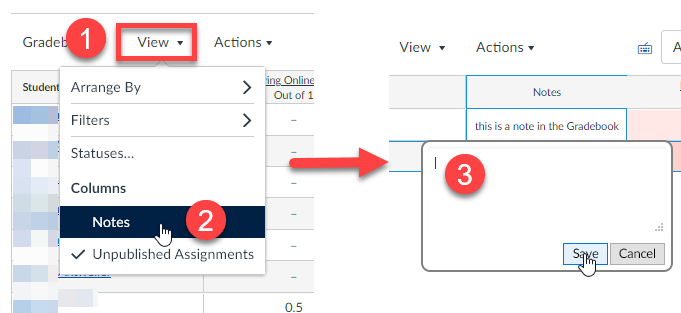
- To enable the Notes column in your Gradebook, click the View menu [1] and then click the Notes link [2]. To make a comment, click the note field for the appropriate student, enter your note in the text field [3] and click the Save button.
- The note field allows up to 255 characters.
Customize your Dashboard
- The Dashboard is the first thing you will see when you log into Canvas. Dashboard courses are ordered alphabetically by course name and your role in the course (nicknames and course codes do not apply to course ordering). Courses with instructor roles are listed first, followed by TA roles and student roles. The are a few ways in which you can customize the Dashboard.
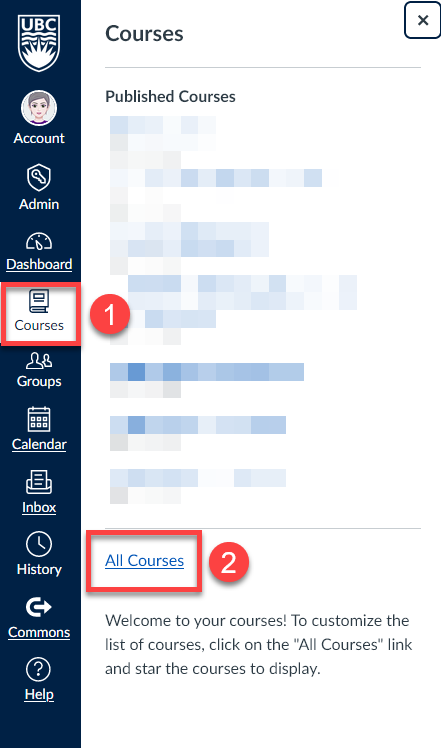
- You can choose which courses are displayed in the Dashboard by customizing your “favorite courses” list. To do so, click the Courses link in the Global Navigation [1], and go to All Courses [2].
- To favorite a course, click the star next to a course. Courses with filled stars show the course is a favorite.
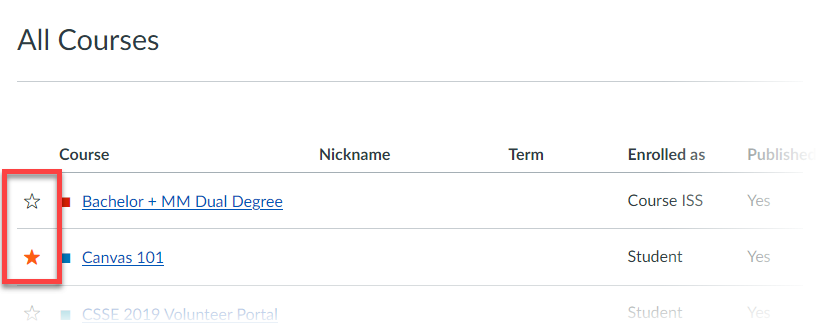
- Note: When you favorite at least one course, the Dashboard will only display favorited courses.
- Note: The “Favorite Courses” list is also what you will see when you click the Courses link in the Global Navigation. (When no courses are favorited, the courses list automatically displays up to 20 courses alphabetically in the drop-down menu. )
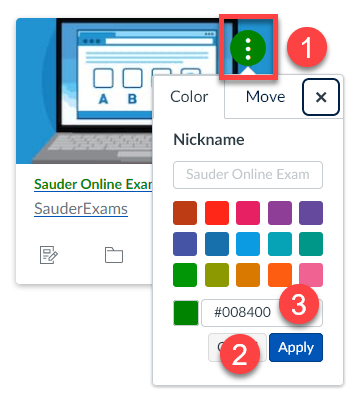
- You can also move a course card to another location in the Dashboard. To do so, you can either manually drag and drop a course card to another location in the Dashboard or click the Options menu [1] and select the Move tab [2]. Depending on the placement of the existing card, you can move the card to the top of the Dashboard, ahead or behind a specific card, or to the bottom of the Dashboard. To remove the course card from the Dashboard, click the Unfavorite option [3].
- Note: Once a dashboard card has been reordered, new courses added to the dashboard always display at the end of all existing courses.

For more information, see How do I view my favorite courses in the Card View Dashboard?
Create and assign students to groups by importing a CSV file
- In a group set, you can choose to create and assign students to groups by importing a CSV file. Alternatively, you can choose to manually create groups or automatically assign students to groups in a group set.
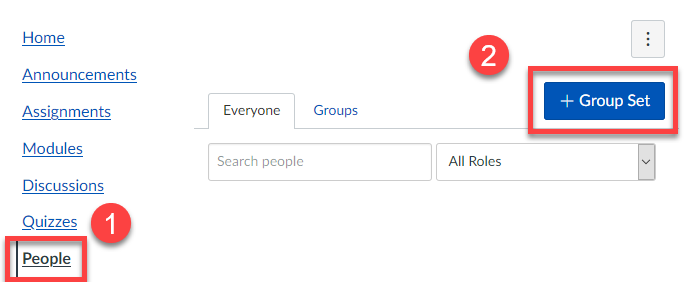
- In Course Navigation, click the People link [1] then click the Add Group Set button [2].
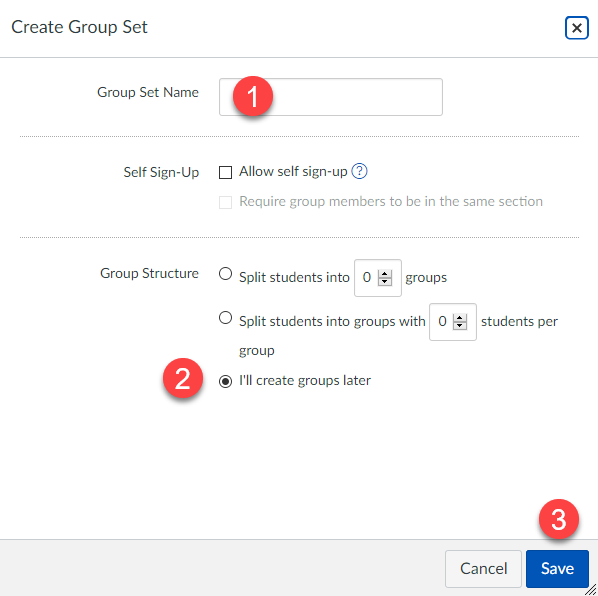
- Add a name for the group set [1] and select the I’ll create groups later option [2]. Then click the Save button [3].
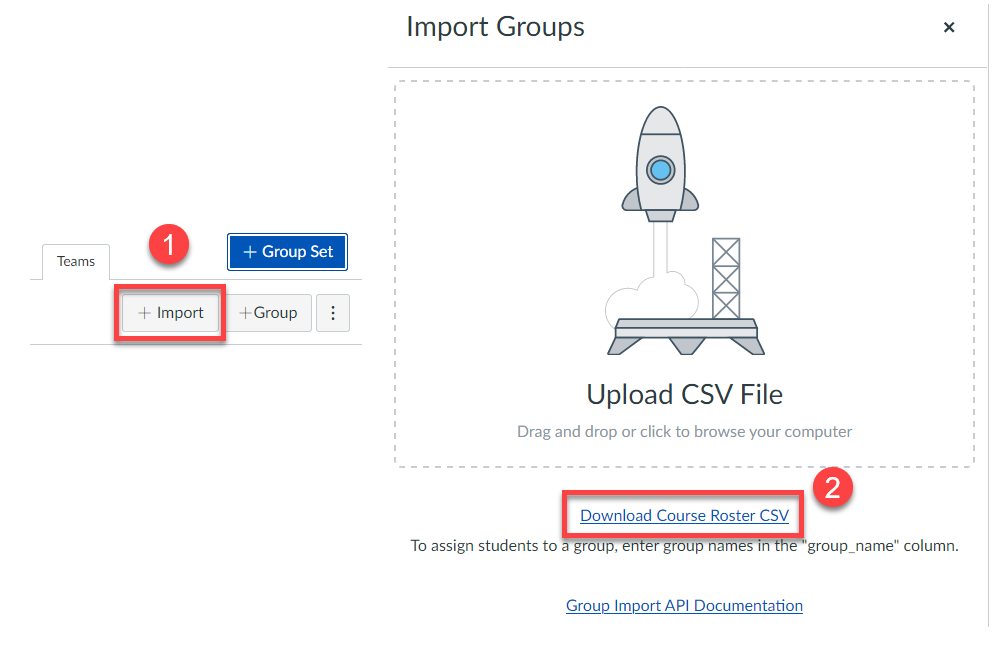
- To import groups, click the + Import button [1]. On the Import Groups page that opens, you can download a template CSV file by clicking the Download Course Roster CSV link [2].
- The Course Roster CSV includes information for each student in the course where applicable, including student name, canvas user ID, user ID, login ID, sections, canvas group ID, and group ID.
- To assign students to a group, enter group names in the “group_name” column (see below).
- When you’re finished editing, save the file as a CSV.

- On the Import Groups page, you can upload your CSV file by clicking and dragging the file or clicking the Upload CSV File area to browse files on your computer.

- A progress bar displays the status of the group creation [1].
- Created groups display in the group set [2].
