
When designing a video for your course, it’s a good idea to follow a step by step process to ensure organization, efficiency and effectiveness. To follow the steps in creating a video, we’ve developed a process called the DOME method.
DETERMINE
You should determine your goals and what you want to achieve with your video. It’s important to consider how your video will align with your course and learning outcomes. Will it enhance the learning experience? Map out a plan for your video including who it’s intended for, what topic will it cover, how might it be used, what tone will it have, where will it be published…etc. It’s important to give structure to your video, deciding what content you will cover in the start, middle and ending.
Finally, once you’ve determined your plan, you can then choose which format of video you would like to use. There are many interesting ways you may choose to relay information to your learners. The versatility of using video in education is quite endless. Formats of video design include but are not limited to:
- Animation
- Interviews (conversation or face only)
- Pen cast
- Recorded lecture
- Role play
- Screencast
- Skills clips
- Stop motion
- Talking head (with green screen, in-classroom, with slides, or with text)
- Webcam capture
- Lightboard
- Synchronous or asynchronous video discussions
Depending on your learning outcomes, content/course subject or taste, you may choose a video format that is most suitable to your needs. Needs may include explaining a concept, introductions (you, your TA’s, students, course, assignment…etc), demos/simulations, pre-lecture content, interviewing an expert, delivering feedback or student-generated videos.
ORIGINATE
Now that you’ve established what and for who your video will be, you can begin pre-production stage where you drill decide on how you will go about creating your video. First, you should write your script – what will you say? Though it may seem like some videos content is improvised, most people have a well-established script before they record. Though it’s not essential to prepare your audio before the visual graphics, it can really help when it comes to achieving synchronization of visual and audio during the editing phase. The timing of visuals are much easier to tweak than audio than recorded audio.
Once you’ve originated your script, you should consider what visuals you want to use. Will you be using only a video recording? Will you include annotations or text? Will you use graphics or images? You may want to curate content rather than create content. If it exists, there’s no need to reinvent the wheel. Just make sure you are aware of copyright.
Another step to the pre-production phase is creating a storyboard. A storyboard is a way to organize all of your content in the sequence of their flow in your video. An example of a storyboard table can be seen in Figure 6.
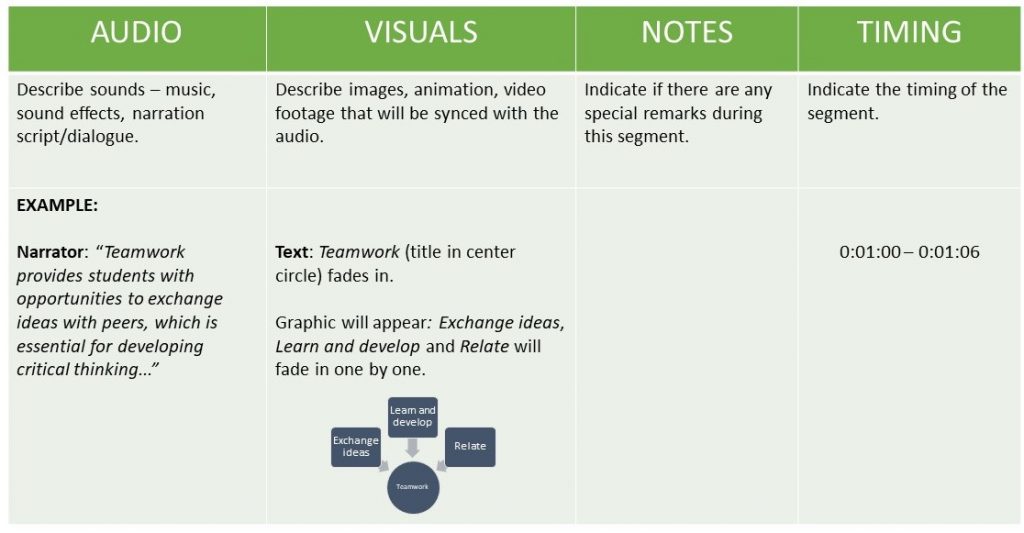
Figure 6: Sample storyboard table for video design.
Before creating your video, you must choose and prepare:
- Software (Camtasia, iMovie, VideoScribe…etc)
- Equipment (camera, lighting, microphone…etc)
- Location (studio, on-site, lab, desk…etc)
MAKE
Lights, camera, action! The third step is the making step. It’s time to put your plan into action and create your video. Follow your storyboard and record in smaller chunks. Make sure your lighting is good. You may also want to record a few takes.
Once you’ve captured what you need, you can move on to the editing process. During this step, you will be combining all of your materials including intro, visuals, audio, credits, references, special effects…etc. This is where you will make cuts, move things around, sync your audio and visuals and add annotations. Be patient because this step may take some time, depending on your project
EVALUATE
When you’ve finished editing before you publish your work, you should make a few considerations:
- Is my audio clear?
- Is my pace appropriate?
- Are my visuals and sounds all relevant?
- Does the flow make sense?
- Does the video meet the goals I originally set?
We’ve created a checklist you can go through to self-assess your work and ensure you’ve covered everything.
It’s often helpful to get feedback from a peer or colleague. You may even ask for feedback from your students. After all, they are your intended audience!
When you’re ready, you may choose how you want to share your video. You may share it on your institutions LMS. You may also want to publish it to a public platform like YouTube or Vimeo. Again, you may refer back to your original goals in order to make this decision.