Posted by: | 5th Aug, 2011

Final Synthesis Reflection

My final synthesis reflection for ETEC 565 is complete! It’s been posted in the “Synthesis” tab of my e-portfolio. Feel free to check it out at: https://blogs.ubc.ca/dbang/synthesis/.

(p.s- I’m thankful that there was no word limit which capped our final reflection. :))


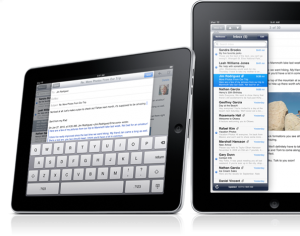
(Apple’s iPad image from: crunchbase.com)

After borrowing a colleague’s iPad, I tried accessing the ETEC 565 WebCT Vista course site and my Moodle site via this tablet. Using its wifi capability I entered our course site and started reading through the discussions. I found that using the hovering touch keyboard would be ok for short messages but for more lengthier ones I would still prefer an external keyboard or the use of my laptop as I had to hold the iPad in one hand and “type” with the other. I found that reading the discussions using the iPad was useful but when it came to reading the learning modules I still preferred the printout notes and course readings I kept organized in a portfolio. As for my Moodle site, I found it difficult to edit my pages primarily because of the keyboard and the size of the screen. The speed and connectivity really depended on the strength of the wifi signals so I was at the mercy of the network. I will say though using an iPad vs. a laptop or standard computer is extremely convenient as it is more lightweight, portable and accessible. I found it primarily useful to quickly check my email and surf the ‘net but for more heavy duty work I would still rely on a laptop or standard computer. Perhaps, with more practice though my typing abilities on an iPad using its touch-based interface would improve over the course of time (or I could make use of an external iPad compatible keyboard which I could then hook up to the iPad). I can see the value of using tablets with its multifunctional capabilities (it can be used as an e-reader, a more portable laptop, as a virtual phone to make calls, for video conferencing, as a camera, and more) and have noticed that the markets are now starting to become flooded with them from Apple’s iPad2 to the Blackberry Playbook to HP’s Touchpad tablet and more!

Additionally, as more educational institutions, healthcare sectors and businesses gravitate towards mobile technology it will be interesting to see the shift of e-learning to expand beyond merely computers but all forms of electronic devices including PDAs such as tablets, smartphones, e-readers, etc. Conducting a quick Google search for “mLearning” yielded over 2.4 million results alone and thus I think not only is mLearning especially through the use of tablets are a way of the future (and a sign for things yet to come)- it is already here and beginning to take shape with the emergence of advancing mobile technologies such as the iPad2. As I connect with colleagues within my field, I am finding that more libraries especially in colleges and universities are also getting onboard with the latest tech tools such as iPads in order to make the best use of mobile devices for classroom-based and online learning. I’ve included a few interesting (and recent) articles I retrieved using the ERIC database which highlights some of the affordances of mobile technology as part of mLearning.

References

Banister, S. (2010). Integrating the iPod Touch in K12 education: Visions and vices. Computers in the Schools, 27(2), 121-131.

Granic, A., Cukusic, M., Walker, R. (2009). mLearning in a Europe-wide network of schools. Educational Media International, 46(3), 167-184.

Parslow, G. R. (2010). Commentary: Tablet PCs–Lightweights with a teaching punch. Biochemistry and Molecular Biology Education, 38(5), 339-340.

Raths, D. (2010). Mobile learning on campus: Balancing on the cutting edge. Campus Technology, 24(3), 19-23.

Valk, J., Rashid, A. T., Elder, L. (2010). Using mobile phones to improve educational outcomes: An analysis of evidence from Asia. International Review of Research in Open and Distance Learning, 11(1), 117-140.

Posted by: | 4th Aug, 2011

E-learning toolkit: Videos and DVDs


Videos
Through ETEC 531, I developed a couple of YouTube videos using Camtasia. One of my first practice videos was “I am an Artist” available at: https://www.youtube.com/watch?v=Cw8ZVs9HN9M. For this video, the theme was whether or not one considered themselves an artist based on their experiences with art and technology. Thus, it was pretty autobiographical in nature as I utilized digital paintings, pencil sketches, photographs from my trips, and my favourite songs. On my subsequent try (and this time more formal assignment) I developed a media production using storyboarding techniques, and script (more of a narrative essay). I chose to cover a theme on digital memories that was highlighted in ETEC 531’s Culture and Technology course text by Andrew Murphie and John Potts. My media production for ETEC 531 entitled “Digital Memories: Theoretical Frameworks and Implications” can be accessed on YouTube at: https://www.youtube.com/watch?v=zL_AU83N2I8. Through both of these experiences producing media (and YouTube account) for the first time, I learned as my classmates did how much work was involved in the planning, production, editing and finalizing stages of creating a video. For my digital memories video, I had to thoroughly research the topic to cover aspects that linked back to our course material and also make interpretations of the content in order to engage the viewing audience (my classmates and professor). Interestingly enough, I’ve embedded this video into my group’s Moodle course site in keeping with our topic of the human digital memory.


DVDs

Having burned DVDs (as well as CDs, CD-RWs, etc) I reflected on my past experiences for this particular activity as I no longer have the need to burn DVDs (with the advent of YouTube, and a multitude of sites where videos can be watched on-demand). One of the key aspects to the ability of burning a DVD (or CD, CD-RW, etc) is to have a computer/laptop with the capability. For example, I know that most netbooks nowadays don’t have an optical drive which would pretty much eliminate the ability to do this activity. In any event, burning DVDs was straightforward as files needed to be dragged and dropped (or copied and pasted) into the project folder. The tips in the e-learning toolkit to test the DVD after it’s burned is a good one. At times, files are prone to becoming corrupted or malfunctioning and thus testing to ensure that it plays correctly in the initial stages can save time in the long run.

Posted by: | 1st Aug, 2011

Dafna’s music video class project

1. Based on the resources available, how might Dafna organize this activity?

Considering that there are limited equipment (5 guitars and 4 iMac computers) Dafna may want to ask students if they could bring their own musical instruments, and electronic equipment (i.e. laptops, camcorders, cameras, smartphones, etc) to work on their music videos during alloted class time and also encouraged to work on their projects on their own time as homework. As well, students could still be given the option to borrow the existing equipment but they would need to arrange a schedule so that the resources would be used in a fair and equitable manner. Dafna’s students could choose to work in groups and they could decide amongst themselves the different roles they would play a part of (i.e. film director, guitarist, camera person, etc). Perhaps, Dafna may need to let the students know about the different types of roles that students’ could contribute and tie this into her lesson plan. The lessons Dafna’s organized so far including camera basics, shooting video, editing video, and post-production can be taught at the same time while students work on their projects so that it helps them complete their music videos. Depending on students’ varying levels of expertise, they could also scaffold their mutual learning.

2. How might she disseminate the music videos, once created?

Dafna could use YouTube to distribute and share the music videos. Students could have the option of changing their privacy settings so that the videos are not publicly available, and they can alter their comments settings. If she has a course site like Moodle or WebCT Vista or even a class website, students could have the option of uploading their videos as an assignment and/or sharing their music videos on the discussion forums as a link and/or file attachment. Dafna’s students could also be provided the option of using tools like Animoto to create and share their music videos. One of the important considerations for disseminating the music videos would to obtain proper permissions (from students, parents, school administration) to ensure that all parties involved provide their informed consent. Additionally, Dafna may want to consider adding extra lessons into her music video activity which covers the terms of service agreements for different social media sites that they may be considering using to create and disseminate their music videos so that her students have a solid understanding of the implications of sharing digital media online. Related lessons could cover privacy concerns, intellectual property rights and copyright issues. Students would also need to consider their target audience (presumably the class) and the medium that they wish to share their music videos in.

Posted by: | 1st Aug, 2011

Raj’s ambitious website venture

1. What might be three (3) important questions Raj could ask himself when deciding which multimedia to include?

i) What is the scope of his project in relation to his technological competencies?
ii) What is the estimated timeframe in which he plans to implement his module/website?
iii) Has the multimedia he has been considering been evaluated using the Bates and Poole’s (2003) SECTIONS framework?

2. Do you think Raj can deliver this in a month? Explain your answer and either:

Depending on the scope and his overall vision for his project (the self-directed learning module) I think it is possible that Raj could deliver this in a month. Also, I think this deliverable timeframe is dependant on his previous skills and abilities developing websites. If Raj has a steep learning curve to overcome then it may take longer than a month. However, if he is a quick learner or already has previous experience then it will make it easier to meet this deadline. Raj may want to consider obtaining assistance from his colleagues who may have more experience developing online modules and working with websites. They could help scaffold his learning as he works to complete his project. He should also consider the time constraints that he faces as his workload (i.e. prep and marking obligations mean he will be working on this on his own time during evenings and weekends). Raj needs to set a realistic timeframe (with an added buffer time just in case of unexpected emergencies) to achieve his goal to develop a website in a month.

o Suggest how Raj approach developing his website?

For developing his website, he may want to draft an outline (site map) of what he is envisioning. Using the Bates and Poole’s (2003) sections framework, Raj should evaluate each multimedia software that he is considering using. Testing the functionality of his website components (i.e. ensuring links work, learning modules has no typos/errors, easy to navigate, etc) will be an important consideration for Raj. Time permitting, it would be in his best interest to pilot-test his website prior to fully implementing it (the “go-live” date) to ensure that there are no major bugs and that he gets a chance to correct any errors prior to its launch. He should also consult or work together with his school’s IT department to ensure that his site will not be blocked, and to obtain advice about any software downloads related to his project. The IT staff may be able to offset the costs associated with developing a website by offering software at a discounted rate or recommend the best software to use for his site. Also, Raj may need to get the proper administrative approvals prior to starting on his project.

o Offer an alternative to the website, one that will use some of Multimedia already collected.

An alternative to the website could be a WordPress blog that could be converted into a course site. YouTube videos can be embedded into this site, and other resources (images, links, text) can all be effectively utilized. Raj could also develop a video using a free Web 2.0 storytelling resource from the CogDogRoo site or consider filming a DVD which he can then share with his students and colleagues via YouTube.


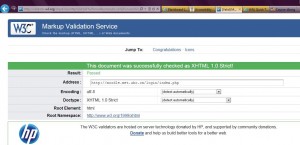
After carefully examining my Moodle LMS site and cross-referencing it with the Quick Tips guide on the Website Accessibility Initiative (WAI), I then checked my LMS site using the Markup Validation Service at: http://validator.w3.org/. I was pleased to see that the following message appeared: “This document was successfully checked as XHTML 1.0 Strict! Result: Passed.” I also noticed that I could put a “valid” icon on my LMS site to show users that I have developed an interoperable Web page. The next step for me now is to add the associated HTML for the “valid” icon on my LMS page. 🙂

Overall, I found this to be a useful exercise and consulting the top 10 list from the W3C site helped provide guidance about the key principles of accessible website design. I’ve included the list below as a reminder:

10 Quick Tips
1. Images & animations: Use the alt attribute to describe the function of each visual.
2. Image maps. Use the client-side map and text for hotspots.
3. Multimedia. Provide captioning and transcripts of audio, and descriptions of video.
4. Hypertext links. Use text that makes sense when read out of context. For example, avoid “click here.”
5. Page organization. Use headings, lists, and consistent structure. Use CSS for layout and style where possible.
6. Graphs & charts. Summarize or use the longdesc attribute.
7. Scripts, applets, & plug-ins. Provide alternative content in case active features are inaccessible or unsupported.
8. Frames. Use the noframes element and meaningful titles.
9. Tables. Make line-by-line reading sensible. Summarize.
10. Check your work.Validate. Use tools, checklist, and guidelines at
http://www.w3.org/TR/WCAG

© W3C (MIT, INRIA, Keio) 2001/01

Why did you choose this particular tool?
After examining the list of 50 storytelling tools from the CogDogRoo site, I had initially chosen Animoto to tell my story. However, while using it I found out that my text was limited to a certain number of characters and I couldn’t write as much as I wanted to for my narrative. Thus, I switched over to Prezi, a presentation software that I found had more interactive features than PowerPoint. I wanted to be able to combine text, images and embed a YouTube video to create my story. Also, I tried to bear in mind aspects of Bates and Poole’s (2003) SECTIONS framework for both myself and students with an emphasis on the ease of use, teaching and learning, as well as its novelty.

How did the tool impact the manner in which you told your story (perhaps in a way that is different had you just used text or related the story using your voice)?
I found that the tool I selected didn’t allow for using my voice recording to tell my story as users would have to click to play each “slide” or autoplay the presentation. Thus, this tool made me consider the importance of developing appropriate text and selecting relevant images that would convey my message. I think one of the most challenging aspects was selecting and narrowing down my topic so that I could tell a story in a succinct manner.

How might you use such tools in your own teaching to produce materials for students?
When I was creating my story, my purpose was tri-fold: 1) to incorporate a way that it could be used to illustrate a story that students could relate to on the impact of using evidence to inform their decision-making which is central to patient care, 2) to use it as a marketing tool to promote library services particularly that of a medical librarian (as I found Prezi to be far superior to that of traditional PowerPoint presentations, and static handouts) and 3) to fulfill the course requirements of using a Web 2.0 cloud-based digital storytelling application from the CogDogRoo site. Thus, I would use this tool as a discussion starter as part of my training modules to teach evidence-based searching, including how to use the PICO method, and the evidence-based medicine pyramid. Additionally, I would use this in the promotion of library services to staff and the general public.

How might students be given access to the same authoring tools?
As Prezi is a freely available online tool, students could use it to create and share their own stories with the rest of the class. This could even be used as an icebreaker integrated with the discussion forum on the Moodle site.

What kind of impact would you expect to see in your students in terms of motivation, creativity, or any other characteristics?
The kind of impact that I would expect to see is that of inspiration, motivation and creativity. I would hope that viewing this story would peak their interest and encourage them to learn more about the topics that I have introduced to them. Also, students can be challenged to learn something new, or delve deeper into topic(s) and/or online tools that they may have been familiar or unfamiliar with.

Reference

Bates, A.W. & Poole, G. (2003). Chapter 4: A framework for selecting and using
technology. In Effective teaching with technology in higher education: Foundations
for success
(pp. 77-105). San Francisco: Jossey Bass Publishers.

My digital story produced in Prezi is included below and available in the “Digital Story” tab of my blog at: https://blogs.ubc.ca/dbang/digital-story/. My reflection will be posted soon.

YouTube video link at: https://www.youtube.com/watch?v=rskC6c_5L1M


Editing images using Picasa:
After downloading Google’s Picasa and watching the provided YouTube tutorials from our e-learning toolkit at: https://www.youtube.com/watch?v=7r36K0j-2Zw and https://www.youtube.com/watch?v=HD23c2VFQPc, I followed the instructions to practice cropping and resizing copies of an original image from my computer. Overall, I found this exercise to be relatively straightforward. Previously, I’ve used Paint to edit images as well as the standard photo editing software that comes with digital cameras but discovered the robust capabilities of using Picasa to manage photos including removing red eye, adding text, creating collages and also developing movies using photos that can be directly rendered then uploaded to YouTube.


Recording audio using Audacity:
After downloading Audacity, I found the tips on how to prepare for a recording were helpful prior to creating a test recording. I used a headset microphone and had to test the mic’s position so that it didn’t pick up any background noise. Also, it was useful to close windows (to eliminate the sound of any traffic), turn of the A/C (momentarily), and ensure that there would be no sudden interruptions. In any case, after a couple of pilot test runs, I was able to create a recording that was pretty clear. This exercise reminded me of recordings I made for my group project in ETEC 510, in which I used Free Sound Recorder to record several sound files and CamStudio to develop a couple of video tutorials. In both instances, I went through multiple revisions as I learned through trial and error how to record sound files with minimal disruptions and background noise.

Posted by: | 16th Jul, 2011

Wimba Voice Email

I just tried out the Wimba Voice Email feature that we have access to from our ETEC 565 course site and found it relatively painless and easy to use. It reminded me of our first intro exercises where we each recorded a brief message about ourselves using Wimba. In any case, I had to edit my WebCT Vista profile and add my email as I was prompted by Wimba that my email address was required. Next, I tried to send to specific recipients but was unable to view this list using my IE 9 browser. So, I decided to switch my browser to Opera and was able to view the list and selected one of my classmates to send my voice email. After recording my message using my headset microphone (and also including a text message) I clicked on the send button and was prompted that my message had been sent! 🙂 Now, I’m just waiting for my classmate to try testing it out too by sending me a voice message back using Wimba Voice Email.

*Update: Success! I’m pleased to report that I received a voice reply from my colleague. We’ve sort of made history in a sense as this was the first time we’ve both used Wimba to send voice emails via an online class. Yay! 🙂

Older Posts »

Categories

Spam prevention powered by Akismet