Steps to Implementation
As a group we have taken many steps to productively and proficiently work cohesively to implement our project this term. There are many steps and events that have lead to the “unfolding” of our implementation.
First, in the beginning of our project we began by meeting our mentor and beginning a Facebook group. With these steps of communication, we had open communication with a useful resource, our mentor, and one point of contact for unity in communication, Facebook group. Secondly, we began to have weekly meetings where we would talk about the progress of individual assignments, dates, meetings and any questions we had for each other. These meetings allowed us to keep our project on schedule and keep everyone on the same page. Through our internal weekly meetings, we also maintained constant communication and updates from the other Richmond Food Bank group, in order to stay consistent in our dates and procedure for communication with the organization. We also planned dates and meetings with the Food Bank with the other group to display a professional and cohesive team. As a large team we have planned our presentation of our project for March 21st 2014. After our presentation, we will finish our poster board for the poster board session, which will summarize our project for the Richmond Food Bank.
These are the steps our group has taken so far to implement our project for the Richmond Food Bank. Through internal group communication and meetings to meetings and presentations with our client and the other group we have taken many steps to have our project successfully “unfold.” We look forward as a team to the poster session to further describe the details our project entailed.
Positives and Negatives
Our Project has run very smoothly and there are many positive aspects to it, but in the following paragraphs it will be shown some of the issues and difficulties we have faced as a team as well.
There are so positive factors that have added to this projects success. First off would be our teams great communication, with each other, client, other team, mentors and everyone involved. This great communoication is based off our teams good group relations and that we all got along well and work well together. Further, we have worked well together with equal participation by all, therefore no one feeling left out or if there are any slackers, because there aren’t any. This may be as we all believe in our project and have a keen interest in the organization we are working with. This dedication to the project has helped us in many ways and especially as working as a team towards one mutual goal.
Though our project has been filled with great communication and productivity, initially we had a few setbacks. The setbacks our team faced are linked to the initial dis-clarity of our project objectives and goals. In the first weeks we were unsure of the projects description, depth and outcomes. This made for a confusion of a time and we were all very unclear on the project and how to proceed. This initially put us off a little, but through communicating with each other, client mentor and professors, this was cleared up and our project was off to the races.
These are the positives and negatives our group has faced over our project’s timeline.
Project Outcomes
For the Richmond Food Bank CBEL project our team has created designs and recommendations to meet the project goals proposed by the client. The project outcomes include design options for the Kid’s Play Area and ideas to create a more efficient system for the Food Distribution Line. Our team, along with the other Richmond Food Bank group will be presenting the design options at the Richmond Food Bank on March 21, 2014 at 2:30pm. The presentation for the client will include multiple options for each aspect of the project including visuals and cost breakdowns.
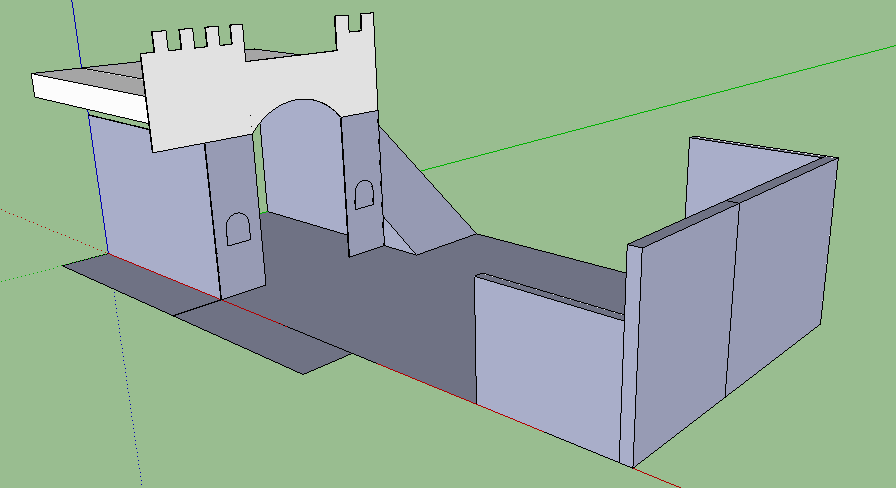
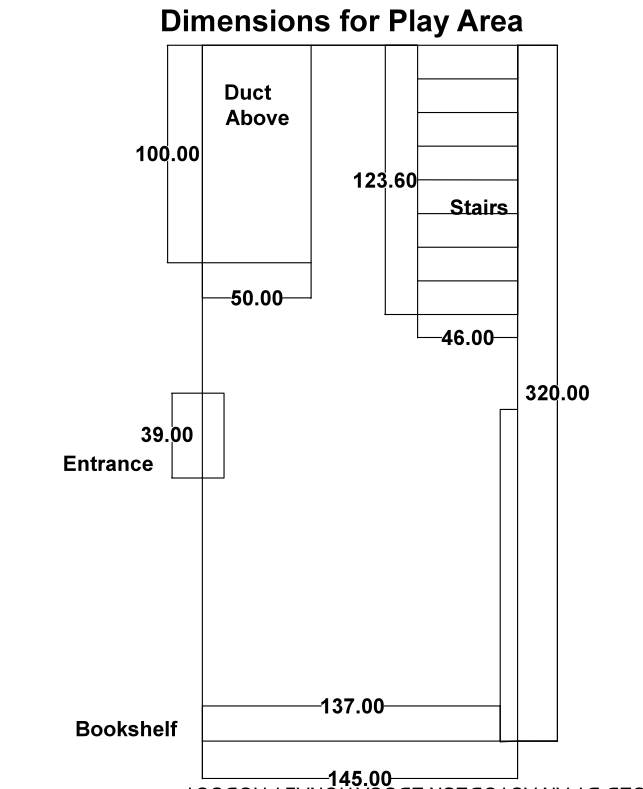
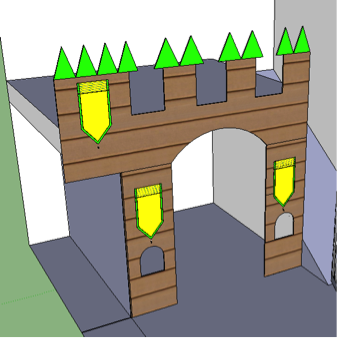
For the Kid’s Play Area our team focused on three aspects including aesthetic appeal, lighting, and storage space. We aimed to optimize the allocated space for the play area and ensured that each design was safe for the children. Considering fixed and flexible parameters we created a plywood castle design that would increase the aesthetic appeal while also covering the duct work that currently hangs over the kid’s space. Below are a few design options for the castle that we made using SketchUp.
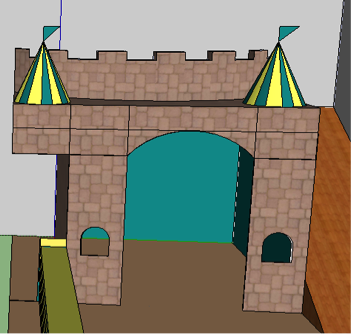 The castle designs are both easy to construct using plywood sheets, bolts, and paint. The castle structures are designed to have fixed supports ensuring the stability and safety for the children. They can be transported easily if relocation is required. The design would completely cover the ducts on the upper left hand side. The castle will cost approximately $200.
For the storage space within the Kid’s Play Area we designed shelves and compartments that can be used both as storage and dividers between the play area and distribution line. Below are a few SketchUp Models of storage design options.
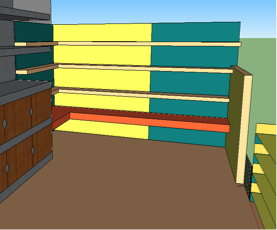
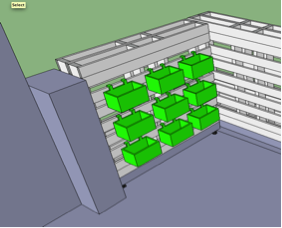
The first image to the left is a shelf and cabinet structure that can be purchased for approximately $150 or built out of wood. Including an organizer as shown would decrese the play area used for storage while also increasing the space for storing temporary and long term items. The cabinets can be shild locked while the shelves are easily accessible by the volunteers. The center image displays the shelf and desk design for the Kid’s Play Area. A dublicate L-shaped divider can be constructed to inccrease the strength and stability of the dividers. The shelves and desk can be constructed from wood beams. The shelveing would cost approximately $90. The last picture to the right shown above is a pallet and basket deign. This option is cost efficient while increasing stroage space and dividing the area effectively. The pallets can be found at the Richmond Food Bank and only require small repairs and paint. Including the baskets this design costs an average of $200.
For the lighting options our team researched aesthetically appealing and cost effeicent lights. The following are the lighting options we have considered as well as the price range for each.

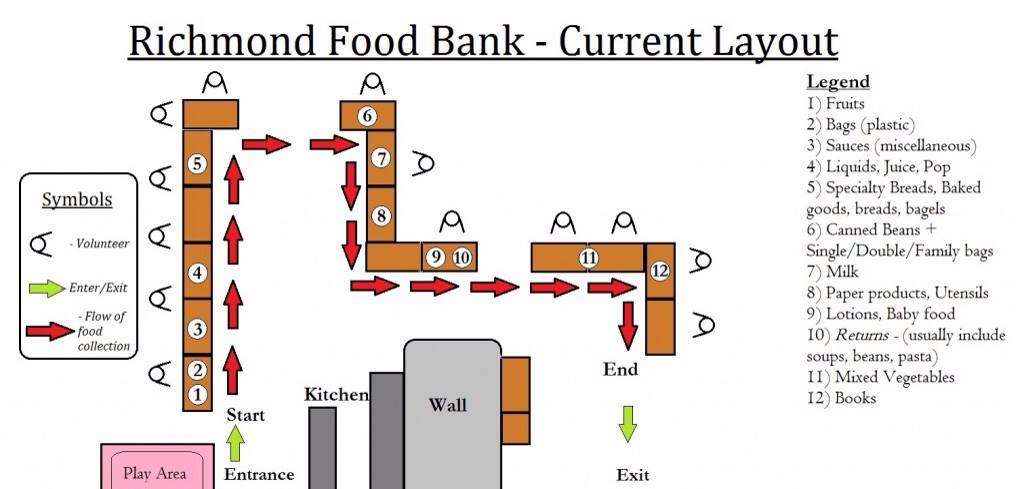
For the Food Distribution Line our project outcomes include creating a more efficient and easy system for the volunteers and costumers. The layout of the tables was considered and rearranged for a more effective line. Below is the current layout and the proposed layout that our team is recommending.
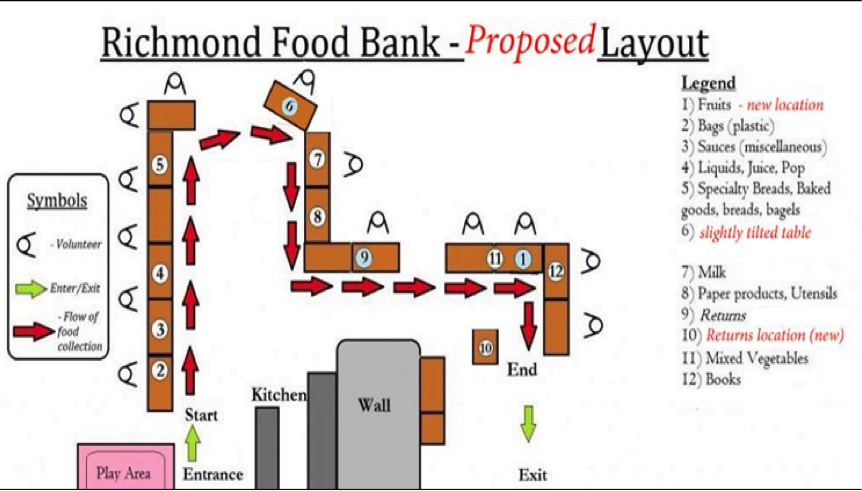
To mitigate the problem of having vegetables crushed in their bags, the heavy items should come first so the table of canned goods is recommended to be placed closer to the beginning. An additional table could serve as the new point for food returns to further reduce bottlenecking and clutter. Items displayed can be more spread out (to reduce bottlenecking)/add in an additional island table(sorting).