This resource is for those new to using UBC Blogs and/or the WordPress blogging platform. These instructions are specific to the UBC Blogs version.
UBC Blogs is a comprehensive service, offering collaboration and communication tools to anyone at UBC with a CWL. Apart from WordPress blogs, the service also allows you to create public & private group discussions, set up forums, and connect with other users via social networking.
1: Logging in.
UBC Blogs is a multi-user platform, which means that once a user creates a UBC Blogs account, they are able to access multiple blogs with the same account. For this reason, the easiest way to log in to the admin side (also known as “the back end”) of your blog is via blogs.ubc.ca.

Logging in.
You will be taken to the CWL login screen. If you already have a UBC Blogs account, you will be directed to the UBC Blogs dashboard. If you are a new user, you will be directed to the UBC Blogs account creation screen. This is where you will select a username. That username will be attached to every blog you create on this platform. Once created, your username cannot be changed, so choose wisely! You will be sent a confirmation email with a link; only after clicking the confirmation link will you be able to access the UBC Blogs services.
2: Getting to your blog.
After logging in, you will be presented with the UBC Blogs dashboard. You’ll also notice a black admin toolbar appears across the top of the screen. This toolbar gives you quick access to the most common blogging tasks, and will change, depending on which page of the site you’re currently on. Point your cursor over the ‘My Sites‘ section, and it will expand with a list of all the blogs you currently have access to. By default, you will be assigned a personal blog associated with your username. If you have previously created or been invited to join other blogs, they will also be listed here.
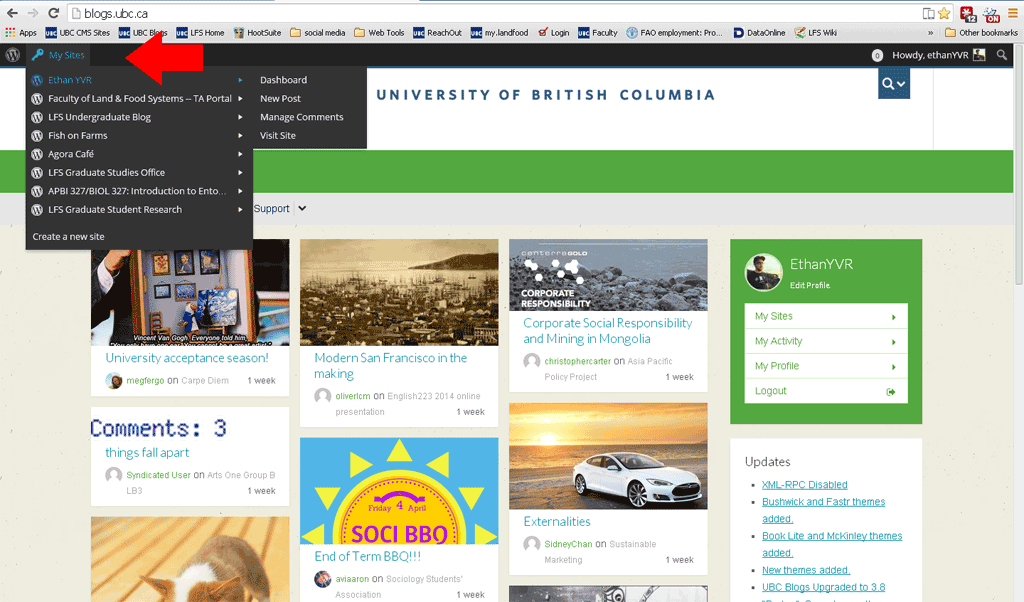
The UBC Blogs dashboard
To create a new blog, click on ‘Create a new site‘ at the bottom of the drop-down menu.
To access an existing blog, click on the blog name from the list. In this example, I will select my personal blog, Ethan YVR, first in the list.
3: The Dashboard.
The control panel of every WordPress site is the Dashboard. This is the first thing admins will see when logging in, and is where all the customizations to the blog are made.

The Dashboard
The options along the left-hand side will vary, depending on the access each user has (see User Management for descriptions). As administrator, you have complete control over the layout, content, and theme (look & feel) of your blog. You are also able to add, delete and edit user access, customize the menu, moderate and control commenting, manage your uploads (images, documents, etc), control the visibility of the blog and a host of other settings.
4: Setting up your blog.
Under ‘Settings‘ you will find a number of options for controlling up the behaviour of your blog. Click on Settings –> General to set options such as the Title of your blog, your blog’s tagline or subtitle (optional), the contact email address for your blog (usually an administrator’s contact), options for how dates and times are formatted on the blog, as well as what Faculty/Unit the blog is associated with.

General settings screen
If you have questions about some of the other settings under this menu (such as Writing, Reading, Discussion, etc), please make an appointment with the web coordinator to discuss your options in detail.
5: Posts vs. Pages.
There are primarily two types of content you can create on your blog: a post and a page.
A post is a standard blog post–it is date specific, and is displayed (by default) in reverse-chronological order. A post is what you would use for announcements, journal-style entries, news, and other date-specific information.
A page is static, and not specific to a certain date. A page on your blog is like a standard webpage, for example, an ‘About’ page.
6: Adding a new page.
To add a new page, hold your cursor over ‘+New‘ in the top utility bar an click on ‘Page‘.
(All of the components in the next section referred to in bold are highlighted on the screencap below)

The editing screen explained.
Enter a title for the page in the title bar. Below the title bar is the main content area of the page. You can include text, images, sound and video files, links to documents or other websites, and other such content.
While all websites are coded using HTML, WordPress gives you the ability to create a webpage and format your text without having to know HTML code. If you need to swap between the visual editor, and plain text mode (for example, to embed a Youtube video), you can switch between the Visual/Text tabs.
The visual editor has a number of formatting options built-in (hold your cursor over each button for a description). To see additional formatting options, click the ‘Show/Hide Kitchen Sink‘ button.
As you’re working, you may wish to save a draft version periodically. On the right-hand side, under ‘Publish’ you will notice two buttons: ‘Save Draft‘ and ‘Preview‘. Preview will open up the page in a new window to allow you to see what the page will look like when it’s published to your blog.
When you ready to publish the final draft, click on the blue ‘Publish‘ button. If you are editing an existing page, this button will show as ‘Update‘ instead.
To embed an image or attach a document to your webpage, click on ‘Upload/Insert‘ just above the formatting buttons, on left. We will explore adding media in the next section.
7: Adding attachments/media.
You can include a number of different attachments in your webpage: images, videos, audio clips, PDFs, Word and other text documents, Excel spreadsheets, etc.
Note: The maximum storage capacity of your blog is 500 MB. This means that once you upload 500 MB worth of attachments, you will no longer be able to upload attachments. For this reason, we encourage you to consider linking to your documents from other sources if possible. For images, Flickr or Dropbox both provide you with the ability to host your images on their sites, while displaying them on your own blog. Youtube also allows you embed a video on your blog, while storing it on their site. For documents that do not contain sensitive information, consider uploading them to Dropbox or the Faculty’s own cloud-storage service, OwnCloud.
In particular, PDFs are generally large files, and will likely eat up a lot of your storage allocation. If you are interested in exploring cloud-based storage options, please contact The LFS Learning Centre, and they will be able to help you find the best service for your file storage needs.
After clicking on the ‘Upload/Insert’ link (see previous screencap), a pop-up box will open giving you the option of uploading a file from your computer, embedding an external file using a link (or URL), or adding an image from your blog’s Media Library. The Media Library is the repository of all the items previously uploaded to your blog.

Options for adding files to your page
Please take a moment to note the copyright warning on this screen:
IMPORTANT: All material uploaded into UBC Blogs must comply with Canadian copyright laws. Uploading and posting content from copyrighted works requires authorization under the Copyright Act or authorization from the copyright holder (for example, specific permission from the copyright holder or a UBC licence that permits such use).
This is especially important regarding other people’s creative content. It is a illegal to save someone else’s images from the web and upload them to your own website, unless you have received explicit permission to do so. There are a number of options for utilizing rights-cleared images on your site, the most popular of which is known as “Creative Commons.” For more on using Creative Commons-licensed material, please see notes from the LFS Learning Centre’s Duncan McHugh and his excellent workshop on Creative Commons.
After uploading a file from your computer, you will be presented with additional display options.
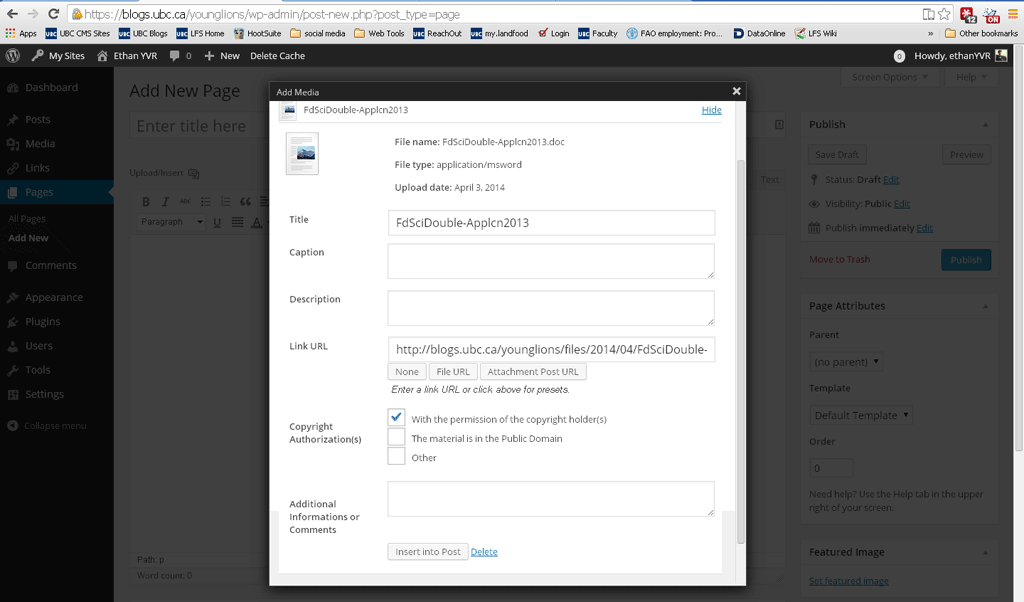
Additional display options for file/image uploads.
- Replace the ‘Title‘ field with the text you want to display on the link to the document.
- The ‘Caption‘ is only relevant for images. This will create a grey border around your image, and your caption text will be displayed along the bottom.
- The ‘Description‘ is optional and is not included in the display.
- The ‘Link URL‘ should default to the ‘File URL‘. If not, you can click that button below the field to set it. This is where the user will go when they click on your document title or image upload.
To embed the document or image into your page, click the ‘Insert into Post‘ button at the bottom of the pop-up box.
8: User Management.
WordPress sets five different levels of user access:
- Administrator — Admins have full access to all areas of the blog, including: ability to create, edit and delete all content and all users.
- Editor — Editors have access to all the content areas of the blog. They can create, edit and delete all pages and posts, add and delete files, and moderate comments. They cannot manage user access, or edit the look and feel of the blog.
- Author — Authors can create, edit and delete their own posts/pages, but cannot edit other people’s work.
- Contributor — Contributors can create draft versions of posts/pages, but cannot publish them. Their work goes into a ‘Pending Review‘ queue, and must be approved by an admin to be published.
- Subscriber — Subscribers can merely follow the blog, and may choose to receive notifications when the blog posts new content, but they cannot create anything.

Adding new users to the blog
If you would like to invite other users to collaborate with you, or help manage your blog, hold your cursor over ‘Users’ in the left-hand sidebar (towards the bottom), and click on ‘Add Users‘. Enter the email address of the person you wish to invite in the box, and select the user access level you would like them to have. You also have the option of setting a time limit on their access to your blog, by setting an expiry limit.
The person will receive an email, inviting them to join your blog. If they already have a general UBC Blogs account, they can join your site by clicking the link in the email they receive and confirming acceptance. If not, they will be asked to create an account first, and then they can click the link to join your blog.
9: Additional options.
There are many additional options that can be incorporated into your blog. If you have some ideas or want to know what’s possible, please send an email to the Web Coordinator, or contact members of the LFS Learning Centre for additional training.
For more resources (including step-by-step videos) on using WordPress, please see Duncan McHugh’s WordPress wiki page.