In the Fall of 2021, we were fresh back to face-to-face learning. Over the summer, I had worked closely with Firas Moosvi and Jackie Stewart on ungrading, both of whom were doing pieces in their respective courses. I chose to go all-in and pilot a completely ungraded third year biology lab course. My primary concerns: Would the students take the course seriously? Would the teaching team be able to support student’s work without grades? This experience profoundly changed the way I view the learning trajectory and challenged many assumptions I had about student motivation. I will piece this out in future posts, but for now – Firas has questions. And he also has questions for the students that took part in this experiment.
Let’s start with them…
The Interview with Claire and Emily (Biol 342 students)
Do you have any general comments about this experience?
“I was a bit skeptical about the concept at first because I’ve never heard of it, but I think it really motivated me to set my own goals in the course. Knowing that I was grading myself made me aware of how much effort I was putting into the course not only in lab but at home as well. Rather than always wanting to impress TAs and Profs (like people commonly do to get a good mark in class), it was more about personal growth. I liked the fact that I actually had a say in my mark, unlike any of my other courses.”
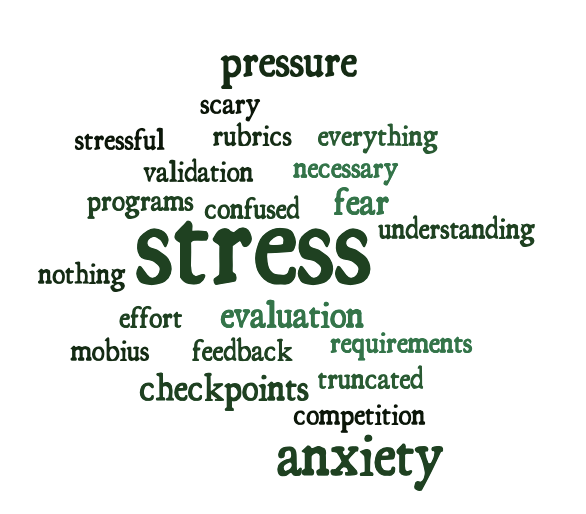
1. On a scale of 1-10 how anxious (10 is very anxious) were you about your grade in this course before you went to the first class? After the first class? At the end of the term?
“Scale of Anxiousness:
Before first class: 9
After first class: 5
End of the term: 7
After receiving my mark: 3”
“Before the first class: 3
After the first class: 3
End of term: 1”
2. What are/were some of your doubts about Ungrading in this course, and in general?
“I was worried that I wouldn’t actually have a say in my mark. Profs tend to say ‘you can let us know if you don’t agree with your mark,’ but when is that really a thing? However, Celeste and the TAs came through!!”
“I thought that it would be difficult to improve and judge how I’m doing in the course if there weren’t grades to reference. We’re taught to evaluate our progress based on grading, so this concept was unfamiliar.”
3. Ungrading is a difficult idea to explain to others without any context. Did any of your peers scoff at how your class was Ungraded ? What were some of the things they said?
“surprisingly, I didn’t get any scoffs from my friends! They found it really interesting and wanted to look into the course.”
“They didn’t scoff, they were just surprised that ungrading was being used since it’s not a common evaluation system. More so, they were interested in how it works.”
4. What do you think made Ungrading a success in BIOL 342 ?
“It was done really well because of two main reasons 1) the TAs and Celeste actually stuck to their word (at least in my case) (Note from CL: I stuck to my word with all students). They listened to our reasoning as to why we deserved the grade. They were really open minded, making it really easy for us to learn at our own pace! 2) it was really organized. There was a PDF and everything for us to fill out, personal ratings, etc. “
“The instructors gave great conductive feedback. Even if there weren’t numerical grades to reference, they made it easier to know what to improve on.”
5. Do you think any instructor can Ungrade in any class? What advice would you have for instructors if they want to do this?
“I don’t think any instructor can ungrade any class. For example, a math course wouldn’t be able to. To get started, ASK CELESTE FOR HELP 😀 but make sure all the bases are covered: student feedback method, give students the opportunity to mark themselves, and be organized!” (Note from CL: You are welcome to reach out if you are considering ungrading in your own courses, but I am not an actual expert in this…)
“I don’t think ungrading would be appropriate for courses such as math, statistics, physics, etc. when students are trying to calculate 1 correct answer. It would better suit courses that have open-ended projects such as BIOL 342. If an instructor were to adopt ungrading, detailed conductive feedback would definitely be essential.”
6. What advice do you have for students that are in an ungraded class?
“I personally really liked ungrading and think it was great!
The Interview with Dr. Celeste Leander
How much did you tell the students about Ungrading or your personal philosophy on grades during the class? Was it all at once at the beginning? A little bit throughout? All at the end? How would you suggest others start this conversation with their students?
“I formally introduced the idea at the start of term with 1 or 2 slides. One of the main reasons that ungrading rings true for me is because it encourages students to stop worrying about assessment, so I didn’t want to belabour it to the point of them worrying about it (if that makes sense.) However, I did casually reinforce ungrading many times- particularly during the first few weeks of term. This happened organically when students would ask things like, “What if x is late?”, or “What if I made this mistake?”. In those situations, I would just whisper, “I’m not grading your work – you are.” Their reaction was the same. They would say something like “oh yeah!” and walk away. I was surprised at how long it took them to settle into the idea.”
2. Often in classes (particularly larger ones), we have to work with others that may not share or buy-in to the ungrading vision. Was this an issue for you? If so how did you deal with it? If not, what do you suggest to others ?
“This was one of the reasons that this course was chosen as a full- course trial. There are 4 sections of lab with 1 lecture, but I teach all of it. However, some of ungrading has been taken up by other large lab courses and there have been some faculty that are not ready to take this on. My suggestion would be to let faculty do what they are comfortable with, and to keep everyone updated on progress. When instructors see that chaos doesn’t ensue, they may be more willing to give it a shot. It’s also possible to start small with a section of a course, but having done it, I don’t think this will have the same benefit to student learning.”
3. Outline the highlights of your ungrading approach
“Students receive feedback from the TAs and/or myself on every submission. Sometimes this is just a quick “great job” or “consider adding x” if it’s something simple. On large projects, students receive significant feedback and are always encouraged to resubmit. (The products of this course are external to UBC, so students have reason to be proud of their work.) At the end of the term, students submit a 5 page self assessment that asks them to reflect on each piece of work in their portfolio and suggest their own grade. Some students understood this from the start and had no trouble, but others asked for more structure as the term progressed. This term I am considering giving students a quick flow chart after each large assignment to reflect in more real time in their lab notebooks.”
4. How did you give students feedback on their work? (how often, how detailed, how technically, etc…)
“The TAs and I were surprised at how fun it was to give feedback on written work without worrying about allocating marks. We give detailed feedback on 3 written projects and 2 lab notebook submissions. The projects are fairly high stakes – one goes to the City of Vancouver, one goes to a restaurant or grocery store in the community, and one is published in an online journal – so formative detailed assessment has always been a necessary part of this course. I would estimate that we are giving some sort of feedback roughly once per week, but sometimes it’s a quick check on something.”
5. Did you have any students that “slipped through the cracks” ?
“Not that I know of, but I did offer to meet with students individually who were having trouble with the self assessment. I had two students who took me up on this offer. We had meaningful discussions on things like “what is the difference between an 80 and an 85?”, for example.”
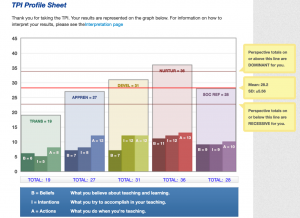
6. Are you willing to share the historical and current grade distributions for your course?
“Yes, but this course has always had very high grades because of the formative nature of assessment. I actually have not compared grades.”
7. Did Ungrading show up in your Student experience of Instruction surveys?
“Yes, in a big way. In the “please identify the strengths of this course” prompt, nearly 1/2 of students specifically mentioned ungrading. I’m excited to delve into these further and identify how this approach helped them learn.”
8. How did you feel after doing Ungrading – will you ever go back?
“It changed my views on teaching and learning forever. I’ve always been a big proponent of student self agency, so the actual process of ungrading was not a huge jump for me. But it was still hard to completely let go of grading. To be perfectly honest, the first project submission was loosely graded. The TAs and I kept a secret spreadsheet of what we would give if we were grading the papers. In the end, it felt dishonest and I had to stop. There was no reason to keep that spreadsheet. I trust my students to do this work themselves, and they need to rely on that trust. I often teach a section of our large introductory biology course, which is traditionally graded. I love teaching that course, and I don’t know how or if I will be able to incorporate ungrading into that course. For the third year lab course, I will definitely not go back to traditional grading.”
10. How much extra work was it to transform your class, what advice would you give to those that want to do this?
“For this specific course, it was not a lot of work. One of the things that made it fairly easy was the student perception of meaningful projects. They have motivation to do their best work that does not depend on me assessing them. My advice would be to incorporate student agency as much as possible- In my ideal world, I would have classes small enough that I could ask students how they would like to demonstrate their understanding and let them do so in their own chosen way. Also – most important – trust your students. They want to learn and they truly are the best assessors of their own learning.”