COGS 300 Lab Software Setup Guide
The instructions on this page should be completed before attending your first lab.
Group Assignments
Please complete this lab survey by the beginning of Lab 1 (https://forms.gle/so3iVHjPsr1F6Qkg7). This will help us match people of varying skill levels.
Unity Installation
Unity is a 3D physics engine which is designed primarily for creating video games. This is the main piece of software we will be using to make labs.
- First, go here and download and install Unity Hub
- The individual -> personal version is fine. No need to get the student version (unless you really want to)
- This is a management tool that will make it much easier for you to manage your Unity projects and the different versions of Unity
- Follow the instructions under the same link above to install (using Unity Hub) the Unity Editor
- You should install version 2020.2.1f1 or 2020.2.2f1 (you can search the archive for the appropriate versions).
- When selecting modules to install, you can uncheck the Microsoft Visual Studio option, as we won’t be using it as our main code editor in this lab. However, if you have issues installing VS Code, you can come back and install Visual Studio just so you have a way to access the code in Unity
- In Unity Hub, create a new 3D project under the Projects tab named “Hello World Project”
- If you’re not sure how to, follow these instructions
- Make sure the Hello World Project can be opened without any errors popping up
Visual Studio Code Installation
Visual Studio (VS) Code is a code editor that is compatible with Unity and will be where you write most of your Unity project code
- First, download VS Code here
- Follow the “Prerequisites” instructions in this article to install everything necessary for VS Code to work with Unity
- You can also view the video instructions here (from 1:00 to 1:50):
- If you haven’t already, go through the Unity Installation steps above and open your Hello World Project
- Create a new C# script called HelloWorld.cs
- Detailed instructions here:
- Follow the instructions under the “Setup VS Code as Unity Script Editor” section of the article link or the video link (both from step 2 above) from 1:50 to 3:12, to set up VS Code as your default code editor in Unity
- Open the HelloWorld.cs file you created earlier from the Unity window and test if IntelliSense is working e.g. try typing GameObject and see if a suggestion pops up for you
- If you encounter issues with the setup or IntelliSense, keep reading through the article for some general troubleshooting guide, or see our troubleshooting section below.
Troubleshooting Tips
General Tips:
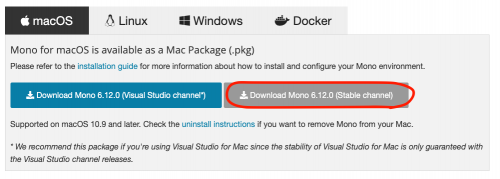
- Install the latest stable mono version from here
- Restart vs code when done and see if it fixes the problem, otherwise move on to the next tip
- Make sure mono is being used correctly
- Open your VS code settings by going File -> Preferences -> Settings
- Search for “Omnisharp Mono”
- Set “Omnisharp: Use Global Mono” to “Always”
- Under the one that says “Omniosharp: Mono Path” click “Edit in settings.json”
- Add these two lines of code at the end after useGlobalMono
-
- you will have to add a “,” after the useGlobalMono line! ->
"omnisharp.useGlobalMono": "always",
- you will have to add a “,” after the useGlobalMono line! ->
"omnisharp.monoPath": "C:/Program Files (x86)/Mono",– change this ^ to the path that mono is installed on on your computer!!!
"omnisharp.path": "latest", -
Windows tips:
- Download the .NET framework 4.7.1 Developer pack here
- Restart VS code
Mac tips:
- VSCode errors where .NET or dotnet cannot be located:
- in your terminal run below command:
dotnet --version
-
- if command does not work, check if you have directory for dotnet by running the below command in terminal:
ls /usr/local/share/dotnet
-
- if you do see some files get listed it should mean that dotnet is installed and you just need to create a symbolic link to point to this dotnet directory from PATH. You can do so by running the below command:
ln -s /usr/local/share/dotnet/dotnet /usr/local/bin
(There is a space between /usr/local/share/dotnet/dotnet and /usr/local/bin)
- VSCode errors with mono / omnisharp
- Check if mono is installed by running below command in terminal:
which mono
which mcs
-
- If mono is not installed properly (ie. cannot run commands above), make sure you are downloading the stable channel version of mono from here.
- If mono installed properly (ie. commands above return some path), go to vscode settings.json file (path: ‘~/Library/Application Support/Code/User/settings.json’ on my machine..) and add these lines to the settings.json file:
"omnisharp.useGlobalMono": "always",
"omnisharp.monoPath": "OUTPUT FROM `which mono` COMMAND"
"(ex: "omnisharp.monoPath": "/Library/Frameworks/Mono.framework/Versions/Current/Commands/Mono")
Live Share Installation
Live Share is an extension in VS Code that allows you to collaborate live with others when writing code (similar to Google Docs). It is recommended that you use this feature to collaborate with your group members during a lab so everyone can work on the same file at the same time
-
-
- If you haven’t already, follow the VS Code installation guide above and open Visual Studio Code
- On the left column, click on the Extensions icon and search for “Live Share”
- Click on “Live Share” and install the extension
- You can also read up on its features and how to get started here
- Feel free to try out this feature and do some exploration on your own. Live Share will be expected to be used more prominently in later labs once the groups are formed
-
Unity Tutorials (optional, but very helpful)
Want some extra practice with Unity? We would recommend going through the first 7 videos in this playlist. This should cover most of the basics about coding in Unity that you might want to know for the course.