Pre-Lab:
Please submit on Canvas before the start of your lab
Download the code for the lab here
Please install Unity version 2020.3.40f1 for this lab using the Unity Hub button from the given link. In the install settings make sure all checkboxes are left unchecked!. This will be the version of Unity used in all future labs.
Please also make sure that you are able to open the lab files.
- In your own words, describe what a physical symbol system is. (50 words max)
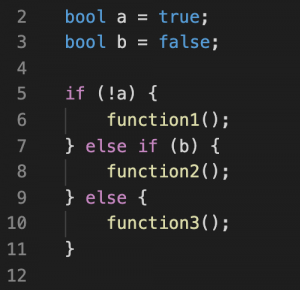
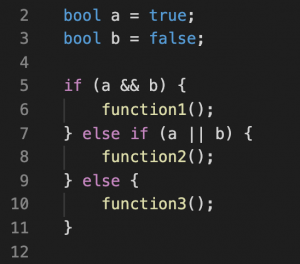
- For each of the following code snippets, which function (1, 2, or 3) will be executed?
Lab:
In this lab, you will be writing algorithms for two approaches using Physical Symbol Systems (PSS) for creating a “self-driving” vehicle. The first part will involve pre-planning the route as a list of instructions. The second will use sensors and logical statements to determine which direction for the vehicle to turn.
Part 1: Pre-planned movement
- Open the lab and navigate to Scenes -> Self Driving
- Select the car object and find the Car Control API script in the inspector
- Check the ‘Planned’ box, and uncheck the ‘sensorLogic’ box if needed
- Run your program to test everything is working. You should see your car move straight forward.
- Open the ‘Car Control API’ script by right-clicking on the name and selecting ‘edit script’
- Find the PlannedMovement() function (line ~50)
- Find the instructions list on line ~55 with the TODO: on the line above.
- Each number in the list represents the direction the car should turn, where –1 is full left, 1 is full right, and 0 is straight. Decimal values between 0 and 1 up to two decimals are allowed. This list will be read and executed sequentially, with a half second for each instruction by default.
- Your task is to edit this list so that your car makes it to the green goal at the end of the path. This may take some trial and error.
- When your car is able to reach the green goal, open the scene labelled ‘Alternate Path’
- Test your pre-planned movement algorithm on the new path. How well do your instructions perform on this path compared to the one you originally programmed the instructions?
- Make a copy of your list and edit it so that your car can reach the end of the alt path
- You can comment out the old one by adding ‘//’ to the beginning of that line.
- When you are able to complete both paths, show your TA to get checked off
Part 2: Sensor Logic
- Open the self-driving scene
- Select the car object and find the Car Control API script in the inspector
- Check the ‘sensorLogic’ box, and uncheck the ‘Planned’ box if needed
- Run your program to test everything is working. You should see your car move straight forward.
- Open the ‘Car Control API’ script by right clicking on the name and selecting ‘edit script’
- Find the SensorLogicMovement() function (line ~90)
- Write an algorithm using the rightDist and leftDist variables to control movement. A good place to start is to keep the car in the center of the road by turning towards the side which is further away. You should be using if statements to control the movement.
- You may find that your car gets stuck on certain obstacles.
- Use controlScript.SetTurn() to control the turning of your car (-1 is left, 1 is right, 0 is straight)
- Add more sensors to your car and edit your algorithm to use them so that you can navigate any obstacles which the car got stuck on.
- The Raycast() function takes in an angle and creates a distance sensor at that angle from the car. 0 is forward and 180 is backward. You can add more of them by calling the Raycast function and assigning the result to a float variable (just like rightDist and leftDist do)
- Experiment with the angles, number of raycasts, and algorithm until your car is able to reach the end of the path.
- Test your car on the ‘alternative path’ scene, and make any edits needed to have your car reach the end of that path as well
- When your car can successfully navigate both paths, show your TA to get checked off.
Post-Lab:
(don’t forget to submit your code)
- In each case for the pre-planned movement, and the sensor logic algorithms, how to they fit with the PSS approach to intelligence (symbols, expressions, processes, designation, etc)? (100w max)
- What happens to the sensor logic algorithm as you added more sensors? How well would this scale if you had 100, or 1000 sensors? (50w max)
- How robust was each algorithm? Recall that robustness is how well a system is able to perform in different scenarios. (100w max)
Grading Scheme:
| Task (PP= Pre-Planned, SL = Sensor Logic) | Marks Awarded (2 total) |
| PP – Generate list of instructions | 0.25 |
| PP – able to make it to end of course | 0.25 |
| PP – Able to make it to end of alt course | 0.25 |
| SL – create basic algorithm (with help) | 0.25 |
| SL – Add more sensors, edit algorithm | 0.25 |
| SL – able to make it to end of course | 0.25 |
| SL – able to make it to end of alt course | 0.25 |
| Stay until end of lab, OR complete all other tasks | 0.25 |