Project Implementation Plan:
Introduction
Project Purpose
Options Community Services Society (OCS) has requested for a renovation of their outdoor play space at their Family Resource Centre in the Guildford area, targeted for children aged 0-6. The purpose of the project will be to remove the facilities’ “traditional” plastic play structures and both design and implement a new nature-based play space, stimulating exploration, curiosity, and imagination. There are numerous benefits and advantages of having a natural playground for children to play, as opposed to their traditional, jungle-gym-based plastic and metal counterparts. This new-wave of innovative play spaces stimulate social interactions between children, fostering imagination and creative play which improves language and collaboration, and they improve young children’s cognitive development through awareness, reasoning, and advanced observational skills (Moore 1986, Bixler et al. 2002, Moore & Wong 1997, Taylor, et al. 1998, Fjortoft 2000, Pyle 2002). Consequently, our new design will serve to replicate these benefits while providing the Guildford community with a suitable play space to entertain its children.
Project Overview
The final project deliverable will be an obstacle course consisting of numerous logs embedded into a loop resembling structure. For a complete and comprehensive description and analysis, refer to Blog Post 5.
Design Phase
Client Meetings, Feedback, and Influence On Design
Throughout the project design, the team met with Katherine Macintyre—Head of Programs at Options Community Services— and site workers in order to determine OSC’s vision of the finished project, including feedback on ideas, inspirations, supplementary design considerations, and the organization’s goals for the final deliverable. Jeremy Tse, Christian LeGagneur, and Jordan Squire acted as client liaison throughout different stages in the project. Table 1 outlines the relevant information regarding client feedback, including suggested ideas, additional design considerations, and project goals:
|
Client Suggested Ideas |
Additional Design Considerations |
Project Outcomes and Goals |
Log Obstacle Course
Outdoor Musical Instruments
Seating Areas for Parents
Interactive Living Walls
|
Surfaces for any obstacle course or climber structure would require a non-slip coating as a preventative safety measure against slips and falls. The required coating would need to provide necessary grip and friction even in cold, wet, slippery conditions.
Play structures over 6” would require 12” of uncondensed wood chips as loose-fill.
The majority of the children who attend the Guildford Family Resource Centre are aged 0-4. As a result, they lack sophisticated motor skills as they are in the developmental stage in which they are beginning to discover and refine their balance and overall movements.
|
Utilize natural materials and elements to strongly emphasis serenity, nature, and create a “Zen” play space for the children.
Utilize current playground space which does not serve any current purpose.
Provide an undefined, ambiguous, and multi-purposeful play space which allows for the children’s creativity to define it as they see fit.
Provide a space to challenge the children’s motor skills, as they learn to fully develop and polish their movement at a young age. |
Table 1: Client feedback, including suggested ideas, design considerations, and project goals
The client requested for the team to construct a log obstacle course based on a list of four different design proposals. The above information summarized in Table 1 was then used as supplemental guidance in constructing the final project, including:
- The obstacle course would need an anti-slip coating to prevent slips and falls in rainy, wet weather.
- The obstacle course would be restricted in the sense that it cannot be challenging as the target audience of the children are aged 0-4.
- The CBEL Group 8 Team would utilize undefined, empty space rather than move or replace any current playground structures
- The team would try and design the structure in a more random order than a defined, set obstacle course, in attempts to leave the space as undefined as possible, as mentioned by the client.
- Analysis would have to be done to determine the viability of creating a structure taller than 6”, as it may be too challenging and would require loose-fill materials.
Project Research
Research was needed in order to determine applications of non-slip coating. The group collectively had decided that any structure higher than 6” would further introduce slip and fall accidents among the younger aged children, while increasing the project costs and labour, as geotextile cloths and 12” of wooden mulch would have been needed to sustain any falls higher than 6” (13-14, Public Playground Safety Handbook). The necessary research and design for the non-slip coating was done by Jeremy Javier. The non-slip coating would consist of an exterior polyurethane wood finish, which has the added benefit of increased durability with respect to mildew, and ultraviolet ray protection for the top of the log surfacing. Furthermore, the design would include an added in mixed grip additive. The purpose of the additional grip additive is to provide small, fine grained material into the polyurethane wood finish. These materials are designed in order to improve grip and friction on wet surfaces by providing a rough, texturized coating, reducing injuries caused by slippery surfaces. Table 2 summarizes the materials needed for the anti-slip coating, including recommendations and suggested brands.
| Materials Used | Recommendations and Suggested Brands | Total Estimated Cost (Estimation may vary and is based on suggested brands and materials) |
| Clear Polyurethane Finish | Minwax 1-qt. High Gloss Helmsman Indoor/Outdoor Spar Urethane | $20 |
| Grip Additive | Tread-Tex Anti-Skid Paint Additive, 16oz | $5 |
| Paint Brushes** | N/A | N/A |
| Salt Shaker** | N/A | N/A |
Table 2: Required Materials, Recommendations and Suggestions, and Cost Breakdown
**Paint Brushes and Salt Shakers are not required materials. These are mentioned and used as methods of applying the grip additive and the clear polyurethane finish to the logs as discussed in Directions. There are many different types of salt shakers and Paint Brushes, and although no specific brand or model is cited, recommendations and explanations are referenced in Directions. If possible, with respect to cost-effectiveness, we recommend that Options Community Services use already owned brushes and salt shakers. As a result, these costs are not included in Table 1.
Directions:
- Transfer grip additive into a large salt shaker. Ensure that the salt shaker holes are large enough to allow grip additive grains to pass through.
- Using a bristled paint brush, apply a generous coat of the polyurethane coating to the top surface of the logs. Be careful when painting edges, ensuring the polyurethane does not drip over the sides which create uneven drips and lines.
- While still wet, lightly sprinkle grip additive to the surface of the log. Use as needed, applying the necessary amount of grip additive required for desired grip. Applying more additive results in a more rough and textured surface. Apply evenly to ensure a consistent anti-slip resistance.
*For reference, 16 ounces of Tread-Tex Anti-Skid Paint Additive mixes with 1 gallon of paint/finish. As such, 4 ounces mixed with an entire quart of Minwax 1-qt. High Gloss Helmsman Indoor/Outdoor Spar Urethane, which covers up to 125 square feet, which results in 0.907 grams per square foot of paint. Each log varies in diameter between 1-2 feet, with a square footage of 0.785-3.14. Compensating for the two coats, the square footage covered by paint will range 1.57-6.28 square feet, resulting in 1.42-5.70 grams of Tread-Tex needed for each log. Note: These numbers are based on the suggested brands and recommendations, and as such, labels should be followed as a general guide to the amount of grip additive needed. - Sit, and let dry. Refer to the polyurethane brand label to determine drying time. Most oil based polyurethanes are more quick to dry than water based ones, and can be ready for their second coat in as little as four hours. Use your judgement, and do not begin to apply second coat until the logs are dry. Note that the weather can affect and prolong drying times based on humidity.
- Once dry, begin to apply the secondary coating. Note that with the added texture of the grip additive, the polyurethane coating becomes slightly more difficult to apply. Ensure complete coverage over the additive by using a cross-stroke method.
- Allow to dry for a complete a complete 24 hours, or until the top log surfaces are completely dry.
AutoCAD and 3D Modelling Design Development
Wei Jang was tasked with completing all necessary 3D design and AutoCAD drawings for the project, which would be used in reports, presentations, and as a model for the expected finished product.
Construction Phase
Overview
Members of the group have submitted their necessary contact information for when the construction of the project begins. Several of us will work as volunteer workers, while the rest of the construction crew will consist of Options Community Service Society workers and other volunteers. OSC is responsible for these workers, and any necessary pay they may require. The construction phase of the project was planned for the summer months. Due to the poor drainage of the site soil, the CBEL Group 8 Team wanted to ensure dry conditions throughout the construction, in order to reduce the possible safety effects that installing the logs would have with wet, inflated soil. Figure 1 outlines the construction timeline.
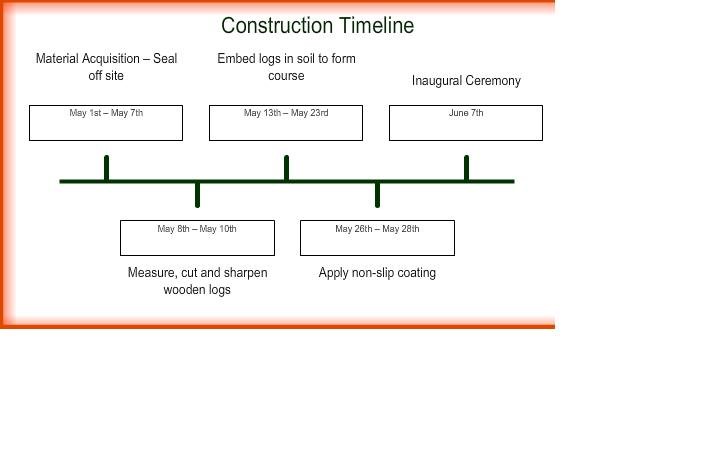
Figure 1: Project Construction Timeline: Completed by Christian LeGagneur
Raw Material Acquisition
Options Community Services will be responsible for the raw material acquisition—the logs. They are being donated to them, and thus reduce the cost of the overall project as they will be provided to them for free.
Material Preparation—Measuring and Cutting the Logs
In order to reduce any possible injuries due to wooden slivers, cuts, or scrapes, the logs will be cut of any protruding sticks, twigs, and branches. The logs were requested to be cut to 2.5 feet prior to delivery. Any logs that were not received at this length will need to be cut using saws to fit the design requirements. The donated logs will then need to be sharpened into a wedge formation to allow for easier installation. The sharpened wedge will run 0.5 feet up the log surface with varying angles dependant on the log’s diameter.
Embedding the Logs On Site—Obstacle Course Layout
Both Jeremy Tse and Kunal Sethi were tasked with determining how to securely embed the wooden logs into the ground which in a way would ensure complete security. This was a significant step in the design, as logs that are too loosely secured could result in toppling and injuries to the children. As a result, they determined that the best way to secure the logs was to dig a one foot deep entrenchment, and hammer the wedged logs (which have been prepared and cut as outlined in Section 3.c) using a sledgehammer to firmly secure into place. Again, Options Community Services will be responsible for this necessary piece of equipment. The depth that they will be dug into the ground will be determined by the preferred height of the log. For logs that will have a 3” height off the ground, these wedged-bottomed logs will need to be hammered 1.25 feet into the ground. For the logs that will have a 6” height off the ground, they will need to be hammered one foot into the ground. The construction crew will then backfill the foot deep entrenchment, and pack the soil compactly. As a result, the logs—which will vary at heights of 3” and 6”—will be dug into the soil at differentiating depths of 2 feet (for the 6” height-above-ground logs) and 2.25 feet (for the 3” height-above-ground logs).
Applications of the non-slip coating
Refer to section 2.b (Design Phase—Project Research) and Table 2 for the required information regarding the non-slip log coating and how to apply.
Project Evaluation
Indicators of Success
As a collective group, team members collaborated to determine five main reflective questions, which we will to quantify the success of the project— renovating Options Community Service Society’s Guildford Family Resource Centre.
- The amount of usage and interest among the Resource Centre’s children the structure will receive. How often is the structure used? Is it a popular play space among the children?
- The diversity in which the children will use the structure. For example, will they use it strictly as an obstacle course? Or will they reinvent it in ways even we, as the design team, did not even imagine?
- The punctuality in the project delivery. Was the construction timeline provided thoroughly followed? Were there unexpected delays that we did not have the foresight to account for? Or, did we simply misjudge the required time that each of the stages in construction needed for completion?
- The accuracy of the cost analysis. One of our goals was to provide a design which would not require extensive costs to implement. Were there any measures that we did not anticipate? Were we able to keep the overall costs of the project to a minimum?
- How happy is the client with the finished project? Was it as she had imagined and envisioned? Had we delivered on the variety of different needs and desires for the obstacle course? Did it fully fit in line with the “Zen” and serene environment that the client envisioned?
References
Fjortoft, I. And J. Sageie (2000). The Natural Environment as a Playground for Children: Landscape Description and Analysis of a Natural Landscape. Landscape and Urban Planning 48(1/2), 83-97
Home Depot (2013). Minwax 1-qt. High Gloss Helmsman Indoor/Outdoor Spar Urethane. Retrieved from http://www.homedepot.com/p/Minwax-1-qt-High-Gloss-Helmsman-Indoor-Outdoor-Spar-Urethane-63200/100376197
Moore, Robin C. (1986). The Power of Nature Orientations of Girls and Boys Toward Biotic and Abiotic Play Settings on a Reconstructed Schoolyard. Children’s Environments Quarterly, 3(3)
Moore, R. & Wong, H. (1997). Natural Learning: Rediscovering Nature’s Way of Teaching. Berkeley, CA: MIG Communications.
NC State University (2012). Affordable Settings and Elements. Retrieved from http://naturalearning.org/sites/default/files/Affordable%20Settings%20and%20Elements_InfoSheet.pdf
Public Playground Safety Handbook. United States:, 2008. Print.
Pyle, Robert (2002). Eden in a Vacant Lot: Special Places, Species and Kids in Community of Life. In: Children and Nature: Psychological, Sociocultural and Evolutionary Investigations. Kahn, P.H. and Kellert, S.R. (eds) Cambridge: MIT Press
Taylor, A.F., Wiley, A., Kuo, F.E., & Sullivan, W.C. (1998). Growing up in the inner city: Green spaces as places to grow. Environment and Behavior, 30(1), 3-27
ThePaintStore.com (2013). Homex Tread Tex Anti-Skid Paint Additive 8600. Retrieved from http://www.thepaintstore.com/Homax_Tread_Tex_Anti_Skid_Paint_Additive_8600_p/8600.htm.
Tables and all kinds of forms are really useful tools to present our ideas. It’s useful and necessary and can help us express our ideas more clearly.
Our material-picking up process based on our clients’ requirements and some additional considerations, and we also consider cost then give our suggestions.
What makes me surprised is your careful consideration in small things like grip addictive in order to result in a more rough and textured surface. Good!
Hi Team,
Congratulations on this excellent work. The level of detail you have provided is laudable and impressive.
I’m particularly pleased to read about the level of interaction you have had with Katherine. Also, the clear instructions and references you have provided are of great value in communicating your recommendations for moving ahead with the project.
Best regards,
Susan Nesbit