introduction
This exercise focuses on honing our technical drawing skills and our hand-eye coordination. Without these tools, we are limited in how well we can draw the things we picture in our mind’s eye. By mastering the very basics of drawing (lines, circles, perspectives, and hatches), we gain a more seamless transition from idea to sketch which fosters a state of creative flow. Our sketches also become more legible with less effort, aiding in the collaborative nature of the design process.
Desired outcomes: accuracy, confidence, efficiency
Methods: technical drawing
materials
- 3 sheets of letter-sized (minimum) paper
- Pens, pencils, markers, fine liners, etc.
instructions
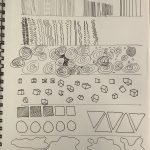
- Divide your sheets in half, totaling 6 sections
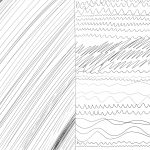
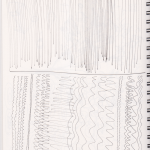
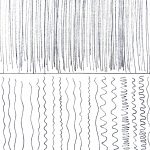
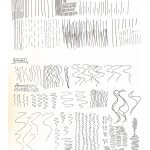
- Fill section 1 with straight lines. Try drawing them slowly and quickly, lightly and heavily. Draw some close together, and make them as parallel as you can. Find an angle that is most comfortable for you and stick with it – turn your page so that your arm always makes the same motion, regardless of the line’s orientation on the page.
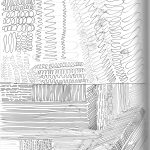
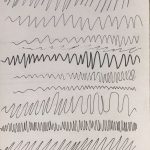
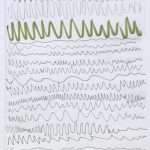
- Fill section 2 with wavy lines. Draw them slowly and quickly, lightly and heavily. Make the waves spread out and condensed, shallow and deep. Try transitioning from one kind of wave to another. Draw one wavy line under another, keeping the distance between them consistent.
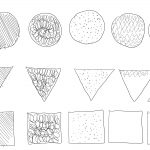
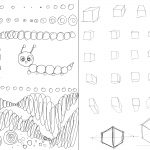
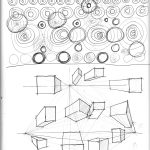
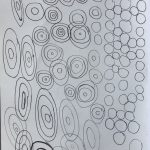
- Fill the top of section 3 with circles. Always begin and end your circle at the same place. Draw them slowly and quickly, lightly and heavily. Try going through the motion a few times before placing your pen down on the paper. Draw circles that touch other circles, and circles within circles. As you move down the page, begin to flatten your circles into ellipses which get more elongated toward the bottom of the page.
- Fill section 4 with cubes in perspective. Try various 1-point, 2-point, and 3-point perspectives. Try to make them look as proportionally accurate as possible. Make some cubes transparent and others opaque. Intersect some cubes with others. Find a perspective you like and draw 5 of them.
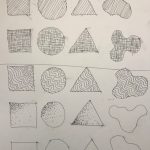
- In sections 5-6, draw 5 large squares, 5 large circles, 5 large triangles, and 5 large squiggly shapes. Choose 5 different hatches (cross-hatching, dots, zig-zags, poche, etc.) and fill one of each shape with each hatch, being mindful of the shape’s borders. Try not to scribble outside the lines! Make each hatch as neat and consistent as you can.
reflection questions
- What application might this type of sketching have in your everyday design practice?
- Which of the sections was most difficult for you? Which was easiest?