Author: Victor Ngo
Using the Boy/Girl Icons
We use the 4 Girl/Boy icons for three reasons on the Learning Commons:
- Interesting or noteworthy piece of information (example).
- For headers to organize content (example).
- To ask questions or communicate directly to the reader (example).
To use the icons, simply paste the following HTML code into the editor box when creating or editing a post or page. You may need to insert a break after the last </div>, epecially if you are using the icons one after the other. You create a break by inserting the tag “<br></br>.”
Blonde Haired Girl
![]()
<div class="girl1 girl">

<div class="bubble">

<img class="alignleft size-full wp-image-7322" title="BlondeHaired Girl Icon" src="http://leap.sites.olt.ubc.ca/files/2010/08/BlondeGirl-Icon.png" alt="" width="50" height="55" />

<p><strong>Enter text in here.</strong></p>

</div>

</div>
Blonde Haired Boy
![]()
<div class="boy1 boy">

<div class="bubble">

<img class="alignleft size-full wp-image-7321" title="BlondeHaired Boy Icon" src="http://leap.sites.olt.ubc.ca/files/2010/08/BlondeBoy-Icon.png" alt="" width="50" height="55" />

<p><strong>Enter text in here.</strong></p>

</div>

</div>
Dark Haired Girl
![]()
<div class="girl2 girl">

<div class="bubble">

<img class="alignright size-full wp-image-7323" title="DarkHaired Girl Icon" src="http://leap.sites.olt.ubc.ca/files/2010/08/DarHairGirl-Icon.png" alt="" width="50" height="55" />

<p><strong>Enter text in here.</strong></p>

</div>

</div>
Dark Hair Boy
![]()
<div class="boy2 boy">

<div class="bubble">

<img class="alignright size-full wp-image-7324" title="DarkHaired Boy Icon" src="http://leap.sites.olt.ubc.ca/files/2010/08/DarkHairedBoy-Icon.png" alt="" width="50" height="55" />

<p><strong>Enter text in here.</strong></p>

</div>

</div>
Media How-To Guides
Click here for an overview of the WordPress Media Library.
Using the UBC Wiki
What is the UBC Wiki?
The UBC Wiki is a shared space for use by students, staff, and faculty at the University of British Columbia. It serves as a course repository, a personal and collaborative work space, a documentation depository, and a growing guide to everything and anything UBC. The information, resources, and links that it contains are created, expanded, and annotated by its users. It is constantly evolving and changing because every member can add to it and edit any page. The UBC Wiki is administered by the Centre for Teaching, Learning and Technology.
This screencast provides a quick introduction and tour of the UBC Wiki:

Organization and Purpose
A wiki is a website that stores information which is collectively created and edited. The UBC Wiki is both an information repository and a collaborative writing space. It is organized into different collections to accommodate its different purposes:
- The root of the wiki is open space for articles related to the University of British Columbia.
- Course-based content or activities should go to Course space. Here is a sample.
- Documentation space is provided for documentation, support and other similar content. Here it is in action.
- The Sandbox is your place to test, play, and work with the UBC Wiki.
Integrating the UBC Wiki with the Learning Commons
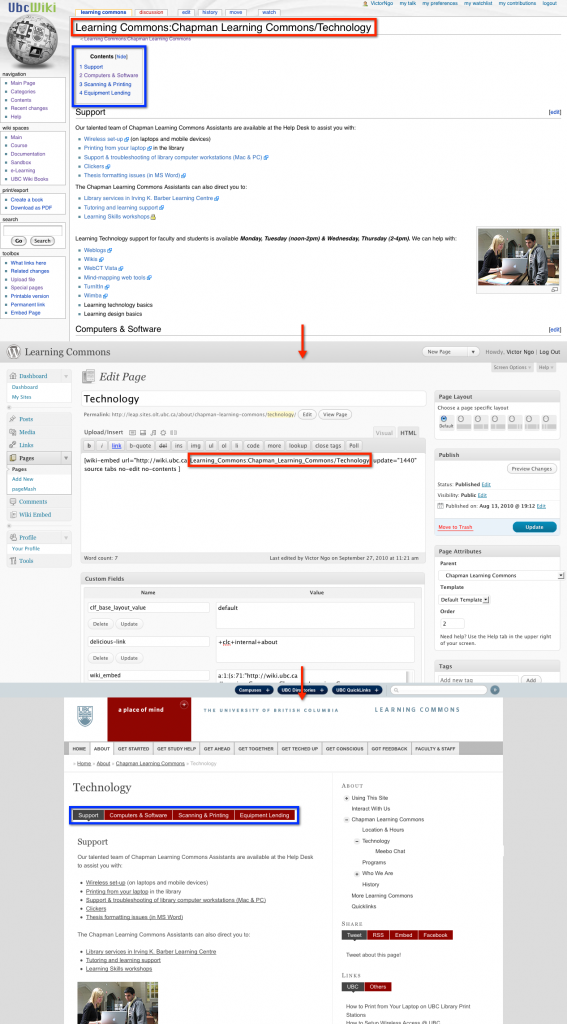
The UBC Wiki acts as the content engine for the community’s online publishing framework. CTLT has developed a WordPress plugin, Wiki Embed, that allows you to publish content on the UBC Wiki to the Learning Commons site.
As a wiki intends to be a collaborative platform, multiple users (with permission) can edit a page on the UBC Wiki. When content is updated once on the wiki, that update is automatically rendered on the Learning Commons site and anywhere else it is published. This simplifies and consolidates the authoring process to the wiki.
If you use content across different sections on the Learning Commons, you no longer have to manually edit every single page!
Using the Wiki Embed Tool
- Go to the Page where you wish to embed wiki content to.
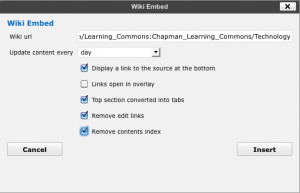
- In the text editor, click on “Visual” and click on the “Wiki Embed” icon.
- Copy the URL of the wiki page:
e.g. “http://wiki.ubc.ca/Learning_Commons:Chapman_Learning_Commons/Technology” - Paste the URL into ‘Wiki URL’ in the Wiki Embed box.
- Make sure the following are selected:
- Update content every: day
- Display a link to the source at the bottom
- Top section converted into tabs
- Remove edit links
- Remove contents index
- Click ‘Insert’ and you should see code similar to this:
[wiki-embed url=”http://learningcommons.ubc.ca/about/chapman-learning-commons/technology/” update=”1440″ source tabs no-edit no-contents ]
Note: We are experiencing problems when audio files are embedded into a wiki page using the Flash MP3 tag < flashmp3 >< / flashmp3 > and subsequently published on the Learning Commons. The audio file will not be published on the Learning Commons site and instead show up blank. Instead, please directly link to the audio file using the [URL] tag if you are using the wiki.
Wiki Workflow
Do you have a learning or research commons project that you want to highlight on our resource site for students: UBC’s Learning Commons? If so, here are the steps to follow to get it done.
- Create your page in the Learning Commons namespace. See Learning Commons:Namespace Orientation. This will your index page for your content.
- Check that you have set up your page correctly once you have created it. If you see it on the index page for the Learning Commons, then you have created it correctly.
- Author your content on subpages within your wiki space. For example, your wiki space may look like this: Learning Commons: Land and Food Systems. An example of common subpages within a wiki spage will look like this:
- Learning Commons: Land and Food Systems/Description
- Learning Commons: Land and Food Systems/Services
- Learning Commons: Land and Food Systems/HoursNote: Keep your subpage titles short.
- Review the Learning Commons:Writing Guidelines for tips on how to prepare your content and what you might want to include.
- Compile your subpage content into an information page for the Learning Commons site. You can do this easily using transclusion. With transclusion, you just add the reference code for each page that you want to include. It is best to call this aggregate page something generic like: About or Information.
- Request a page on the Learning Commons.
- Notify us when your page is ready to publish on the Learning Commons site.
If you need further support with any of this please contact Centre for Teaching, Learning and Technology.
Writing Style Guide
Thank you for contributing your content to the Learning Commons!
The Learning Commons website’s mission is to be a resource-hub for students, written in a student voice, with a student perspective in mind. In past focus groups, students consistently said that they valued the site’s student-centered tone, and preferred it over a more formal, administrative style.
To help us maintain the website’s personal voice and identity, please consider the following writing guidelines when contributing:
- Conversational and Casual Tone
Write as you would speak to a student who comes to you for help. Avoid jargon-y words and acronyms when possible, and opt for more common vocabulary. - Limit Organizational Details
Instead of introducing your dept/organization/unit in official terms (for example, “The Disability Resource Centre (DRC), a component of Access and Diversity, works with the University community to determine reasonable accommodation…”) tell the students, what can you do for them first. Ie. “The Disability Resource Centre (DRC) helps students with …” - Bullet Points and Numbered List Are Your Friend
Using bullet points and numbered lists help keep information organized and easy to read. - KISS: Keep It Short and Simple
Your page is meant to be a summary of what you offer students (along with important times and dates, if relevant), and should link to your website, but does not need to be as comprehensive as your own website. Focus on the “need to knows” and try to keep your paragraphs limited to a max of 4-5 sentences. Research shows that web audiences have a very short attention span. - Who, What, When Where, How and Why?
Journalists use this simple rubric to keep them on track. It can be useful to keep a mental checklist about if you’ve answered the Who, What, When, Where and How (and Why) in a clear way.
Writing Style Guide (for Wiki)
What to Include
First, you’ll want to set up your page in the Learning Commons namespace. To do that, follow this workflow.
Once you have your page (index page) set up, you’ll want to create the following subpages. Do this by adding a slash after your index page and the following titles:
- /Description. A brief description of your program/department/unit/service and what it can do for the students and a link to your site.
- /Services. The services you offer and how they can be accessed.
- /Contacts. Any important front line contact information.
- /Hours. Any schedule information or hours of service (i.e. for tutoring).
- /About or /Information. This is where you can aggregate all or any of your subpages in preparation for publishing on the Learning Commons. See the workflow.
Of course you may have other subpages, that’s fine too–these tend to be the important pieces of content that students will be looking for.
Making Content Re-usable
- Keep subpage titles short.
- Create an About or Information page with basic information as above. Make this an easy process by using transclusion.
- Consider page sections carefully. Page sections can be defined with page titles from transcluded content, OR as subheadings on a single page. Keep headings short and top level (==Level 2 headline==).
- Subheadings within a section should not be actual ==headings== but instead just bolded and capitalized.
Following these guidelines will ensure that tabs look reasonable of you plan to use these on your page. Here is an example of a page authored in the Wiki and published on the Learning Commons site: Resources for Distance Learning
Style Guides for Wikis
Writing Guidelines are basically the same in the wiki as they are for any other collaborative writing environment. It is helpful to set a few guidelines for your project when it involves collaborative writing: Here are a few sample Style Guides for Wiki projects:
Tips specific to Wiki formatting: Hands On: 6 Things To Know
Thanks for your contribution!


