
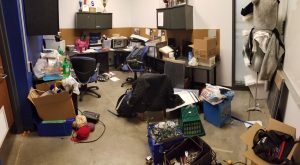
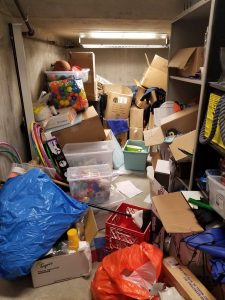
Photos look familiar? Does your student group storage room resemble this? Or maybe you are reading this thinking, well at least we aren’t as bad as that. No matter what stage of disorganization your student group is facing, starting to get organized can feel daunting. You may feel like things are too disorganized to even begin getting organized. It may seem like a never-ending cycle: you can’t get organized because things are too disorganized, so you just continue to stack boxes on top of each other.
If you are feeling like you are deep into this disorganization cycle, then you came to the right blog! Tidying up can feel scary. Have you seen an episode of Marie Kondo’s Tidying up? Everyone thinks they are too far gone for help. But like Marie Kondo, we are offering some easy practical steps to begin your organization journey!
Step 1: Assess the Problem
If your storage room looks like the one above, you may think this step is unnecessary. You may be thinking that the problem is clear: Things are everywhere! Always! But while you may think this problem is unnecessary, your student group needs to know the extent of the problem you are dealing with. Is the problem that your volunteers and executives simply do not know where to put things? Or is the problem that nothing gets thrown out, so you keep accumulating trash or unnecessary items that could be recycled or donated? Without knowing what the problem is, your group won’t be able to find an effective solution.
Assessing the problem will also help make the start of the organization journey more manageable. No one wants to jump in and have an overhaul cleaning day. Start small; start manageable.
Now enter the dilemma: How do you assess how much of a mess is being made?
Proposal: Monitor and Observe!
Assign someone to simply monitor and observe the state of your storage room. Take notes and collect real-life observational data without influencing anyone’s behavior! You need to know how people act on a day-to-day basis if you want to understand what the root problem is.
From our experience, here are some tips for on-site evaluations:
1. Set a timeframe for evaluation or assessment.
- Timeframe needs to be long enough that you can get an understanding of the situation. We propose one month, but this can be adjusted to whatever timeframe works best for your group.
2. Set frequency of assessment.
- When deciding on the frequency, think about how frequently do things actually change. Are there events that cause changes in the situation? How frequent are these events?
- We propose twice a week, but again this can be adjusted to whatever timeframe works best for your group.
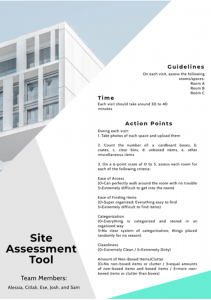
3. Create a guide or checklist for assessment.
- Create a guide or checklist to know what you or your student volunteers should be monitoring during assessments. Categories can be adjusted based on your group’s needs.
- As an example, see our tool that we created and used:
4. Ensure that the metrics for assessment align with the goal and information sought.
5. Ensure that all team members or volunteers working with the tool, understand how to use it.
- This will be important to have consistency in the results.
6. Decide on a way to analyze and review the data.
And some extra tips:
– Reevaluate as needed. Your first site assessment tool may not be perfect. Allow for adjustments as the monitoring continues.
– Communicate your findings between teammates!
– Document extensively – it is always better to have more information than less!
This first step can help your group start your group’s organization journey! Good luck 🙂