
- Home
- Start Here
- Start of Term
Start of Term
Whether you are new to teaching or are preparing for your upcoming term, here are some resources to help you prepare to teach.
Prepare to Teach
To help you prepare your courses for the start of term in Canvas, here are some steps we’re recommending:


You can also
Organize your course navigation menu
By default, your Canvas course has been enabled with certain tools/features. They will appear in the left hand navigation in your course.
How do I know what my students can see in the left hand navigation?
You can tell what items are available for students if they do not have an eye icon crossed out beside them.

There are two reasons why there may be an eye icon beside your item
- It has not been enabled in settings
- There is no content in that item. Once you publish content in that item, the eye icon will go away if it is enabled in settings
How do I edit what items are available in my navigation?
You can adjust what tools are available to you and the students by editing your course navigation in Settings. Anything in the upper block will appear to students, anything in the lower block will only appear to instructors.
Open Settings

In Course Navigation, click the Settings link.
Open Navigation

Click the Navigation tab.
Drag and Drop Navigation Links

Remember after making any changes to scroll to the bottom and Save (this will not auto-save)!
Utilize the Canvas Calendar
The Calendar is a great way to view everything you have to do for all your courses in one place. You can view calendar events by day, week, month, or agenda list. The calendar also includes access to the Scheduler, which is an optional scheduling tool in Canvas.
When would I use the Calendar as an instructor?
As an instructor, use the Calendar to:
- View and create activities in your course as well as events and personal reminders; you can also filter the calendar view to only see specific calendars
- Quickly add Assignments to a blank course. Fill in the details of those Assignments later
- Adjust the dates of Assignments that have been imported from previous terms. Canvas makes it easy to drag and drop events across multiple months
- Schedule appointments with students using the Scheduler (optional feature)
Student View
Students can use the calendar to view their upcoming course events and assignments. They can also create personal events such as study groups.
How to I access the Calendar?
You and your students access the calendar the same way:
Open Calendar

In Global Navigation, click the Calendar link.
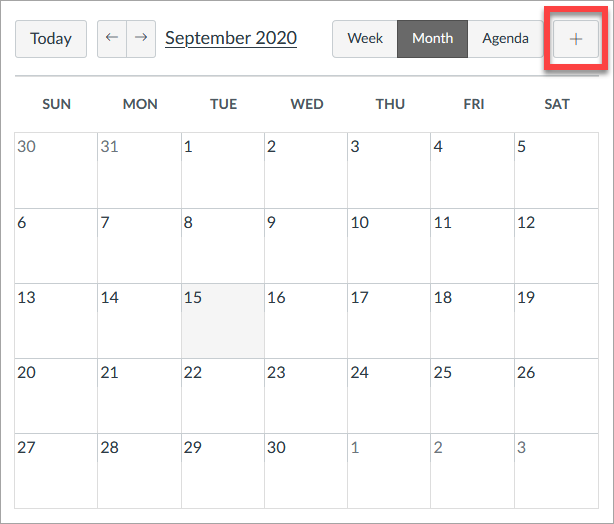
Your calendar will look similar to below:

Schedule Meetings with Students
Canvas Scheduler is the perfect tool to create a block of time for office hours. It allows students (or groups) to sign up for appointment times in their own calendars.
Add Event
In Global Navigation (Canvas left-hand side menu) click Calendar. Then, either click the date on which you want to schedule your office hours or click the Add icon (i.e. the plus sign in the top right hand corner).
In the new window that opens, click the Appointment Group tab.
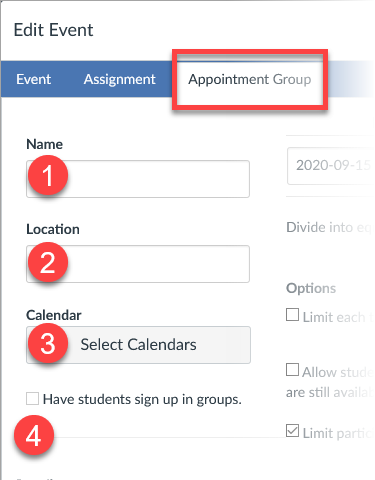
- Type the name of the appointment in the name field [1] and the location of the appointment in the location field [2]. (It can be your virtual office hours Zoom link.)
- Click the Select Calendars button [3]. Select the course(s) or section(s) where you want to show the appointment group to show, then click the Done button.
- If you have at least one group set in your course, you can have students sign up in groups by clicking the Have students sign up in groups checkbox [4]. (Select the name of the group category you want to use for the group signup from the list.)
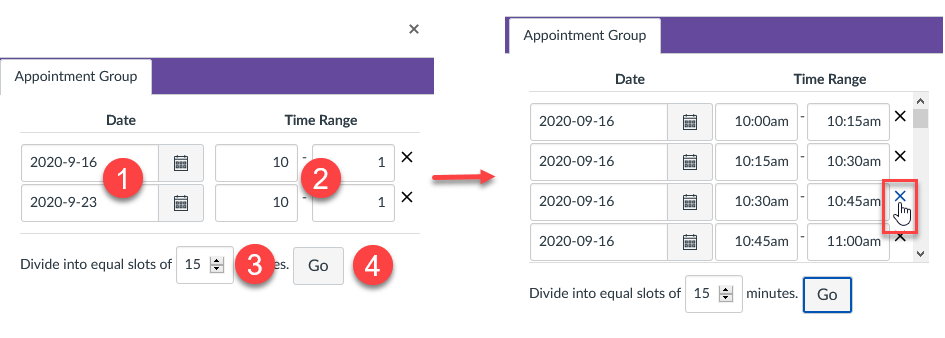
- In the date field [1], enter the date of the appointment. (You can also select a date by clicking the Calendar icon.)
- Set the time range for the appointment by typing in the time range field [2]. (Note: you can set up the appointments for multiple days at once!)
- Split the time range into multiple time slots by entering the division time into the time field [3]. Then click the Go button [4].
- You should now see a list of your appointments. You can manually change any appointment time created by the division and if you want you can remove an appointment time by clicking the Remove icon.
Note: The appointment date, time range, and appointment slots cannot be modified after the appointment group is saved. However, additional dates, time ranges, and appointment slots can be added to the original appointment group.
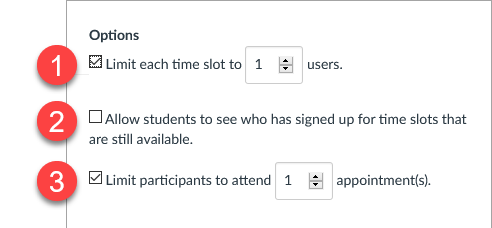
- In the Options, you can limit how many users can sign up for a time slot by clicking the Limit each time slot checkbox and typing the number of time slots in the limit field [1]. If you selected the option to have students sign up in groups, this field reads as Limit each time slot for x groups.
- To make the appointment slots public to students in the course, click the Allow students to see who has signed up for time slots that are still available checkbox [2]. Selecting this option also allows students to see comments other students add to their appointments.
- If you want to limit the number of appointments available, click the Limit participants to attend [number] appointment(s) checkbox [3].
Note: When using the group signup option, only one group member needs to sign up for a time slot on behalf of their group. Each member in the group will see the appointment on their own group calendar
- If you want to add details about the appointment group, type them in the details field at the bottom.
- Click Publish button.
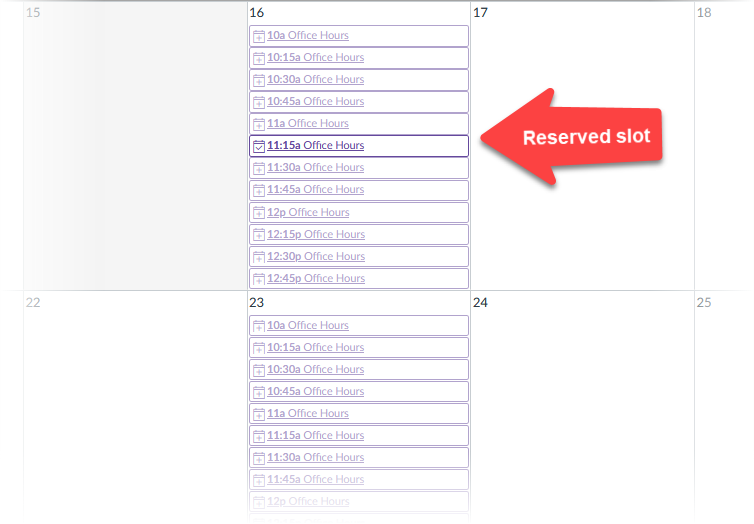
- View the appointment dates and times in your course calendar. Time slots that have been reserved by students will show as a solid color.
Note: If you added an appointment group to more than one course, appointment slots only display in the calendar for the first course shown in the appointment group.
View and Edit Appointments
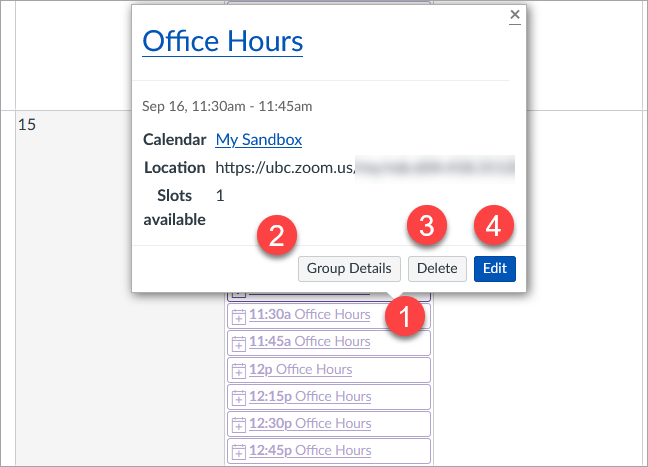
- To open an appointment group, click any time slot in the target appointment group [1] and in the appointment window that opens, click the Group Details button [2].
Note: At this point you can also delete and individual appointment slot by clicking the Delete button [3]. You can also click the Edit button [4] to edit the description of the appointment slot or limit the slot to a specific number of users. (Changing either of these values in an individual time slot does not affect the description or user signup limit for the entire group.)
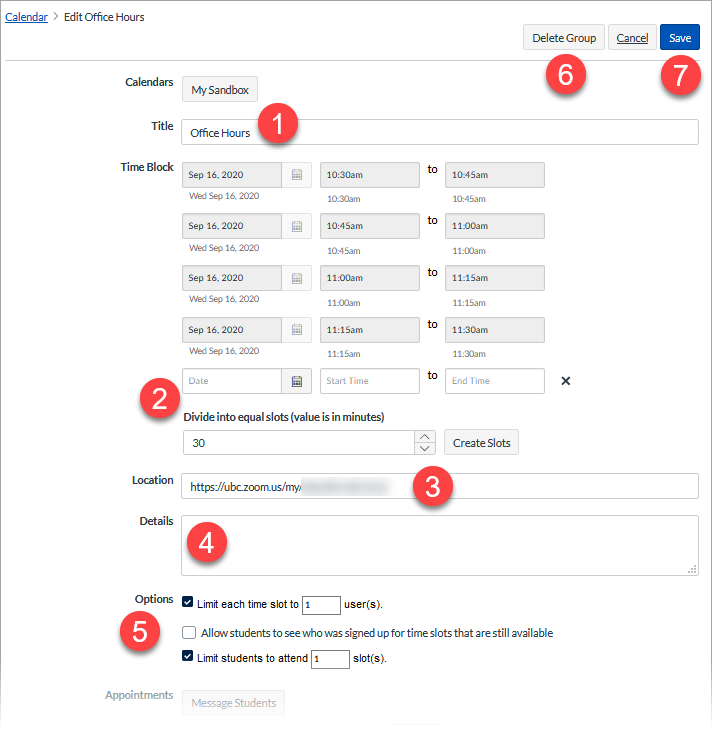
- In the Appointment Group details page, you can edit the name of the group [1]. You can add new appointment group sets and additional time slots to the entire group [2], and you can add or modify the assignment group location [3], group details [4], and group options [5].
- To delete the appointment group, click the Delete Group button [6]. Please note this option does not provide a warning and cannot be undone. Deleting the group will also delete any appointments that have been reserved by students.
- To save changes in the appointment group, click the Save button [7].
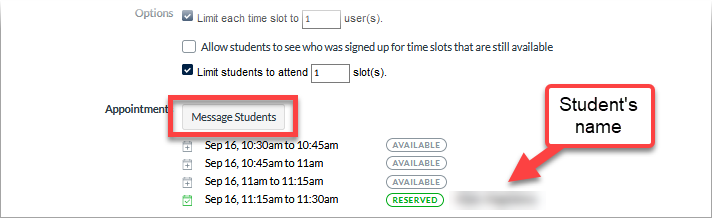
- At the bottom of the Appointment Group details page, you can view all appointments in the group. Each time slot shows the date and time and whether or not the time slot is available. You can also view the name of each student who signed up for the time slot.
- If you want to send a message to students in the appointment group, click the Message Students button. You can send a message to all users in the appointment group, users who haven’t signed up for a time slot, and users who have signed up.
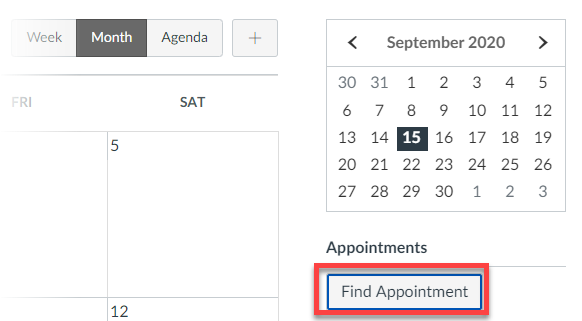
Important: Students need to click the “Find Appointment” button in their calendar to see the time slots you’ve created. (For more information see How do I sign up for a Scheduler appointment in the Calendar?Links to an external site. in the Student Canvas Guide.)
Update your course level notification settings
Users can manage notifications for a single course through the Course Notification Settings page, allowing you to decide which kind of notifications you receive, the frequency of notifications etc.
This is particularly useful if you are teaching multiple courses and want different notification settings for each. For example, you might want to receive notifications for every assignment submission in a fourth-year course but not for a first-year course.
Please note that these notification settings apply only to you, not to your students. They can set their own notification preferences for each course.
Updating Your Course Level Notification Setting

Steps
- In Global Navigation, click the Courses link [1], then click the name of the individual course you would like to set notification preferences for [2].

- In the course home page sidebar, click View Course Notifications. This will take you to the Course Notification Settings page.

- Click the Enable Notifications toggle to manage your course notification settings. When notifications are enabled for the course, the toggle displays a checkmark icon [1]. When notifications are disabled for the course, the toggle displays an X icon [2].

- To manage notifications for specific course features, click the icon for the notification method [1]. You can select how often you want to receive notifications for the course. Options include Notify immediately [2], Daily summary [3], Weekly summary [4], or Notifications off [5].

- On your course home page, the View Course Notifications button icon displays if course notifications are enabled [1] or disabled [2].
Getting Help
Schedule a one-on-one overview/course set up session with Learning Services at your convenience by emailing help@sauder.ubc.ca.