So I have managed place the wiki embed plugin to a more permanent home.
Here is the link to the latest version.
This relies is even more up to date then my last post.
So I have managed place the wiki embed plugin to a more permanent home.
Here is the link to the latest version.
This relies is even more up to date then my last post.
So I have finally finished round one of wiki embed implementation, and I need your help testing it.
You can download it here: wiki-embed-09-alpha.latest version
The install is quite strait forward, upload the unziped plugin, to you WordPress plugins folder and active it.
After that please report any bugs, problems, spelling mistakes 🙂 and any confusing bits by posting a comment or sending me an email at enej.bajgoric@gmail.com.
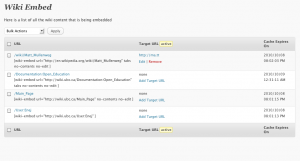
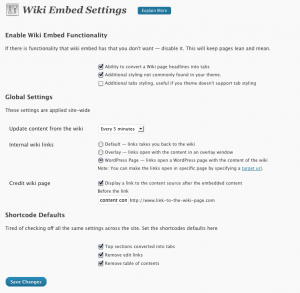
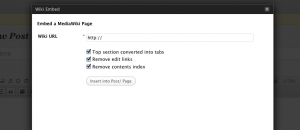
Here are a few screen shots

A page that list all the wiki content that is embedded on the site.

a look at the wiki embed settings page.

A way to embed a media wiki page inside your site.
Thanks in advance.
In short : Organizing information your posts. Think of them as folders.
So how are they different from tags? Well here is a good post comparing them.
We have been relying to plugin commander to allow user to enable and disable plugins per blog/ site. However, having the link to your plugins show up under
Dashboard → Posts → Plugins
Is not the most intuitive. Luckily the developers have though of that and make the plug in easy to modify.
Take a look at theline 34 of the plugin-commander.php file. Which should read something like
define('PC_PLUGINS_HOME','edit.php');
and change it to
define('PC_PLUGINS_HOME','tools.php');
if you want the link to show up under Dashboard → Tools → Plugins
instead or change it to
define('PC_PLUGINS_HOME','options-general.php');
if you want the link to show up under Dashboard → Settings → Plugins.
Here is some WordPress developer documentation, if you would like to know more about the whole process.
Yesterday I went though some of my past posts, some of them only contain a video I found on YouTube or Vimeo. Since I haven’t been paying attention to my blog, some of these embeded videos were not working. They relied on a WordPress Plugin that might have been disabled on my blog during an update or two.
As far as I know there are two ways to fix my broken videos.
Go and reactive the plugin by going to:
Dashboard → Posts → Plugins
The plugin is called “Viper’s Video Quicktags 6.2.17”
This works but it might break in the future again. However it is quite easy to fix.
This is the fix that I went with. It meant that I had to go back to each post that I found had a broken video and replaced this
[youtube]https://www.youtube.com/watch?v=Y6nO5RZLjdw[/youtube]
with something like this
https://www.youtube.com/watch?v=Y6nO5RZLjdw
This new method is a really easy way to embed videos.
Instead of relying on a plugin I just pasted the url to the YouTube, Vimeo or Flickr page
and WordPress inserts the proper embed code instead of the url. I have to admit it is a bit like magic.
Here is an example:
http://vimeo.com/4446890
That’s all you need to do. So next time you want to post a quick video into you blog just copy and paste the url of the youtube page you are on into a new post and WordPress will do its part to embed the video properly.
This works because WordPress supports Oembed.
Here is a bit more information on how you can use it and what websites are supported.
And now for your entertainment, another video by the talented David Ko. Enjoy.
Customizing your blog can be fun. Take it from me, I have probably switched between themes more often then I have written blog posts.
Here is a quick overview of how I achieve the current look using the new WordPress default theme TwentyTen.
Enable Custom CSS. Go to Dashboard → Posts → Plugins and active Simpler CSS 0.5
This will give you access to Dashboard → Appearance → Custom CSS
Copy and Paste the following CSS in to your Custom CSS.
#site-description{width:300px;}
#site-title { width:640px;}
#branding img{ display:none; }
#access{ margin:-85px auto 10px; background:none; }
#access .menu-header ul, div.menu ul{ float:right; }
#wrapper{ margin:20px 0 0 10px; border-right:10px solid #D9D8C4; }

#content, #content input, #content textarea {
 font-size:12px;
 line-height:18px;
 font-family:"Lucida Grande","Lucida Sans Unicode",sans-serif;
}
#access ul li.current_page_item  a{ background:#333;}
Go ahead and change the background color to #EEECD6
You can do that under Dashboard → Appearance → Background
Recently we got a small request to add a header image to the thesis theme. Curretly there is no option to add this to the thesis theme we are using right now. And since we don’t allow our user to make changes to theme files for security, stability and other good reasons.
However, there is a workaround, thesis allows you to place html into the footer of every page.
In case you need to add scripts to your footer (like Google Analytics tracking code).
You can use the textarea to create a header using css. The textarea can be found in the thesis options page.

Here is the HTML/CSS that I am using in my case.
<style>
#container{
 padding-top:120px;
 background: url(https://blogs.ubc.ca/enej/files/2009/08/home.png) no-repeat 0 28px;
}
</style>