My foray into VR as an interface to archival materials begins by experimenting with archival stereographs, like the one below from the City of Vancouver Archives:
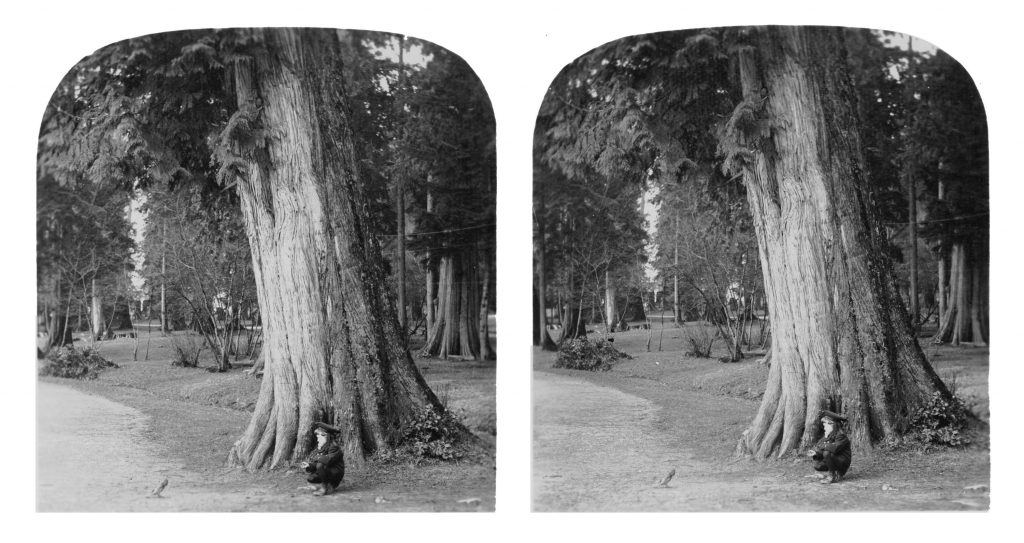
Coaxing the blue jay, Stanley Park – Philip T. Timms (Vancouver Museums and Planetarium Association fonds)
After wading into VR with the Unity equivalent of “hello world,” I’ve started to get down to creating VR apps in earnest. My first objective was to use VR to display stereoscopic archives as three-dimensional views rather than two side-by-side images, which is how they are typically encountered online and in person. In keeping with the project aim of being judicious in the use of VR, the archival user experience of stereoscopic archival materials stands to be greatly enhanced in VR compared with existing online modalities. And I figured it would probably be fairly easy to do – a quick win, if you will (it was).
Stereographs are comprised of two images that – when seen through a stereoscopic device – convey a solid-looking impression of depth; that is, that the scene within the stereograph appears to recede backwards from the two-dimensional picture plane (much like VR). The challenge for archival institutions is in providing access to the three-dimensional stereo view, which is arguably a critical dimension of the stereograph’s context as a record. It requires archival institutions to have, and manage the use of, a stereoscope for what is likely only a small percentage of their holdings. And even when a stereoscope is available to archival users, the repetitive task of switching the stereo cards may prove tiresome.
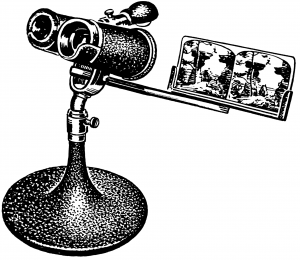
An (elaborate) example of a stereoscope with stereograph
Online access fares no better: while it’s possible to simulate the stereoscopic sense of depth by rapidly alternating between the left- and right-side images, as the NYPL’s Stereogranimator does, the results are variable – as evidenced by some of the contributed images on the Stereogranimator website. Making disparities between the two images more visible, the animated method disrupts the illusory qualities of stereo view.
And it worked! Not a terribly impressive feat – using VR, which renders content stereoscopically, as a stereoscope – but actually more complicated than it sounds. Unity, by default, treats the stereograph as a two-dimensional object in a three-dimensional scene – like a poster. To achieve the stereoscopic effect within the stereograph, the left eye must only see the left-side image and the right eye must only see the right-side image.
Creating a Stereoscopic Viewer in Unity
Tip of the hat to Loren Abdulezer for his instructions; you can read his extended original post if you get stuck (he includes more screenshots), and for instructions on how to render stereoscopic archives in Google Cardboard. I’m reproducing a bare-bones version of them in this post for the purposes of a quick demonstration – like a VR sketch.
For the stereoscope VR sketch, you will need to work with a stereographic source image. You can find an abundance of them on the NYPL Digital Collections website, on Wikimedia Commons, and so on – many of which are in the public domain. The stereograph must then be divided into a left- and right-eye image using an image editor of your choice; crop each down as closely to the photograph as possible to ensure that the sizes and baselines of both images are roughly the same.
The directions below assume that you have set up Unity to build your app in VR, and have been introduced to Unity’s core concepts through a foundational tutorial like one of the ones mentioned in the post on Getting Started with Unity.
Step 1: Create the Stereoscopic Viewer
1a. At the top-level of the hierarchy window, create an empty game object and name it “Viewer” (note: none of the names provided are meant to be prescriptive – you can call the object “Stereoscopic Viewmaster Fantastic” if you feel so inclined).
1b. Set “Viewer” to a position of x=0, y=2, z=0 and use the default scale (i.e. 1 for all axes) in the inspector window; this will represent the viewpoint of the user (hence why the positional y-value is 2 rather than being 0, or on the ground).
1c. In the hierarchy window, drag the “Main Camera” camera onto “Viewer” and rename as “Left_Camera.” If necessary, reset the transform values in the inspector window.
1d. Duplicate “Left_Camera” in the hierarchy window and rename “Right_Camera.”
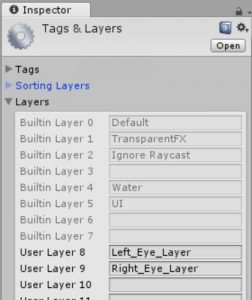
1e. Create new layers for each eye
1e. Open the “Tags and Layers” panel in the inspector window by navigating to Edit > Project Settings > Tags and Layers. Create two new user layers named “Left_Eye_Layer” and “Right_Eye_Layer.”
1f. Select “Left_Camera” in the hierarchy window and then change the following Camera properties in the inspector window:
Culling Mask > deselect “Right_Eye_Layer” from the dropdown list
Target Eye > select “Left” from the dropdown list
1g. Lather, rinse and repeat for “Right_Camera” (deselecting “Left_Eye_Layer” and selecting “Right,” respectively).
Voilà – you have yourself a virtual stereoscope.
Step 2: Create the Virtual Stereograph
2a. Again at the top-level in the hierarchy window, create a quad and name it “Quad_Left.”
2b. Set “Quad_Left” to a position of x=0, y=2, z=0 and use the default scale (i.e. 1 for all axes), as you did with “Viewer.” The quads will be the picture planes for the left- and right-eye images.
2c. Duplicate “Quad_Left” and rename it “Quad_Right,” ensuring that the position and scale are the same as “Quad_Left.”
2d. Import the two halves of the stereographic source image (i.e. left- and right-side) into the project. They will appear in the project window in the assets folder.
2e. Drag the left-side image from the assets folder onto “Quad_Left” in the hierarchy window. The image will become the material, and should be visible when you select either of the cameras. You may need to resize the quad to match the ratio of the stereograph-half so that it doesn’t distort the image.
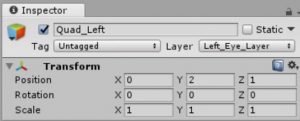
1f. Change the layer to “Left_Eye_Layer”
2f. With “Quad_Left” still selected in the hierarchy window, change the layer in the inspector window to “Left_Eye_Layer.”
2g. Duplicate “Quad_Left,” rename “Quad_Right” and repeat 2e. & 2f. for the right side of the stereograph.
Step 3: Build the App
3a. Make any necessary adjustments to the directional light in the hierarchy window, though it should be okay by default.
3b. Save the scene… you’ve likely been saving the scene all along, but do it once more with feeling to ensure that all of your changes are captured in the build.
3c. Build and run.* Test it out on your phone to identify any tweaks that need to be made, and to revel in the stereoscopic glory of your creation.
* Ah, if only it were that easy in practice.
And you’re done. This is a pretty stripped down project, obviously; there are no ambient environmental components (you can, of course, create a plane to act as the floor if you’re not too keen on hovering vertiginously in space), no controller functionality and I haven’t even included any of the Google VR prefabs that allow you to test out the app within Unity. It’s simply meant to illustrate the possibilities of providing access to stereographic archives in VR.
Next steps: create an interactive carousel of stereographs and determine if it’s possible to have the stereoscopic image completely fill the screen. Will they be completed during the first phase of the project (i.e. Winter term 2018)? Probably not – it’s a fairly small component of the project proposal to get bogged down on, but let’s see how it goes…