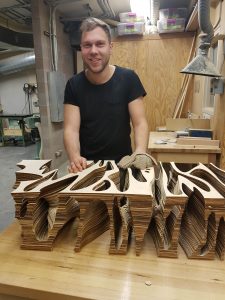
Laser Cutters
*The laser cutter is available for use during reserved time slots while the laser tech is present. Prior training is not required.*
![]()
The Varga Safety Saw:
Located in the laser room in MacMillan, the Varga Safety Saw is an easy way for students to get accurate, high-quality cuts that are straight and square for smaller cuts. The Varga saw will be free to use whenever the laser cutter is in operation. If a laser cutting file that includes lots of square, straight cuts, consider doing it on the Varga saw.
The Varga saw cuts wood, plywood, MDF and acrylic very well. It can be used with many sheet goods from wood veneer up to about half an inch (12mm) thick. It must not be used to cut any kind of paper, cardboard or chipboard- those materials do not cut smoothly and dull the blade, Foam or foamcore also cannot be cut, as it will dull the blade and will put off toxic dust. The saw also can cut PETG plastic which is prohibited on the laser cutter due to toxic fumes.
Location
Please review the facilities page for laser locations.
Booking
The laser cutters have morning, afternoon, and evening time slots. Check the online booking system for available slots (CWL required for login, and VPN may be required, especially if off-campus).
Fee
The cost is $1.40/min at Lasserre, and $0.90/min at Macmillan, with a $5.00 minimum charge. This includes file processing time. There is also a $100 no-show fee if you do not come to your appointment.
Materials
You must provide your own materials and tape. Generally these are paper, wood or acrylic up to 1/4" (6mm) thick. When using the MacMillan laser, the maximum horizontal dimensions are 16" x 28" (400mm x 710mm). When using the Lasserre laser the maximum horizontal dimensions are 23” x 39”. The flatter the material, the better the cut.
Because of toxic fumes, we do not cut:
- Corrugated cardboard
- MDF
- PVC = polyvinyl chloride (e.g. white plastic plumbing pipe)
- ABS = acrylonitrile butadiene styrene (e.g. black plastic plumbing pipe)
- PVA = polyvinyl acetate
- Polystyrene (e.g. Styrofoam)
- Styrene (this includes anything sold with this classification)
- Polyurethane
- Polycarbonate (e.g. Lexan)
- Polyester film including PETG or DURALAR (The thin sheets they sell at DeSerres with the blue covering.).
- Nylon
- In general, less expensive options purchased at big box stores will perform badly and may be banned.
Select materials are for sale directly at the laser cutter- the most common materials, pre-cut to fit (note that material size is not going to be the same as the machine’s bed size!). We try our best to keep the laser cutter stocked up, but we cannot guarantee we will have all of everything all the time. To that end, we limit sales of material at the laser cutter to four pieces. If you need more, please come to the workshop to get it.
For a full list of items available for purchase in the shop, please visit our materials page.
File Set Up
For All Files:
We can laser cut from Rhino or Illustrator.
- Create a new, separate file for each job to be sent to the laser cutter.
- Ungroup everything.
- Delete everything (objects, layers, etc.) that is not required.
- Convert bitmaps to grayscale.
- Organize your drawing by layer, with all cuts on one layer named Cut, all scores on one named Score and all etches on one named Etch.
- Change the units to inches and scale it to the desired size.
- Optimize your drawing: If all shapes are joined, the machine will cut an entire shape before going on to the next. Similarly, shapes can be laid out adjacent to each other so that they share a single common side. This saves time and space. Do not, however, lay out shapes with two lines in the same place. This will cause extra burning. Etching should be placed in as compact an area as possible.
For Rhino
- Use the Purge command to get rid of unwanted blocks and unused layers.
- Draw a rectangle that is the size of the laser bed (Lasserre, 23”x39”; McMillan, 16”x28”). Make the line purple and put it on a new layer. It is a good idea to draw a second rectangle the size of your material. Place your work within the second rectangle.
- Set the Cut layer to red, Score layer to blue and Etch layer to black.
- Etched objects should have the line weight specified, all other lines should default to hairline.
- To insert a bitmap for etching, use the PictureFrame command.
For Illustrator
- Ensure that you are in RGB colour space.
- It is best to have an artboard the same size as the your material.
- Orient the job to landscape.
- Ensure that red lines are 255,0,0 with line weight of 0.06pt and remove all fills. Ensure that blue lines are 0,0,255 with line weight of 0.06pt and remove all fills. Ensure that black lines are 0,0,0 and at whatever line weight you wish.
- SALA's laser cutter has difficulty with certain line types:
- Make sure there are no transparencies.
- If you have dashed lines: Go to Object > Expand Appearance > dialogue box pops up > Check the box for "stroke" > hit okay
- If you have a pattern fill: Select the fill pattern > Object > Expand > dialogue box pops up > Check the box for "fill" > hit okay
- Save as an Illustrator (.ai) file for best results or as a .pdf file for less reliable results. It is very important to downsave to Illustrator version CS. Later versions can cause problems.
Download Example Illustrator File
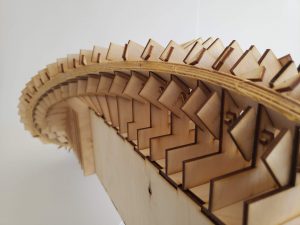
Example Work