Rekindling BeLeaf

Standard

In the 2017 cohort of Hatching health, which ODetect was also a part of, I came across BeLeaf. From my perspective, it looked like an idea championed and introduced at the event by Matthew Miller, from Island Health. They won the top prize at the event.

Its core idea was a simple one. People suffering from depression needed a low-barrier way to be connected with their loved-ones. As someone who has ghosted friends when my mental health was in the gutters, this idea made natural sense to me. This low-barrier communication would take the form a physical, electronic “Leaf” that lives on bedside tables. There would also be a mobile app, because apps will eat the world (jk).

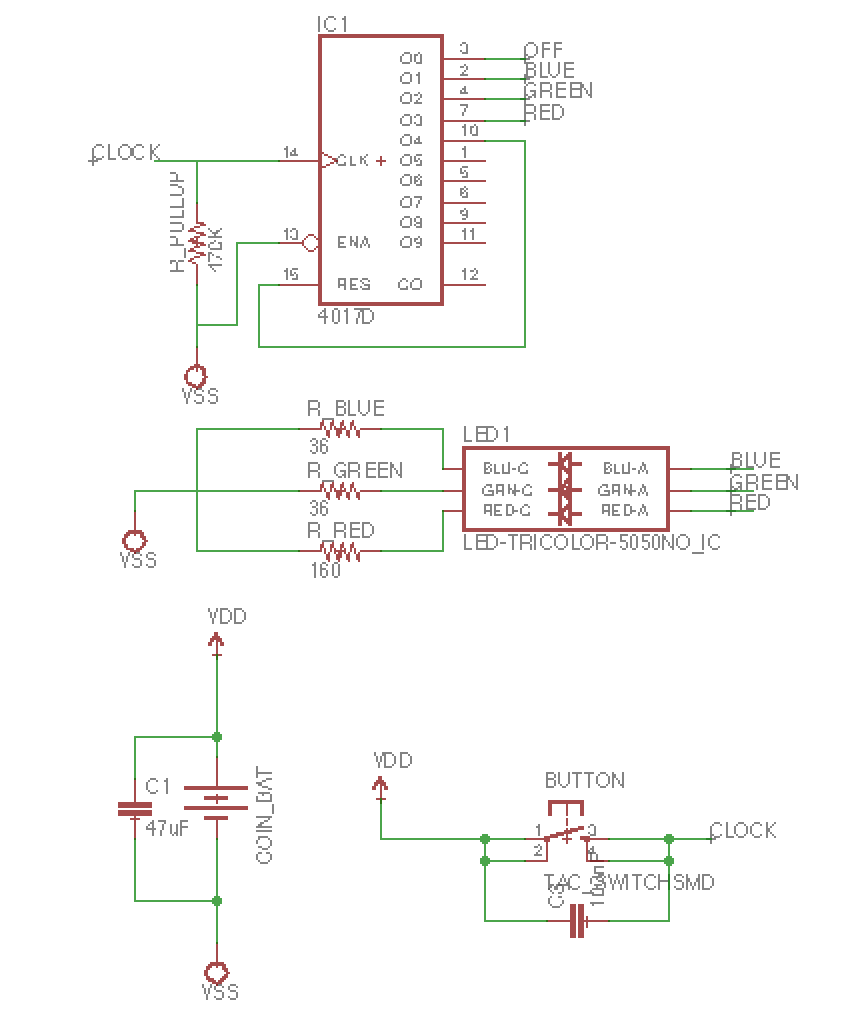
Each synthetic plant — one for the individual living with depression, the other for their supporter — would be connected to a series of lights and a mobile app, which would serve as a self-assessment and support tool for users. As new data is entered into the app, the colour of the light emitted from each synthetic plant would automatically change, signalling the individual’s current state of mental health.

“We recognized pretty early on that it was important for us to not only create a mobile app, but to have a physical product that would enable people living with depression to express themselves and communicate with those who are special in their lives. Sometimes the hardest thing is starting the conversation,”

They chose to embody the physical aspect of the connection as a leaf, to draw a parallel to mental health – requiring that they both need care, and constant ongoing work.

They later went in the lean launchpad program at e@UBC, did some rebranding as Cora Luma. The twitter handle isn’t active since July 2018 and their website down. Matthew Miller is still active and Director of innovation at Vancouver Island Health.

I’m really curious to know more about what happened. I guess an email to Matthew is due. (Update: I have sent him an email).

My thought stream regarding this…

Following up from post regarding being a subject expert (related to the ESP32), and looking to see what kind of a solution and product I can build up as a 1-man-band is quite intriguing (after seeing Luke Cyca’s extremely thorough, intentional work with CraftMetrics). Essentially, what can I accomplish if nothing is riding on this. If I’m not looking to financially support myself off this work, if there is no “deadline” that I’m running towards, if I don’t cut corners (no technical, intellectual or financial debt), what is it that I can contribute to this field and myself.

{I will go technical here}

Going towards the solution that brought this idea/project that was floating in the “past” section of my brain to the front –

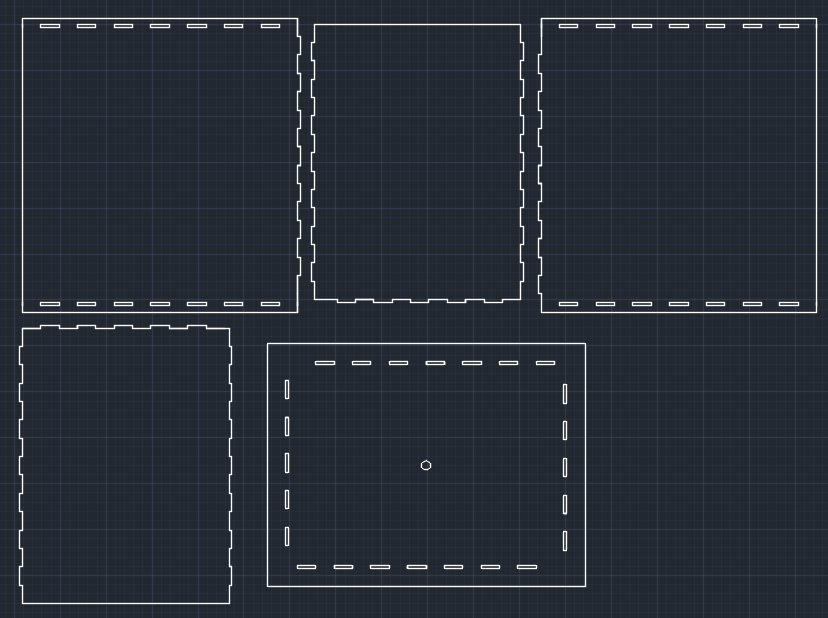
The ESP32 is this open source microcontroller with WiFi and Bluetooth. I feel like it is all that is required to be the brains and the controller for a synthetic leaf. It additionally has capacitance sensing on a couple of its pins so it could be used to sense tactile feedback. It can obviously control various LEDs. In addition, the BLE functionality on the device could be used by the end-user to connect the device to WiFi. Essentially, a simple development board off-the-shelf could entirely be used to build up the proof of concept.

In addition, the amazing folks at espressif have prepared an ESP Jumpstart guide that goes over how we can create a “product” using the microcontroller including OTA features, cloud connectivity (AWS) and some form of app control? Things the particle already provides, but hides them under a layer of convenience which they charge for.

Currently playing around with the Arduino tutorials and planning to move on to the jumpstart tutorials when I set up the IDF (not israeli defense force but the integrated development framework).

All this media coverage

Standard

<Views are personal and have no relation/bearing to anyone/anything I’m related to or part of>

As part of the team working on the opioid overdose detection project, I have been covered by print, radio and television media in Vancouver, BC and national media in a few cases. It’s given me a few insights into how media works and presenting/talking about what you’re doing in general.

It’s a positive feedback, all-or-nothing cycle. Once someone picks you up, and there is a whiff of public interest everyone jumps on it. From an engineering perspective it feels unfair, the same way u/gallowboob’s posts on reddit are designed to reap as much karma as possible.

General tips on speaking to the media (after inputs from the UBC public affairs office)

  1. Say little – Don’t say anything you don’t want to.
  2. Even if you’re live and you say something that didn’t come out the way you wanted it to, make it a point to take it back explicitly.
  3. Speak in short simple sentences, they shouldn’t take more than a single breath. You sound more coherent that way 😛
  4. Things may get reinterpreted into a version the audience/people wants to hear
  5. Something that was just pointed out to us was that media coverage can make the research ethics hearing much harder as the messaging related to the project/product is not controlled by you, but other forces that are not under your control.


What is this media attention doing to the project and le me?

  1. Making me freak the f*%@ out
  2. In pathfinder words, a Mage has cast haste on the party. Things are moving fast. Super fast.
  3. Bringing up more questions, and hence greater clarity on issues that we haven’t talked about. Questioning so far has been supportive rather than confrontational/takedown-ey. It will be interesting to see how we fare up to that line of questioning.
  4. Spotlight on our efforts when we were not ready for it. We were between prototypes to being with. Most of what we’re doing is now reactive to the attention rather than be proactive. Our twitter handle, @OverdoseDetect was created in response to the attention we were getting. We’re printing circuit playground straps in ninjaflex instead of PLA and the onshape model partly because it will look nicer. On the other hand, the contrasting school of thought one can never be truly ready and learn on the job.

DIY Gel Doc

Standard

The lab was looking for a simple non-UV gel doc system after we got the DNA electrophoresis setup. EmbiTec sells a cheap (~1K USD with camera, 600 without) gel doc system that lets one take images simply with a camera or even a mobile phone. Could I take the major themes from this product, and build one really quickly (and cheaply)?

It simply consists of a black plastic box that provides the necessary focal length for the camera to focus on the gel that is placed on a glass bottom that is illuminated with the necessary LEDs to excite the DNA dye. Optionally, an amber long pass filter can also be used to increase contrast.

I first made a box out of black poster sheets from thorlabs that was lying around in the lab by laser cutting. I definitely need to automate the process of making 3D objects by using slots in 2D sheet material. Maybe solidworks can help with this. Need to learn! Once assembled by aligning the slots with the holes, the edges were simply glue together to produce a reasonably strong and optically non-reflective box.

This box was sized to fit the 385 UV lamp that we currently have in the lab, but it was observed to be too strong when used with the gel. It’s too bad there isn’t any intensity control. Also, we needed a diffuser since the the LED’s in the lamp are large and discrete. When this didn’t work, I started thinking about using a tracing light box/surface as the light source. 

Taking it apart revealed a few interesting things and increased by already high mad respect for chinese engineering. The device simple consists of a row of white LED’s (with 68 ohm resistors) all connected in parallel to voltage rails. The voltage across these rails can be cycled through 2.6V, 3.3V and 4.4V by tapping on a capacitive switch (no BOM, all in PCB design itself!) connected to an 8 pin microcontroller. Would love to reverse engineer this when I have time. But going back to the original task at hand, I needed this box to now generate a diffuse uniform blue back-light.

Doing this called for a couple of modifications, the white LEDs in the PCB had to swapped out for specific LEDs that are capable of exciting gel green (the DNA dye). Gel green has an excitation peak at 500nm, and an emission peak at 530nm. Sadly, 500nm is right between blue and blue-green, so I couldn’t find an LED on digikey that had a coincident emission peak.

Image result for gel green excitation spectrum

I settled for the SMLE13BC8TT86, which is an InGaN LED that emits at 470nm. It is available in an 0603 package, whose footprint is close to the footprint on the PCB of the tracing box. Assuming a forward voltage of 3V. Using the 68Ohm resistor at the high voltage rail setting gives an approximate forward current of 20mA (almost close to the peak applicable current). Increasing intensity would mean a decrease in size of the light box and a density increase.

An image of a gel frame with the dark box and the modified LED array looks like this

Disc golf and blinking LEDs

Standard

Sydnie introduced me to disc golf, which is a really cool sport. Think golf, but replace the clubs and the ball with frisbees. Vancouver, well being vancouver has quite a few disc golfing courses (which also double up as public parks – disc golf isn’t elitist). When winter sets in at the 49th parallel, it can get dark pretty early in the evening. Some amazing soul came up with the idea of putting LEDs on discs to light them up at night.

Sydnie has a bunch of them, and they’re really similar to these you can get off amazon. They’re powered by a coin cell battery and have a tactile switch that can toggle between 4 states – OFF, always ON, fast blink and slow blink. I was super impressed that all of this could be done under a price of 25$ for 12 and in that form factor. The bill of materials for each piece was definitely less than 1$. The engineer in me wanted to replicate this, and I set with much academic naïveté.

I knew the circuit definitely had

  • A dual 555 timer or equivalent to enable blinking at a slow and fast rate
  • A CR2016 battery (as mentioned in the battery specs)
  • A tactile switch
  • An LED

As engineers are always wont to do, I wanted to better the current specs and put in an RGB LED whose colors could be toggled through and blinked at different rates. I still wanted to theoretically make it cheaper than the amazon price, so $2 was my limit. There was no way and design could could come under that limit if it featured a micro controller. (An attiny85 itself costs $3 in singles). I would have to stick to using some kind of a digital IC.

An initial idea for a prototype that toggles through multiple states involved a decade counter. A decade counter IC pulls one of its 10 pins high in increasing order when it receives a clock pulse as input (detects the positive edge). A momentary tactile switch (with a capacitor across to prevent key bounce) could be used to pull up the clock pin to VDD from ground through a pull up resistor. As each of the pins of this decade counter can sink more current than the rated supply current of the LED, no additional circuitry would be required. 3*3 pins for (R,G,B)*(ON, Fast Blink, Slow Blink) and 1 pin for OFF. The plan sounded great in principle. I started making the schematics and routing the signals on a dual layer PCB. There was no way I could get this fit in the footprint of a CR2016 battery (which was a vague yardstick and also because I could get a circular PCB). I was definitely doing something wrong in my design.

However when I held Sydnie’s LED against bright light, I couldn’t see any circuitry other than the LED module, switch and the the battery terminals. There were only traces on the PCB. When i looked closely at the LED, it seemed to have too many components on the die for a single color LED. And then it clicked… the 555 die was wire bonded directly to the LED. Putting both dies on the same substrate and wire bonding them together results in a far smaller footprint than laying out a PCB and routing them external to the package. (as an aside, I was listening to the macrofab engineering podcast the other day where there’s a company trying to make systems in chips for products such as the beaglebone, cool!).

I tried finding LEDs with timers integrated, but I was probably using the wrong search terms, nothing turned up. Serendipitously, during one of my good for nothing jaunts on aliexpress, I found flashing/blinking LEDs! They look totally similar to the non flashing ones.

The LEDs I’m getting

  • 60pcs blinking solid smd 0805 LEDs for 5.5CAD (fast blink)
  • 100pcs 3mm blinking RGB DIP LEDs for 2.7CAD
  • 50pcs 0807 RGB LEDs for 6.35 (slow blink)

Ideally, connecting these LEDs to a switch and a battery is all I need to do!

But the engineering doesn’t end there and that’s the most fun part of it all. OFF-ON switches are way more expensive than simpler OFF – momentary ON switches and this makes a huge difference especially when cost is a huge specification. An OFF – momentary ON switch can either produce positive edge or negative edge clock pulses and these can be used to turn a JK flip-flop’s output high or low.

Lines in BOM

  • Tactile switch EG4621CT-ND – 2.86 CAD per 10
  • JK type flip flop 296-31493-1-ND – 5.22 CAD per 10
  • ON – OFF switch – 10.7 CAD per 10
  • Battery holder CR2016 – 4.1 CAD per 10
  • Batteries CR2016 – 9 CAD per 25
  • 470 Ohm resistor – Negligible
  • LED – negligible
  • PCB – Assuming OSH park medium run at $1/sq inch – 3 CAD per 10

Total price – 18.78 CAD per 10

YAY!


A Moleskin

Standard

I’m schizophrenic, but not in the clinical sense of the word. I brew freshly ground, recently roasted coffee in an aeropress with temperature and weight control while also enjoying a cup of Indian instant nescafe with milk and lots of sugar in the morning. I love good sourdough, and I’m experimenting making my own Idli and Dosa batter. By the way, this is unrelated to the topic of this post. Or not.

My planning’s ratchet, but I have this inexplicable urge to use a Moleskin book. I believe it has something to do with a visit to the Computer history museum in Palo Alto. The bay area is an amazing place. It’s almost as magical as it’s made out to be. The museum displays include pages from William Shockley’s laboratory book. Such revolutionary ideas casually written on single pages.

I gifted myself a Moleskin (with Amazon store credit from my Uncle). I hope this helps in my research. Just today, Hong and I came up with some pretty sweet ideas for my research. They’ve been dutifully added to Molly. May this blog post serve as a reminder of the approximate time frame I started keeping research notes.

Electrical Engineering to Microfluidics to Bioengineering

Standard

[Written for the IITBNF Blog]

My life’s taken some pretty interesting turns. I attribute the most intriguing one to IITBNF (which was CEN when I started working there). What started as an undergraduate summer project to measure capacitances at the femto farad level morphed into one where I was actually fabricating tiny channels at the micrometer scale to act as fluid conduits. One thing led to another and I’m now working on a masters thesis involving cancerous cells and chemical gradients!

Over the course of 3 years at IITBNF I learnt a lot of skills – tangible and intangible. From a hyperopic perspective, they were lasting lessons for life. That rushing through the fabrication process will culminate in a disaster during characterization. Also, I learnt the hard way that lady luck and triplicates are not great friends. The intense planning and level of exacting control over each step of the fabrication process was both frustrating and satisfying at the same time.

It’s fun to look back and play a game of ‘what if?’. What if IIT Bombay was not chosen to host the CEN facility? What if my supervisor did not simply trust an undergrad with actual fabrication(we do have this unsavory reputation)? What if the instruments I needed were not available? On asking myself these questions in retrospect, it dawns on me how lucky I have been to have been exposed to one of the most well equipped fabrication labs (I’ve seen a grand total of 2).

I could conclude with the cliched reference to Robert Frost’s “The road not taken” but I shall refrain myself from doing poetic injustice to this wonderful set of experiences.


Is the Apple watch a medical device?

Standard

The FDA is the bossy overlord of everything material that should ever come into contact with you and affect you, such as Food, Drugs and Cosmetics (Food, drugs and cosmetics act – Which I’m not paraphrasing or quoting verbatim).

Every medical device that is manufactured in the USA, right from cardiac pacemakers and orthopedic implants to surgical gloves, condoms and pregnancy test kits, comes under the purview of the FDnC act which is administered by the FDA. Diagnostic devices (instruments take readings from the body) such as the Fitbit, Apple watch, blood glucose monitors and mobile interfaced pulse-oximeters are touted as the new personal doctors.

While a pulse oximeter that measures your heart rate and oxygen saturation in your blood is subject to the stringent regulations of the FDA, the Apple watch which has a similar functionality is not. The difference arises in a seemingly benign statement called “Intended use”. The reason why a laser pointer used for presentations cannot be used along with an endoscope for tumor necrosis is simply because the manufacturer has not said so.

In a policy draft, the FDA referred to this glut of personal monitors in the market with the umbrella term of “General wellness devices”. As long as they are not marketed with the intended use of diagnosing health conditions, they are not under the purview of the FDA and are theoretically not medical devices. For example – The Apple watch’s heart rate feature is marketed with ONLY an intention of fitness tracking during an use case such as cycling or running.

Apple’s HealthKit SDK is also a wondrous exception for most people acquainted with the FDA which anecdotally is like a huge drop of water that seeks to coalesce with everything around it. FDA’s being really proactive about the domain of mobile medical apps, dedicating a section on it’s website to the topic and clearly laying out boundaries of regulations.

http://www.fda.gov/downloads/MedicalDevices/DeviceRegulationandGuidance/GuidanceDocuments/UCM429674.pdf

http://www.fda.gov/MedicalDevices/DigitalHealth/MobileMedicalApplications/default.htm

Putin’s gait – KGB or Parkinson’s

Standard

The British Medical Journal published a research article on a really interesting topic – Vladimir Putin. It has long been suspected that he has been suffering from Parkinson’s disease due to a marked difference in left and right arm swings [Lewek et al, Gait & Posture; 2010]. Sponsored by the National Parkinson’s Foundation(many lulz), Rui Araujo et al [BMJ 2015; 351:h6141] settle the score once and for all.

http://bcove.me/6dnnnqzp

Putin’s a fascinating world leader. He’s photographed riding a horse bare chested, doing the breast stroke in a Siberian lake, hip-throwing a judo opponent and smugly grinning while watching Angela Merkel squirm seeing his big black dog.


If Putin does not have Parkinson’s, how would one explain the asymmetric limb swing? The crux of this research article lies in the shrewd observation that this gait feature was not limited only to Putin, but other highly ranked Russian officials, usually with a military background.

It turns out that in the KGB manual (oh what I wouldn’t give to lay hands on that) – “When moving, it is absolutely necessary to keep your weapon against the chest or in the right hand. Moving forward should be done with one side, usually the left, turned somewhat in the direction of movement.” That explains it!

Or maybe not. Officials in Russia have been found wearing watches on their right hand – borrowing from Putin’s style. Could they have been aping their supreme mugwump? The jury’s still out on that.