Tag Archives: make

Makerspace:

What is it?

Known also as fab labs, tinkering areas, or hackerspaces, makerspaces are generally areas where people can gather to make, create, and experiment with a variety of materials and tools.

As the name suggests, makerspaces are spaces where people can make stuff. While these creations are often physical things, digital productions can also be included. Varying in size, equipment, budget, location, and audience, makerspaces generally have one thing in common; they are places for people to gather to collaborate in the act of creating.

The term makerspace can be used to describe a whole range of spaces that vary from entire buildings and rooms to dedicated room corners, carts, and tubs. Makerspaces can be found in schools, libraries, classrooms, museums, community spaces, and even trucks and buses. The materials within a makerspace also vary quite drastically from inexpensive or free materials like recycled cardboard, to more costly tools such as 3-d printers.

Why is it Relevant?

In schools, Makerspaces can be located in libraries, dedicated rooms or spaces, and in individual classrooms. If there is not enough space for a permanent Makerspace, flexible alternatives such as carts or tubs can help alleviate challenges such as these. While Makerspaces aren’t necessarily new in schools, their popularity is growing greatly as 21st century skills becoming increasingly important in education.

Makerspaces are significant for education because when they are used to their full potential, they can help students develop critical 21 century skills such as collaboration, problem-solving skills, perseverance, and creating thinking. Makerspaces are environments that can foster meaningful and authentic learning through the implementation of STEAM pedagogical approaches.

Drawing on constructivist and constructionist theories of learning, makerspaces allow for hands-on active learning through the creation of things. Both Jean Piaget’s Constructivism and Seymour Papert’s Constuctionism emphasize learning through active construction and interaction with objects. By allowing students to experiment and play with materials in the Makerspaces, teachers can leverage these theories to encourage deep and meaningful learning.

Makerspaces offer a wide array of opportunities for creating so they can easily support valuable pedagogical approaches such as student centered and project-based learning. Additionally, a well-designed makerspace is likely to have low floors, high ceilings, and wide walls. The concept of low floors and high ceilings was originated by Papert. “For a technology to be effective, he said, it should provide easy ways for novices to get started (low floor) but also ways for them to work on increasingly sophisticated projects over time (high ceiling)” (Resnick, 2020). Resnick (2020) has suggested the addition of a third dimension to the metaphor, wide walls which enable a large variety of work to be explored and created. In terms of makerspaces, it is important that they include a variety of low or no tech materials as well as high tech materials. This will ensure the makerspace is accessible for a variety of users while also allowing for a breadth of projects.

Getting Started

  • Visit a local makerspace to get inspired. Reach out to other schools that have makerspaces to learn from them or visit a makerspace in your city. While these community spaces often charge a membership, you may be able to schedule a brief visit for free. Locate a makerspace near you
  • Start small – dedicate a table or corner in the classroom to a makerspace, if this is too much, consider a cart or tub that can be easily moved around.
  • John Spencer recommends starting with a temporary makerspace like creating a mobile makerspace with a cart or starting with a single maker project. Listen to him here https://www.cultofpedagogy.com/makerspace/
  • Your makerspace doesn’t need to be finished for you and your students to start using it. You can continue to add to your makerspace as you learn more about the needs and interests of your students. Additionally, having students involved in the design of the makerspace can help them take ownership of the space and be responsible for its maintenance.
  • Create rules and routines for using the makerspace and be sure your students know them. Some important elements to include are safely using the tools and responsibility for tidying the materials.
  • Allow your students time to play with the materials especially when you first introduce the makerspace. This is also a good chance to reinforce rules and routines.
  • You don’t need a lot of money, collect donations of materials, use recycled materials, use what is already in your school
  • If you are asking for donations from families, be sure to specify that items should be empty and clean. You don’t want old yogurt stink in your classroom!
  • Below are lists of various supplies that are commonly used in makerspaces. The following do not represent exhaustive lists, nor do they reflect the need to acquire all of these materials to run a successful makerspace. Use these lists as inspiration but do not feel limited to the materials here.

No Tech Makerspace materials

  • Cardboard (recycled from food boxes, shipping boxes, or other packaging)
  • Cardboard tubes
  • Paper, cardstock
  • Newspapers
  • Styrofoam packaging
  • String
  • Yarn
  • Thread
  • Ribbon
  • Tape (packaging tape, masking tape, duct tape)
  • Glue (white glue, hot glue, glue sticks)
  • Fabric scraps
  • Felt
  • Buttons
  • Balloons
  • Magazines
  • Bottle caps
  • Cans, bottles, and/or food storage containers
  • Milk/juice cartons
  • Egg cartons
  • Popsicle/craft sticks
  • Old cds
  • Paper bags
  • Old toys
  • Scrap wood
  • Nature items (pinecones, sticks, leaves, stones)
  • Drawing supplies
  • Paint
  • Scissors
  • Rulers & measuring tapes
  • Needles (sewing, knitting, crochet hooks)
  • Looms

Low & High Tech Makerspace Materials

  • Makey Makey
  • Micro:bit
  • Green Screen
  • Microphone
  • 3-d printer
  • Printer
  • Paper circuit materials (LEDs, copper tape, coin cell batteries)
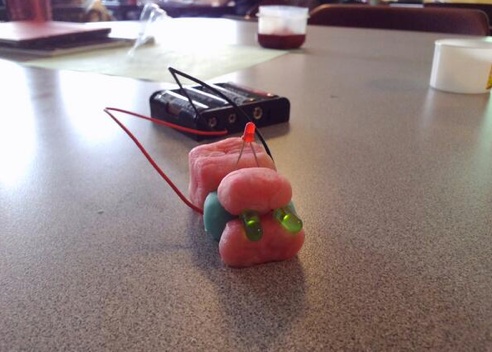
  • Squishy circuits
  • iPads, tablets,
  • Laptops or computers
  • Cricut
  • Ozobot
  • Sphero
  • Dash & Dot
  • Lego
  • K’Nex
  • Bloxels

References

Resnick, M. (2020). Designing for wide walls. Medium. https://mres.medium.com/designing-for-wide-walls-323bdb4e7277

Credit:
Guest post by UBC MET student, Lexie Tucker. Peer Mentor 2021-23
Video by Janis Sawatzky, UBC BEd 2014, Tech Integration Facilitator, 2019

Leave a Comment

Filed under Active Learning, AppliedDesignSkillsTechnologies, Blog Posts, Curriculum, Engineering, Inclusive Practices, Math, Not Subject Specific, Planning, Science, STEAM, Technology, The Arts

“Making Literacy” in LLED 350 and LLED 360

“Making Literacy” – a centers based approach to integrating Applied Design Skills and Technologies and Making in K-12 classrooms was presented in the Neville Scarfe Education Library in September 2018. During the month of September, every teacher candidate in the Bed program (elementary, middle and secondary) had the opportunity to participate in some ‘Makerspace’ stations as part of an orientation to Library and Information Literacy with your LLED 350 and LLED 360 course.

In Scarfe 155 (through the ed lib), we began with a brief overview and discussion about ‘maker ed’ and how this fits with the revised BC Curriculum including integration with the Core Competencies and the BC Applied Design Skills and Technologies Curriculum (ADST).

Following this brief overview, it was all hands on, minds-on exploration. Teacher Candidates had the opportunity to play and learn at several different stations and were invited to return to play anytime.

Here is a copy of the slides from the session:  LLED Maker Space Slides_Sept 2018

During the orientation, TCs also participated in an Augmented Reality exploration of the library. There are a number of applications that teachers can use to create their own AR experiences – HP Reveal (used in the library session), Zappar, Augment, Layar are only a few.

Our stations are organized under 4 main themes:

Storytelling (Storytelling Makerspace Sign_Sept 2018)

  • Green Screen – Tell your story as an image or video. Grab a puppet and play… select a fanciful background and transport yourself in space and time or check out the Postcards Canada project from a couple of years ago as inspiration. Remember, no fancy green screen required… use any plain wall or roll of paper as a backdrop.
  • Blackout Poetry – repurpose a library discard to create your own unique poem!
  • Button Maker (when available)– procedural knowledge is important to literacy! Creatively design your own unique visual micro-story and learn to follow the steps to create a button… ok, this one isn’t so much about the valuable learning opportunity as the sheer fun of creating a unique button! Add a little ‘flare’ to your wardrobe!

Design Challenges (Challenges Makerspace Sign_Sept 2018)

Programming (Programming Makerspace Sign_Sept 2018)

  • Ozobots – mini-robots. Code these using coloured markers, block/visual coding or javascript! So many access points and a great deal of extension potential. There are even online lessons and resources to help develop conceptual understanding in upper level sciences and maths.
  • Makey Makey – create your own game controller using any conductive material. I’ve even seen interactive posters created using Makey Makey kits! The Makey website has some lesson plans you can adapt for your own use.
  • Micro:bits – Try your hand at programming one of these micro-processors (kind of like Arduino but a little simpler and with all of the sensors built in…). Great for grades 5 through post-secondary and can be coded using visual programming blocks, javascript and python!

Computational Thinking (Computational Thinking Makerspace Sign_Sept 2018)


Also on the Maker Kit Shelf in Scarfe 155 – feel free to explore!:

Squishy Circuits – explore conductivity, circuitry and electricity as you problem solve and persevere to make a buzzer buzz, an LED light shine or a motor spin.  Visit the University of St. Thomas Squishy Circuit website for recipes and lessons ideas.

Magnet Play – what can you learn when you simply play with various types of magnets? K-7 Science curriculum includes properties of matter at most every grade level… allowing children the opportunity to free play and explore the properties of magnets helps to naturally scaffold their learning. Students will learn about polarity, attraction, repulsion and more and may even invent a new toy or device as they play!

and more….


If you didn’t get a chance to play with one of the above and would like to try it out, check out the kits available on the shelf in Scarfe 155 – (available for loan beginning September 25th with more to come – Use them in Scarfe 155 anytime or sign them out at the circulation desk)

2 Comments

Filed under AppliedDesignSkillsTechnologies, Blog Posts, Not Subject Specific

Pop Up Making! (in LLED 350 and 360)

This month, in the Scarfe Digital Sandbox (Scarfe 155) every teacher candidate in the Bed program (elementary, middle and secondary) will have the opportunity to participate in a ‘Makerspace’ as part of your orientation to Library and Information Literacy with your LLED 350 and LLED 360 course.

In Scarfe 155 (through the ed lib), we’ll begin with a brief overview and discussion about the ‘maker movement’ and ‘maker ed’ and how this fits with the revised BC Curriculum including the Core Competencies and the BC Applied Design Skills and Technologies Curriculum (ADST).

Following this brief overview, it’s all hands on, minds-on exploration. You will have the opportunity to play and learn at several different stations. You are also invited to return to play during some noon hour ‘pop up making’ opportunities during the month of September or you can drop by the TC Tech Coach table in the Scarfe foyer Tuesdays and Thursdays 12 – 2 beginning Sept. 12th.

During your orientation, you will also participate in an Augmented Reality exploration of the library. There are a number of applications that teachers can use to create their own AR experiences – Aurasma, Zappar, Augment to name a few. In your library orientation, you will use an app created by a UBC student as part of a project developed by Wendy Traas, our own Ed Librarian!

Making Stations include the following:

Ozobots – mini-robots. Code these using coloured markers, block/visual coding or javascript! So many access points and a great deal of extention potential. There are even online lessons and resources to help develop conceptual understanding in upper level sciences and maths.

Keva Contraptions (Bricks or Planks) – explore concepts including force and motion as you create a course or even a Rube Goldberg machine! The Keva website has some design challenge ideas and lesson plans to get you thinking. Check out ‘Audri’s Monster Trap’ video to see the engagement that might occur when a child designs and tests their own machine!

Unplugged Coding – Help students build their computational thinking skills without the need for digital devices! There are many examples of unplugged coding activities you might engage in with your students. We might try ‘binary bracelets‘ or My Robotic Friends. Visit Code.org for many plugged and unplugged coding ideas and resources. Check out ‘hour of code’ for some one hour lesson plans from K – 12.

Osmo – Some interesting possibilities (particularly at the elementary level) with this hardware and the associated apps… We’ll also have some interesting augmented reality applications at this station.

Button Maker – procedural knowledge is important to literacy! Creatively design your unique visual story and learn to follow the steps to create a button… ok, this one isn’t so much about the valuable learning opportunity as the sheer fun of creating a unique button! Add a little ‘flare’ to your wardrobe!

On the Maker Kit Shelf during the session – feel free to explore!:

Makey Makey – create your own game controller using any conductive material. I’ve even seen interactive posters created using Makey Makey kits! The Makey website has some lesson plans you can adapt for your own use.

Squishy Circuits – explore conductivity, circuitry and electricity as you problem solve and persevere to make a buzzer buzz, an LED light shine or a motor spin.  Visit the University of St. Thomas Squishy Circuit website for recipes and lessons ideas.

Magnet Play – what can you learn when you simply play with various types of magnets? K-7 Science curriculum includes properties of matter at most every grade level… allowing children the opportunity to free play and explore the properties of magnets helps to naturally scaffold their learning. Students will learn about polarity, attraction, repulsion and more and may even invent a new toy or device as they play!

Sphero – a programmable robotic sphere that is not only fun to play with but also an excellent access point for students of any age to explore coding. Consider creating a ‘design challenge’ using a Sphero as a motor (The Sphero website has an example of a chariot challenge... how can you take this to the next level? Perhaps open up the challenge to include any type of vehicle (yes, the sphere is also waterproof!). Students can work together to use the iterative design process to create their own land or water vehicles using various found materials and then use  the Sphero to test their prototypes.  Once satisfied with the vehicle, they can then program a path using drag and drop programming (use of such programming language is included in Grades 6 – 9 of the BC ADST curriculum and can be incorporated even in the early primary years)

and more….

If you didn’t get a chance to play with one of the above and would like to try it out, check out the kits available on the shelf in Scarfe 155 – (available for loan beginning September 25th with more to come – Use them in Scarfe 155 anytime or sign them out at the circulation desk)


Leave a Comment

Filed under AppliedDesignSkillsTechnologies, Blog Posts

Take a Break and Make!

Visit one of our ‘pop up’ mini-makerspaces in the Scarfe Digital Sandbox – Scarfe 155 (Tuesday 12:45 – 2 beginning September 29th & the last Wednesday of each month 12 – 1pm). Explore ways to bring hands-on learning to your clasquishycarssroom through activities that spark imagination through playful exploration and invention. This activity is particularly relevant to Science learning but, I believe (and research agrees with me), that making and tinkering can support cross-curricular learning! Come explore, share and learn.

“Although the practice of planning and carrying out investigations has always been a part of good science instruction, the student focus often has been more on carrying out than on planning, with teacher-structured investigations far outnumbering student opportunities to develop their own research questions. Giving students opportunities to design and plan investigations allows them to truly experience the excitement of science and better understand the nature of scientific inquiry.” (Science Teacher, an NSTA publication)

Sandbox Handout – Making and Tinkering Handout

A terrific Resource for educational applications of making, tinkering and developing a inquiry learning mindset in your students:   Invent to Learn by Sylvia Libow Martinez and Gary Stager, 2013    www.inventtolearn.com

Other links of interest:

http://nstacommunities.org/blog/2014/02/14/planning-and-carrying-out-investigations/

Squishy Circuits Guide – University of St. Thomas

See also MIT’s Soft Circuits Guide – FABRIC circuits!!

A sample lesson plan…

or, be a little more inquiry oriented in your exploration. See Lynda’s blog for some ideas!

Request a planning guide to support creating a MakerSpace in your school (geared to secondary ed)


Leave a Comment

by | September 1, 2015 · 1:17 pm

Create your own gif’s

A GIF (Graphics Interchange Format) is a file format for both animated and static images. Gif files are well-suited for the web due to the level of ‘compression’ (how small they are and how fast they load). Gif files can be ‘static’ images or animated. Consider how you might ‘perk up’ your presentations using these interactive images… or perhaps challenge a student to create their own (think ‘makerspace!)

The Gif file below was created by Brittney Merriweather (MY-SRL cohort) using http://makeagif.com/  You can use your own images or video to create an animated gif and embed the gif on your blog (as we’ve done here) or use it in your presentations. Brittney used a flikr image  ( _DJ_/Flickr) to create this gif.
Brain Grow on Make A Gif

make animated gifs like this at MakeAGif

Have Photoshop and want to try creating your own gif? View this tutorial: Using Photoshop to create a gif.

 or visit this site for a variety of options.

Leave a Comment

by | September 1, 2014 · 12:24 pm