
What is Coding?
Coding is a set of instructions given to a computer to produce different kinds of output. Learning to code involves a variety of competencies that can be introduced or developed in K-12 classrooms across the curriculum. The Applied Design Skills and Technologies curriculum includes introducing block or visual programming languages beginning at grade 6. Many teachers incorporate activities using physical and digital ‘block code’ from a much earlier age.These activities can help build the essential competencies leading to build computational thinking (link to SD61).
Why teach coding in your classroom?

Coding is included in the Applied Design Skills and Technologies Curriculum (ADST) in BC. Outside of teaching students job-marketable skills, coding can help your students learn mathematical logic, creative exploration, how to understand systems, and a systemic procedure that exists in common computer programs (automator, video editing, animation, web design.). We might think of this as building computational thinking skills. By building these skills in collaborative and communicative hands-on ways, computational participation helps to link coding with the core competencies in the BC Curriculum and enhances student learning (and enjoyment).
How might you teach coding in your classroom?
Depending on the age, interests and abilities of your learners, (and access to equipment/materials), you can approach coding in many ways. A computer programmer friend of mine pointed out that, while learning to code using visual programming blocks as a language doesn’t necessarily translate to being able to code using Java or Python (two languages used by professionals), the computational thinking skills developed do transfer!
Consider your student interests: are there particular themes or activities you might employ to engage your students? Can you get students moving physically? Can students make something that is motivating to them? Can students work together to create and problem solve?
You might begin with some unplugged coding activities in order to apply a kinesthetic, hands-on approach to build resilience with directionality/commands, critical thinking and trial and error or you might dive right into one of the many programming applications that supports this. I’ve found older students (including me!) are motivating by coding to make something that ‘does something’ in the ‘real world’ (ex. MicroBits, Sphero or Ozobots). That said, many students will enjoy creating stories or games online (ex. Scratch, Twine).
Below are a few examples and links to resources that can support coding in your classroom across K-12.
“Unplugged” Coding
Coding and learning computational thinking can begin with unplugged activities where learners engage in problem-solving, sequencing, and design. Unplugged simply means ‘without a computer’… making this form of ‘coding’ accessible to all classrooms.
Unplugged Coding Activities:
- Binary Braclets
- Learn Binary by building bracelets! Students can code their initials using black and white beads which represent the language of coding.
- Canada Learning Code
- This Canadian content website includes a searchable database of lesson plans for unplugged and plugged coding activities including activities using popular tools and bots. Try searching by ‘unplugged’.
- Code.org
- houses an impressive amount of resources to learn about coding, start coding, and even use unplugged activities inside and outside of the classroom. Each idea includes a video tutorial, lesson plan, and assessment answer key.
- Kid Bots
- Kidbots demonstrates cross-curricular advantages of coding by involving numeracy, geometry, and literacy. Students design a way to rescue an item from a designated location, but a classmate is the programmable “kidbot.”
- CS Unplugged
- They house lesson ideas of how to get learners working on core components of computational thinking!
- Logic games like Sudoku, Mastermind, and Kanoodle can help students work on problem-solving skills that are integral to coding.
- Lego challenges
- Teachers can provide a task (like building their dream amusement park). This activity could also be paired with design thinking to help generate ideas or potential solutions to a problem.
- Students can create a design (without showing their partner), then try to communicate the instructions for their partner to build the same design (without looking!). In coding, it’s important to be able to program specific instructions to get the results you want.
“Plugged” Coding
Also known as coding with a digital device! When we think about “plugged coding”, we might first look at students utilizing visual programming blocks. As a student’s computational thinking skills improve, they might begin to experiment with other programming languages including java and python. In the BC ADST curriculum, visual programming is referred to in Grades 6 through 9.
-
Visual block coding
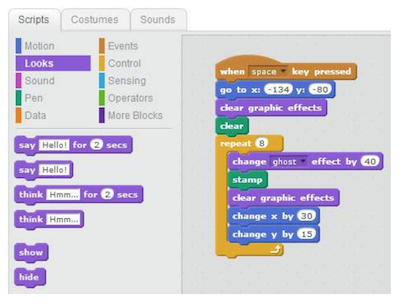
 Visual block coding is an approach to coding that represents instructions in the form of visual blocks rather than programming language syntax. This form of coding is seen to be friendlier to beginners of coding due to not having to memorize syntax due to the drag and drop feature, the “puzzle” piece aspect of the blocks that help you determine which blocks fit with one another, and a predefined list (limited choice of blocks) of functions, variables and objects you can use.
While visual block coding might seem or feel like playing with logos, this is what coding essentially is at its highest level of abstraction. Once you understand how the functions, variables and object blocks work, you just need to apply language and syntax and that is coding! Visit Code.org or Canada Learning Code for some lesson ideas.- BBC Microbits make code block coding language is a visual representation of the JavaSript language. JavaScript is a function-based programming language that is used in web development. The Microbits block UI (user interface) allows you to swap or toggle between JavaScript and visual blocks to learn how the addition or subtraction of blocks affects your code in JavaScript.
- Scratch is a block coding language developed by MIT that does not represent any other language (whereas with Microbits, the blocks represent Java). The actual code that is used is the blocks themselves. MET hosts a free cloud-based app and community where users can create stories, games, simulations, animations, and more. Scratch Jr. is a simple mobile app allowing students to drag simple block instructions to create actions on their iPad or tablet.
- BBC Microbits make code block coding language is a visual representation of the JavaSript language. JavaScript is a function-based programming language that is used in web development. The Microbits block UI (user interface) allows you to swap or toggle between JavaScript and visual blocks to learn how the addition or subtraction of blocks affects your code in JavaScript.
“Real” or Pro Coding
(The information below was provided by my programmer friend and former worklearn student, Eric):
Don’t be scared to start coding in “real” coding languages! Apply what you’ve learned in visual block coding and learn the language and the syntax and you’ll do fine! The first question one might ask themselves when they first decide to learn to code is: which language should I start with? Both Java and Python are good languages to begin learning to code. Both present high levels of abstraction in their language (code is more reminiscent of human language – visual coding is often thought to be very high levels of abstraction.) They are also both very commonly used and have plenty of resources for you to begin learning or if you have questions. Most people also find that once they learn one language, learning new languages becomes much easier.
Resources
- Codecademy
- Guides you through a suitable set of activities that are structured to help you understand the basics of coding. Once you first sign up, you are given a 7-day free trial to their premium program which allows you to explore all exercises. Once the trial is over, you will be relegated to practice on their free exercises; albeit, not as complete but still very helpful.
- freeCodeCamp
- Very similar to Codecademy, with a different set of exercises. As opposed to Codecademy, all exercises are free! However, the interface is not as easy to use as Codecademy and there is not as much guidance in completing exercises. If you progress further in freeCodeCamp, you might find it helpful to Google hints on how to do things and/or ask questions on Stack Overflow (a question and answer platform for computer programming.)
- CodinGame
- Directed towards more advanced coders to write and debug(fix problems) code in the form of a game. As opposed to Codecademy and freeCodeCamp, the exercises often involve multiple objectives and can take over an hour to solve. Despite its difficulty, CodinGame allows you to swap between 25 different languages. This tool is very helpful if you already know one language and you want to learn another! Don’t give up if you’re finding CodinGame hard – read the instructions very carefully and use the hints!
YouTube videos
- Directed towards more advanced coders to write and debug(fix problems) code in the form of a game. As opposed to Codecademy and freeCodeCamp, the exercises often involve multiple objectives and can take over an hour to solve. Despite its difficulty, CodinGame allows you to swap between 25 different languages. This tool is very helpful if you already know one language and you want to learn another! Don’t give up if you’re finding CodinGame hard – read the instructions very carefully and use the hints!
- Hour of Code – Global Coding
- Get globally connected by participating in the HOUR OF CODE. This initiative began to introduce all ages, and especially students, to the concept of coding…. in less than an hour! Hour of Code provides multiple plugged and unplugged activities so that classes around the world can begin coding. Anyone anywhere can organize an Hour of Code event – NO EXPERIENCE NECESSARY!
Robotics
There are many robots out there that can be used with specific branded apps or open coding apps like Tickle. Some that we have played with during our Sandbox Session were the following: Dash, Sphero, and Ozobots and K-8 powered by microbits. These robots are also available to borrow from the Education Library!


 select a fanciful background and transport yourself in space and time or check out the
 creativity in the Math class