Studio Session – Getting Started w/ H5P

Accessing H5P

UBC Open H5P Hub

https://h5p.open.ubc.ca

H5P.COM

https://h5p.com

Multiple Choice Style Questions

Examples of multiple choice style questions

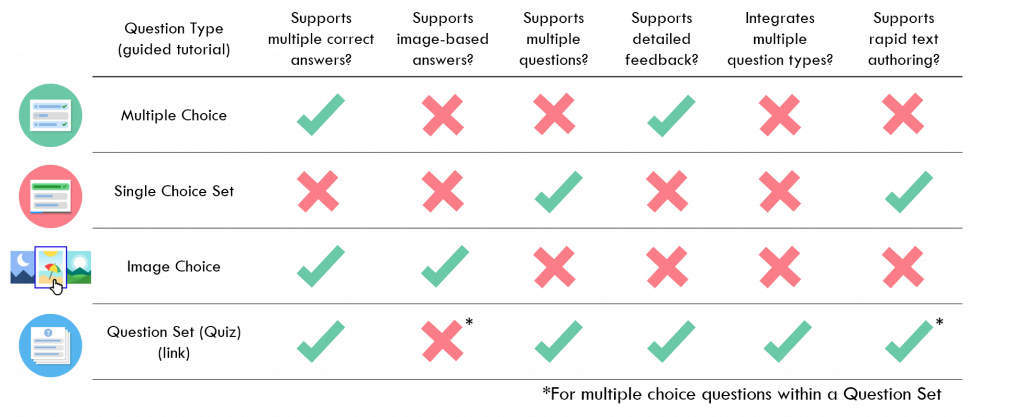
Resources: Multiple Choice

We will work together to recreate the question below:

Image


Alternative text: Green circle surrounding coding symbol; Red no symbol over dollar sign; WordPress logo; Open Source logo

Question: Which of the following statements is / are TRUE of H5P? 

Option 1 (correct): H5P is open-source.

Tip: Open-source means that you are free to copy, study, and change the code to suit your needs.

Feedback if selected: H5P is open-source which means that you are free to copy, study, and change the code to suit your needs. 

Option 2 (correct): H5P is free.

Feedback if selected: Yes! If you are able to host it on a server, H5P is completely free. 

Option 3 (incorrect): H5P only works on WordPress.

Feedback if selected: H5P works across a variety of platforms including WordPress, Canvas, Moodle, Drupal, Brightspace and Blackboard

Option 4 (incorrect): H5P requires you to know how to code.

Feedback if selected: H5P stands for HTML 5 Package. Although H5P is based in HTML 5, you do not need to know how to code in order to make use of H5P. 

Resources: Question Set

We will work together to recreate the question below

Question 1: How many H5P content types are there?

Option 1 (incorrect): 15

Tip: All content types are listed at h5p.org

Feedback if selected: There are more than 15 content types. Try again.

Option 2 (incorrect): 32

Feedback if selected: There are more than 32 content types. Try again.

Option 3 (correct): 49

Feedback if selected: Yes! Currently there are 49 content types but more are added frequently.

Review

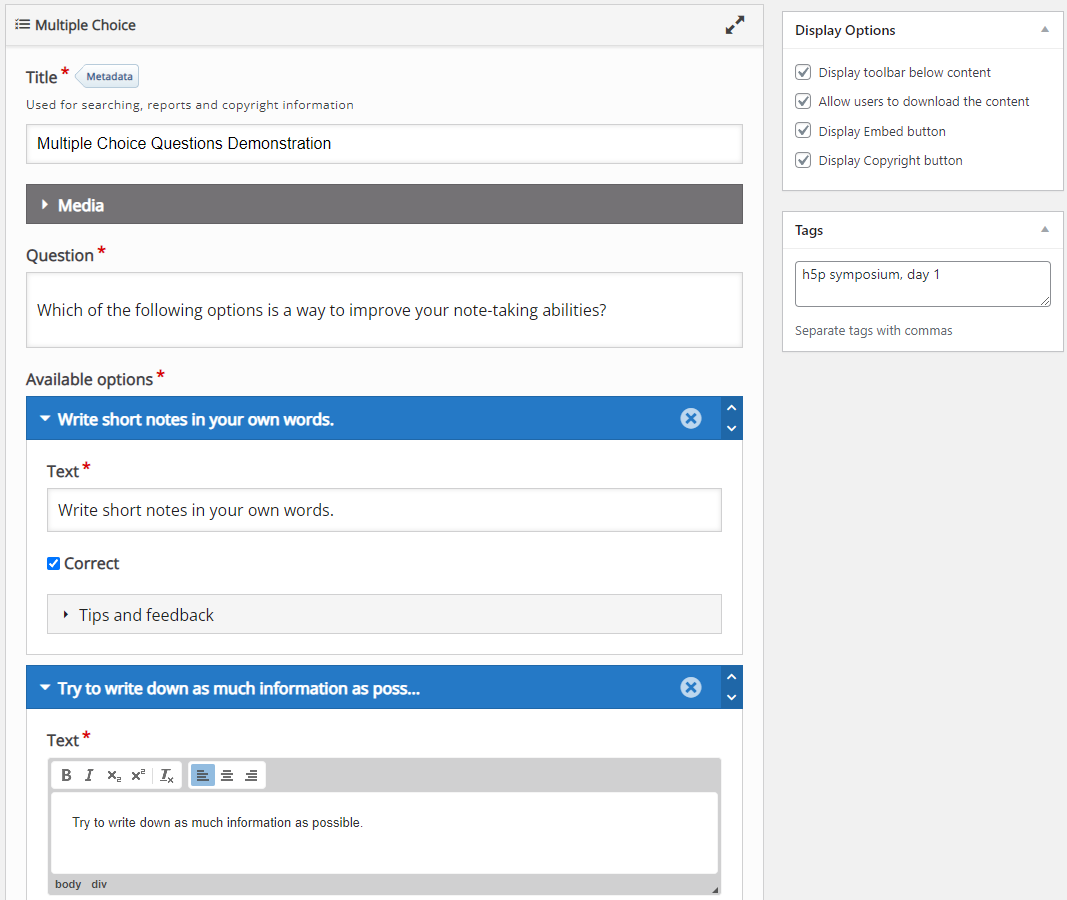
How to create Multiple Choice elements (guided walkthrough)

69 STEPS

1. Navigate to an H5P Authoring Tool (for example, h5p.open.ubc.ca) and type in Search for Content Types
or scroll to find Multiple Choice

Step 1 image

2. Click Multiple Choice

Step 2 image

3. Optional: Click Tutorial to navigate to a tutorial for this question type on h5p.org. A tutorial link is available for each content type.

Step 3 image

4. The h5p.org tutorial will guide you through this content type.

Step 4 image

5. Optional: Click Example to see a completed h5p element for this content type on h5p.org.

Step 5 image

6. This Multiple Choice page on h5p.org has an example. The question threads at the bottom of this page and the tutorial page often have answers to common questions and issues.

Step 6 image

7. Return to h5p.open.ubc.ca and add a Title.
This title will be visible in your h5p library and question metadata. It is not displayed to the user as part of the question.

Step 7 image

8. Optional: Click Media if you want to add an image or video at the top of your question.

Step 8 image

9. Select Image or Video if desired.

Step 9 image

10. Click Add and select the appropriate file.

Step 10 image

11. Recommended: Click Metadata.

Step 11 image

12. Add a Title for your image.

Step 12 image

13. Select a License.
For help choosing a license, see copyright.ubc.ca/creative-commons

Step 13 image

14. Click Save metadata.

Step 14 image

15. Add Alternative text. A good image description here is important for accessibility.

Step 15 image

16. Scroll down and add your Question as you want it to appear to the user.

Step 16 image

17. Type in an answer Option as you want it to appear to the user.

Step 17 image

18. Check Correct if you want to mark this as a correct answer.

Step 18 image

19. Optional: Click Tips and feedback to add tips or feedback for this answer option.

Step 19 image

20. Optional: Type Tip text for this answer option. This will add a tip button beside this option. The tip or hint will appear if the user clicks on the tip button.

Step 20 image

21. Recommended: Add Feedback that will appear to the user after checking their answers if they select this option.
For tips on how to give good feedback, see the OpenEd Kitchen’s Focus on Formative Feedback.

Step 21 image

22. Optional: Add Feedback that will appear to the user after checking their answers if they do not select this option.

Step 22 image

23. Scroll down and add another answer Option. Leave “Correct” unchecked if this is not a correct answer. Add tips and/or feedback as above.

Step 23 image

24. Scroll down and click Add option to add more answer options as needed.

Step 24 image

25. Add text for a third answer Option

Step 25 image

26. Check Correct to mark this as a second correct answer. Add tips and/or feedback as above if desired.

Step 26 image

27. Optional: Scroll down to Overall Feedback and click Add Range. You can set different overall feedback for each defined score range.

Step 27 image

28. Once you have as many score ranges as you desire, click Distribute Evenly if you would like the ranges to be evenly distributed.

Step 28 image

29. Add Overall feedback for each defined score range.

Step 29 image

30. Recommended: Scroll down and expand Behavioural settings to review and change default behavioural settings.

Step 30 image

31. Scroll to Enable “Retry” button.
Keep checked if you want students to be able to try question again until they get it right.
Uncheck if single attempt is important, such as embedding in an interactive video with branching based on answer.

Step 31 image

32. Navigate to Enable “Show Solution” button.
Keep checked if you want students to be able to view the solution.
Uncheck to encourage retry or if you do not want to reveal the answer.

Step 32 image

33. Navigate to Question Type to select if answer options appear as checkboxes or radio buttons. Recommend to keep selection as Automatic.

Step 33 image

34. Navigate to Give one point for the whole task.
Keep unchecked to keep the default where each correct answer option is +1 and each incorrect answer is -1.
Check this box to instead have all or nothing marking using threshold set by pass percentage below

Step 34 image

35. Navigate to Randomize answers.
Uncheck this box if you want the answer options to appear in the same order you added them.

Step 35 image

36. Navigate to Require answer before the solution can be viewed.
Recommendation: Keep this box checked so that users must attempt an answer before viewing the solution.

Step 36 image

37. Navigate to Show confirmation dialog on “Check”.
If you check this box, users will receive a “Are you sure you want to finish?” popup when they submit their answer by clicking “Check”.

Step 37 image

38. Navigate to Show confirmation dialog on “Retry”.
If you check this box, users will receive a “Are you sure you want to retry?” popup when they click “Retry”.

Step 38 image

39. Navigate to Automatically check answers.
If checked, users would receive correct/incorrect feedback immediately when selecting answers rather than after selecting “Check”.
Recommendation: Keep this box unchecked to maintain accessibility.

Step 39 image

40. Navigate to Pass percentage. If you checked the :Give one point for the whole task” box, set the percentage required on the question for the user to receive 1 point (full credit).

Step 40 image

41. Navigate to Show score points.
Recommendation: Keep this box checked to help users understand positive scoring for correct answers and negative scoring for incorrect answers.

Step 41 image

42. Optional and usually not necessary: Scroll down and click to expand Text overrides and translations.

Step 42 image

43. Click to expand Multiple Choice

Step 43 image

44. Click to expand Check

Step 44 image

45. Change any default text, if desired. For example, you could change Retry button label to Try Again.

Step 45 image

46. Optional: If included on your authoring platform, scroll down and edit default Faculty if necessary. This is helpful for organization and admin support.

Step 46 image

47. Optional: If included on your authoring platform, scroll down and add a relevant Discipline. This is helpful for organization if you may share your question to a database.

Step 47 image

48. Recommended: Scroll up and add tags. Tags will appear in your h5p content library and are useful for organization and searching.

Step 48 image

49. Click Metadata

Step 49 image

50. Select a License.
For help choosing a license, see copyright.ubc.ca/creative-commons.
Edit other metadata as desired.

Step 50 image

51. Click Save metadata

Step 51 image

52. Navigate to Display Options. When this box is checked, a small toolbar appears under your content that displays Reuse, Rights of Use, and Embed buttons. Keep check initially to get an embed code. You can uncheck it after embedding, if desired.

Step 52 image

53. Navigate to Allow users to download content. When checked, the Reuse button allows users to download an h5p file of your content. This file can be used to upload and/or modify your content elsewhere if you chose a creative commons license.

Step 53 image

54. Navigate to Display Embed button. Keep checked initially to obtain an embed code for your content and continually to allow others to share your content elsewhere if you chose a creative commons license.

Step 54 image

55. Navigate to Display Copyright button. Keep checked to allow users to view the metadata such as title, author, and license details for your content.

Step 55 image

56. Click Create

Step 56 image

57. Try question to confirm that everything works as expected.

Step 57 image

58. If you need to make any changes, click Edit.

Step 58 image

59. Make any desired changes then click Update.

Step 59 image

60. Click Embed.

Step 60 image

61. Copy Embed code.

Step 61 image

62. Embed your content wherever you would like it to appear.

Example 1 (Canvas Insert): Click Edit.

Step 62 image

63. Scroll down and click Insert.

Step 63 image

64. Click Embed.

Step 64 image

65. Paste your embed code and click Submit. Your question will be embedded on your Canvas page.

Step 65 image

66. Example 2 (html): Switch to the html editor, for example in Canvas or WordPress.

Step 66 image

67. Find the location where you want your h5p content to appear and paste the iframe Embed code.

Step 67 image

68. Scroll down and click Save

Step 68 image

69. That’s it – you’re done!

Step 69 image

Here’s an interactive tutorial

** Best experienced in Full Screen (click the icon in the top right corner before you begin) **

https://www.iorad.com/player/1914568/Multiple-Choice-H5P-Guide—Detailed

How to create Question Set (Quiz) elements (guided walkthrough)

34 STEPS

1. Navigate to the H5P Hub on your preferred H5P Authoring tool and click Quiz (Question Set)

Step 1 image

2. Add a Title (not displayed as part of the question)

Step 2 image

3. Optional: Click Quiz introduction to add an introduction. Skip ahead if you do not want an introductory slide skip forward to step 7.

Step 3 image

4. Click Display introduction if you would like to display an introductory slide with text and/or an image before the first question. If you do not include an introduction, the first slide is the first question.

Step 4 image

5. Add a Title to be displayed on the introductory slide

Step 5 image

6. Add Introduction text to be displayed on the introductory slide. Scroll down and add an introductory image if desired.

Step 6 image

7. Add a background image if desired. We will not add an image here.

Step 7 image

8. Choose whether you want question Progress to be shown as Dots or Text

Step 8 image

9. Change Pass percentage if desired

Step 9 image

10. Select Question type for the first question. Here we will start with Multiple Choice.

Step 10 image

11. Create a multiple choice question as normal, or Click Textual to access the rapid text authoring tool.

Step 11 image

12. Type Questions and answers following the format
Question
*Correct:tip:feedback if selected:feedback if not selected
Incorrect 1
Incorrect 2

Step 12 image

13. Click Default to return to standard question authoring tool

Step 13 image

14. The text-authored question has been inserted. Click Add Question to add the next question.

Step 14 image

15. Click dropdown menu to select question type for next question. Instead of authoring the next question here we will demonstrate how to copy-paste a previously authored question.

Step 15 image

16. Navigate to the question you want to copy (for example, Click My H5P Content and open the question you want to copy).

Step 16 image

17. Click Copy

Step 17 image

18. Return to Quiz (Question Set) and click Paste at the top of the Question 2 tab. Your question will be copied.

Step 18 image

19. Optional: Scroll down and check Disable backwards navigation if you only want users to be able to progress forward through questions.

Step 19 image

20. Click Randomize questions if you want the questions to appear in a random order. Note: this adds a challenge in that a user may report an issue with the second question, and you might not know which question they saw second.

Step 20 image

21. If you want a subset of the full number of questions available to be displayed, enter the Number of questions to be shown here

Step 21 image

22. Scroll down and click Finished

Step 22 image

23. Change any default settings if desired

Step 23 image

24. Scroll down and click Add file under Passed video and/or Fail video if you want users to view a video after the quiz based on their results.

Step 24 image

25. Optional: Select Discipline if desired

Step 25 image

26. Scroll up and add tags for organization

Step 26 image

27. Click Metadata

Step 27 image

28. Click the dropdown menu under License

Step 28 image

29. Select Preferred License

Step 29 image

30. Click Save metadata

Step 30 image

31. Click Create

Step 31 image

32. If all functions as desired, click Embed

Step 32 image

33. Copy the embed code and paste it in an html editor where you want the content to display.

Step 33 image

34. That’s it. You’re done.

Step 34 image

Here’s an interactive tutorial

** Best experienced in Full Screen (click the icon in the top right corner before you begin) **

https://www.iorad.com/player/1920007/H5P—Quiz–Question-Set–Guide

Short Answer Style Questions

Examples of short answer style questions

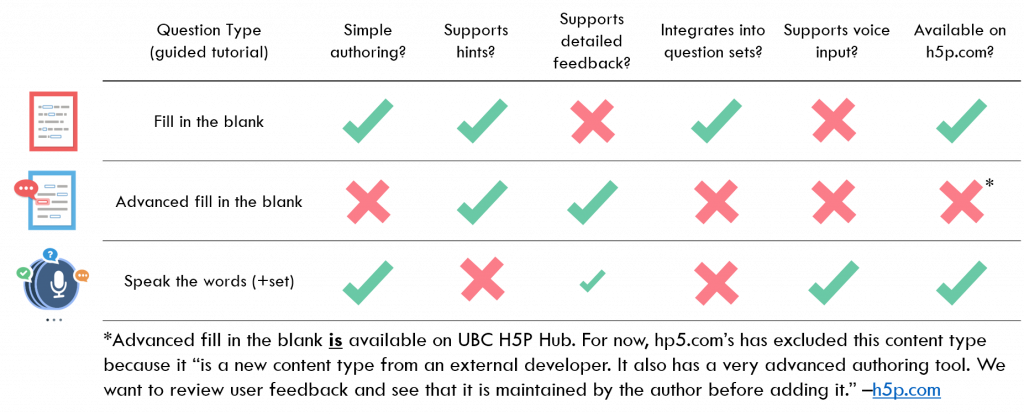
Resources: Fill in the Blank

We will work together to recreate the question below

Question: Note-taking is beneficial because it has benefits for both __________ and __________ information.

Blank 1: encoding

Tip: What is the first step in getting information into your mind?

Blank 2: storing

Tip: What is the process of keeping information in memory?

Review

How to create Fill in the Blank elements (guided walkthrough)

Hotspot Style Content and Questions

Examples of hotspot style content and questions

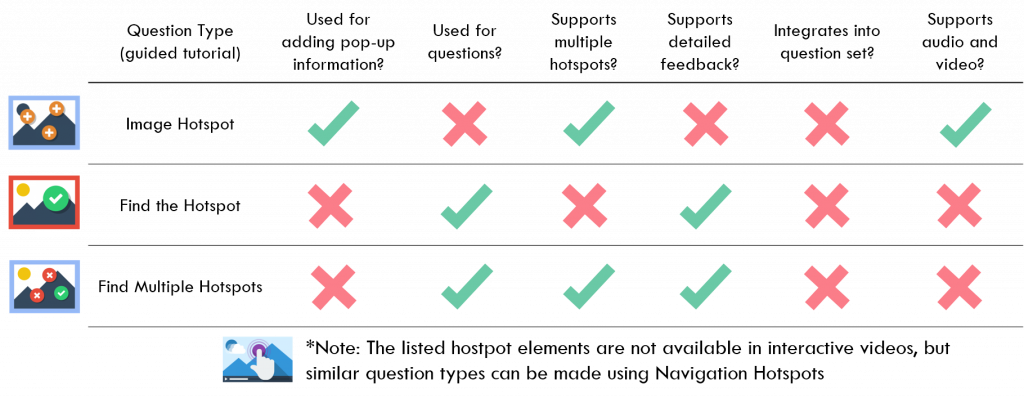
Resources: Find the Hotspot

We will work together to recreate the question below

Question: Click on the button that allows you to set legal restrictions on who may use your H5P element and how they may use it.

Image:

Feedback

Over “Metadata” (correct): Correct. The metadata is where you set the license for your H5P content. For some of the more common license types and what they entail, see https://creativecommons.org/licenses/

Over “Allow users to download the content” (incorrect): This option allow people to download your H5P element and import it into their instance of H5P. The type of license that you set will have important implications for downloading your work. Where might you set the type of license you want to use?

Over “Display embed button” (incorrect): The embed code allows people to copy and place your H5P element in their website / LMS. How / when you can do this is contingent on the license that you choose. Where might you choose which license you want for your H5P element?

Over “Display Copyright button” (incorrect): Clicking on this option will display what type of license you have set for your H5P element. It is not where you choose the license type. Try again!

Review

How to create Find the Hotspot elements (guided walkthrough)

35 STEPS

1. Select Find the Hotspot (scroll or use Search for Content Types if it is not at the top)

Step 1 image

2. Add a Title (for metadata and organization; not displayed as part of the question)

Step 2 image

3. Click Add to add the background image that your hotspots will be located on

Step 3 image

4. Click Edit copyright

Step 4 image

5. Add a Title for your image. This title is used for licensing and is not displayed as part of question.

Step 5 image

6. Add an Author for your image. This author is used for licensing and is not displayed as part of question.

Step 6 image

7. Scroll down and select your preferred License. For help choosing a license, see UBC Creative Commons.

Step 7 image

8. Click close

Step 8 image

9. Click Hotspots

Step 9 image

10. Add a Task description to provide instructions to the user.

Step 10 image

11. Scroll down and click your preferred shape to Create a hotspot

Step 11 image

12. Check Correct to mark the current hotspot as correct. Multiple correct hotspots can be assigned, but for this Content Type the question will end as soon as a single correct hotspot is found. Use Find Multiple Hotspots for additional functionality.

Step 12 image

13. Add Feedback that will appear to the user if this hotspot is selected.

Step 13 image

14. Click Done

Step 14 image

15. With your mouse, click and drag the new hotspot, then drop it on the desired location (white rectangle)

Step 15 image

15b. Drop

Step 15b image

16. With your mouse, click and drag bottom corner to resize, then drop when it is the desired size (covering full white rectangle)

Step 16 image

16b. Drop

Step 16b image

17. Click to create another Hotspot

Step 17 image

18. Leave correct unchecked to mark this as an incorrect hotspot. Type Feedback that will appear to the user if this hotspot is selected.

Step 18 image

19. Click Done

Step 19 image

20. With your mouse, click and drag new hotspot, then drop it on desired location

Step 20 image

20b. Drop

Step 20b image

21. With your mouse, click and drag bottom corner then drop to resize.

Step 21 image

21b. Drop

Step 21b image

22. Scroll down and type the Feedback that you want the user to see if they select part of the image without any assigned hotspots.

Step 22 image

23. Scroll down and uncheck Show feedback as popup if you want feedback to appear at the bottom of the image instead of as a popup over the image. We will leave this checked in the tutorial.

Step 23 image

24. Optional: Scroll down and select appropriate Discipline

Step 24 image

25. Optional: Scroll up and add tags

Step 25 image

26. Click Metadata

Step 26 image

27. Select preferred License. See UBC Creative Commons for help selecting a license.

Step 27 image

28. Click Save metadata

Step 28 image

29. Click Create

Step 29 image

30. Click highlight to test functionality of incorrect hotspot

Step 30 image

31. Click Retry

Step 31 image

32. Click highlight to test functionality of correct hotspot

Step 32 image

33. Click Close

Step 33 image

34. If all works as expected, click Embed. If you need to make changes, click Edit at the top to update your question.

Step 34 image

35. Copy the Embed code and paste it wherever you want it to appear. Click close.

That’s it – you’re done!

Step 35 image

Here’s an interactive tutorial

** Best experienced in Full Screen (click the icon in the top right corner before you begin) **

https://www.iorad.com/player/1917904/H5P—Find-the-Hotspot-Guide

Card Style Questions

Examples of card style questions

Resources

We will work together to recreate the flashcard set below

Flashcard 1:

Image:

Metadata: ds_30, soft-4875297_1920, https://pixabay.com/photos/soft-toy-blank-childhood-toys-4875297/

Question: Recalling information from memory is known as _____________________ practice.

Answer: retrieval

Flashcard 2:

Question: What is the most popular study technique used by students?

Answer: rereading

Review

How to create Flashcard elements (guided walkthrough)