1.8 – How to use this Weblog
The ETEC522 Course Weblog is the site where all course content, activities and discussions will take place. Once you have logged into the weblog (using the instructions that were emailed to you), you will be able to view all of the material, post new topics and comment or respond to existing posts that have been made by other students or the instructors. Please bookmark the course weblog so that you can easily find it again.
The layout of the material on the course weblog is quite simple:
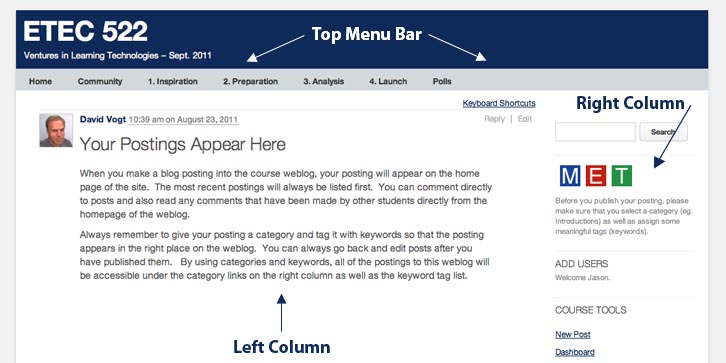
The Top Menu Bar of the weblog
leads to static pages of course content on which you will find the course materials for
all of the materials and descriptions of activities that we want you to engage
in. You can read any of this material whenever you want, but we will be moving
through it as a cohort, according to the Course Schedule that is part of Stage
1. You cannot edit or comment on the pages on this weblog.
The Left Column (the one you are reading now) is where on-going discussions will appear throughout the course in the form of blog-postings and comments on the postings. This column is also a dynamic space, and it will always show the most recent postings made in the course weblog. These postings will appear according to the time and date they were posted, with the most recent posting always on the top. If you find it confusing to follow the discussions that way, you can always click on the Category links on the right column to pursue your reading only within the one discussion category. You can choose whichever approach works best for you.
The Right Column has links to
help you to login/out of the site, to search for information, as well as to
jump directly to postings as organized within the different Categories in the
course (Announcements, Questions & Answers, Week 1, Week 2, etc.) The category
links on the right column will automatically appear as postings
are made into the various topics, so at the start of the course, you will only
see categories relating to the early weeks, with the later categories
appearing as people begin to post into them. On this right column, too, we
have added a tag-cloud and a popular posts link, so you can jump into content
according to how people have tagged information as well as see where most people
are discussing issues at any time.
Take a bit of time to explore the different parts of the weblog so that you become familiar with the overall navigation.
Private Group Areas
We are working with a special plugin for WordPress called BuddyPress which allows
for a number of special functions not typically available within a weblog.
There is one group that is set up for all of the students in the course, where
you will be able to see all of the members of the course and have private discussion.
To access this area, click on the “Community” link from the top menu and then once you are at the group page, select “Join Group” to
join. Once you’ve been approved, you’ll have access to the group.
There will also be private groups set up for your second assignment, the Emerging
Market Analysis, where you will be working in small teams to create a presentation
for the other students in the course on a particular emerging technology. Once
you have been organized into your teams by your instructor, you will then be
subscribed to the working areas in which you can begin to deliberate on how
you will develop your presentation. The private group areas have their own
forum, a shared document space and a simple blogging wire that allows you to
post updates to the group. Only the members of your project team will be able
to see the material posted into that space.
You can navigate to your private group area by clicking on the Community link on the Top Menu Bar, and then selecting your group from the dropdown list. You will not see the groups listed, however, until the groups have been established.
Creating a New Post
Creating a new Post in a weblog is just like creating a new thread within WebCT: you are creating a message to which other people can respond and comment. To create a new post, click on “Site Admin” in the right sidebar to bring up the dashboard view for your Weblog account.
Posting from the Front Page
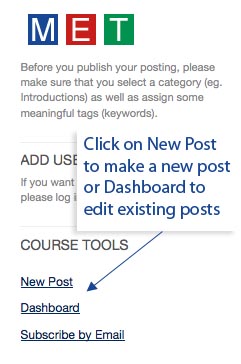
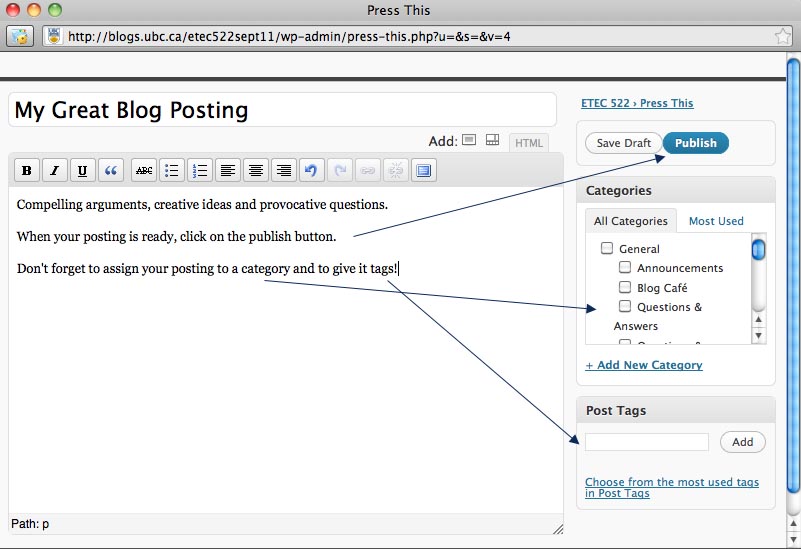
To post from the front page, simply click on the “New Post” link on the right column of the weblog under the “Course Tools” heading. A pop-up window will open that will provide an interface for you to enter your post. Give your post a title and enter your post into the content area. When you are finished, assign a category to your post, give it tags and then hit the “publish” button.
Posting from the Dashboard
To create new posts from the Dashboard, look for the “Posts” section and click on “Add New” in
order to create a new page.
You will be presented with a template that you can fill out to write your post. Start off by giving your post a title: this will be displayed on the weblog page. Then, use the Post field to type in the body of your posting. You can edit using either the wysiwyg editor (visual) or use html and format your text with colours, links or even embed media (like pictures of videos). For videos, you only need to paste in the URL of the resource and the link will automatically be embeded in your posting.
If you are going to embed a video, you have to already have the video hosted somewhere on the web. There is a page of resources for the Venture Forum in Module 12 that describes some different sites you can use.
Tags
We would also like to encourage you to associate keywords with your posting. We will be generating a tag-cloud from the keywords you enter into your postings, so it will be possible to quickly find postings that have been created on similar topics regardless of where they are in the course. Please use this format for any tags you are using for the modules: M1, M2, M3, etc. You can use more than one keyword tag for a posting, so feel free to add the ones that are meaningful to help people to find content by themes.
Categories
When you create your posting, you will also need to
assign it to a particular category. We have created a list of categories in
the weblog that correspond to the weeks in the course as well as for some general
topics such as “questions and answers”. As soon as people start to post in
a particular category, that category will appear as a link in the right side
column, and you will be able to see any topics and comments that are related
to the topic. If you make a mistake when assigning your posting to a particular
category, you can go back and edit your post and change its category. To do
this, click on “Site Admin” in the drop down menu, look for the “Posts” and
then click on Edit. An posting you have made to the weblog will appear and
you will be able to edit the one you want to change. By default, postings that
are not assigned to a category are “uncategorized.”
Saving or Publishing Your Post
You can save a draft of your posting to work on at a later time without actually making it public. Only you are able to edit a posting that you have initiated. When you are ready to make your posting public, navigate to your page using the “Site Admin” link, edit your page and then click on the Publish button on the posting template page. All postings will show up in the left column, dynamically, with the latest topics at the top, but you will also be able to find them either through the Category links on the right-side column, through the tag-cloud or, even, by searching the weblog.
Advanced Options
You can write an excerpt of your posting if you want, which will give people a shortened version of what a longer post might be about, but beyond that, you do not need to do anything with the other options that are listed.
Responding to a Post
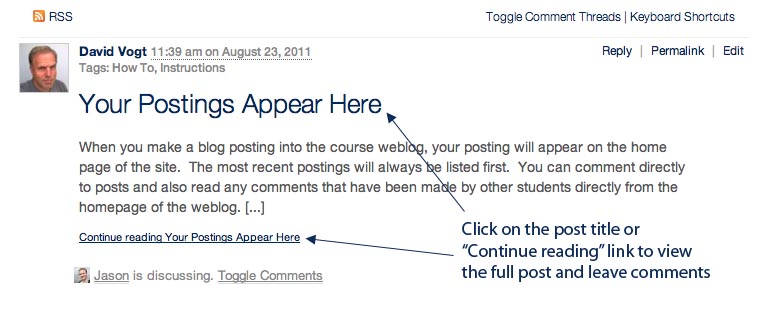
Responding to a posting, or commenting is just like responding or replying to a message in WebCT. To do so, you simply need to look for a link at the bottom of the original posting that will either indicate that there are comments or that there are no comments. When you click on that link, you will then see a template that allows you to enter in your own comments. Simply fill in your comments in the provided text field and then submit. Your comment will then be connected to the original posting and will form part of the thread of comments that will grow as others also respond to the original posting. Once you try out commenting a few times, you will quickly get the hang of it!
Communicating with Your Instructors and your peers.
We have set up a “Questions & Answers” category for you to use to ask any general or content related questions that you might have. Use this category to post such questions and your instructors (or other students in the course) will respond. If you want to contact your instructor directly, send an email to: David Vogt <david.vogt@ubc.ca>. You can also use the private message feature within our course weblog to send a message to anyone who is a member of the course weblog. You can send a message by clicking on the avatar image on any posting/comment that you see on the weblog. Or, you can click on the Community link on the Top Menu and then select Members to see all of the registered members of the course weblog.
Updating your Profile and Creating your Avatar
Please check that your profile information is correct by clicking on “Profile” in the “My Account” drop-down menu. On this page, you can update your email address, as well as link in any other information about yourself that you might want to share with students in the course. Don’t forget to click on “Edit Profile” on the bottom of the page if you have made any changes.
WordPress also allows you to set an avatar (a virtual image for yourself) so that any postings you made will also display the image. You can use a picture of yourself or any other image that you want. To set your avatar, click on “Profile” in the drop-down menu and then select “Your Avatar”. You will be asked to Browse for an image on your own computer and then to upload it to WordPress. Once you have done that, you will see your image when you login.
Notifications and Subscriptions
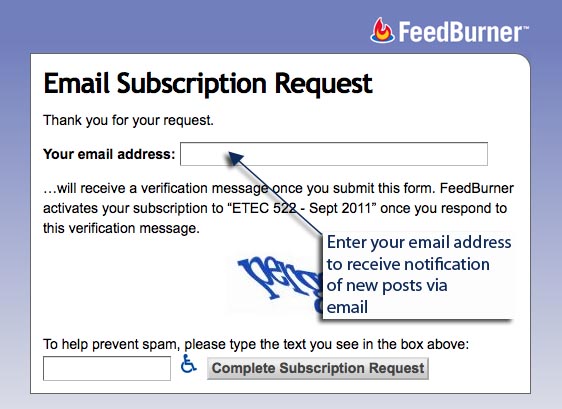
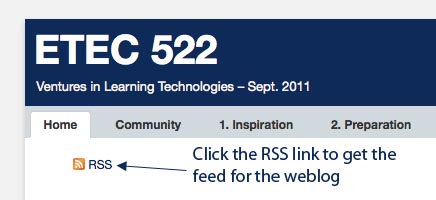
To keep up to date with the conversation happening on the weblog, it is a good idea to subscribe to the weblog, either through an RSS reader or through email subscription, to receive notice when there are new postings. To subscribe via RSS, click on the RSS icon in the upper left hand corner of the weblog and then use an RSS reader such as Google Reader or Netvibes to subscribe to the feed.
To subscribe via email, click the “Subscribe by email” link on the right sidebar of the weblog. Then, on the next screen, enter the email address where you would like to receive notification for new posts to the weblog.
The WordPress server we are using is also able to notify you via your personal email address about a range of activities that take place on the site such as comments in response to postings or activity within your group’s private area. You can turn these notifications on or off by first clicking on the “Settings” link on the top right portion of the course weblog. When your settings screen loads, clock on the “Notifications” tab. On the Notifications screen you will be able to control what information is sent to your email address by WordPress.
