Tag Archives: copyright

Les droits d’auteur

What is it
La législation sur les droits d’auteur existe pour assurer aux créateurs de contenu original de recevoir des compensations (monétaire ou non) pour leur travail et aussi pour que le public général ait accès à ces ressources et créations.  Les auteurs ont le droit de reproduire, distribuer, représenter, et afficher leur travail. Comme pour tout autre objet physique, que ce soit une voiture, une maison, etc. le propriétaire doit donner son accord pour que quelqu’un s’en serve.  La violation des lois sur les droits d’auteur entraîne des mesures juridiques.

Why is it relevant

Il faut comprendre les droits d’auteurs avant de télécharger et de publier des contenus sur un site Internet.  Si les idées ne sont pas protégées par la loi sur les droits d’auteur, le support sur lequel elle est exprimée, l’est, que ce soit un texte, une image, de la musique, une vidéo, etc.  Alors, avant d’utiliser un contenu trouvé sur internet pour des présentations ou des leçons, bien vérifier bien qu’on peut le faire. En cas de doute, il vaut mieux trouver une autre source.  Pour plus d’information ou pour poser des questions spécifiques visiter : copyright.ubc.ca ou passer nous voir.  Nous avons des ateliers et des séances d’information.  


How to get started

En règle général : utiliser Creative Commons ou les images du domaine public.  Quand on cherche des images en ligne, préciser ses besoins en utilisant Creative Commons Image Search.  Si le besoin n’est pas pour ‘raison commerciale’ décocher l’option et comme ça les choix d’images augmenteront considérablement.  En utilisant le Creative Commons, on peut en même temps consulter des sources populaires, par exemple : Google images, Flickr, Wikimédia commons et YouTube.

Il faut noter que cette recherche est filtrée et que les résultats ne montreront que les images avec le CC licence – cela veut dire que c’est à chacun de vérifier que le contenu n’a pas d’autres restrictions.  Ces restrictions et ces obligations sont généralement clairement indiquées sur la page du site de l’image. Si la page indique que le contenu est sous la CC licence quant à l’ attribution, vous n’avez qu’à référencer l’auteur du travail.  Souvent il y a des instructions sur le site qui indique comment faire.  En général, que ce soit demandé ou non, il est préférable de référencer les auteurs.

Pour une démonstration, regarder la vidéo ci-dessous:


Video demonstration
Many thanks to Common Sense Media for allowing us to translate their original video!

Leave a Comment

Filed under Blog Posts, en francais, Open Educational Resources, Resources

Creative Commons Search (CC Search) : les contenus qui peuvent être partagés, utilisés et mixés !

What is it

Le CC Search est une banque de données pour les contenus de Creative Commons qui peuvent être partagés, utilisés et mixés dans un but éducatif ou autre.  En utilisant le CC Search, on peut rechercher différents types de ressources. Par contre, il ne faut pas oublier de citer les références de ces ressources dont la plupart viennent de CC .  Certaines sources du domaine public n’ont pas besoin d’être référencées (mais le faire est toujours apprécié).

Garder en tête que ces ressources ont des licences indépendantes avec le Creative Commons.  On peut même demander des licences pour son propre travail en ligne. Pour en savoir plus sur ces licences, visiter le site: https://creativecommons.org/choose/

Savoir à l’avance comment utiliser les ressource CC peut aider dans sa recherche.  Dans le CC Search, on peut cocher et décocher les onglets << ressources you can modify or adapt>> et << use for commercial purposes>> selon les besoins et le contexte.  Ne pas oublier de référencer les auteurs à chaque fois que des ressources sont utilisées !

En plus du site CC Search, il y a d’autres endroits où on peut chercher des images de Creative Commons:


Why is it relevant

Pour les professeurs, ils vont vouloir trouver des ressources multimédia pour des diapositives, des feuillets d’information, le blog professionnel ou le site de leur classe.  Le montage de leurs propres photos ou vidéos peut être un défi. Le CC Search aide à rassembler les ressources qui peuvent être utilisées à loisir tout en ayant conscience des règles de mention des licences et des références aux  auteurs. Il faut TOUJOURS lire et apprendre avant d’utiliser.


How to get started

Pour commencer l’utilisation de “CC Search” (le site nouveau et amélioré): CC Search 

  • Ensuite choisir “Use for Commercial Purposes” (pas necessaire pour un usage éducatif) et/ou “modify, adapt or build on” (si on veut modifier l’image).
  • Sélectionnez une image que vous aimez - copier les informations d'attribution pour les utiliser dans votre travail
    

Pour une recherche plus avancée, utilisez la vieille recherche “old CC Search” Website.

  • Vérifier que la touche « Use for Commercial Purposes » est décochée si on l’utilise pour des raisons éducatives, et selon les besoins cocher/décocher la boite « modify, adapt or build on ».
  • Ensuite choisir la source du site qu’on va rechercher, indiquer les mots clés, et appuyer sur le bouton vert. 
    • Pour les images :
      • Pixabay – permet de partager immédiatement sur des réseaux sociaux comme Facebook et Twitter.  Ces images sont en grande demande et sont de haute qualité. Elles sont gratuites et n’ont pas besoin d’être référencées.  Le site permet aussi l’accès payant à un stock de photos de haute qualité.
      • Open ClipArt
      • Google Image
      • Flicker
      • Unsplash (communauté virtuelle de partage de photos)

      Pour la presse : Europeana, Wikimédia Commons, et SpinXpress

      Pour les vidéos et la musique : YouTube, ccMixter ou Soundcloud

  • Enfin, choisir la taille du fichier, le télécharger.  Ne pas oublier de lire les droits d’auteur et référencer les auteurs dont les travaux sont utilisés.
  • La vidéo ci-dessous montre comment faire.


Leave a Comment

Filed under Blog Posts, en francais, Not Subject Specific, Open Educational Resources, Resources

Assistive technology and open education resources take flight in UBC’s BEd Summer program

As part of the large TLEF project, “Enhancing Secondary Teacher Candidates’ Digital Competencies”, coordinated by ETS and Yvonne Dawydiak, Technology Integration Mentor, students and instructors in each section of ESPE 317 had the opportunity to partake in lectures and workshops that modeled digital technology integration and centered on the importance of assistive technologies and open education resources. We would like to thank Kathy Heikkila, course coordinator of the Development and Exceptionality course along with the seminar instructors for their interest and support in helping us introduce teacher candidates (TC’s) to these important concepts and resources.

Catchbox microphone in action with BEd teacher candidates

The first workshop incorporated the concept of Universal Design for Learning (UDL) and focused on the integration of assistive technologies in the classroom to provide a more equal and just learning environment for all learners. In the assistive technologies lecture, we discussed and introduced the various resources available to teachers to use with varied learners in the classroom based on five types of assistive technologies: reading, vision, writing, communicating and studying. TC’s participated in open discussions surrounding the five categories of assistive technologies, reflected on their practicum experiences and had hands on opportunities to play with different digital technologies including ThinkMap Visual Thesaurus and ShowMe Interactive Whiteboard.

The second set of workshops was composed of two parts (lecture and seminar) and was a joint effort between CTLT and the UBC library. This initiative was designed to introduce TC’s to licensing and open education resources (OER) and, hopefully, to promote the sharing of materials online among educators.

At the beginning of the lecture, teacher candidates were asked to participate in an online poll and reflect on their own experiences in collecting and developing resources. Although responses showed that the majority of teacher candidates access and use online resources when developing lesson plans and activities, responses also showed that teacher candidates did not typically share their own works online. They argued that they were unaware of how to license their work and where to share them.

With this in mind, we introduced TC’s to Creative Commons, which is a non-profit organization that allows individuals to license their works in order to share them freely online as OER. During the lecture TC’s also had the opportunity to explore some examples of OER on three well-known open education repositories: Teach BC, OER Commons and Share my lesson. The following week, teacher candidates participated in a seminar, which gave them the opportunity to work on their lesson plans and reflect on different ways in which their work can be licensed and shared on an open education repository. Teacher candidates enjoyed the hands on activities arguing that it clarified various questions they had regarding licensing, the use of images in their works and selection of open education repositories. Although feedback was positive, teacher candidates expressed concern regarding the quality of their lesson plans and their confidence in sharing their work.

We found teacher candidates and their instructors to be receptive to the integration of technology in the classroom and the concept of OER. Teacher candidates were enthused to reflect on their practicum experience and discuss their own integration of technology and how they share their works. In addition, teacher candidates expressed interest in learning more about the technological resources available and suggested that UBC continue to conduct these workshops for future BEd students.

Leave a Comment

Filed under Assistive Technology, Blog Posts, Open Educational Resources

Creative Commons Search: Find media you can use, share and remix!

CC Search is an engine where you to find Creative Commons content that you can share, use and remix for educational and other purposes. Using CC Search, you can search for a variety of media types. Remember, though, you still need to attribute/cite sources with most CC content. Some public domain sources do not require attribution (though link backs and credit are always appreciated!)

All resources have individual licensing within the creative commons. As you develop your own resources, you can even apply your own CC license to your content online. For more about how to determine the licensing you want, visit: https://creativecommons.org/choose/

Knowing how you plan to use the media can help in your search. In the CC search, you can select or deselect “resources you can modify or adapt” and “use for commercial purposes” depending upon your intent and context.

Below are some direct links to sources of Creative Commons Images:


As a teacher, you will want to find multimedia resources to use in your slides, presentations, handouts, on your professional blog or class website. You will also want to share with your students how and where they can find copyright appropriate images and media for their own multimedia projects. It is a common misunderstanding that « educational fair use » allows teachers and students to use works/images for their own work published online. Our Ed library has a comprehensive resource detailing image use.
Taking and editing your own photographs or videos has great value but may not always be possible. CC search helps you gather resources that you can feel free to use, as long as you are aware of licensing requirements and generally attribute the work to the author. ALWAYS read and learn before you use!
Often I will create a set of resources or slides for use in my own classroom and then wish to share these with students, colleagues or parents online. Beginning with creative commons media as a starting point ensures my work can be freely shared! This can also open the door to more widely sharing with the educational community through open education repositories such as Teach BC or even the Scarfe Sandbox ;D

  1. Go to https://search.creativecommons.org/
  2. Select “Use for Commercial Purposes” if you are going to sell or share ‘for profit’, and check the box for “modify, adapt or build on” if you plan to remix or change the media in some way. You can leave both boxes unchecked if you’re looking for educational media to us ‘as is’. This will garner more images.
  3. Scroll through the media presented, Select one you like.
    1. You will see the attribution and license link below the image. Copy this so that you can cite the image in your presentation.
    2. To Save/Download the image: Right click (control click on a mac) to Save the image to your computer or click ‘share’ to share via social media or Pinterest.

For a more targeted search of specific media through several different repositories, CC Search has an alternative and somewhat more complicated interface via their ‘old search’ portal. Here, you select the repository you’d like to search:

For Images:

  • Pixabay – allows immediate sharing to various social network sites including Facebook and Twitter. Some high interest and high quality images. Free with no attribution required. This site also links to high quality stock photos you can pay to use.
  • Open ClipArt
  • Google Image (using CC search, you are automatically doing an advanced image search for copyright appropriate/cc images)
  • Flicker
  • Unsplash ( free photo sharing community)

For Media:  Europeana, Wikimedia Commons, and SpinXpress

For videos and music:  Youtube, ccMixter or Soundcloud

To get started with using the ‘old search’ tool:

  • Go to the old CC Search website.
  • Be sure to unclick the “Use for Commercial Purposes” if you are going to use the content for education, and check/uncheck the box for “modify, adapt or build on” depending on your needs.
  • Choose the source website you are going to search from, input your keywords, and click on the Green Search Button.
  • Finally, choose the appropriate size (smaller for fast loading on web; larger for large display) and download the resource you want to use. Don’t forget to read the author rights and give credit to the author while using his/her work! While some sources do not require attribution, most do.
  • You can also watch this 1-minute video that shows you how to get started.

Leave a Comment

Filed under Not Subject Specific, Open Educational Resources, Resources

Creative Commons Image Search

Taking and editing your own photographs can be a challenging, yet rewarding way to enhance your web spaces. Further, this virtually eliminates copyright issues! Still, if you are looking for web content you can use, here are a few places to look:

Creative Commons Image Search NB: you still need to be aware of licensing requirements and generally attribute the work to the author. ALWAYS read and learn before you use!

Public Domain Image Search *always check the image sources and ensure the image is in the public domain.

  • Wikipedia Public Domain listing – fairly comprehensive
  • Pixabay – allows immediate sharing to various social network sites including Facebook and Twitter. Some high interest and high quality images. Many are free with no attribution required. This site also links to high quality stock photos you can pay to use.
  • UnSplash – high resolution photos, free to use (even commercially) no attribution required (always appreciated though)
  • Burning Well
  • freefoto.com  is one I like to use with younger students when developing digital stories or web-based projects
  • http://www.public-domain-image.com/
  • Various governmental sites offer high quality images – always attribute source and note any special licensing requirements in their FAQ or About pages. These can be particularly helpful for Science and Social Studies!: NOAA photo library (National Oceanic and Atmospheric Administration) ; US Library of Congress ; NASA ; Archives Canada ;
  • Open ClipArt
  • PDPhoto.org  – free public domain images

videopng-360x61.png

Leave a Comment

Filed under Blog Posts, Not Subject Specific, Open Educational Resources, Resources

Understanding Copyright

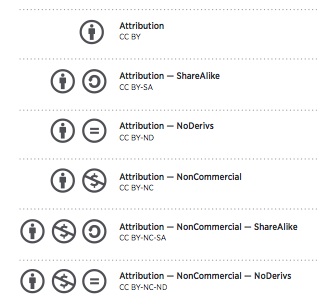
from: wiki.creativecommons.org/images/6/6d/6licenses-flat.pdf

wiki.creativecommons.org/images/6/6d/6licenses-flat.pdf

whatisit.png

Copyright laws exist to ensure creators of original content to receive compensation (monetary or not) for their work and also that the general public is granted access to these resources and creations. The creator owns the rights to reproduce, distribute, perform, and display the work. Just like any physical object, like a car or house, the owner has to allow someone else to use it. By violating copyright laws, legal action may ensue.


Why-is-it-relevant-360x82.png

You need to understand copyright if you are planning to upload content of any kind to a website. While an idea is not copyrighted, the medium in which it is expressed, be it text, image, music, video, etc., is. Therefore, before grabbing content off the Internet for presentations or lessons, make sure that you have the appropriate permission.

If you’re not sure, it’s just best to find another source. Visit: copyright.ubc.ca for more information or drop in to see them and ask specific questions. They regularly offer workshops and drop in sessions to help keep you informed.


how-to-get-started-360x80.png

As a rule of thumb: Use creative commons or public domain images. When you search for images online use ‘creative commons image search’ and specify your needs. If you do not need the content for ‘commercial purposes’ be sure to deselect this option as your choice of images will ‘open up’ considerably. From the CC image search browser, you can search using several popular sources such as google images, flickr, wikimedia commons and youtube.

Please note that this search will then ‘filter’ the content and attempt to show only those with a CC license – it is still up to you to ensure the content does not contain other licensing restrictions. Licensing restrictions and requirements are generally clearly stated on the image source page. If this page states this is under CC license with attribution, then you need to attribute  the work to its author (cite it). There are often guidelines on how to do this within the page. In general, I always ‘attribute’ whether this is required or not.

Two of my favourite sources of high quality images, clipart and video are: pixabay and unsplash. The material on these two sites is CC licensed with NO attribution required – many of the images on the Scarfe Sandbox website are from these two sources. One reason that such high quality content is free of charge is that the authors of these ‘gifted’ images also sell via the sites’ affiliated stock photo galleries.

For more information and links to other creative commons image/media sources and to learn more about how to use them in your classroom, please visit this blog Post.


videopng-360x61.png

Leave a Comment

Filed under Not Subject Specific, Open Educational Resources, Resources

Citing Research in your Blog

“The term reference is used in many spheres of human knowledge, adopting shades of meaning particular to the contexts in which it is used.”

When citing other sources in your blog or website, it is very important to give ‘credit’ where credit is due (and it is always due!). For online sources, you can simply create a link to the original source and remember to always use quotation marks when directly quoting. You can highlight and link to the entire quote as I have done above.

When sharing information you gleaned from another online space or publication (that is not a direct quote), such as a blog or website, you should link out to the site as I have done below. For academic sources, I would suggest using Chicago in text citations (which footnotes your reference) as they are ‘cleaner’ looking with numbers rather than bracketed names and dates, but you can use any style with which you are comfortable. Again, though, I would recommend citing on each page or post of your blog rather than a reference list as a separate page. Unfortunately, I am unaware of a specific style guide to advise on this. You can create the footnotes in Word and just copy and paste the paragraph into your blog. The footnotes automatically become links and the citations from your document will appear on the bottom of the page.

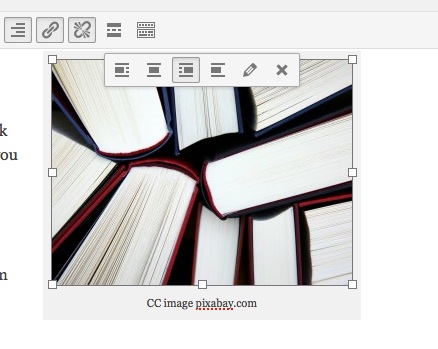
books-462579_1280

CC image pixabay.com

With images, it’s also important to reference (and use creative commons images citing appropriately where needed). I often use a caption with a link to the image source but always ensure you check individual copyright needs. NB: Pixabay has creative commons images with not attribution needed (although link-backs as I’ve done here are always appreciated!)

NB: to add the caption below the image, click on the image you’ve inserted into the page or post, select the ‘pencil’ edit tool and type the caption. You can also set alignment here so that your images has text ‘wrapping’ or not. (I used text wrapping above but not in the image below)
imageedit

Below the following paragraphs, I’ve added a horizontal line (from the visual editor menu bar) for a more organized appearance:

Interactive WhiteBoards, like the SmartBoard, have become commonplace in many schools over the past decade. IWB’s afford access to a variety of learning styles and can support inclusion according to Universal Design for Learning theory.[1] They promise the ability to increase student engagement by providing a focal point for instruction, interactivity, gaming and animations. This increased focus and engagement can improve student learning.[2]

Still, barriers to this potentially valuable technology include the price tag (a system must include a dedicated computer, projector and the IWB), and time. Teachers report that initial planning and preparation time are increased when using IWB’s. Further, time spent on troubleshooting, including ‘orienting’ the board, is seen as a disadvantage to implementation.[3]


[1] Pellerin, M. (2013). E-inclusion in early french immersion classrooms: using digital technologies to support inclusive practices that meet the needs of all learners. Canadian Journal of Education, 36(1), 44+. Retrieved from http://go.galegroup.com.ezproxy.library.ubc.ca/ps/i.do?id=GALE%7CA323659495&v=2.1&u=ubcolumbia&it=r&p=CPI&sw=w

[2] Troff, B. & Tirotta, R. (2009). Interactive whiteboards produce small gains in elementary students’ self-reported motivation in mathematics. Computers & Education ,54, 379-383.

[3] Krug, D, (2004). Leadership and Research: Reimagining electronic technologies for supporting learning through visual arts. Studies in Art Education: A Journal of Issues and Research. 46(1), 3-5.

CC images courtesy of Pixabay.com

Leave a Comment

by | January 14, 2015 · 3:50 pm