Hide Grades for the Entire Grade Centre (Do this prior to entering any grades)
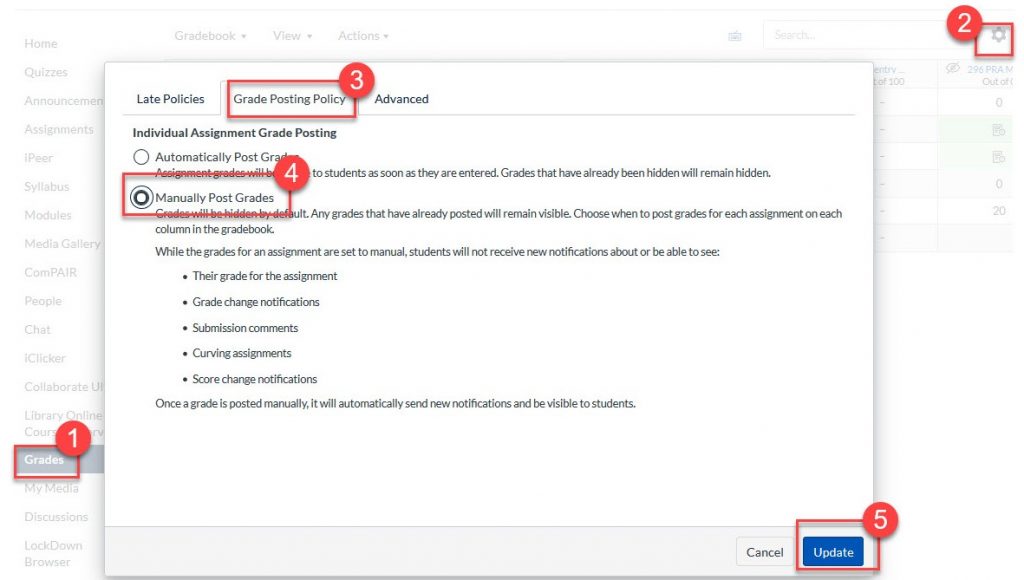
If an instructor doesn’t want the grades they enter to be immediately visible to students, we recommend changing the course’s grade posting policy to Manually Post Grades. Instructors can change the grade posting policy for their course by following these steps:
In Course Navigation, click the Grades link.
Click the Settings (gear) icon.
Click the Grade Posting Policy tab.
Choose a grade posting policy for the course (Manually Post Grades or Automatically Post Grades).
To apply the changes, click the Update button.
* Note that once the course’s grade posting policy is changed in this way, all of the columns in the gradebook will switch to Manually Post Grades. If there are quizzes in which the instructor wants students to be able to see their responses or correct answers right after each attempt, then you will need to remain the Grade Posting Policy automatically for those assignments. You can do so by clicking on the three dots next to the column name.
Make Grades Visible to Students
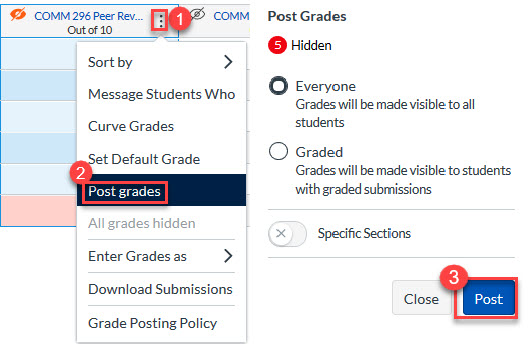
If an instructor has set the Manually Post Grades Policy, they will need to post grades before they will be visible to students. When grades are entered for students’ submissions and are hidden from them, there will be an orange eye. When students can see their grades, there will be a grey eye. The following steps show how to post grades for an individual assignment:
Click on the three dots next to the Assignment name to open the assignment menu.
Click Post grades. There will be the option to Post Grades to Everyone (all students) or to Graded (only students with graded submissions).
iPeer is a peer review platform which lets students evaluate their group members. It facilitates self-evaluations as well, and is integrated with Canvas.
iPeer helps collect feedback within student teams. This encourages accountability in group work, and provides students with opportunities to reflect and be heard by the instructor.
Any feedback given is anonymous, and instructors can choose whether they want the results to be released or not.
Evaluations can be created from scratch, with a variety of question types (Likert, Paragraph, Sentence, Dropdown) to choose from. These can be saved and re-used in future courses.
Grades can be synced to Canvas, or exported to a CSV for further analysis.
iPeer is used commonly at Sauder to get students to:
1 — Reflect
Students can be given a text box to write in.
How did this teammate contribute most when working working with others?
2 — Rate
Students can be given a Likert scale to click on.
Rate this person’s participation. A rating of “3” indicates that the team member’s contributions met your expectation. A rating of “4” means that the team member contributed slightly more than expected, and “5” reflects a contribution well above your expectation. Similarly, a “2” reflects a contribution slightly less than expected and a “1” is a contribution that was much below what was acceptable.
3 — Distribute
Students can be given a dynamic slider to adjust for each group member.
Example — Did each group member contribute equally?Rate your peer’s relative performance using the sliders below.
iClicker Cloud is an online student response system that allows instructors to collect and grade responses to in-class questions that students answer individually using their own computer or mobile device. They receive the responses instantly, and can use these results to inform their teaching and/or share them with the class. Through the Canvas integration, iClicker Cloud poll and quiz results can automatically count toward student grades.
There is no cost for instructors or students to use iClicker Cloud. Unlike iClicker Classic, students do not need to purchase any special device and will instead respond in their web browser.
iClicker is useful for polling, quizzing and attendance in which instructors want to track student responses and/or grades. If there is interest in doing anonymous informal polling not for points, zoom polling is ideal.
Students can sign up for iClicker Reef (the student iClicker Cloud application) accounts. Because the registration data is stored in the U.S., students can use a pseudonym and email address. As long as students are informed of the data residency, iClicker Cloud is FIPPA compliant. There is also an integration with Canvas that will allow the students to register their iClicker Reef account within their Canvas course in order to activate it for free.
Once Sauder Instructors create the iClicker course in iClicker Cloud and activate iClicker Sync in a course, students will be able to register via the iClicker sync link and will automatically see the course in the iClicker application.
Students will also need to click the iClicker Sync navigation item in the Canvas course at least once, in order to properly connect their Canvas account with their iClicker Cloud account and sync their grades.
iClicker Resources for Synchronous Classes
NOTE: ALL THE LINKS IN THIS SECTION REQUIRE UPDATE TO POINT TO THE NEW ICLICKER SUPPORT SITE.
These instructions will guide Sauder Instructors to set up an iClicker Cloud Course and connect it to their Canvas Course.
Here are the step by step instructions:
Enable iClicker Cloud in Canvas
Go to your course in Canvas and click “Settings”
Select the “Navigation” tab
Find and enable “iClicker Cloud”
Click “Save”
Download iClicker Cloud for your desktop
We recommend running iClicker Cloud from the desktop app and not from the web browser.
Go to the iClicker Cloud download page and select Windows or Mac to download the application. Once you do this, you can usually find the iClicker Cloud icon on your desktop.
Register / Sign Into iClicker Cloud
In the iClicker Program, either Sign in or Create Account
Create an iClicker Cloud Course
Within the iClicker Program Click “Create New Course” on the top left. Note that if you have multiple sections, you will need to create an iClicker course per section to prevent students from receiving “double credit” or being marked as absent in sessions they do not belong to
Even if you only want to use iClicker to take attendance, keep “Full Course” selected
“Course Name” should be the same as what it appears on your Canvas course page
Start and end dates should be teaching start and end dates
Back on the iClicker homepage, select the three dots on the right hand side of your course > Settings
On the Polling tab, select:
“Do not send a picture of my screen” → Students cannot see and answer the question if they are not in class
“Do not send results” → This ensures that students will not automatically see the distribution of responses in the class. You can still share results manually from your end if needed
“Session Participation” is how you wish to grant participation marks
“Session Performance” is how you want to mark student answers
Integrating iClicker Cloud with your Canvas Course
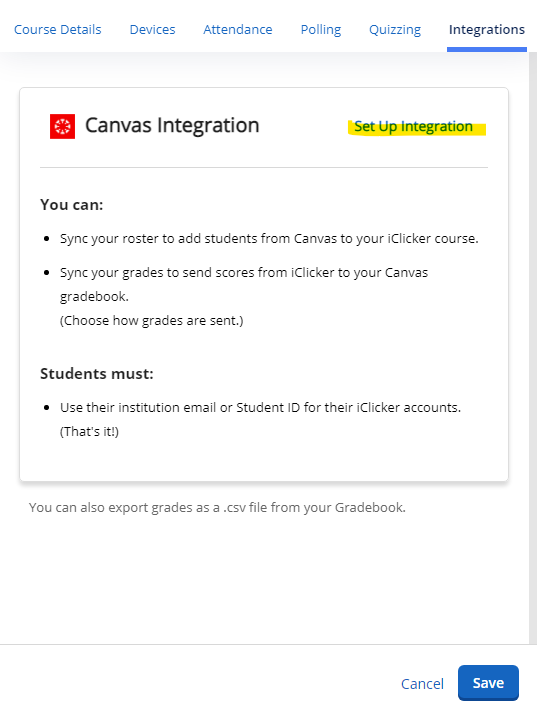
In the “Integrations” tab of the settings, select “Set Up Integration”
2. A window will pop up that says “Setting up this integration requires the web application”. Click “Save and Continue” and a window will pop up leading you to the web application.
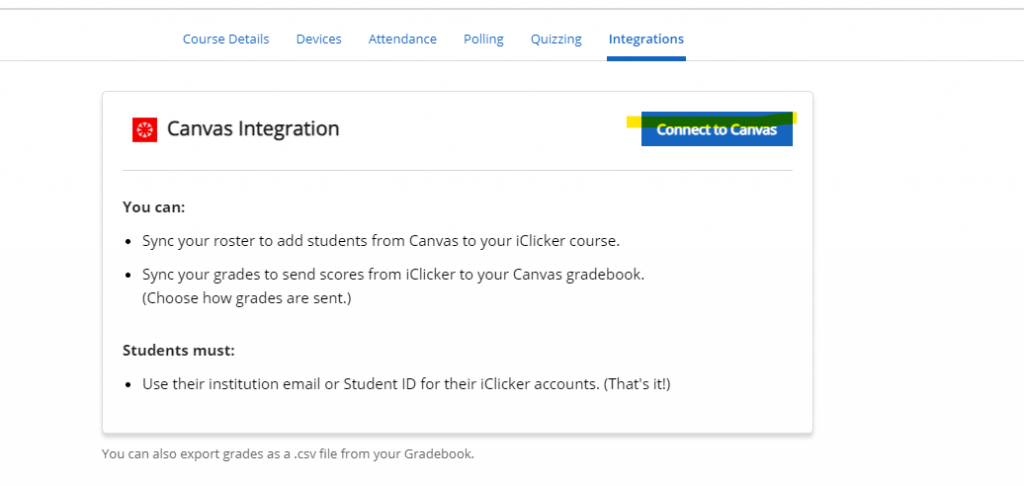
3. In this new window, select “Connect to Canvas” and then click “Go to Canvas”. If prompted, please log into Canvas with your UBC CWL.
4. iClicker will request Authorization. Select “Authorize” to proceed connecting iClicker with Canvas.
5. You will be brought back to the iClicker Cloud web page where you will see a list of the Canvas courses that you teach. Select the course that you wish to sync with iClicker and click Next.
*Note: By default, you will be shown a list of your published courses that you are teaching. If your course is currently unpublished, toggle the button on the top right side of the “Select Your Canvas Course” window to “Unpublished” and select the course you wish to sync with iClicker.
6. If your course has multiple sections, select the section you wish to add to your class and click “Connect”
7. Select “Sync Roster Now” and the Canvas integration is complete!
Get your students access to your course
Prior to your first iClicker class, we suggest sending an announcement to students to get them to sign up for your class. Here is an example:
Welcome to COMM 123 sec 234. Tomorrow we will be using iClicker in class. If you do not have an iClicker student account. please follow the instructions on the iClicker Student Guide. Once you have an account, you must access the course by going into the Canvas course and clicking ‘iClicker Cloud’ in the left hand navigation. You must access the iClicker course through the ‘iClicker Cloud’ link at least once for your points to be captured. Then add the iClicker course to your account. This course is called COMM 123 sec 234. Please make sure you join the correct section so your grades will be captured.
Suggested Settings
Within settings, under polling, instructors can set scoring for the course and what to share with students. These are suggested settings.
Send a picture of my screen to student devices: Do not send a picture of my screen
Send class results to student devices: Do not send results
Participation: Instructors can select an amount of points to give students if they answer a certain percentage of questions. These points will be added on to the session performance points.
Session Performance: Instructors can select an amount of points for correct response and for just responding. Usually instructors will chose 1 point but it is up to each instructor.
Grades
You can choose to sync your iClicker grades with your Canvas Gradebook.
Log into iClicker Cloud and select your course
Select Gradebook on the left hand navigation
Select Sync Grades Button on the top right
Select the Sesssions that you want to move from iClicker to Canvas. ‘Sessions’ correspond to each of your classes.
Click ‘Sync’
If you run into an error:
-Ensure you have set up your Integration to Canvas via the settings area in iClicker.
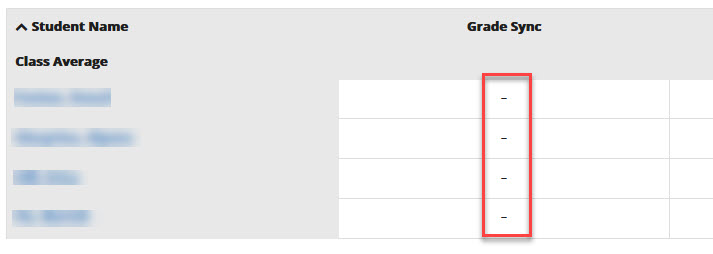
-Have your students sync’d their accounts? If you are in your grades area in iClicker cloud and you do not see any green dots under Grade Sync column, that means that no students have sync’d their iClicker account with you specific course. Every student needs to go into your Canvas course and click on the iClicker Sync button once to enable this and get their grades.
FAQ’s
Why are some students grades not syncing from iClicker to Canvas?
If student have not accessed an iClicker course from your Canvas course at least once, the grades will not sync properly. Please relay the information below to students. it is also available in the UBC iClicker Student Guide.
Once an iClicker account has been set up, log in to the Canvas course and click iClicker Cloud in the Course Navigation.
If students don’t see the iClicker Cloud option in their Course Navigation, contact the instructor. iClicker Cloud needs to be enabled in the Canvas course by the instructor for students to see it.
Students must add each course that uses iClicker through the iClicker Cloud link in Canvas or else they will not receive grades for iClicker activities in the course. Students should not try to add courses in iClicker Reef directly, unless your instructor specifically tells you to.
Once the course has been added, students can participate directly through your web browser for the course activities by logging in at app.reef-education.com.
What should I do if I have multiple sections merged on Canvas?
Create a separate iClicker Cloud course for each section. Make sure you’re in the right one before starting a class activity!
Note that course sections in iClicker will all have separate columns in your Canvas Gradebook. For example, you are not able to automatically combine all ‘session 1’ marks for your section 101, 102 and 103 iclicker courses into one column in Canvas gradebook. If you want help organizing the iclicker grades, please contact Learning Services at Help@sauder.ubc.ca
I got an error message using iClicker Cloud and a MAC, what can I do?
If the fatal error message appears and you are unable to quit, use force quit to close the application. The hotkey for force quit is Command+Option+Escape. Another option to force quit is to use your Activity Monitor. You can open your Activity Monitor by opening Spotlight Search (Command+Space), then type ‘Activity Monitor”
If force quitting the application does not fix the fatal error, you can try deleting and re-downloading the application.
How can I remove sessions and/or attendance from iClicker?
Log into the iClickerCloud website.
Select the course you are interested in.
Navigate to the Class History tab.
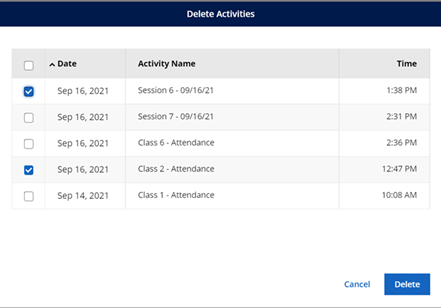
In the top right corner, select Delete.
Check off the attendance and/or session dates you’d like to remove. Confirm that you’d like to delete the data.
Attendance and sessions are counted separately. If you remove the attendance for a class, it will not remove the poll results for that class, and vice versa.
If you have already synced grades, clicking “Sync Grades” again will not remove the grades for the deleted sessions from Canvas. You will have to remove them manually.
There is no way to retrieve deleted attendance/sessions.
Instructional Video
Video instruction on how to set up iClicker Cloud Course
Turnitin has a suite of internal tools that includes:
OriginalityCheck: helps instructors check students’ work for improper citation or potential plagiarism by comparing it against Turnitin’s content databases which contain the current and archived web, student submitted papers, and content from Turnitin’s partnerships with leading publishers (including library databases, textbook publishers, digital reference collections, subscription-based publications, homework helper sites, and books).
PeerMark: allows for an online peer review environment for students to evaluate each other’s work.
GradeMark: provides a paperless, browser-based grading environment for instructors (and teaching assistants). The tool allows instructors to create custom rubrics and QuickMark (reusable comments).
User Guides & Links
Information for Instructors
If you have never used Turnitin as an instructor please request an account by emailing help@sauder.ubc.ca.
Create a class (If you have a TA who needs access to your Tii account or you have multiple sections of the same course and want to keep them separate you will need to set up a master class and then create sections.)
If your students will be submitting papers directly to Turnitin, when you create the class/sections, make a note of the:
Class ID
Enrollment key – these need to be passed on to students so they can enroll in the class (see student enrollment)
For Zip files generated from your online exams, you can refer to this guide, How to upload ZIP files in Turnitin, to see the more specific step-by-step instruction.
Please note: Information submitted to Turnitin is stored in the United States. Therefore your students should be advised to remove identifying information, such as their name and student number, from the text of any assignment submitted to Turnitin. They can also choose to use a pseudonym and/or anonymous email address to set up their accounts.
If you encounter any issues with Turnitin, please email help@sauder.ubc.ca.
Information for Students
Below is an example of how you can introduce Turnitin to students – to see how this information could be presented in Canvas see Turnitin – information for students.
COMM XXX written assignments are to be submitted using Turnitin, a web service that checks for content originality.
If you already have a Turnitin account, you will need to enroll in a class.
To set up your Turnitin user profile or enroll in a new class you will need the COMM XXX Class ID and Password (“enrollment key”):
Class ID: XXX Password: XXX
Important Privacy Information: Information submitted to Turnitin is stored in the United States. If you don’t want your personal data to be stored in the US, please remove identifying information, such as your name and student number, from the text of any assignment submitted to Turnitin. You can use an alias or pseudonym but please remember to let your instructor know your alias.
A synopsis of what this technology does and what it is typically used for.
Lorem Ipsum dolar sit amet, in nisi neque, aliquet vel, dapibus id, mattis vel, nisi. Sed pretium, ligula sollicitudin laoreet viverra, tortor libero sodales leo, eget blandit nunc tortor eu nibh. Nullam mollis. Ut justo. Suspendisse potenti. etc.
Lorem ipsum dolor sit amet, consectetuer adipiscing elit. Phasellus hendrerit. Pellentesque aliquet nibh nec urna. In nisi neque, aliquet vel, dapibus id, mattis vel, nisi. Sed pretium, ligula sollicitudin laoreet viverra, tortor libero sodales leo, eget blandit nunc tortor eu nibh. Nullam mollis. Ut justo. Suspendisse potenti. Lorem ipsum dolor sit amet, consectetuer adipiscing elit. Phasellus hendrerit. Pellentesque aliquet nibh nec urna. In nisi neque, aliquet vel, dapibus id, mattis vel, nisi. Sed pretium, ligula sollicitudin laoreet viverra, tortor libero sodales leo, eget blandit nunc tortor eu nibh. Nullam mollis. Ut justo. Suspendisse potenti. etc.
A rubric is a tool to aid in marking by setting clear expectations in advance of receiving the work from students. Rubrics go beyond a marking guide by not just listing criteria to be judged, but also by providing clear examples of what each level of achievement looks like.
What is a rubric?
Put simply, a rubric is a tool that helps save time during marking and helps provide effective feedback to students. Rubrics are written alongside the assignment and lay out the criteria on which students will be assessed, and what each level of achievement looks like.
A rubric can be holistic or analytic depending on what is needed. Holistic rubrics consider the student work as a whole, while an analytic rubric breaks the marking down into independently assessed components.
A rubric helps ground the marking process in clear expectations for each aspect of the assignment. This requires an up-front time commitment in describing aspects, what success looks like for each aspect, and what score or marks will be attributed.
Remember! Rubrics should be written to speak to the student, rather than the instructor. (Though they are helpful for instructors!)
This up-front commitment pays off during the actual marking as the basic judgments have already been made. If TAs or Markers are assessing students’ work, or instructors are team-marking an assignment with colleagues, rubrics can help get everyone using the same language and standards on an assignment.
Rubrics can be a powerful part of the student learning process by creating a shared knowledge of expectations. When a student sees the rubric for an assignment, they can see precisely what dimensions require improvement, and what such improvement would look like. When used as part of formative assessments, this shows students paths to learning and success.
Creating Rubrics
Canvas supports adding rubrics to your assignments. Mark using a rubric, and the total can push automatically to the gradebook as the assignment score. Students can see feedback that is listed in the rubric; this can help cut down on time spent on marking.
Alternatively, rubrics can be made in a word processing or spreadsheet program, printed out, and written on freehand. This technique is used by some instructors for live presentations so that there are no device distractions.
Get Support
Learning Services is pleased to offer dedicated support for rubrics as part of the assessment and course design process.
Hide your grades for entire grade centre (Do this prior to entering any grades)
If you do not want the grades you enter to be immediately visible to students, we recommend changing your course’s grade posting policy to Manually Post Grades. You can change the grade posting policy for your course by following these steps:
In Course Navigation, click the Grades link.
Click the Settings (gear) icon.
Click the Grade Posting Policy tab.
Choose a grade posting policy for your course (Manually Post Grades or Automatically Post Grades).
To apply your changes, click the Update button.
* Note that once you changed the Grade Posting Policy this way, all of the columns in your gradebook will switch to Manually Post Grades. If you have quizzes in which you want students to be able to see their responses or correct answers right after each attempt, then you will need to remain the Grade Posting Policy automatically for those assignments. You can do so by clicking on the three dots next to the column name.
Marking Assignments Using Rubrics
Student will have the opportunity to see the rubric marks in their grades page for the assignment. They can see this by clicking the “View Rubric” button for the assignment on the Grades page..
Marking assignments using Rubrics must be done in SpeedGrader.
To do so, open SpeedGrader for the relevant assignment and you will see a “View Rubric” button.
The rubric will open in the grading pane, however, most often the rubric will not fit in the space provided.
Tip: You can drag the divider (highlighted in green below) between the submission and the grading pane to fit.
To mark, click in appropriate box. If you wish, you can leave a criteria-specific comment by clicking the speech box icon (circled in purple below).
Remember: You must click the “Save” button below the rubric to save the rubric marks. If you mark the rubric, then click “Submit” the rubric marks will be lost.
Reusing Comments in Rubrics
If you are using a free-form rubric, you can save comments for re-use on other students assignments. This can come in handy if you will be providing similar feedback over and over.
When marking the first student, type in your comments and scores. For any comments you believe you will reuse, check the box for “Save this comment for reuse.”
Note: Saved comments cannot be altered or deleted from the drop-down menu. Remember: you will still need to enter the numerical score for each criteria.
Before marking with TAs it is worth taking a few minutes to explicitly state the aims of the assignment and the importance of the TAs role in the process.
Consider! Is what you are asking appropriate for an undergraduate student to mark?
Multiple choice, or basic quantitative problem sets are appropriate.
Essay questions and case analyses, generally are not appropriate for TAs to mark.
It is critical to communicate and calibrate expectations if a TA is marking an assignment.
One way to calibrate is to mark the same assignments together on a video call. (Zoom or otherwise.)
There are two ways to proceed: You can pick random assignments, or vetted to provide the TA with an example of a range of work (i.e., an exceptional piece, an acceptable piece, and an unacceptable piece.)
Another method is to provide marking guidelines and a sample assignment ask the TA(s) to mark a few assignments and submit them for review, then have a discussion.
If you have multiple TAs marking, the discussion is best had over zoom or a conference call to ensure that all of the TAs are aligned.
Using rubrics can help keep TAs on track marking with little deviation. In these cases, providing detail in each square is helpful.
Another strategy is to utilize a canvas feature called Moderated Grading. This allows marks to be entered into SpeedGrader, then be reviewed by a moderator, generally the instructor. More information is available in 9.1.5 Moderated Grading.
Tip: If you don’t want to provide this level of detail to students, give your TA a “marking copy” to work from that contains the details.
Anonymous Grading
Overview
Anonymous grading is a feature that, when enabled, removes any information from Canvas Assignment submissions that could identify a student. This can help mitigate bias while TAs and/or instructors are grading. Anonymous grading also hides the name of the marker from student view, so students don’t know if the marker is a TA or an instructor.
When anonymous grading is enabled in a course, content creators can create assignments with the option to hide student names from graders.
Be Aware! Anonymous Grading removes identifiable information from the gradebook and Speedgrader, but not from the assignment itself. If a student includes their name in the assignment then anonymous grading will not help.
Anonymous Grading can be enabled two ways: in the SpeedGrader (see “A” below) and at assignment creation (see “B“).
A. Enabling Anonymous Grading in SpeedGrader
To enable anonymous grading:
Open SpeedGrader from the assignment you would like to grade anonymously
2. Click the gear icon near the top left of the browser and choose “Options”.
3. From the pop-up, check the box “Hide student names in the SpeedGrader” and click “Save Settings”.
Note: This setting will turn on anonymous grading for all assignments even after leaving SpeedGrader. To turn it off, uncheck the box and save the settings.
You can check to see that the student names are hidden by clicking the student drop-down menu. You will see the names of students are now listed as Student 1, Student 2, etc.
When you are ready to post grades to students, skip to section B, step 7 below
B. Enabling Anonymous Grading at Assignment Creation
1.Click on “Settings” from your course navigation.
2. Select the “Feature Options” tab.
3. Turn on the “Anonymous Grading” option. Clicking the switch automatically saves your selection.
4. Turning this option will show a new “Anonymous Grading” option when creating an assignment.
5.When viewing the anonymous grading assignment in the GradeBook, the column is blanked out.
6. If the grader tries to open an individual student’s assignment in SpeedGrader, a warning appears telling the grader that they cannot access a specific student. Opening SpeedGrader from this warning will take the grader to SpeedGrader with an anonymous view. This feature cannot be turned off in the options and is only on for the specific assignment.
7. Once assignments have been graded, and you are ready to view an individual student’s grade for the assignment, you can click on the three-dot icon next to the name of the assignment and click “Post Grades”.
8. A message will alert you that anonymity will be removed. Click “Post” to post grades and remove anonymity.
Moderated grading is a feature where assignment grades are entered, but then reviewed by a moderator (generally the instructor) before being released to students.
This can be useful in courses with multiple instructors or in courses where marking is performed by a TA or TAs.
Once the assignment is created, only the moderator and admins will be able to change the assigned final grader. For each moderated assignment, the user set as the moderator is the only person who can specify the final grade for each assignment.
Note: the moderator does not have to personally grade the assignment.
Enabling Moderated Grading
In course navigation, click the Settings link.
Click “Feature Options,” then Toggle the “Moderated Grading” option on.
Create a new assignment or go on an existing assignment.
Moderated Options
When moderated grading is enabled in a course, content creators can create assignments with moderated options:
Number of Graders—the number of graders who should grade the submission (e.g., entering 2 in this box will prompt 2 graders to mark each assignment). This number does not have a limit. However, the page displays a message if there are not enough course users with grading permissions to fulfill the desired number of graders.
A moderator does not have to specify which graders can grade submissions. If a course includes a surplus of graders higher than the desired number of graders, any grader can assess an assignment submission until the specified number of grades has been achieved. When an assignment has reached the specified number of graders, remaining graders will not be able to access the assignment.
The moderator is never included in the number of available graders since the moderator does not traditionally grade individual submissions but may provide a custom grade.
Grader comment visibility—the option that allows graders to view each other’s comments. This option is selected by default.
Final grader—the moderator, or the grader who determines the final grade. The Select Grader menu displays the names of course graders who have been given permission to determine the final grade. This permission is assigned to one or more roles at the account level.
Moderated assignments cannot be edited by any grader except the moderator. Any edits made to the assignment will be tracked.
Note: Moderated grading cannot be enabled when peer review is turned on.
Be Aware: Moderated grading is not available for group assignments.
Q. Is the moderator restricted to selecting a final grade from those given by the graders of the submission?
A. No. In the final grade column, the moderator can select a grade from the menu from any grader or open the menu and type their own grade for the final grade.
The Final Grade Override allows you to enter a final grade for students that is different from the grade automatically calculated by Canvas in the Gradebook. You can enter a letter grade or a percentage. (A letter grade results in the lower bound of the grading scheme; a percentage is retained as the override score.)
Students can view the overridden grade in their Grades page. However, students will not know the score has been overridden.
Notes:
The override column is included in Gradebook exports and can be changed with a Gradebook import.
Final grade override actions are not recorded in the Grading History page, which only records changes for individual assignments.
Steps:
In Course Navigation, click the Grades link then click the Settings icon (on the left).
In the new window that opens, click the Advanced tab [2] and then click the Allow final grade override checkbox [3]. Click the Update button at the bottom [4].
The override column displays at the far right of the Gradebook. Locate the student whose grade you want to override and enter a percentage or a letter grade in the Override column.To delete an overridden grade, click the grade cell and click the Delete key.
You can use a CSV file to upload changes to the Gradebook. You can upload information for existing assignments, or you can also use a CSV file to create new assignments in the Gradebook. New assignments will automatically be published in your course. If you do not know how to save a file in a CSV format, please check the documentation for the program you are using to create your Gradebook changes (e.g., Excel).
If you don’t want to create a new CSV file, you can always download the CSV from Canvas, change it, and re-upload the same file and the changes you made will appear in Canvas once you re-upload the CSV file.
If you create a column for a new assignment, Canvas will ask how you want to import the assignment. New assignments upload with the following settings:
Assignment Group: Assignments
Submission Type: No submission
Due date for: Everyone
Required columns and order
Student Name
Student ID
SIS User ID (only required if you use SIS)
SIS Login ID (only required if you use SIS)
Section
Assignment (this can be for an existing assignment or a new assignment; retain IDs for existing assignments)
More information on how to import grades into the Gradebook is available here:
Providing effective and rapid feedback is imperative to student success. This section outlines best practices for communicating constructive feedback to students.
Why provide feedback?
Facilitating detailed and timely feedback can help students get more out of their learning.
Be specific so students know what actions to take moving forward.
Be prompt so that the content is still relatively fresh and relevant in their minds.
Be sensitive, and focus on how students can improve rather than just listing what they did wrong.
Formative
One approach to feedback is using formative assessments — smaller but more frequent activities throughout the course.
Design lower-stakes opportunities for students to demonstrate knowledge. The more data points generated, the more guidance instructors can provide.
Summative
Summative assessments can be useful in evaluating each student’s overall progress. When creating exams or final projects, ensure that they align with course objectives and content.
Canvas
Feedback can be delivered through Canvas in many ways.
SpeedGrader allows instructors to view and grade assignment submissions in one place. It makes evaluating assignments quick and easy. NOTE: multiple people should not grade assignments at the same time, because SpeedGrader does not automatically update with the latest information for each submission.
The Canvas Gradebook is a page that allows instructors to see all students, assignments, and grades in one place. Instructors can access it by clicking on “Grades” in the left-hand course navigation menu. It has three additional viewing modes, which can be changed by clicking on the currently selected mode and choosing a different one from the drop-down list. Not all settings are available in each mode. The modes are:
“Gradebook” – the main viewing page
“Learning Mastery” – assessment based on Outcomes
“Individual View” – assessment of individual students on separate assignments
“Gradebook History” – a log of grade changes
The rest of this section is focused on the “Gradebook” mode.
Columns
Each column corresponds to an assignment or quiz in the Canvas course.
The order of these columns corresponds to the order seen in “Assignments”.
Search / Filter
Use the search bar to search for specific students.
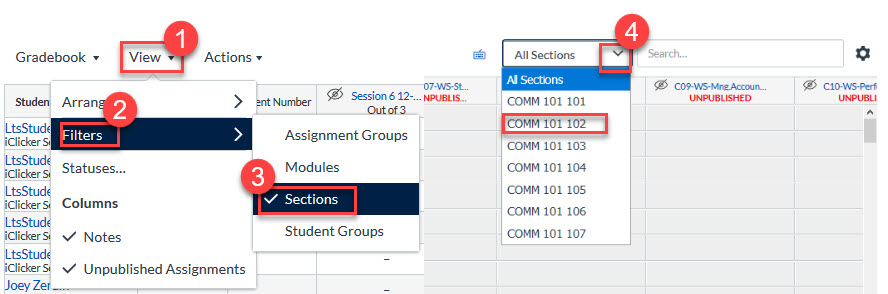
To filter students by section, select View –> Filters.
Grade Directly
Click into a student’s cell to input a grade directly.
Click the arrow to expand more options, including (1) the ability to leave comments, (2) mark an assignment as “Excused”, and (3) launch SpeedGrader.
Manual Grade Posting Policy
By default, instructors are encouraged to to use the “Manual” grade posting policy.
This means that any marks / comments input will not be visible to students UNTIL instructors select “Post Grades” in the column.
To set this policy for the entire course, click the Settings cog —> Grade Posting Policy.
To toggle this policy for specific assignments, hover over the column header and click the 3 dots —> Grade Posting Policy.
Import and Export Grades
If needed, grades can be exported into a CSV.
Bulk changes can be made in the spreadsheet and re-imported back into Canvas.
Use case — making a new column to provide students with a scaled midterm / final score, without needing to release the raw marks.
Posting Final Grades
Final grades must be uploaded to the Faculty Service Centre in order to be deemed official.
Grading Best Practices
If a student has been excused from an assignment and approved by the program office
Best practice in this case is to mark the student assignment as ‘excused’ in the Canvas Gradebook. Canvas will average the student’s other grades and not include the excused graded activity.