Tag Archives: app

Haiku Deck

D


“The Wanderer’s Eye Photography”

whatisit.png

Haiku Deck is a presentation tool that simplifies the task of preparing a slideshow. It comes in two flavors: mobile app and web version, both of which create slideshows that can be viewed instantly on screen, or shared with a link. Like most presentation creators out there, it allows the user to add text, images, graphs, and public or private annotations. Here’s a comparison of the free and paid versions

[column size=3]

Free version:

  • Limited to 3 decks
  • Decks must be public
  • Themes
  • Uploading own images

[/column][column size=3]

Paid version:

  • Unlimited decks
  • Downloadable decks
  • Video
  • Private Decks

[/column]


Why-is-it-relevant-360x82.png

The great thing about Haiku Deck is its simplicity and how intuitive it is. Users can just click on anything to figure out what to add to the slideshow. Furthermore, with its embedded image search capability (Haiku Deck even suggests a few keywords pulled from your text to use!), users can easily add Creative Commons licensed images into the presentation, without having to worry about copyright issues. The attribution is added to the presentation automatically. Graphs can also be created in-app with all the necessary labels and values. In summary, it allows the presenter to focus on creating the content, rather than spending valuable time with preparing visuals.


how-to-get-started-360x80.png

Check out this example made with the web version, then watch the video below for a walk through:

Haiku deck – Created with Haiku Deck, presentation software that inspires


videopng-360x61.png

Leave a Comment

Filed under Not Subject Specific, Resources

VideoScribe

children-593313_1920

whatisit.png

VideoScribe is proprietary software (*FREE for UBC students and staff via Canvas) available for OSX, Windows, and IOs users for quickly producing high quality engaging videos, no experience or skill required. It comes with a large library of images, and adding and customizing your own content is easy and intuitive. Drop in audio, images, and video and customize their look and feel in addition to their display and animation time with the simple and powerful editor. What’s more, the app will automatically animate images and text you add to your project. When a project is complete it can be published to YouTube or Facebook, exported to PowerPoint, or saved locally.

Features

  • Royalty-free images
  • Automatic image and text animation
  • Download to multiple computers with a single license
  • Works offline
  • Save your Scribes in MOV, WMV, or AVI format
  • *At time of writing (Summer 2017), UBC licensing allows for a one year download that can be renewed by current staff, faculty and students. Update & Download instructions TBA (Sept 2022)

Why-is-it-relevant-360x82.png

Creating engaging content is an important part of presentation. As a digital technology for multimedia creation VideoScribe cuts down on production time and has the potential to significantly increase video quality, requiring little expertise on the part of its users.

This resource is great to use in a second language classroom such as French Immersion, Core French, etc.  It allows for students to creatively engage in language learning.

A students’ perspective including some tips and an example video are available on this blog post on the LT Hub. (Note: download instructions are dated and no longer apply)


how-to-get-started-360x80.png

VideoScribe is proprietary software. You will first need to download a free trial OR if you are a UBC student, staff or faculty member, you can download it via Canvas (or via the Teacher & Learning tab on the LT Hub)

    1. Log in to Canvas
    2. Navigate to the “Help” tab in the left hand navigation menu (question mark icon)
    3. Select “Software Distribution”
    4. Select “VideoScribe”
    5. Select “Contact the LT Hub” – at this point, UBC Learning Technologies Hub will verify your eligibility and provide support for you to access and download a license.


videopng-360x61.png

Check out this video tutorial that will guide you through creating with VideoScribe:

An example of a what you can do with VideoScribe:

A short animation created in about 10 minutes

Leave a Comment

Filed under Not Subject Specific, Resources

Assistive Technologies in the classroom

Assistive technologies (AT)  refers to various technologies that teachers can use or make available to students to support equity in the classroom.  Integrating assistive technologies following Universal Design for Learning (UDL) principles can help all students find  success as they share in an equitable and meaningful educational experience. In particulary, these digital technologies support students with exceptionalities and particular learning needs. They may be a part of an individualized learning plan and, in some cases for students with specific identified needs, may be provided through integration support teachers. Visit SET BC  to learn more about this valuable program and partnership to support BC students in both independent and public schools. Their blog has many excellent examples of digital technology integration in action.

As an educator, you may find it difficult to make a choice between helping the majority or spending your time assisting one student. By effectively integrating assistive technologies into your lessons, varied learners in your class will be given the opportunity to participate. For example, by using a multi-modal assistive technology such as ShowMe, students can choose different ways to express their ideas whether through drawing, writing, video or audio clips thus enabling them to communicate with each other and you (the teacher) in his/her preferred way. Click here to see an example of a second grade English as an Additional Language (EAL) learner “showing” her learning through drawing, writing and narration.

CC Brad Flickinger


Although there are many ways to classify these technologies, we’ve divided them into five categories (click on each category to further explore different technologies for various types of support):

• Assistive Technologies for Reading
• Assistive Technologies for Vision Support
• Assistive Technologies for Writing
• Assistive Technologies for Communicating
• Assistive Technologies for Studying

Take some time to review the various digital technologies in each category and try some out as you consider the possibilities of integrating them into your own teaching context.

PS. if you have any recommendations on a specific technology that you have used/heard of, or if there are some technologies that you wish to explore and share with us, please feel free to let us leave us a comment to this post OR email us at etsproject.educ@ubc.ca!

1 Comment

Filed under Assistive Technology, Blog Posts, Not Subject Specific

Plickers – Student Response System

whatisit.png

 ‘Plickers’ is a free Student Response or All-Class Response System (SRS), useful for those without access to one-to-one devices in the classroom. All you need are some downloadable and printable class cards, the Plickers app, and one handheld device. The students hold their cards up based on their answer (A, B, C, D), the teacher scans the cards from anywhere in the classroom using a smartphone, tablet or iPad, and the responses are automatically entered.

You and the class can view a graph of responses if you connect your computer to a projector (without your students seeing who provided which individual response). Teachers can ask multiple choice questions or yes/no questions and can save the results of each quiz or poll in their teacher account.

NEW: Plickers now has hybrid and online mode for using plickers face to face, online (or in both modes at once!). The Plickers question editor allows you to include advanced mathematical and scientific equations. In addition, the ability to include images, Gifs, sound and other multimodal features might add a more gameified feel!


Why-is-it-relevant-360x82.png

Regular check-ins with your students during instruction aids formative assessment and future planning. Teachers often use thumbs up/down or hands up or fingers to try to gauge understanding or interest but these ‘systems’ can be difficult if not impossible to track. Plickers allows you to save the individual student responses (and you don’t need to ‘give away’ any of your students’ information to do so).

Plickers can even be used in the gym or outdoors (be sure to download the large sized cards if using in large spaces). This youtube video shares how one teacher uses a ‘magnet version of Plickers’ called ‘Plagnets’ in a PHE class.

Many teachers lack access to individual devices needed to use other student response systems (iClickers, Socrative, Menti, Kahoot and others). With Plickers, all you need is an app, one device and printable cards for your students. Some excellent features include (excerpts below from Plickers.com):

1. Scoresheet: “review your students’ results over multiple questions. Use it to spot learning trends with students, identify questions to review from a unit, or even get grading done faster.”

2. Individual Student Reports: On the left panel of Scoresheet, you can print individual student reports or save them as a PDF. The first sheet provides an overall class average and lists the 3 most commonly missed questions for you to save for your records, while the remaining pages contain individual student reports including the question and answer choice selected.
This resource can be used in a second language classroom such as French Immersion, Core French, etc.

More information about features is available   on the Zendesk on the Plickers website.


how-to-get-started-360x80.png

Go to Plickers.com and set up a free teacher account. When you select ‘classes’, you will be prompted to enter student names or aliases which will automatically be assigned to a plicker card number. If you teach multiple classes, you can simply create a new class and add the new students and there’s no need to have a separate set of plickers cards since the app easily lets you toggle between your classes.
Now all you need to do is think of some excellent questions – remember, the questions you ask can make or break an assessment opportunity. Think carefully about your questions. I’d also suggest having a few ‘generic’ questions (i.e. temperature checks, checks for understanding) that you can use at any time regardless of subject or content.
Plickers Quick Start Instructions



videopng-360x61.png

Leave a Comment

Filed under Not Subject Specific, Physical and Health Education, Resources

Hudl: Improving Athlete Performance Through Video Annotation

stockvault-american-football115895

whatisit.png

Hudl is a video annotation software that allows coaches and athletes to review their performance after matches and/or training sessions. After uploading video from either a dedicated video camera or a mobile device, tags can be added to individual players and passes to generate stats. If filming on a mobile app, tags can be added on the go by an assistant. Highlights from the game can be showcased and annotated with drawing tools and diagrams to be used as feedback for the players.


Why-is-it-relevant-360x82.png

Hudl can improve gameplay and tactics when used to show exactly what coaches expect and athletes have been doing. Game stats can also help think about strategy, strengths and weaknesses in teams. Video footage also allow athletes to study their movements precisely, especially if seen in slow motion. This is then a great tool for Physical Education teachers, allowing students to review their movements and learn step by step. Also, all the footage/stats can be used in portfolios for students or athletes.


how-to-get-started-360x80.png

Please refer to video below for an overview of the software and learn how to get started.


videopng-360x61.png

Leave a Comment

Filed under Physical and Health Education, Resources, Video & Video Tutorials

Google Forms

Screen-Shot-2016-07-13-at-2.48.24-PM

whatisit.png

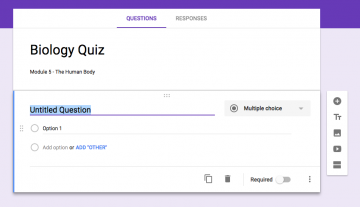
Google Forms is a free and easy way to collect information from students online. Google forms allows its users to create free-answer, multiple choice, free answer, date/time, and linear scale questions and send them to other users (or students) via email. Images and videos can be attached to question and forms can be divided into sections for ease of use. Responses are all recorded and can be exported into Google Sheets spreadsheets for analysis with a single click.


Why-is-it-relevant-360x82.png

Google Forms could be particularly useful for collecting homework assignments, surveys, feedback, and contact information from students when interned access is a non-issue. They are highly modifiable and can be answered in the recipient’s mailbox or online.


how-to-get-started-360x80.png

Check out the Google Forms Getting Started Guide for more information.


videopng-360x61.png

Leave a Comment

Filed under Not Subject Specific, Resources

Live Binders – resource sharing

Digital devices connected to the virtual cloud

whatisit.png

Live binders is a platform developed to support curation of resources. Using ‘binders’, teachers can virtually create and share their own resource repositories, texts and lessons/units. You can visit ‘Livebinders’ – scan them or create your own binder of resources that you can share with others.


Why-is-it-relevant-360x82.png

LiveBinders allow teachers to create an online collection—paperless, aka go green!—of teaching materials, whether these are websites, presentations, multimedia, Google Docs, you name it! These can then be accessed from any browser and updated on the go. There are many other potential applications, such as classroom material for a substitute teacher, notes and resources for parents, student projects, portfolios, the list goes on.

how-to-get-started-360x80.png

Visit http://www.livebinders.com/ and browse through the online collection for some inspiration. Then create an account, a new binder, and start inputting your own resources. These can then be used privately or shared with the world.


videopng-360x61.png

Leave a Comment

Filed under Not Subject Specific, Resources