Tag Archives: survey

Plickers – Student Response System

whatisit.png

 ‘Plickers’ is a free Student Response or All-Class Response System (SRS), useful for those without access to one-to-one devices in the classroom. All you need are some downloadable and printable class cards, the Plickers app, and one handheld device. The students hold their cards up based on their answer (A, B, C, D), the teacher scans the cards from anywhere in the classroom using a smartphone, tablet or iPad, and the responses are automatically entered.

You and the class can view a graph of responses if you connect your computer to a projector (without your students seeing who provided which individual response). Teachers can ask multiple choice questions or yes/no questions and can save the results of each quiz or poll in their teacher account.

NEW: Plickers now has hybrid and online mode for using plickers face to face, online (or in both modes at once!). The Plickers question editor allows you to include advanced mathematical and scientific equations. In addition, the ability to include images, Gifs, sound and other multimodal features might add a more gameified feel!


Why-is-it-relevant-360x82.png

Regular check-ins with your students during instruction aids formative assessment and future planning. Teachers often use thumbs up/down or hands up or fingers to try to gauge understanding or interest but these ‘systems’ can be difficult if not impossible to track. Plickers allows you to save the individual student responses (and you don’t need to ‘give away’ any of your students’ information to do so).

Plickers can even be used in the gym or outdoors (be sure to download the large sized cards if using in large spaces). This youtube video shares how one teacher uses a ‘magnet version of Plickers’ called ‘Plagnets’ in a PHE class.

Many teachers lack access to individual devices needed to use other student response systems (iClickers, Socrative, Menti, Kahoot and others). With Plickers, all you need is an app, one device and printable cards for your students. Some excellent features include (excerpts below from Plickers.com):

1. Scoresheet: “review your students’ results over multiple questions. Use it to spot learning trends with students, identify questions to review from a unit, or even get grading done faster.”

2. Individual Student Reports: On the left panel of Scoresheet, you can print individual student reports or save them as a PDF. The first sheet provides an overall class average and lists the 3 most commonly missed questions for you to save for your records, while the remaining pages contain individual student reports including the question and answer choice selected.
This resource can be used in a second language classroom such as French Immersion, Core French, etc.

More information about features is available   on the Zendesk on the Plickers website.


how-to-get-started-360x80.png

Go to Plickers.com and set up a free teacher account. When you select ‘classes’, you will be prompted to enter student names or aliases which will automatically be assigned to a plicker card number. If you teach multiple classes, you can simply create a new class and add the new students and there’s no need to have a separate set of plickers cards since the app easily lets you toggle between your classes.
Now all you need to do is think of some excellent questions – remember, the questions you ask can make or break an assessment opportunity. Think carefully about your questions. I’d also suggest having a few ‘generic’ questions (i.e. temperature checks, checks for understanding) that you can use at any time regardless of subject or content.
Plickers Quick Start Instructions


videopng-360x61.png

Leave a Comment

Filed under Not Subject Specific, Physical and Health Education, Resources

Google Forms

Screen-Shot-2016-07-13-at-2.48.24-PM

whatisit.png

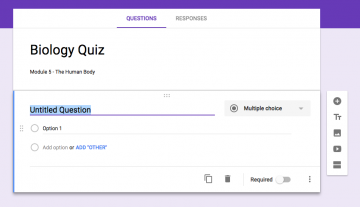
Google Forms is a free and easy way to collect information from students online. Google forms allows its users to create free-answer, multiple choice, free answer, date/time, and linear scale questions and send them to other users (or students) via email. Images and videos can be attached to question and forms can be divided into sections for ease of use. Responses are all recorded and can be exported into Google Sheets spreadsheets for analysis with a single click.


Why-is-it-relevant-360x82.png

Google Forms could be particularly useful for collecting homework assignments, surveys, feedback, and contact information from students when interned access is a non-issue. They are highly modifiable and can be answered in the recipient’s mailbox or online.


how-to-get-started-360x80.png

Check out the Google Forms Getting Started Guide for more information.


videopng-360x61.png

Leave a Comment

Filed under Not Subject Specific, Resources

Kahoot! : Free Tool for Creating Learning Games !

whatisit.png

Kahoot! is a platform for teachers to create fun, engaging learning games with little technological knowledge/skill needed.

In Kahoot, you can create a series of questions combining with images, videos, diagrams, etc. The number and type of questions fully depend on your needs, and your students can get access to your learning game by simply go to kahoot.it and input a 4-digit number comes with your game.

There are four different types of Kahoots you can create, include:

  1. Quiz: you can use quiz Kahoots to introduce a topic, review what you’ve been teaching in a class, or use the quiz results to offer rewards to some of your students.
  2. Jumble: it’s a type of brand new game that allows students to rearrange the sentences, sorting algebraic equations, or putting historic events in order, etc. To learn more about Jumble Kahoot, click here for more information.
  3. Discussion: you can create Discussion Kahoots to initiate and facilitate a debate
  4. Survey: use this kind of Kahoot to gather opinions, insights or students’ feedback on a specific subject, a special event, workshop, or a class.

Why-is-it-relevant-360x82.png

Teachers need different forms of assessing their student learning and Kahoot! offers a “gamified” version of getting student feedback. It can be used to gather student background knowledge, assess midway through a unit to see if Students are getting the “big idea,” or used as a review.

With Kahoot, students can answer questions on their own devices, while games are displayed on a shared screen. As a teacher, you can pick from the existing games that other teachers have uploaded and even contribute your own games to the community.

Teachers should think carefully about their objectives and utilize the appropriate kinds of questions to help meet those objectives, elicit student understanding and propel learning. Consider varying questions between selection and supply and access the different areas of Bloom’s Taxonomy. This graphic, shared on Flickr by Enokson helps connect Bloom’s with question frames for assessment.

CC image Enokson Flickr Stream

Students might also create their own kahoots to deepen their understanding of the class content.

Kahoot allows you to connect and play in real time with other players in other places (synchronous learning across space!)

*at the time of writing, Kahoot does not seem to allow you to track student responses. If you are interested in trackingindividual responses, consider Plickers or another student response system.


how-to-get-started-360x80.png

  1. Create a teacher account on kahoot.com
    • There are several video tutorials on the site to help you out.
  2. Create a new Kahoot by selecting the type of interactivity you want to create.
  3. Title your Kahoot, add a description, and set up the visibility, language and audience type. Feel free to add a cover image to customize your Kahoot and invite engagement.
  4. Now you can start to work on your questions.

Let’s take Quiz Kahoot as an example, first, input the question to the “Question” area (here, we recommend you to prepare with the questions in another document, that will fasten your Kahoot creation process. Then, set up the time limit for the question, and feel free to add awards points to the question if you are doing a quiz. After this, input the answers and click on the checkmark next to the correct answer(s). Remember to give credit to the resources that you have used/ referred to in your questions.

  1. Now it’s time to save and share your Kahoot!

How to get access:

  1. Go to a web browser
  2. Go to kahoot.it
  3. Enter the game pin that showed on the shared screen
  4. Enter a nickname and start to answer the questions

Kahoot Instructions One Page Handout


videopng-360x61.png


1 Comment

Filed under Not Subject Specific, Resources

PeerWise


PeerWise features represented in icons

whatisit.png

PeerWise is a free program where you can create, share, evaluate and discuss assessment questions. It is simple to use and only takes you a minute to create your account and get started. It allows instructors to integrate collaborative learning and peer tutoring into a class.

Features include:

  • Designing and answering questions
  • Writing explanations
  • Question evaluation
  • Large test banks
  • Optimized for large classes

Why-is-it-relevant-360x82.png

By using PeerWise, instructors can see how students are performing and get early feedback. Allowing the students to create their own multiple choice questions (MCQ) questions gives instructors the opportunity to then use that as a test bank for a quiz or test and enhance collaborative learning, especially in large classes.

Students benefit from using PeerWise by reinforcing concepts when having to write an answer explanation, understanding the learning outcomes for the course when creating questions and assessing their own understanding of concepts when answering questions. Creating good quality MCQ questions together with effective distractors is not an easy task. However this process provides opportunities to improve knowledge of the subject matter and develop awareness of the relevant curriculum for specific learning. Moreover, by providing feedback to their peers’ questions, students become mindful of their own misunderstandings and appreciate different styles of learning. Finally, since the identity of the MCQ creator is anonymous, the process of feedback, assessment and evaluation of questions can be completely honest.


how-to-get-started-360x80.png

1. Open the PeerWise webpage.

2. Choose your institution from the list.


3. Log-in with your registered username and password or

if you are a new user, register first (Make sure you have the Course ID and Identifier provided to you by the instructor).

4. Begin creating and sharing!

For more detailed information refer to the guide for students.


videopng-360x61.png

Leave a Comment

Filed under Not Subject Specific, Resources

Padlet – cloud-based collaboration

UPDATE: As of April 2018, Padlet has changed to a paid subscription model. Free access is now limited to 3 boards. Once you’ve deleted a board, you can create additional boards.

For those interested in exploring Open Educational options, you may wish to try a suite of apps from apps.opened.ca hosted in the ‘Sandstorm’ ecosystem (a Canadian housed space) – you can even host the apps on your own server. Scrumblr and Brainstorm are the closest I’ve found to Padlet. You might also be interested in Etherpad (like a google doc but FIPPA compliant!). For more information, please visit ‘Open ETech: Free Range Ed Tech’.

Visit this blog post for a description of digital whiteboards and a few alternative applications including: Jamboard


What is it?

Padlet is an online wall to which anyone with the link can easily add text, audio, video, images, hyperlinks and even make simple sketches! There are templates available including a gps located map.
Users can share their ideas from any device with internet access whether they’re inside or outside the classroom. These virtual sticky notes can then help keep track of and enrich classroom discussions or help when designing a project. Students are even able to comment or react to the posts of others (depending on how the teacher/moderator configures the settings).

Why is it Relevant?

A collaborative whiteboard or posting board is a great way to share information and collaboratively create content. Consider a classroom brainstorm that often entails students raising their hands and sharing, one at a time, while the teacher or another student records on the board… now think about the possibilities if groups of students or pairs of students have a shared Padlet wall open and are all adding and sharing ideas and resources in real time! Once the brainstorming has taken place, the teacher can follow up with a group discussion that might involve evaluating, sorting and classifying responses… something that can be difficult to make time for when the act of brainstorming and recording is lengthy.

Using the Mapping template, students might collaboratively create a geo-located map for place based learning activities, response to a novel that involves a journey, sharing information about cultures and places around the world, etc.

Embedding media like videos and images is simple, and Padlet even allows users to record videos or take pictures in real time and places them directly into their documents. Create and share mind-maps, plans, diagrams, portfolios, maps and more. Remember to always consider privacy and copyright permissions when sharing images, video or other content online.

Another valuable affordance of Padlet for teachers is that you can ‘moderate’ your posts using the privacy settings so that you view anything a student posts and approve it before it becomes ‘live’.

Important features and considerations:

  • Accountability: MODERATE your wall using the MODIFY menu (the ‘settings wheel’ in Top right corner) to help provide some accountability for students (‘Modify’ –> Require Approval). In a f2f classroom, the T can also circulate while students work and approve posts (using a mobile device) as T circulates, interacts/prompts/probes. You can also ask students to self-identify using initials or you can have students work in small groups or partners.
  • Privacy: Using the SHARE menu, you can adjust privacy. Consider: is the content sensitive at all? If so, there are also techniques like question boxes to support co-creating ideas/questions around more sensitive issues – the T can then preview the questions and discuss with the class the next day. Will students share their photos? names? what are the school/district norms and expectations or permissions needed? This is NOT a FIPPA compliant space so it is very important that students not be required to login and/or provide any personal or identifying info. (Metadata including things like location services in images provide data so it is important your students are aware of how to protect their own privacy)
  • Accessibility: You can create a custom URL using the ‘SETTINGS wheel’ (top right corner). This is also where you add a title and instructions/description. Consider: Do all of your students have devices? Will this be an individual or small group or partner? Are there visually impaired students? Other learning needs?

Getting Started

Visit https://padlet.com/ and click on “Create a padlet”. Then double-click anywhere to start writing, it is that simple! The URL can be shared with anyone. To explore some of the settings available, please refer to the video demonstration at the end of the post.

Padlet One Page Instructions

Padlet Tips & Tricks


Save

Leave a Comment

Filed under Not Subject Specific, Resources