Tag Archives: interactive whiteboards

“Explain Everything” : l’application du tableau blanc interactif

What is it

Explain Everything est une application de présentation dans le style du «tableau blanc». C’est également un puissant outil de narration et d’apprentissage qui permet aux élèves de collaborer et de travailler sur le même projet. Explain Everything permet de concevoir et créer des contenus multimédia avec la vidéo, l’audio, des images importées ou dessinées, du texte, etc.

Explain Everything est disponible pour iOS, Chrome OS, Android et Windows.

L’application est payante, mais il y a certaines fonctionnalités d’essai gratuites (ça varie en fonction du la plate-forme et de la licence)

  • iOS, Chromebook, Android et Windows
  • Tableau blanc interactif
  • Collaboration en temps réel
  • Partager directement du “cloud”

Les écoles peuvent obtenir un plan spécial EDU en contactant l’équipe Explain Everything .


Why is it relevant

Il existe de nombreuses applications de type tableau blanc sur le marché, chacune avec ses forces et ses faiblesses. Cette classe d’applications permet aux enseignant.e.s de créer des tutoriels attrayants et de haute qualité, ainsi que de présenter les informations de manière visuelle et attrayante. Les étudiants peuvent également utiliser ces applications pour créer des présentations, des leçons, des tutoriels, etc. VideoScribe est une autre application du même genre. Il s’agit d’un logiciel puissant et exclusif auquel les étudiants, et les professeur.e.s de UBC ont accès via LMS – “learning management system.”

Un excellent objectif pour les applications de tableau blanc sont les évaluations formatives ou sommatives. Plutôt que de se concentrer sur un programme déjà formaté au publication, il faut encourager les élèves / les étudiant.e.s à «tout expliquer» sur un sujet particulier ou à «montrer» ce qu’ils.elles savent (peut-être en utilisant ShowMe une application du genre tableau blanc qui est gratuite).

Cette ressource est idéale dans une classe de langue seconde telle que l’immersion française, le français de base, etc. Elle permet aux élèves de s’engager de façon créative dans l’apprentissage du langage.


How to get started

Il suffit de quelques étapes et un peu de pratique pour commencer à utiliser Explain Everything :

  1. Télécharger l’application Explain Everything depuis l’App Store ( iTunes pour iPad, Google Play pour tablettes Android, etc.).
  2. Avec une adresse e-mail il faut sélectionner / acheter la version le plus convenable.
  3. Ensuite, on clique sur le bouton «+» dans le coin supérieur droit pour créer un nouveau projet. Il existe des modèles pour commencer et modifier par rapport aux besoins. Il y a aussi l’option de commencer à zéro.
  4. Maintenant le temps est venu de dessiner et de travailler sur les animations et les commentaires audios.
  5. Pour plus d’information sur Explain Everything consulter ce document  Explain Everything de Brittney Merryweather.

Video demonstration

Leave a Comment

Filed under Assistive Technology, Blog Posts, en francais, Not Subject Specific, Resources

Educreations: Interactive Whiteboard App

whatisit.png

Educreations is an interactive whiteboard that has an easy, interactive platform and is straightforward to use. It allows you and your students to do screenshots, record video/audio clips, embed websites/images and share what you have created with others immediately. Educreations is only available for iPads and web browsers, and basic features are free.

The features include:

  • Capture your ideas
  • Use your content
  • Share instantly
  • Cloud sync

Why-is-it-relevant-360x82.png

Educreations is a good tool to help you create a digital classroom or work with a flipped classroom model. On the one hand, it is straightforward to use, so you can focus on your content instead of spending time learning about the technologies. With it, you can easily save your drafted work on your iPad, and share it with your students and co-workers whenever you want. What’s more, all of its basic features are free.

On the other hand, Educreations can be used as a multimedia model to help your students with their learning and communication. Students can choose their own format to capture their ideas (video, audio recording, drawing, typing, inserting website or take a picture, etc.) and to communicate with others. They can also control their own pace while learning new content. Educreations is a platform that helps you to create an equal accessible environment for all your students.

Here is an example of what you can do with Educreations:

https://cdn1.educreations.com/static/examples/paul-groves-accuracy-and-precision.mp4


how-to-get-started-360x80.png

You can get started with Educreations in a few steps:

1. Download the app from your iTunes store on your iPad or to your laptop web browser.
2. Sign up as an educator (or student) and log in.
3. As shown in the screenshot, you can choose to click on the audio icon to record your lecture, use the pens/brushes to draw/mark on the screen, use the eraser to erase your typos, or click on the “+” icon to add websites’ URLs, videos, images, etc., to your screen.
4. Play to explore different features!


videopng-360x61.png

Leave a Comment

Filed under Assistive Technology, multimedia creation, Not Subject Specific, Physical and Health Education, Resources, Video & Video Tutorials

Padlet – cloud-based collaboration

UPDATE: As of April 2018, Padlet has changed to a paid subscription model. Free access is now limited to 3 boards. Once you’ve deleted a board, you can create additional boards.

For those interested in exploring Open Educational options, you may wish to try a suite of apps from apps.opened.ca hosted in the ‘Sandstorm’ ecosystem (a Canadian housed space) – you can even host the apps on your own server. Scrumblr and Brainstorm are the closest I’ve found to Padlet. You might also be interested in Etherpad (like a google doc but FIPPA compliant!). For more information, please visit ‘Open ETech: Free Range Ed Tech’.

Visit this blog post for a description of digital whiteboards and a few alternative applications including: Jamboard


What is it?

Padlet is an online wall to which anyone with the link can easily add text, audio, video, images, hyperlinks and even make simple sketches! There are templates available including a gps located map.
Users can share their ideas from any device with internet access whether they’re inside or outside the classroom. These virtual sticky notes can then help keep track of and enrich classroom discussions or help when designing a project. Students are even able to comment or react to the posts of others (depending on how the teacher/moderator configures the settings).

Why is it Relevant?

A collaborative whiteboard or posting board is a great way to share information and collaboratively create content. Consider a classroom brainstorm that often entails students raising their hands and sharing, one at a time, while the teacher or another student records on the board… now think about the possibilities if groups of students or pairs of students have a shared Padlet wall open and are all adding and sharing ideas and resources in real time! Once the brainstorming has taken place, the teacher can follow up with a group discussion that might involve evaluating, sorting and classifying responses… something that can be difficult to make time for when the act of brainstorming and recording is lengthy.

Using the Mapping template, students might collaboratively create a geo-located map for place based learning activities, response to a novel that involves a journey, sharing information about cultures and places around the world, etc.

Embedding media like videos and images is simple, and Padlet even allows users to record videos or take pictures in real time and places them directly into their documents. Create and share mind-maps, plans, diagrams, portfolios, maps and more. Remember to always consider privacy and copyright permissions when sharing images, video or other content online.

Another valuable affordance of Padlet for teachers is that you can ‘moderate’ your posts using the privacy settings so that you view anything a student posts and approve it before it becomes ‘live’.

Important features and considerations:

  • Accountability: MODERATE your wall using the MODIFY menu (the ‘settings wheel’ in Top right corner) to help provide some accountability for students (‘Modify’ –> Require Approval). In a f2f classroom, the T can also circulate while students work and approve posts (using a mobile device) as T circulates, interacts/prompts/probes. You can also ask students to self-identify using initials or you can have students work in small groups or partners.
  • Privacy: Using the SHARE menu, you can adjust privacy. Consider: is the content sensitive at all? If so, there are also techniques like question boxes to support co-creating ideas/questions around more sensitive issues – the T can then preview the questions and discuss with the class the next day. Will students share their photos? names? what are the school/district norms and expectations or permissions needed? This is NOT a FIPPA compliant space so it is very important that students not be required to login and/or provide any personal or identifying info. (Metadata including things like location services in images provide data so it is important your students are aware of how to protect their own privacy)
  • Accessibility: You can create a custom URL using the ‘SETTINGS wheel’ (top right corner). This is also where you add a title and instructions/description. Consider: Do all of your students have devices? Will this be an individual or small group or partner? Are there visually impaired students? Other learning needs?

Getting Started

Visit https://padlet.com/ and click on “Create a padlet”. Then double-click anywhere to start writing, it is that simple! The URL can be shared with anyone. To explore some of the settings available, please refer to the video demonstration at the end of the post.

Padlet One Page Instructions

Padlet Tips & Tricks


Save

Leave a Comment

Filed under Not Subject Specific, Resources

Explain Everything: Collaborative Interactive Whiteboard App

Explain Everything is a “whiteboard style” presentation app you can use to create tutorials and presentations. It is also a powerful storytelling and learning tool that allows your students to work on the same project collaboratively. Using Explain Everything, you and your students can design, screen cast and create multimedia content with video, audio, imported or drawn images, text, etc.

Explain Everything is available for iOS, Chrome OS, Android, and Windows.

Paid app with some free trial features (varies depending on platform and license)

  • iOS, Chromebook, Android and Windows
  • Interactive screen-casting whiteboard
  • real-time collaboration
  • cloud content and link-based sharing

PS. Schools can get a special EDU plan by contacting the Explain Everything Team .


There are many whiteboard style apps available on the market, each with their own particular strengths and weaknesses. This class of app allows teachers to create fairly high-quality, attractive tutorials and present information in a visually and engaging way. These apps can also be used by students to create presentations, lessons, tutorials, and more. Another application in a similar class is ‘VideoScribe‘ – it is powerful, proprietary software that UBC students, staff and faculty have access to through our LMS – learning management system.

An excellent purpose for whiteboard apps is in a formative or summative assessment. Rather than focusing on polished content for publication, students can be encouraged to ‘explain everything’ about a particular topic or ‘showme’ what you know (perhaps using ShowMe – a free white board style app).

This resource is great to use in a second language classroom such as French Immersion, Core French, etc.  It allows for students to creatively engage in language learning.


Read our Explain Everything Quick Start & Task sheet, then print & share it with your students if it’s their first time!

You can also read Explain Everything’s Comprehensive Guide HERE.

It only takes a few steps and a little practice to start using Explain Everything:

  1. First, go to the Explain Everything to download the app. You can also download it from the app store on the specific device that you’re going to use (eg. iTunes for iPad, Google Play for Android tablets, etc. )
  2. Next, sign up with your e-mail address and select which version you’re going to purchase.
  3. Then, click on the “+” button at the right top corner to create a new project. There are templates you can begin with and modify to meet your needs or you can start from scratch.
  4. Now it’s time to draw your elements and work on your animations and voice-overs!
  5. Want to use Explain Everything in your classroom? Here is a handout  Explain Everything BrittneyMerryweather that you can have a look!

Here is a video tutorial that will explain the most-used features of Explain Everything and help you to get started:

Leave a Comment

Filed under Assistive Technology, Not Subject Specific, Resources

ShowMe Interactive Whiteboard

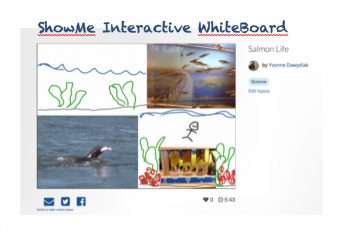
ShowMe Interactive whiteboard app is a mobile application that allows teachers and students of any age to create presentations called ShowMe’s that can be shared via the device or online privately or to a community audience. The user can record and create engaging voice over presentations of their chosen topic by using some of the many tools such as adding text, drawings, photos and images.

You can also access teacher and student created ‘ShowMe’ content covering a vast selection of academic subject matter as well as non academic topics on their website and you can subscribe to a premium service that provides a number of extra features such as private postings options, advanced tools, more storage and specified group sharing. The ShowMe interactive whiteboard app is a tool with great potential for both teaching and learning.

FEATURES

– Voice-record
– Multiple brush colors
– Enter text
– Pause and erase
– Import pictures from your photo library, built-in camera, or web image search
– Import documents as pictures from dropbox, or google drive
– Create video from any document
– Unlimited lesson length
– Free to upload and share your recordings with friends
– Easy embedding for sharing anywhere
– Manage students with Groups

As flipped classrooms become more popular, teachers are interested in creating their own tutorial videos for their students. ShowMe is a straightforward tool that would help you create attractive screen casts. Other applications to try for this purpose include: Camtasia, VideoScribe, Explain Everything or Shadow Puppet.

Given it’s relatively straightforward user interface, ShowMe makes an excellent formative assessment tool for teachers. Students can be encouraged to “ShowMe” what you know about a particular concept or topic. The app will allow them to share photos, drawing, video and audio – showing and telling the story of their learning in a way some children are unable to do effectively on pencil and paper.

Recently, ShowMe has also come out with a ‘Markup App’ that allows teachers to annotate student work on their ipads.

Leave a Comment

Filed under Assistive Technology, Not Subject Specific, Resources