What are concept maps? 
“A concept map is a type of graphic organizer used to represent knowledge of a topic, forge connections between ideas and create visual representations of one’s understandings. Concept maps begin with a main idea (or concept) and then branch out to show how that main idea can be broken down into specific topics” (Novak & Canas, 2006). Visit the Concept Mapping resource post on this blog for a brief overview and links to resources.
Features of concept maps
There are four essential features represented differently in a concept map:
- Concepts: are words that try to represent a phenomenon, object, or idea. They may synthesize patterns in events or knowledge produced over time. In concept maps, these are depicted as shapes in the diagram.
- Linking words/phrases: are used to connect two or more concepts and express some kind of relationship between them. They may indicate cause, consequences, conditions. In general, are written using a verb or few words.
- Focus concept or question: it is the main goal of a concept map. It may be a question, an explanation, or a general idea that conducts your thought and organize all ideas around in the concept map. It is highlighted in the concept map, depending on the hierarchy chosen (top, center, etc.).
- Hierarchical and structure: it is how you will choose to organize the main concepts and their connections. It can be hierarchical (the main concept in the top), circle (the main concept in the middle), or other shapes appropriated to the idea you want to express.
Read more on about the ‘concept’ of ‘concept mapping’ in this blog post on the “Inspiration” website and how teachers and their students might use concept maps, mind maps, or outlines to support writing, idea generation, and organization, planning and more. Inspiration is a software commonly found on school district devices.
You can also find a step-by-step construction of a concept map about the solar system in the Lucidchart or in the example below:
When to use concept maps in education?
Concept maps are powerful graphic organizers that can be used in many ways to illustrate and explore connections across ideas. In this sense, concept maps allow students to formulate their understanding in a non-linear way of thinking, showing their process of thinking during understanding a new idea or content.
Teachers can use concept maps to:
- Build new knowledge, deepen students’ understanding: designing a concept map provides students and teachers with an opportunity to construct and share their understanding of a topic, theme, concept, area of interest. This Edutopia article provides a good starting point for learning more about the power of concept maps and other strategies to support deeper thinking.
- Identify possible misconceptions: during the process of designing a concept map, teachers can understand better the logic used for students to build their knowledge and the origin of misconceptions. Curtis Chandler, a former Kansas teacher of the year shares how concept maps can be used to understand some students’ misconceptions or not use accurate language in a ‘middleweb’ blog post.
- Designing lessons: concept maps can even be used by teachers as a format for planning units or lessons of instruction, allowing teachers to visualize the logic used to connect several lessons into a unit plan or make cross-curricular connections.
- Assessment: concept maps can help students illustrate the connections between their ideas, concepts, or content in meaningful ways and can be used as formative and summative assessments. The University of Waterloo has some guides about what is important to consider when designing rubrics for assessing concepts maps.
- Create study habits: teachers can have students create concept maps summarizing the main ideas of a unit, creating the habit of continuum revision of the knowledge learned.
- Encourage collaboration and communication: a mind map might be collaboratively constructed in real time or asynchronously (using appropriate apps) allowing students to negotiate, think critically and communicate their ideas and understandings with others.
How to get started? 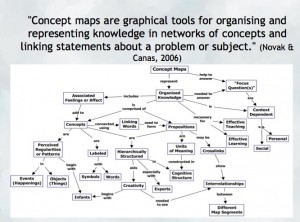
As mentioned, CMaps, concept maps can be analogue or digital. Teachers might consider providing students with a choice in developing their map using high tech or low/no-tech approaches depending on the objectives. If the objective is to widely share the map, then digital may be preferable (of course, students might also take a photo of a map ‘in process’ and one that is ‘completed’ in order to share as part of a portfolio or published work/project).
Some higher-tech options
- Mindmaps: it is a tool that allows you to create concept maps without the need for an account. It also allows you to save your map in the cloud or download it to your computer.
- Inspiration or Kidspiration as computer based or iPad apps Highly visual concept mapping software that allows the user to easily insert images from a large media folder. School districts commonly license these applications for use on their devices.
- Bubbl.us is an online collaborative concept mapping software – each individual with an account can be invited to contribute to a given map being created in the cloud. With a paid educator account, a teacher can invite students using a link to either view or collaborate (students do not need to provide their information or sign up for an account). Paid app with Free trial options for Educator accounts.
- For schools using ‘Google Classroom’ MindMup or Miro offer collaborative mindmapping (login required)
- Teachers should always be aware of appropriate permissions in their context/school districts. These might include parental consent, student informed consent or it may not be permitted to have students sign up using gmail or other account information.
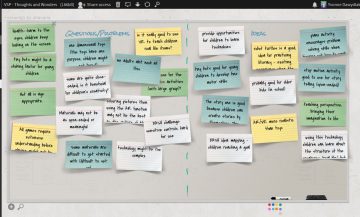
No/Low Tech Options
Collaborative or Individual drawing on chart paper or using sticky notes on a whiteboard or a table with a group of students are great options for kinesthetic or non-digital mind mapping. A primary teacher might even have students use kinesthetic, solid objects to create their mind map. Teachers might begin helping students develop their ability to connect ideas by providing a skeleton. This will help scaffold learning and introduce students to different ways to connect ideas.
Freeform Concept maps can be drawn by hand or using some of the available draw applications made for smartphones and tablets!
References:
Novak, J. and Cañas, A (2006): The Theory Underlying Concept Maps and How to Construct Them (Technical Report IHMC CMap Tools 2006-11). Florida Institute for Human and Machine Cognition.
Original post YD 2017 adapted by Peer Tutor Ariane Faria dos Santos (Ph.D. EDCP), Feb. 2022.