Tag Archives: field trip

My Maps: Google interactive maps

whatisit.png

My Maps is an online platform by Google that allows you to personalize your Google map and also add multimedia information to different locations. It is important to consider student data privacy when using non-Canadian housed resources (FIPPA). In some cases, school districts have permissions in place for the use of google classroom, while in others, it would be wise to have students utilize a class login if adding to the map (and, of course, ensuring this is appropriate in your district/school). It is important to ensure students develop digital literacy and know what kind of information is safe to share and what isn’t. Valuable contextual learning can take place when students have the opportunity to create in online environments at school with a teacher who is conscious of the issues and possibilities.


Why-is-it-relevant-360x82.png

My Maps can enhance place-based learning and learning about place by providing a space for students to upload images, text and audio connected to a specific location in the world. They can be used by teachers to create guides or presentations for students allowing them to explore and discover different areas and information. Creators and contributors of maps can tie in their own images to create a more personalized and interactive experience than a more linear slideshow or video affords. Viewers of the map can click on the tags including text, videos, and weblinks, creating a more interactive and non-linear experience than a more traditional presentation, video or slideshow might afford.

One example of an excellent use for an online collaborative map is this Eco-poetics project: Poems from the Garden.


how-to-get-started-360x80.png

Creating a map
  1. Sign into your Google Account.
  2. Click on “Maps” (Depending on your browser, you may need to select the ‘gear’ icon after logging in before you can see ‘My Maps’).
  3. from the ‘menu’, select ‘your places’ and select ‘Maps’ – scroll to the bottom, select ‘create’.
  4. Title the Map.
  5. Select your privacy option for the map using the sharing icon (public, private, viewable or editable by anyone with link or by invitation, etc)
    • Public (shared with everyone online)
    • Unlisted (shared only with people to whom you provide the URL/Map address)
  6. Share the URL of your map.
    • Click on ‘Link’ in the upper right-hand corner of the map. You can copy the link and share it with others. You may even copy the ‘embed code’ and paste it into your website.
    • NB: Individuals with the URL can view the map but cannot edit the map (i.e. add markers) unless they are logged into their Google Accounts.

Adding a marker

  1. Login to My Map.
  2. Find your location.
    • Zoom in to your location (using the +/- or by double clicking on the map) or find your location using the ‘Search bar
  3. Select the ‘Marker’ tool (from the toolbar below the search bar).
  4. Click on the location where you would like to place the marker.
  5. Type your title and description.
  6. Add an image.
  7. Change the icon to one of many custom icons in the app.

Teaching Tip: To help protect student privacy, create a class Google account that students can use to login so that they do not need to set up and use individual Google accounts.

videopng-360x61.png

Leave a Comment

Filed under Resources

Google Expeditions Pioneer Program

Google-Expeditions-08


cc Chris Betcher

whatisit.png

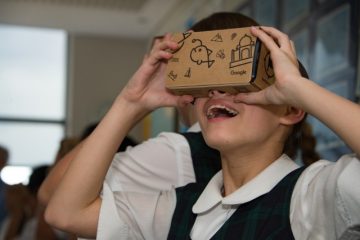
Imagine being able to take students on a field trip without leaving the classroom. With the Expeditions Pioneer Program, teachers lead a guided virtual reality tour of a range of places such as museums, wonders of the world, and even some otherwise inaccessible places like the deep sea or the surface of Mars!

With the following equipment, students can have an immersive learning experience with 360 video that enriches the day’s lesson. In a Google Expedition virtual tour, onscreen annotations help to provoke questions, point out details and provide further background information about the location/content.

  • Teacher tablet,
  • Google Cardboard or other VR goggles,
  • Smartphones  compatible with cardboard
  • *You may also need an inexpensive router to create a local area network within your school’s secure network so that students can connect their phones to your tablet. We’ve used the Aptus router with some success for small groups but more powerful routers may provide even better results!

Even without the formalized ‘expeditions’ provided by google, a a teacher could also easily ‘bring’ students to a relevant 360 video or  image and engage them in a tour/exploration with some guiding questions or prompts. Students can also interact with 360 videos or images using an ipad or by scrolling in their browser, although the experience is less immersive than with the goggles.


Why-is-it-relevant-360x82.png

Expeditions can be an engaging and interactive experience for students as they explore 360º space. The possibility of taking a virtual tour of faraway places in the blink of an eye can augment classroom learning in a way that wasn’t possible prior to the development of accessible digital technologies. While Virtual Reality should not replace real-life experiences, it can enhance and help uncover aspects of curricular studies through a ‘virtual’ place-based and experiential approach. Some places would be literally inaccessible without this kind of technology and, often, funding, logistical and transportation barriers can get in the way of students leaving the school grounds as frequently as we might like.

As with any digital technology, always keep in mind the value of the teacher as facilitator. Consider your purpose for exposing students to particular content and experiences. Be sure , also, that these virtual experiences don’t replace opportunities for students to engage in real world, f2f experiences by getting outdoors, in the school yard, the local community and even further afield. Such real world experiences nurture students in a way that digital tech cannot.

Further reading (articles available online in UBC Ed Lib):
Dutton, L. (2016). Google Expeditions. School Librarian, 64(3), 147.
Lamb, A. & Johnson, L. (2010).Virtual Expeditions: Google Earth, GIS, and Geovisualization Technologies in Teaching and Learning
 Teacher Librarian; Feb 2010; 37, 3; Canadian Business & Current Affairs Database

how-to-get-started-360x80.png

  • Download Google Expeditions and install the app on your student devices. Android from the Play Store or get the app on iOS from the Apple Store.   Install IPAd, IPOD, Android or IOS phone devices.
  • Sign onto the same WIFI network. Must be one that allows peer to peer networking.
    Or you can also use a router. In most schools, you will need to set up a local network since the secure wifi network will not allow you to do peer to peer networking – you can do this with an inexpensive router. We have used low cost Aptus routers successfully in our workshop sessions but there are likely other possibilities.
  • Select an expedition and download the expedition. Each expedition consists of a series of scenes.
    On the teacher device, the teacher will select Leader and the students on their devices will select Follow.
  •  When on a tour, look for the smiley face icons on your teacher device. These show you where your students are.
  • Points of Interest. Each tour has a teacher script which is not something you just want to read aloud.  Read ahead of time and pick out the things that you think would be the most relevant for your students. When you select the script an arrow will appear for your students and it will point them to this target symbol.   Be prepared for questions from the explorers about things they see that are not on your script. Have your key questions about the Expedition ready.  Take time to let the students experience the Expedition before you dive in with additional information.
  • Google Expeditions kits are available in Canada through Best Buy. They include student devices, virtual reality viewers, a rapid charger, teacher device, router, case.  They come in kits for 10, 20 or 30 students, however, Google Cardboard can be cut out and assembled as a making project and there is some excellent open access content available online.

Learn more about Expeditions here: https://www.google.com/edu/expeditions/


videopng-360x61.png

Leave a Comment

Filed under AR & VR, Not Subject Specific, Resources

ThingLink: Annotate Images and Videos

Thinglink is a web-based and iOS / Android application that allows you to embed  audio, video and other rich media links directly into images and share them across the web. Using Thinglink, you can engage your students with images text, video, songs and sound clips allowing them to explore the concept or big idea of a unit or lesson.

Thinglink has a limited free version for educators (and various paid levels). The free version comes with enough features to allow you to create engaging interactive posters, maps or other artifacts and you can even create a class account for up to 100 students. You can link to and embed YouTube content, upload images and sound and add text blocks or titles. You can even embed 360° Videos and create interactive 360° images with embedded ‘hot spots’.


Thinglink is a tool that fits various subjects and different grades. As a teacher, you can use ThingLink to provide interactive professional learning experiences and present information to your students. It can also be used as an Augmented Reality tool in a field trips as well: you can work on a ThingLink map, and add multimedia information to different spots on the map. When students come to a certain place, they can click on the accordingly place on the map and be directed to the information you have prepared for them (such as Youtube videos, audio, images, or webpages!)

With a free teacher account, you can create a class group of (up to 100) students and do not need student personal information (emails or full names) in order to add students. Given that Thinglink is not Canadian housed, I would recommend avatar names or initials and also be sure to educate your students about privacy protection. To create multiple classes, you need a paid account.

In a Social Studies classroom, for example, students might use an historical image and add features (video, hyperlinks, text, sound) to the image in order to tell a story about a particular event or period in time. Hover your mouse of the example below to see images from the past and present integrated to tell ‘my’ story. Teachers might create a video of their own story to share with their students as inspiration for discussion or student-created stories.


1. Sign up: select the free education version and sign up with your email address. (You can always upgrade to pro after you try it, if you think you’ll use it and/or if you want to use it with your students)

2. Start: Click on the “Create” tab to start making your own interactive images and videos.

3. Tagging your image:

  • Click anywhere on the image to add your first tag
  • Click on the icon image to select an icon

4. Sharing Your Videos and Images

  • Open up the image or video and select the “Share” button
  • Either click on an icon for one of the linked platforms or copy and paste the URL or embed code
  • Sharing your image

For more detailed tutorials, go to ThingLink Standard Features Tutorial.

ThingLink in 3 Minutes or Less – highlights uses of the app:


Leave a Comment

Filed under AR & VR, Not Subject Specific, Resources