Tag Archives: augmented reality

Embodied Learning: physical engagement and digital tech integration

“Movement, or physical activity, is thus an essential factor in intellectual growth, which depends upon the impressions received from outside. Through movement we come in contact with external reality, and it is through these contacts that we eventually acquire even abstract ideas.”

(Montessori, )

Physical movement in learning has been widely researched and written about. In the early 1930’s, Dr. Montessori understood that learning relied on how our physical bodies interacted with the environment. For her, the environment was physical. Today, we are able to consider the role of digital technologies, spaces, objects and experiences in the context of embodied learning.

Embodied, for our purposes, means that the learner has initiated a physical gesture or movement that is well-mapped or linked to the content to be learned. This might include place-based learning experiences, in-class hands-on engagement, learning labs, games and also includes the possibilities afforded through immersive technologies.

Immersive technologies, including Virtual Reality (VR) and Augmented Reality (AR), have the potential to enhance or even redefine learning (Puentedura, 2013). VR offers potentially emotionally charged, immersive experiences, where the user is ‘within’ the virtual environment, while AR overlays digital content on the real world. Research by Johnson-Glenberg MC (2018) emphasizes the levels of embodiment in education—ranging from basic gestures to full-body movement—to deepen learning experiences.

This emotional engagement, can lead to increased behavioural and, ultimately, cognitive engagement (Dubovi & Tabak, 2021). As teachers, integrating embodied learning means actively engaging students physically in the learning process. Digital and other technologies offer a spectrum of physical engagement levels for a more immersive and effective approach to teaching science. We can move from simple gesture to full body movement.

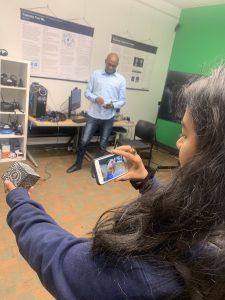
At the lower end of the embodiment spectrum would be the use of 360 video or other gesture based media (such as the Shakespeare folio we explored in our visit to UBC’s Emerging Media Lab – links to external UBC site). 360 video would be another good example. With equipment becoming less expensive and more accessible, you might try shooting your own video (or take still images using Google Streetview).

The following is an example 360 video a friend and I shot in Pacific Spirit Park. It shows my mentor, Lynn Pollard, a long-time Surrey teacher, environmental activities and naturalist educator. (Special thanks to Sharon Hu)

Now imagine the potential engagement and immersion if we could also smell the forest while learning about the carbon cycle! I actually tried this out using simple ‘scent boxes’ that students held while interacting with the video (one with moss, others with cedar, fir, leaves). While this video doesn’t allow for ‘smellivision’, it does allow a greater level of immersion than a static image or standard video. I have used this as ‘prep’ for heading outdoors with students and as a ‘replay’ to re-immerse ourselves upon return and before we do some art or writing activities related to our field experience. It could also be used as a replacement to an outdoor experience (depending on context, objectives).

student wearing VR goggles and holding controllers in front of screen showing stanley park immersive experience

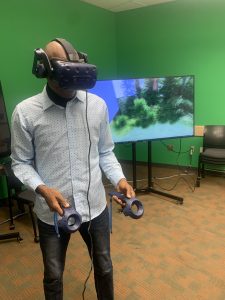
Student ‘immersed’ in VR

Levelling up a bit on the embodiment spectrum would be opportunities that allow for full body movement and gesture. This might include fully immersive VR of the kind explored on a recent visit to UBC’s Emerging Media Lab (EML).(links to external/UBC based site) Of course, while some schools have invested in this digital tech, access may not be possible in the average k12 school today. We were fortunate in our visit to the EML to try out a few different options (see table below for resource links).

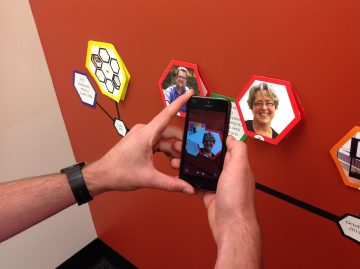
Using the rather ubiquitous smartphone, we can view a variety of 3D images using a google search and engage with them as AR images in the environment.

Person gesturing towards a virtual AR image of a tiger in the classroom

Dr. Khan virtually pats a tiger!

Imagine our surprise when a tiger joined the class (or when the full circulatory system model wandered by!). In order to view these 3D images, we need to move around them physically and gesture to adjust size; allowing a somewhat ’embodied’ experience.

student holds merge smart phone in front of a merge cube AR block. Phone shows an AR beating heart.

Holding a beating heart in her hand!

We might also use a Merge Cube to view AR models. Again, not super high tech, but thought provoking when we think about the difference between a static model of the heart and a larger than life sized beating organ suspended in the room in front of us!


Embracing embodied learning empowers students to not just learn about science or the world around them, but to tangibly experience and internalize it. It’s about creating educational experiences that transcend the traditional confines of a classroom, fostering a deeper and, hopefully, more lasting connection between physical engagement and knowledge acquisition.

References:

Dubovi I, Tabak I. Interactions between emotional and cognitive engagement with science on YouTube. Public Underst Sci. 2021 Aug;30(6):759-776. doi: 10.1177/0963662521990848. Epub 2021 Feb 5. PMID: 33546572; PMCID: PMC8314998.

Johnson-Glenberg MC. Immersive VR and Education: Embodied Design Principles That Include Gesture and Hand Controls. Front Robot AI. 2018 Jul 24;5:81. doi: 10.3389/frobt.2018.00081. PMID: 33500960; PMCID: PMC7805662. Retrieved from https://www.ncbi.nlm.nih.gov/pmc/articles/PMC7805662/

Montessori, Maria. The Secret of Childhood. Orient Longman, 1966.

Puentedura, R. R. (2013, May 29). SAMR: Moving from enhancement to transformation [Web log post]. Retrieved from http://www.hippasus.com/rrpweblog/archives/000095.html


Resources from our Session (Oct 2023)

I recently had the opportunity to work with UBC Faculty, grad students and members of the team at the Emerging Media Lab on the Vancouver Campus on some interactive and ’embodied’ stations to allow students to experiment and consider the levels of embodiment afforded with Augmented and Virtual Reality tools. Below are some resources from our session. It is important to note that we did not offer these AR and VR options as alternatives to ‘real world embodied learning’ but as enhancements to the learning environment.

EML offers weekly drop-ins and opportunities to collaborate on projects, co-plan and co-teach! https://eml.ubc.ca/

Station/Activity Level of Embodiment  Resource notes/Links
VR immersive exploration (Stanley Park Simulation EML Project) immersive VR, interactive controllers, gesture, movement, sound https://eml.ubc.ca/projects/geography-vr/
Holo brain (using Hololens) gesture-based augmented reality https://eml.ubc.ca/projects/holobrain/
Smartphone Google Search AR gesture-based AR with some body movement Link to ios/android instructions and full list of available 3D images – Google link.
Star Walk AR gesture-based AR with some large body movement Requires smartphone, ipad, tablet. Star viewing apps allow you to view celestial objects/night sky in real time and across space and time. Link to Star Viewing Apps SS Blog post.
Merge Cube AR gesture-based AR Requires handheld/smart phone or ipad. Link to Merge Cube blog post in Scarfe Sandbox. 
Shakespeare XR Interactive gesture-based AR A table top virtual Shakespeare text, turn the pages with gesture. https://eml.ubc.ca/projects/shakespeare-xr/


Planning for ‘Tech-enhanced Embodied Learning’

I created the following ‘solution tree’ of considerations when electing to incorporate these tools (note this tree is a first draft… I’m hoping to make a more effective diagram for a future edit of this post – please comment on this post if you have feedback)

  • Is the experience you wish to offer POSSIBLE in the real world? Can you/your students visit the place or hold the object
  • if yes, then…
    • Consider incorporating the digitally enabled tools as supplement or enhancement to real world experiences and labs. For example, pre- or post- labs; allowing students to pre-play and re-play content or experiences using digital tools including 360 media can enhance their reflections on the experience, can supplement and even deepen connections to learning.
    • if yes, then:
      • Think about: your learning objectives and the ‘level of embodiment’ you’d like to offer your students as you choose the tools.
      • Ask:
        • are any students going to be excluded (due to health and safety or access issues?
        • if no, then… 
          • GO! Try to make it happen. Advocate for it!
        • if yes, then…
          • plan or consider alternative experiences. For example: if a student has vestibular or other health or safety concerns and may not be able to use a VR headset, is there an AR experience you can offer that is more comfortable for that student (Consider Universal Design for Learning (UDL) principles in your planning and you’ll see that having an alternative will likely be necessary for some and of benefit to many!)
  • Is the experience you wish to offer IMPOSSIBLE in the real world (perhaps unsafe or inaccessible to some/all of your students)
  • if yes, then…
    • consider incorporating the digitally enabled tools as the main/central experience in the lesson or unit or lab.
    • if yes, then:
      • Think about:
        • your learning objectives and the ‘level of embodiment’ you’d like to offer your students as you choose the tools.
        • how you will ensure access and engagement (if you have access to only one device, what will students do when it is not their ‘turn’? are there stations you can set up for students for more active engagement and to lessen ‘wait time’; what role do students have who are not ‘immersed’ in the activity?
        • how will students reflect upon their experience?
      • Ask: Are any of my students going to be left out of this experience?
      • if no, then… 
        • GO! Try to make it happen. Advocate for it!
      • if yes, then…
        • plan or consider alternative experiences. For example: if a student has vestibular or other health or safety concerns and may not be able to use a VR headset, is there an AR experience you can offer that is more comfortable for that student (Consider Universal Design for Learning (UDL) principles in your planning and you’ll see that having an alternative will likely be necessary for some and of benefit to many!)


Blog post by Yvonne Dawydiak, Learning Design Manager, Teacher Education Oct 2023

1 Comment

Filed under Activating Strategies, Active Learning, AR & VR, Assistive Technology, Blog Posts, Curriculum, Interactivity, Not Subject Specific, Planning, Resources

Star Viewing Apps

These are apps that provide an immersive and augmented viewing of the stars, planets, and sometimes even space stations or satellites!

They allow students to recognize and experience the locations of various stars in relation to themselves. It’s a powerful tool that promotes questioning, deeper understanding, and engagement because students can rotate their devices to view constellations and more. These apps are a way to help students recognize that the stars and planets never “disappear” and that their locations move throughout out the day and year!

You will find that once students are “viewing the stars”, they will come up with their own questions which is a perfect and natural inquiry opportunity and way to personalize your teaching for students.

Some questions we often hear are, What is a pulsating star? How can I tell the difference between a planet and star without this [app]? Who named the constellations and why are they important?

  1. Choose which app would work best with your students!
    • Skyview or SkyGuide
      • Uses the camera and overlays it with the Milky Way galaxy. Includes descriptions of star types, constellations, planets, the International Space Station, and the Hubble space telescope. Great for using outdoors and in the evenings.
    • Starwalk
      • Uses an evening themes background with the stars, constellations, and more over top. Features Real-time celestial bodies tracking, the ability to travel in time with “Time machine,” and anastronomical calendar with various celestial events.
  2. Download and open the app.
  3. Decide how you will engage students with the app.
    • Free exploration
    • Scavenger Hunt
    • Question generator – have students write as many questions as they can.
    • Galactic Explorer – write from the perspective as a 22nd Century Galatic Explorer. This could be compared to Explorers from history. They could also plot a course based on a chosen destination.
    • Storytelling – How do constellations tell a story? Be inspired by this app and then read various stories about the constellations before having students create their own (oral stories or written). You could also compare historical narratives from different cultures to build multiple perspectives of the stars.

Below is a scavenger hunt we use with Teacher Candidates but you can also borrow and personalize it for your own students. We use it to encourage engagement and exploration of the tool but leave room for TCs to create and record their own questions as they explore.


Leave a Comment

Filed under AR & VR, Not Subject Specific, Resources

Merge Cube

Merge Cube is an Augmented Reality square that applies realistic graphics and 3D models with which users can engage (available on iOS or Android) using both free and paid apps on a mobile device. Merge Cube, along with available apps, allows users to apply a different interface to their experience.
Some apps are simple viewers while others are “gamified” and/or more interactive.

You can even print and make your own paper merge cube or make a giant sized ‘class’ cube (I’d recommend using a slightly heavier card or print on paper and glue to cardstock). For full instructions, a video and printable template, visit the Merge Cube Website Support page via the link here.

Galactic Explorer

The opportunity to hold an object in your hands, rotate it, make choices about how you interact with it can lead to a a richer learning experience and deeper engagement. The merge cube allows you and your students to have a somewhat more authentic experience than holding a static model ever could! Imagine students in a biology class holding the beating human heart in your hands, moving it to see how it looks from various angles and even looking deep inside the heart to see the vessels. Students in Math can create and view geometric models. Physics students might create models of molecules or elements, Bio students might design strings of DNA!

In Merge, you can also upload your own 3D models! We know that moving from simple consumption through to creation has learning value. The trend to prototyping and 3D printing in classrooms and libraries as had me thinking a lot about the waste involved in 3D printing and prototyping. I think there is value in creating using Tinkercad or other 3D modelling software, uploading the model to Merge and carefully viewing all dimensions of your model BEFORE or even INSTEAD of Printing. That way, we’re only printing what is ‘needed’, useful or has value.

The following have some free access (for others, you’ll need a Merge EDU paid account.)

  • Object Viewer 
      • If you have students build their own 3d model, they can use this app to hold it and view them from any angle. You’ll need both a free TinkerCad account and a Merge Edu Account (free allows 5 uploads).
      • CREATE!!!
        • Create a 3D object at TinkerCad (you can also use Sketchup or CoSpaces)
        • In Tinkercad, select the “Send to” button on the top right
        • Select “MergeEdu” (you can also share to a Thingaverse account)
        • MergeEdu will open in a new tab. Follow on-screen instructions.

        1. Launch a Merge App
        2. Allow camera and photo access
        3. Enter your model code  if needed **first time only**
        4. Engage with the Merge Cube

    MERGE. Getting Started (2017).

    MERGE. Math with the Merge Cube (2018).

Leave a Comment

Filed under AR & VR, Engineering, Math, Not Subject Specific, Resources, Science, Technology, The Arts

Tech Integration for Secondary Science (EDCP 467 – Junior Science)

Walking away from this afternoon’s session working with Secondary Jr. Science Methods TCs and their instructor Leslie Johnstone, I realized I hadn’t taken a single photo to help capture the engagement in the classroom. Ah, well, the moment will live in my brain at least ;D. Below are some promised links and notes about our session. 

We utilized one of the Scarfe Teaching and Learning Studios (Scarfe 1007) to provide a stations based approach allowing some student movement and choice (and to be sure students know that these ‘student priority’ spaces are available for them to use!). After a brief introduction in Prezi to five themes of technology integration, students had 10 minute opportunities to dip their toes into each theme at facilitated and self-directed stations.

Remember, in a Secondary Science classroom, especially if students are new to cooperative learning, I would advise creating groupings in advance of class. The groupings might be homogeneous or heterogeneous and based on any number of factors including ability or interest  depending on the objectives of the teacher and the needs of the students. Sometimes, randomized groupings can be used and have the added benefit of introducing students to opportunities to interact with many different members of the class. There are many online options. GroupMind, a lovely little App developed by Louai Rahal an Education PHD student & instructor I met a few years ago, is free and open for you to use with no sign up required. For more on groupings, this article by Beatrice A. Ward (1987) is worth a read.

Our themes:

  1. Whole class student response – We discussed the value of incorporating approaches including digital technologies that move beyond ‘teacher asks question’, ‘students raise hands and respond one at a time’. Students had the opportunity to put their ‘teaching hats on’ and explore Padlet or Kahoot. Some might have seen this station as a wee bit off task as students became pretty engaged in playing ‘Halloween’ Kahoot… Still, with a little prompting, students were also considering issues including
    • Student privacy (Kahoot and Padlet do not require students to login or give personal info!)
    • What constitutes an effective question?
    • How might gaming and competition impact student learning and how might it be leveraged or tempered…?
  2.  Video and Simulations in the Science classroom – afford the opportunity for students to try experiments that might be otherwise impossible or, perhaps, just inaccurate if done hands-on. Sims and video can also support varied learners including ELLs in pre-playing or re-playing hands-on experiments. Check out PHET for some free, open access sims.  For some amazing video experiments, see: Olympian vs. Toaster and Evolution of Bacteria on a Megaplate
  3. Google Tour Creator – Sharon Hu, Learning Design Strategist, shared the possibilities of creating a 360° VR environment that offers an immersive experience learners can explore on their own. Students found out how to use existing templates (ranging from human anatomy to the solar system) and how a group of learners can customize and annotate the template and use it as a collaborative storytelling tool.
  4. Teachers and students can create their own videos, digital stories and multimedia presentations using a variety of freely available tools including (but not limited to) Viva Video and Sway. *As UBC students, faculty and staff, we have access to some robust proprietary applications including:
    • Camtasia (we’ll look at this one in another workshop!)
    • VideoScribe (the animated hand we tried out today)<
    • UBC Students, staff and faculty can download these and other applications either through ‘Canvas’ (click on Help  and select ‘Software Distribution’) or through UBContheHub.
  5. Augmented Reality – How might this emerging technology increase learning through rich media experiences and ‘hands’-on access to otherwise unaccessible objects or media? Does it go beyond toy?
    1. Theodore Gray’s Elements – interact with the periodic tables on a handheld device (this one is a paid app but very powerful and worth chatting with your school librarian about!)
    2. Science 360 – an app and website that houses a large database of science videos and content
    3. Leslie had fun sharing Curioscope Virtual-i-tee – a very cool AR T-shirt & accompanying App that allows students to peer inside the human body
    4. Merge Cube  this $15 AR spongy cube & accompanying free apps allow students to hold the the beating human heart, lungs, the earth and even the entire solar system in their hands! The ‘hologram’ that appears in your VR headset, ipad or smartphone is interactive to an extent (you can see different sides of an object by turning the cube or with a swipe or tap, adjust the view, see annotations, or even look inside of the object)
    5. StarWalk – allows you to see the night sky ‘in real time’ at any given place or time. Hold it up to view the horizon or sky above you; hold it down to the floor and see through to the southern hemisphere. This app is transformative in that without such an app, students really have a difficult time visualizing the movement of the celestial sphere (and we definitely can’t show them this during the school day!).

It was a pleasure working with the group of soon to become Educators! If you’d like to explore anything related to teaching, learning and digital technology further, please be in touch or click the ‘Ask a Question’ link in this blog. Look for Eric in the foyer on Wednesdays or visit Janis or Yvonne in a drop in or workshop sometime this winter! Schedule here.

Cheers!

Yvonne


Leave a Comment

Filed under AR & VR, Blog Posts, Resources

HP Reveal – Augmented Reality Platform

IMG_0154


User scanning a trigger with the HP Reveal app

whatisit.png

HP Reveal (previously known as Aurasma) is an augmented reality platform accessible via the web, mobile app, or as a software developer’s kit (SDK).

Users upload “trigger” images and add overlays like images, video, 3D animations and sounds to them either through the web application or on their devices. Making your Auras public allows your followers to scan your trigger images in the real world in order to view your Auras.

Free Features:

  • Shared Auras (users must follow you to view)
  • Unshared Auras (which you can still share with specific user using links)
  • Social media sharing (with controllable sharing permissions)

Why-is-it-relevant-360x82.png

As virtual and augmented reality software and applications like Pokémon GO become more advanced and accessible to the average user, educators must ask themselves where they might benefit the educational community. The value in HP Reveal is that it brings static content to life, turning an observational learning environment into a more interactive one. There are already a number of ways teachers have incorporated this platform in their classrooms to boost student engagement and interactivity.


how-to-get-started-360x80.png

  1. Download the HP Reveal app from the Apple App Store or the Google Play Store depending on your device
  2. Sign up with your email, create a username and password
  3. Create your first Aura:
      1. Take a picture of an object to act as a trigger. HP Reveal works best with flatter triggers like pictures, posters, or patterns. The more detail in the image the better.
      2. Upload the image either from your device or through the web application.

    Screen Shot 2016-08-26 at 10.20.29 AM

    Screen Shot 2016-08-26 at 10.30.48 AM

  4. Add overlay content. When the trigger image is scanned the overlay content will be displayed. If you are creating the Aura on your device you are limited to the default overlays that come with the application. Creating Auras through the web application allows you to upload 3D animations, sounds, images, videos, and add actions to each to make them even more interactive.
  5. Screen Shot 2016-08-26 at 10.39.56 AM

videopng-360x61.png

Leave a Comment

Filed under AR & VR, Not Subject Specific, Resources

AR Flashcards: A new way to engage your students


AR Flashcard – Animal Alphabet

AR Flashcards are a series of Augmented Reality apps used to teach your students words and concepts based on different categories such as animals, shapes, colors and planets. By using 3D animation, AR Flashcards bring print outs of animals and planets to life.

Some main features include:

  • colorful renditions of animals, dinosaurs and the solar system
  • sound effects
  • screenshot button which allows you to save your pictures

Click here for more information…


AR Flashcards are great tools for early childhood educators and English as an additional language (EAL) instructors. AR Flashcards create an entertaining way to introduce different vocabulary words to young children. According to testimonials, students have engaged with the app and have enjoyed the learning process:

“It’s definitely unique and a very clever way to get children involved in learning the alphabet and animal names.”

“Love how the animals pop up! My son gets a huge smile on his face when the animals appear. The new graphics are great and being able to take pics is cool.” (Augmented Reality Flashcards).


  1. Download and print out the cards from here . (Tip: print out flashcards in color and use cardstock paper)
  2. Download and install AR Flashcards to your mobile devices (the Alphabet and color have free versions where as the rest are paid apps) .
  3. Double tap the screen to bring up the focus button onto the flashcard so that you can adjust your device’s camera to bring the cards to life.

videopng-360x61.png

Leave a Comment

Filed under AR & VR, Math, Not Subject Specific, Resources

Augment: designing and customizing your own augmented reality

whatisit.png

Using Augment in Education – It’s all free!

Augment is a tool to design and integrate Augmented Reality (AR) into your classroom. There are three components included: the Augment app, the Augment Manager and the Augment Desktop. The Augment app allow you to visualize 3D Models via the camera on your mobile devices. The Augment Manager is used to upload and manage various models. Lastly, Augment Desktop makes it simple to design and animate models before publishing them (click here for a tutorial to get started with your design!)


Why-is-it-relevant-360x82.png

Augment is one of the top AR apps on the market and is an effective tool that can be used to enhance your lessons and activities. Its visuals can help present your designs and captivate your students with 3D interactive experiences. In addition, it allows you to update course content without wasting paper.
In fact, Augment can specifically help you:
  • Engage students by drawing their attention with interactive presentations, posters and text book enhancement
  • Clarify complex concepts that would be hard to understand with a 2D handout. For example, educators use Augment to help students see the difference in the movement of gas molecules and liquid molecules in containers through animated 3D models
  • Empower your lessons by updating content and models for classes without printing

how-to-get-started-360x80.png

There are a few steps to get started with using Augment in your classroom:
  1. Create an account on manager.augment.com.
  2. Click on upgrade Now and choose Education Plan.
  3. Download the Augment App free on IOS or Android and log into your account.
  4. Upload 2D images of your model, or you can choose to find 3D models to use from the following sources:

videopng-360x61.png

Want to know what other educators did with Augment? check this video out !

https://youtu.be/89nvotfDCgk

Leave a Comment

Filed under AppliedDesignSkillsTechnologies, AR & VR, Not Subject Specific, Resources