Tag Archives: apps

Science Journal

whatisit.png

Science Journal is a free app developed by Google that allows mobile devices to record and document experiment results. A phone is no longer just a pocket-size device but also a compass, accelerometer, magnetometer, and so much more. With its easy-to-use features and extensive resources for educators, Science Journal is highly accessible and can be a great tool for classroom activities and lesson plans.

Some cool features of Science Journal include:

  • Ability to accurately measure and record light, sound, movement, and many more using built-in device sensors
  • Personal customization of projects with photos and notes
  • Compatible with multiple platforms such as Android, iOS, and most Chromebooks
  • Over 70 free activities available for students and teachers, organized by levels of difficulty and specific features such as “outdoors friendly” and “do at home”
  • Ability to sync with Google Drive which encourages students to collaborate in groups and continue the learning outside the classroom

Why-is-it-relevant-360x82.png

Science Journal is a valuable resource for educators as it makes many science experiments possible without the need for specific measuring tools. All you need is a mobile device that can download the app and a curious mind! Especially at this current time when many students do not have access to a physical classroom, Science Journal fills the gap by allowing students to conduct experiments at home and share the results with teachers online. As well, Science Journal encourages outdoor learning since students can take their mobile devices outside and run a science experiment.

Furthermore, Science Journal has a specific “For Teachers” page that has over 70 experiments designed by experts including California Academy of Sciences and Playful Learning Lab. This can be of special interest for teacher candidates going on practicums. Whether you plan on choosing an experiment from this extensive list or decide to make your own, the possibilities are truly endless. You can even submit your own experiment and have it featured on the site!


how-to-get-started-360x80.png

  1. Download the Science Journal App (also available in App Store)
  2. Sign in with Google account or continue without signing in
  3. Allow Camera and Photo Access
  4. Add a new experiment (look for the + symbol at the bottom right of your screen)
  5. Start collecting data

Below is a video demonstration of how to use Science Journal to create an exoplanet light curve. This activity is a part of the Phenomenal Physics and Astronomy At Home series developed by the UBC Physics and Astronomy outreach team.

Leave a Comment

Filed under Resources

Electronic Signatures

Teaching and working remotely brings about new challenges many of us haven’t considered. Authorizing documents through your signature may seem complicated when you cannot sign a digital screen with your pen. Thankfully, there are many solutions to this issue. Note that this post only covers electronic signatures and not digital signatures. Digital signatures involve cryptographic certificates to verify and decrypt messages. Electronic signatures involve putting a hand-written signature onto a digital document.

Scan and sign

If you are in possession of a printer and a scanner, you can still sign documents the old fashioned way.

  1. Print the document that you wish to sign.
  2. Sign the printed document with a pen.
  3. Scan the signed printed document using your computer’s native scanning software.
  4. Send the scanned documents to the intended recipients.

If you are not in possession of a scanner and only a printer, you can also scan with various mobile apps. You might even open the file on your mobile device and use any annotation tool and your finger, a stylus or e-pencil to Sign, Save and Send.

Here are two examples of mobile apps (many others are available) that can turn your mobile device into a scanner:

You can also sign a blank piece of paper, scan it and use that as a signature for future documents. The following software-solutions will expand on that.

Adobe Acrobat Reader DC

The free version of Adobe Acrobat Reader DC offers the ability to sign documents.

  1. In the right-hand corner of the tool bar, find the Fill & Sign button.
  2. Click the Sign button on the top tool bar to begin your signature.
  3. Choose between typing your signature, drawing your signature or uploading a picture of your signature.
    • This is where you can upload a scanned copy of your signature
  4. Save the document and send to the intended recipients.

macOS Preview

The native pdf viewer app (Preview) on macOS has a built-in tool to sign documents. Your Mac device will need to either have a trackpad or an iSight camera.

  1. Under the Edit button in the menu bar, show the Markup Toolbar (CMD + Shift + A)
  2. Click the signature button to begin creating your signature.
  3. Either choose to sign with your trackpad, or sign a piece of paper and hold it up to your camera with the iSight option.
  4. Save your document and send to the intended recipients.

Adobe Fill & Sign

On top of being a mobile scanning app as mentioned above, you can also use your touchscreen on your mobile device to sign documents. With this app you can either scan already signed documents or electronically sign scanned documents.

  1. Open the document you wish to sign with Adobe Fill & Sign.
  2. Tap on areas of the document you wish to write on.
    • You can add text, check marks, lines, circles and of course, signatures.
    • Save the document and send to your intended recipients.

You may wish to learn more about what qualifies as an electronic signature in Canada if you are signing legal documents.

Leave a Comment

Filed under Blog Posts, Digital & Media Literacy, Not Subject Specific, Remote teaching & learning, Resources

Programmation glisser-poser : Scratch

What is it

Scratch est un langage de programmation glisser-poser pour les enfants de tous âges pour apprendre les bases du codage. C’est gratuit et disponible comme application de web ou de bureau. ScratchJr pour les enfants de 5 à 7 ans est disponible sur les tablettes Android et iOS. Scratch vous permet de créer tout ce que vous voulez : des animations, des narrations et des jeux sur lesquels des matériaux informatiques (comme MakeyMakey) peuvent être branchés.

Fonctionnalités du dernier logiciel Scratch 2.0 2.0 Scratch version:

  • Comptes pour les profs et pour les élèves
  • Données dans le cloud
  • Blocs de codage glisser-poser
  • Télécharger des fichiers de votre propre ordinateur
  • Dessiner vos propres éléments
  • Blocs customisés
  • Programmes d’éditeur – Vector, Bitmap, Paint
  • Éditeur de son
  • Enregistrement des vidéos pour les projets
  • Partage de projets

Why is it relevant
Scratch est une façon simple et amusante pour aider les enfants à apprendre les bases de la programmation et du codage. On peut créer une suite d’événements en utilisant des blocs customisés qu’on peut glisser et poser – on code les actions qu’un certain élément réalisera. On peut ajouter des éléments du base de données de Scratch, télécharger des éléments de son propre ordinateur ou dessiner ses propres. ScratchJr permet aux enfants dès 5 ans d’apprendre à coder ! La programmation visuelle qu’emploie Scratch est pertinente par rapport au programme d’études de la C.-B. revisé – en particulier le programme de CCPT.

ScratchEd fournit aux profs un endroit en ligne où ils.elles peuvent voir des ressources pédagogiques pour Scratch, collaborer avec des autres éducateurs.trices et partager leurs propres histoires. Les profs peuvent y trouver des exemples de comment ils.elles peuvent employer Scratch pour engager un sujet avec leurs élèves, et de comment s’inspirer.

Regardez ce guide Co-Creative Activities for the 21st Century Kids (disponible en anglais seulement) pour explorer des idées de comment les activités de codage (avec et sans Scratch) peuvent s’intégrer dans un cours.

Regardez aussi le guide Creative Computing (disponible en anglais seulement), créé par un membre de l’équipe de recherche ScratchEd à Harvard.


How to get started

1. Allez au site Scratch, ou téléchargez le programme de bureau.

  • Si vous allez au site web, vous pouvez l’essayer (mais rien de ce que vous faites ne sera sauvegardé) ou vous pouvez vous inscrire sur le site et puis créer quelque chose (il sera possible donc de sauvegarder et partager vos projets).

Pour vous inscrire, cliquez sur le bouton « Rejoindre Scratch » (en haut de la page) et remplir les infos requises. Vous devrez aussi confirmer votre adresse e-mail.

Après vous êtes connecté.e, cliquez sur « Créer » (dans la barre d’outils en haut de la page) pour commencer un nouveau projet ou « Explorer » si vous voulez d’abord trouver de l’inspiration.

  • Si vous décidez de télécharger le logiciel sur votre ordinateur, cliquez ici et puis choisissez votre plateforme.

Ouvrez le fichier que vous venez de télécharger et installez-le.


2. Les interfaces de l’appli web et de celle de bureau sont pareilles.

  • Glissez des blocs de codage du menu « Code » (entouré en rouge) et posez-les sur l’espace à la droite. Faites se toucher les blocs pour définir une série d’actions.
  • Ajoutez un arrière-plan et des nouveaux personnages/objets (appelés « sprites », entourés en orange) du base donnée Scratch, téléchargez-en de votre propre ordinateur ou dessinez vos propres.
  • En créent des nouveaux sprites, cliquez-les pour programmer leurs actions.
  • Regardez votre projet sur l’écran d’affiche (entouré en bleu). Cliquez sur le drapeau vert pour activer votre projet et le signe rouge pour l’arrêter.

Leave a Comment

Filed under AppliedDesignSkillsTechnologies, Blog Posts, Curriculum, en francais, Resources, STEAM

Creating an Inclusive Environment through Digital Tech (LLED 360 – ELL)

BC’s classrooms and school populations are evolving which includes a growing number of English Language Learners who are entitled to support. To help Teacher Candidates in LLED 360 begin to consider this need, we worked with some instructors and their classes with some digital tools that will help ALL students, including ELLs.

Image the creation of Dr. Ruben Puentedura, Ph.D. http://www.hippasus.com/rrpweblog/

We discussed the theory behind selecting tools – specifically for ELLs and inclusive educational environments – by creating the distinction between tools for instruction and tools for learning. This was followed by taking that knowledge and applying it to the needs of ELLs based on their language proficiency levels. I also want to add that the class brought up the importance of a teacher evaluating a digital tool using the SAMR model. (Watch this SHORT video)

Afterward, we launched into Padlet to access TCs background knowledge on Digital Technologies and how they are currently being used in the classroom. This activity frames our conversations but also models how you can engage a Language Learner by giving them models to read, vocabulary to borrow, and time to think before providing an answer.

Padlet allows the creator to curate responses (a.k.a posts) and then select what format to view them in – we used a Wall so everyone could post at the same time but then we transitioned it to a Stream so that we could read responses one at a time. We then looked at other features of Padlet and discussed how it specifically supports ALL learners in a classroom. We also saw that the teacher is able to moderate the wall – a valuable affordance! A low tech version of this would be sticky notes or placemats or writing on the walls… with the limitation that not all learners can see at a glance the contributions of others… That said, it also allows for more movement when we write on the walls or circulate in a gallery walk!


In Margaret Early’s section, she introduced REWORDIFY – an online application that allows users to enter text and simplify it. This is great for teachers to adapt text for their students so that they can access the content and recognize key content vocabulary.

The second portion of  her class focused on Student Response Systems (SRS) and specifically how using the ESRU model allows these digital tools to be used for formative assessment (read more on the ESRU model HERE). Margaret and I each led a session based on groups modeled after classroom stations.

The Student Response System/All-class response or SRS tools we tried out where Plickers and Socrative, The third option, but we ran out of time, was for TCs to self-teach themselves Kahoot or Quizalize. The big takeaway is that these tools don’t have to be used only for summative assessment at the end of a lesson. They can be used for a K/W/L (know, wonder, learned), as a temperature check to immediately find out who needs support or to change the direction of a lesson, or as an exit ticket to inform the teacher of what to review or spend more time on in the following lesson.  

We also had some great questions brought up in class regarding screen time and youth. After discussing with Yvonne, she recommended Screen Time for Young Children  and Digital Media and screen time Guidelines for children and youth from the Canadian Pediatric Society which discusses this concern. I’ve also included a Canadian Guidelines of Physical Activity because it includes recommendations for teens, not just young children. Teachers can also educate their own students about appropriate uses of technology and model the transformative creative aspects it provides.

Slides from Margaret’s class:


In Kyle Stooshnov’s section, we focussed on multi-modal student response using ‘WhiteBoard style applications’ including Explain Everything, Showme and Puppet Edu which are common apps in local districts. We took the time to ‘play’ with Showme since it’s a free option TCs could download.

Using a Digital Whiteboard in a group allows TCs to practice their oral language as they worked together to accomplish a specific task. TC’s were challenged to use the ShowMe App to share how to make a paper airplane as a way to explore the benefits (and challenges) of using Digital Whiteboards. They were able to take photos, add text, draw their own arrows and if we had more time they would have also been able to narrate their presentations in-app.

Lastly, we discussed the resources available on the Scarfe Digital Website. We appreciate all the feedback TCs provided so we can make changes and improve it.

The slides below were used in Kyle’s class and include Digital Whiteboard resources which differ from the slides used in Margaret’s class.


Another approach we discussed was incorporating a ‘backchannel’ for students to ask their questions or make comments as they occur to them during a lesson. The teacher might watch the channel or simply review it afterwards and address it later in the lesson or the next day… There are many tools to help with this approach including some of those explored for All-Class Response. A backchannel can provide ‘student voice’ by letting them post questions throughout without needing to raise their hands or feel like they’re interrupting. It can also provide some anonymity for learners and some formative assessment for the teacher. In conversation with some school district admin, learning to leverage the backchannel was mentioned as valuable for early career teachers. Recognize that it exists and leverage it when possible.

When selecting a tool, consider carefully your needs, access and whether it is valuable for students to view the responses of others in real time or if it is better for only the teacher to see responses (i.e. moderate responses). Deciding on your purpose and knowing which tools afford which options is important.  Teams or Google Classroom are in use in many SDs and will provide backchannel options.

A NO TECH version of a backchannel chat could be a question box or a parking lot poster on the wall. Students have sticky notes, cards or notepaper and record questions as they occur to them. Students can share their notes in the box or on the poster during a break or as they wish/need to move (when and how they share depends on their needs and yours… are you comfortable with students standing and moving while you are speaking or while others are speaking? do you have students who NEED regular movement breaks? can you schedule a time for everyone to move? Another NO TECH approach is a snowball – students record their ideas/questions and crumple and toss… a bit chaotic but, depending on your needs and the environment, valuable!

It was a pleasure working with the group of soon to become Educators! If you’d like to explore anything related to teaching, learning and digital technology further, please be in touch or click the ‘Ask a Question’ link in this blog.


Additional Resources

Colourful Handouts

Padlet Instructions | Socrative Instructions | Plickers Instructions | Kahoot Instructions| Quizalize Getting Started Guide

Leave a Comment

Filed under Blog Posts, Inclusive Practices, Planning

Word Clouds

whatisit.png

A word cloud is a cluster of words that responsively shows most used words as larger or more pronounced that lesser used words. It is a form of data visualization sometimes called ‘text’ or ‘tag’ clouds. You sometimes see a word cloud to represent the tags used for posts on a blog.


Why-is-it-relevant-360x82.png

A word cloud allows you to represent the most important or most used information in a single graphic. One might create a word cloud using a paragraph or two of text in order to visually tease out relevant information or you might use a word cloud to represent the results of a brainstorm or group discussion.

illustration of a word cloud from wordsift.org

Word cloud of text from this post using wordsift.org

Word clouds are excellent for visualizing the attributes of a character, the key points in a plot or features of a civilization. I’ve even used word clouds as a way of having students share their observations of a particular place, field trip location or image/video. Word clouds also make fun gifts… have a group of people share words to describe someone they wish to thank, then share the cloud with the recipient! Perfect for framing! Depending on your purpose, there will be a ‘tool for you’!


how-to-get-started-360x80.png

Steps:

  • Determine your purpose or objectives
  • Select a tool that meets your needs
    • Keep in mind data privacy as you make your selection – avoid tools that require personal information or login.
    • If you want multiple people/students to add to the word cloud, select an all class response tool that allows co-creation.
  • Add your text and create. In most Word Cloud applications, you can also manipulate the text to an extent using themes, colours, font, orientation, shape. Typically, you can also limit the number of words and eliminate select words.

Co-creation tools (multiple people can add words to a single cloud in real time):

    • Answer Garden – this is a student response system (no login required) where you can launch a particular question for a brainstorm, gather responses from a group and a word cloud is autogenerated.
      • A quick and visual way to share the results of a brainstorm!
      • No sign up needed (by teacher or students).
      • Teacher can set up an Admin password and make various adjustments/moderate resposnes.
      • The ‘AnswerGarden’ can be embedded in a Canvas page (find embed code in ‘share’ settings)
      • Students can access and respond from within Canvas.
      • Drawback: When using the direct link to the ‘garden’, there are large banner ads. These do not appear in the Canvas embed.
    • MentiMeter – is quite a powerful all class or student response system.
      • allows multiple question types and a variety of data visualization options (scatter plot, bar graphs, charts, text bubbles, word cloud and more).
      • Menti requires teacher sign up but no student sign up.
      • The Menti ‘live presentation’ can be embedded in Canvas.
      • Drawback: Students access and contribute via menti.com using a join code (not directly in Canvas)

Individual Tools (copy and paste a block of text to create a word cloud):

  • WordSift.org is my preferred site since it was created and is maintained by a Stanford grad student and is the result of a grant project linked to an academic institution! They even include a ‘theory’ section including references and several useful teaching tips on their website. With WordSift, users can upload/paste text, create and manipulate word clouds and capture the results in moments. It has an intuitive interface with no login required and plenty of tutorial info. There is so much potential here for the creative user or educator! Once created, select on an individual word to see a visual map thesaurus (much like ThinkMap above!), see words ‘in context’, definitions and images. Use the settings wheel to adjust number of words, orientation & more.
  • WordClouds.com allows you to paste a block of text to create a custom word cloud. The cloud can be ‘masked’ with a visible shape or ‘unmasked’ (without a border or visible shape). When you arrive at wordclouds.com, select File, New Word Cloud –> File, Paste/type text (or import from URL or file upload!)

Unique uses of WordClouds for visualization:

  • ThinkMap Visual Thesaurus: Word clouds or maps autogenerated when you enter a word into the thesaurus! (free trial only or paid subscription needed)

Leave a Comment

Filed under Active Learning, Not Subject Specific, Resources

Socrative.com

whatisit.png

Socrative is an online assessment tool that allows teachers to assess students through the use of cloud-shared quizzes, exit slips, and informal question prompts.
The students can take the quizzes using their smartphones and laptops and teachers can see immediate feedback. Teachers are able to write quizzes using Socrative’s web applet and are also able to see statistics evaluating a student’s performance. Socrative also allows teachers create team learning games. Quiz question options include multiple choice, true/false, and short answer. Quizzes that a teacher creates can be exported and downloaded, so teachers are able to share quizzes with other teachers.


Why-is-it-relevant-360x82.png

Deploying Socrative quizzes works well within a classroom setting, allowing students to use any electronic device to submit their answers. Socrative offers flexibility to teachers when it comes to how they would like to deploy Socrative quizzes. Socrative gives the ability to launch pre-created quizzes through:

  • a Regular Quiz
    • Students will complete the quiz by answering one question after another.
  • a Space Race
    • Students will be organized into teams and will compete against each other in seeing who can answer the most questions quickest.

Teachers can also utilize an Exit Ticket option to allow students to give feedback about the class and have a field for them to answer a question you pose. You can use this option as a mandatory quiz for students to complete before they are able to exit the class (as the name suggests.)

Socrative can deploy “quick questions.” This is useful for cases where a teacher has not previously prepared to ask a specific question in class, but would like to see immediate feedback. These “quick questions” can be Multiple Choice, True/False, or Short Answer.

*Keep in mind that multiple choice/selection questions are the most difficult to create well, so pre-planning them is always optimal.


how-to-get-started-360x80.png

Create a quiz

  • Sign up for a Socrative account at socrative.com
  • Create a quiz by going into the Quizzes tab, then click “+ Add quiz”
  • Give your Quiz a name, and build your first question by choosing multiple choice, t/f, or short answer.
  • Add an explanation to your answer for more completeness.
  • Save the question, continue building your quiz.
  • Once you have finished, click Save & Exit and launch your quiz.

Launch

  • Click into the launch tab, and choose whether you’d like to deploy your quiz as a regular quiz, a space race game, or an exit ticket.
  • Choose your quiz, choose your delivery method (instant feed back, open navigation, teacher-paced)
  • Give out your Room Code and ask your students to input it into here to participate: https://b.socrative.com/login/student
  • Once your students are finished the quiz, click the finish button, and click the view Chart button to see the results of your students.

videopng-360x61.png

Leave a Comment

Filed under Resources

HP Reveal – Augmented Reality Platform

IMG_0154


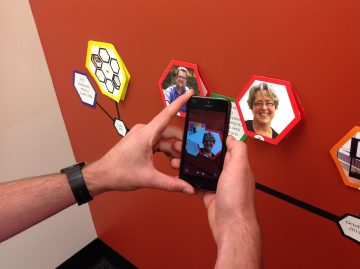
User scanning a trigger with the HP Reveal app

whatisit.png

HP Reveal (previously known as Aurasma) is an augmented reality platform accessible via the web, mobile app, or as a software developer’s kit (SDK).

Users upload “trigger” images and add overlays like images, video, 3D animations and sounds to them either through the web application or on their devices. Making your Auras public allows your followers to scan your trigger images in the real world in order to view your Auras.

Free Features:

  • Shared Auras (users must follow you to view)
  • Unshared Auras (which you can still share with specific user using links)
  • Social media sharing (with controllable sharing permissions)

Why-is-it-relevant-360x82.png

As virtual and augmented reality software and applications like Pokémon GO become more advanced and accessible to the average user, educators must ask themselves where they might benefit the educational community. The value in HP Reveal is that it brings static content to life, turning an observational learning environment into a more interactive one. There are already a number of ways teachers have incorporated this platform in their classrooms to boost student engagement and interactivity.


how-to-get-started-360x80.png

  1. Download the HP Reveal app from the Apple App Store or the Google Play Store depending on your device
  2. Sign up with your email, create a username and password
  3. Create your first Aura:
      1. Take a picture of an object to act as a trigger. HP Reveal works best with flatter triggers like pictures, posters, or patterns. The more detail in the image the better.
      2. Upload the image either from your device or through the web application.

    Screen Shot 2016-08-26 at 10.20.29 AM

    Screen Shot 2016-08-26 at 10.30.48 AM

  4. Add overlay content. When the trigger image is scanned the overlay content will be displayed. If you are creating the Aura on your device you are limited to the default overlays that come with the application. Creating Auras through the web application allows you to upload 3D animations, sounds, images, videos, and add actions to each to make them even more interactive.
  5. Screen Shot 2016-08-26 at 10.39.56 AM

videopng-360x61.png

Leave a Comment

Filed under AR & VR, Not Subject Specific, Resources