Tag Archives: apps

Verbally: Text-to-Speech

whatisit.png

Verbally is a convenient, Augmentative and Alternative Communication (AAC), text-to-speech app that can be used to help your students with challenges in communication. Currently (August 2017) it is only available for iPad and iPhone. With Verbally, your students can either choose from the word clouds provided to create sentences or they can type in a sentence. After the sentence has been inputted, the app will read it out loud.

Free features include:

  • Core Words Grid – contains 50 essential words to save you time when inputting your sentences
  • Core Phrases Grid – offers common phrases to enable faster and easier conversation
  • Text Prediction – the app learns the words you use and makes self-expression easier
  • Choice of male or female voice.
  • Steady Hands feature – if your students have limited motor abilities, this feature makes it easier to type

Premium Features (paid):

  • 3 new voices to choose from (1 male, 1 female, and 1 child’s voice)
  • Customize your own phrases and save them as your favourite
  • Personalize your predictions
  • Find what you want to say from past phrases spoken
  • Connect through email and compose your email with Verbally

For more information, check out the Verbally website.


Why-is-it-relevant-360x82.png

As a teacher, it is important that you can ensure that your students with different learning styles and disabilities such as selective mutism or autism spectrum disorder (ASD) have the opportunity to communicate with you and their classmates. With Verbally, they can easily communicate and engage in the classroom.


how-to-get-started-360x80.png

  1. Download the app on your iPad or iPhone from the iTunes store.
  2. Go to “Settings”, and set up important components such as the voice, keyboard, and predictions you would like to use.
  3. Test out the app by choosing words from the word collection or type in the sentence that you would like it to say.
  4. Click on “Speak”.

videopng-360x61.png

Leave a Comment

Filed under Assistive Technology, Not Subject Specific, Resources

AR Flashcards: A new way to engage your students


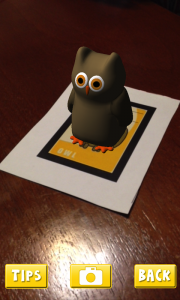
AR Flashcard – Animal Alphabet

AR Flashcards are a series of Augmented Reality apps used to teach your students words and concepts based on different categories such as animals, shapes, colors and planets. By using 3D animation, AR Flashcards bring print outs of animals and planets to life.

Some main features include:

  • colorful renditions of animals, dinosaurs and the solar system
  • sound effects
  • screenshot button which allows you to save your pictures

Click here for more information…


AR Flashcards are great tools for early childhood educators and English as an additional language (EAL) instructors. AR Flashcards create an entertaining way to introduce different vocabulary words to young children. According to testimonials, students have engaged with the app and have enjoyed the learning process:

“It’s definitely unique and a very clever way to get children involved in learning the alphabet and animal names.”

“Love how the animals pop up! My son gets a huge smile on his face when the animals appear. The new graphics are great and being able to take pics is cool.” (Augmented Reality Flashcards).


  1. Download and print out the cards from here . (Tip: print out flashcards in color and use cardstock paper)
  2. Download and install AR Flashcards to your mobile devices (the Alphabet and color have free versions where as the rest are paid apps) .
  3. Double tap the screen to bring up the focus button onto the flashcard so that you can adjust your device’s camera to bring the cards to life.

videopng-360x61.png

Leave a Comment

Filed under AR & VR, Math, Not Subject Specific, Resources

iMovie

iMovie is an IOS and MacOS based video-editing tool. With iMovie, you can choose and edit previously shot videos, add titles, music and effects in only a few steps. In addition, you can access your creations from any Mac device, and you can publish or share it on various social media platforms such as Facebook, Vimeo, and YouTube.

Features include:

  • various built-in music and sound effects
  • 10 creative video filters
  • voice-over recording
  • speed-changing effect
  • picture-in-picture effect
  • split-screen effect

With iMovie, you and your students can create engaging videos that can be shared with the class and that incorporate topics relevant to the lesson. iMovie allows you to use different effects and features to edit and add different elements to your video. For example, as an instructor you can add titles and record voice-overs that can be useful when trying to guide your students or provide additional information.

In addition, with iMovie’s effects, students can add a broadcast feel to their productions with picture-in-picture and split-screen effects. They can also place their characters “on location” in exotic places using green-screen effects. Last but not least, using the built-in filters, you and your students can easily make videos look more professional.

Click here for more detailed information about iMovie’s features.


  1. Download iMovie here or from the iTunes store on your iPhone/iPad. After downloading the app, choose to create a new project with your app.
  2. Name your video and set the aspect ratio. The widescreen ratio (16:9) is recommended.
  3. Choose the theme you wish to use. Take the time to play with the theme before making your decision. Of course, you can always switch to a different theme while editing as long as you ensure the “Automatically Add Transitions and Slides” option is unchecked; otherwise, you will need to do some tedious work on manually setting up the timeline.
  4. In order to import your video, go to “File” in the menu bar, select “Import”, and click on “Movies…”. From here, you will choose the video files that you would like to import into iMovie.
  5. Now you need to select which clips you would like to add into your video. Once  your clips are loaded into the iMovie project database, select which clips you would like to add into your video. Click on each clip and drag it into the timeline. While adding your clips, make sure to put them in the right order.

Leave a Comment

Filed under multimedia creation, Not Subject Specific, Resources

SECTIONS Model – Assessing Technologies in the Classroom

whatisit.png

The SECTIONS Model is an applicable framework that educators can use to evaluate the effectiveness of applying a certain technology in their classrooms. SECTIONS specifically refers to 8 different areas: Students, Ease of use, Costs, Teaching & Media, Interactivity, Organizational issues, Networking and Security & Privacy.


Why-is-it-relevant-360x82.png

Inquiry, creative thinking and digital literacy have gained significant importance in the classroom and are playing a larger role in education. As an educator, it is thus essential to recognize the importance of integrating digital technologies in the classroom. A common question remains : How can educators evaluate and select the most appropriate technology to use in their classroom?

Using the SECTIONS MODEL by Bates and Poole, can help guide the instructor since it was designed to “facilitate decisions with regard to choice of technology at both the strategic and the tactical level, and also to help decide within a particular technology the most appropriate balance between different media” (Bates & Poole,2003, p.79-80). This makes SECTIONS a great tool to use to support decision making on technologies in the classroom.


how-to-get-started-360x80.png

Based on the handout provided by UBC Wiki, the process of using SECTIONS can be summarized as:

  1. Define

In this step, instructors should think about what they want their students to learn, what kind of activities they wish to use, and what technology can they integrate into their approach.

  1. Assess

Instructors can use the SECTIONS model as a checklist to assess the technology that they are thinking of using in the former step to see if it aligns with their goals.

  1. Implement

After assessing the technology, it is time for the instructor to implement it in the classroom. Allow students time to engage with the technology and let them help you with the evaluation process.

  1. Refine

Refine your approach based on the reflections you obtained from your students and your own self-reflection of the implementation process.

Want more support in using SECTIONS to evaluate technologies? Click here to look at the UBC Wiki handout – Assessing Technologies!


videopng-360x61.png

Reference
Bates, A. W., & Poole, G. (2003). Effective Teaching with Technology in Higher Education: Foundations for Success. Jossey-Bass, An Imprint of Wiley. 10475 Crosspoint Blvd, Indianapolis, IN 46256.

Save

Save

1 Comment

Filed under Not Subject Specific, Resources

Code.org: unplugged and plugged activities

stockvault-random-numbers136890

whatisit.png

Code.org aims to increase access to computer science in schools. It contains a large collection of activities, lesson plans, and tutorials that encourage school-age learners to explore the basics of computer programming. Topics include computational thinking, algorithms, abstractions, and even digital citizenship.


Why-is-it-relevant-360x82.png

With the onset of the Digital Revolution, computer skills, even at a basic level, are fundamental, especially when considering digital inclusion, literacy, and access. Contrary to what many believe, coding activities are not always performed in front of a screen. There are a host of unplugged activities that teach real-life problem solving skills and digital representation. Some of these can even be used in makerspaces to create digital-like but tangible gadgets.


how-to-get-started-360x80.png

Check out these examples of different types of activities:

  • Hour of Code: In this Classic Maze lesson, learners give instructions to Angry Birds characters, just like line-by-line programming. The instructions are dragged and dropped on the screen, and a Test run performs the instructions in animation format. The lessons are sequential and learners explore game programming.
  • Unplugged lessons: In this Binary Bracelets example, students make a bracelet representing the first letter of their name, learning about basic data storage and digital literacy.
  • App Lab: For more advanced students, these activities teach app making and coding with JavaScript.

videopng-360x61.png

Leave a Comment

Filed under AppliedDesignSkillsTechnologies, Resources

Plickers – Student Response System

whatisit.png

 ‘Plickers’ is a free Student Response or All-Class Response System (SRS), useful for those without access to one-to-one devices in the classroom. All you need are some downloadable and printable class cards, the Plickers app, and one handheld device. The students hold their cards up based on their answer (A, B, C, D), the teacher scans the cards from anywhere in the classroom using a smartphone, tablet or iPad, and the responses are automatically entered.

You and the class can view a graph of responses if you connect your computer to a projector (without your students seeing who provided which individual response). Teachers can ask multiple choice questions or yes/no questions and can save the results of each quiz or poll in their teacher account.

NEW: Plickers now has hybrid and online mode for using plickers face to face, online (or in both modes at once!). The Plickers question editor allows you to include advanced mathematical and scientific equations. In addition, the ability to include images, Gifs, sound and other multimodal features might add a more gameified feel!


Why-is-it-relevant-360x82.png

Regular check-ins with your students during instruction aids formative assessment and future planning. Teachers often use thumbs up/down or hands up or fingers to try to gauge understanding or interest but these ‘systems’ can be difficult if not impossible to track. Plickers allows you to save the individual student responses (and you don’t need to ‘give away’ any of your students’ information to do so).

Plickers can even be used in the gym or outdoors (be sure to download the large sized cards if using in large spaces). This youtube video shares how one teacher uses a ‘magnet version of Plickers’ called ‘Plagnets’ in a PHE class.

Many teachers lack access to individual devices needed to use other student response systems (iClickers, Socrative, Menti, Kahoot and others). With Plickers, all you need is an app, one device and printable cards for your students. Some excellent features include (excerpts below from Plickers.com):

1. Scoresheet: “review your students’ results over multiple questions. Use it to spot learning trends with students, identify questions to review from a unit, or even get grading done faster.”

2. Individual Student Reports: On the left panel of Scoresheet, you can print individual student reports or save them as a PDF. The first sheet provides an overall class average and lists the 3 most commonly missed questions for you to save for your records, while the remaining pages contain individual student reports including the question and answer choice selected.
This resource can be used in a second language classroom such as French Immersion, Core French, etc.

More information about features is available   on the Zendesk on the Plickers website.


how-to-get-started-360x80.png

Go to Plickers.com and set up a free teacher account. When you select ‘classes’, you will be prompted to enter student names or aliases which will automatically be assigned to a plicker card number. If you teach multiple classes, you can simply create a new class and add the new students and there’s no need to have a separate set of plickers cards since the app easily lets you toggle between your classes.
Now all you need to do is think of some excellent questions – remember, the questions you ask can make or break an assessment opportunity. Think carefully about your questions. I’d also suggest having a few ‘generic’ questions (i.e. temperature checks, checks for understanding) that you can use at any time regardless of subject or content.
Plickers Quick Start Instructions


videopng-360x61.png

Leave a Comment

Filed under Not Subject Specific, Physical and Health Education, Resources

Assistive Technologies for Communicating

There are many assistive technologies available for teachers and their students. In terms of communicating,  digital technologies can include augmented and alternative communication apps, text to speech, text to sign language tools and closed captioning.

These digital technologies can assist your students, particularly those with written and/or verbal communication challenges. Providing options for students in how they share their learning can support equity in the classroom – ensuring access for diverse learners.

how-to-get-started-360x80.png

There are many resources that you can use in your classroom to afford multimodal communication opportunities for students and also assist students with exceptionalities. Below are only a few examples. Simply click on the name of the resources and you will be direct to the resource posts on Scarfe Sandbox or a concise introduction video! All of these tools are either free or with relatively low cost (less than 5 CAD).

Leave a Comment

Filed under Assistive Technology, Not Subject Specific, Resources