Tag Archives: apps

Kahoot! : Free Tool for Creating Learning Games !

whatisit.png

Kahoot! is a platform for teachers to create fun, engaging learning games with little technological knowledge/skill needed.

In Kahoot, you can create a series of questions combining with images, videos, diagrams, etc. The number and type of questions fully depend on your needs, and your students can get access to your learning game by simply go to kahoot.it and input a 4-digit number comes with your game.

There are four different types of Kahoots you can create, include:

  1. Quiz: you can use quiz Kahoots to introduce a topic, review what you’ve been teaching in a class, or use the quiz results to offer rewards to some of your students.
  2. Jumble: it’s a type of brand new game that allows students to rearrange the sentences, sorting algebraic equations, or putting historic events in order, etc. To learn more about Jumble Kahoot, click here for more information.
  3. Discussion: you can create Discussion Kahoots to initiate and facilitate a debate
  4. Survey: use this kind of Kahoot to gather opinions, insights or students’ feedback on a specific subject, a special event, workshop, or a class.

Why-is-it-relevant-360x82.png

Teachers need different forms of assessing their student learning and Kahoot! offers a “gamified” version of getting student feedback. It can be used to gather student background knowledge, assess midway through a unit to see if Students are getting the “big idea,” or used as a review.

With Kahoot, students can answer questions on their own devices, while games are displayed on a shared screen. As a teacher, you can pick from the existing games that other teachers have uploaded and even contribute your own games to the community.

Teachers should think carefully about their objectives and utilize the appropriate kinds of questions to help meet those objectives, elicit student understanding and propel learning. Consider varying questions between selection and supply and access the different areas of Bloom’s Taxonomy. This graphic, shared on Flickr by Enokson helps connect Bloom’s with question frames for assessment.

CC image Enokson Flickr Stream

Students might also create their own kahoots to deepen their understanding of the class content.

Kahoot allows you to connect and play in real time with other players in other places (synchronous learning across space!)

*at the time of writing, Kahoot does not seem to allow you to track student responses. If you are interested in trackingindividual responses, consider Plickers or another student response system.


how-to-get-started-360x80.png

  1. Create a teacher account on kahoot.com
    • There are several video tutorials on the site to help you out.
  2. Create a new Kahoot by selecting the type of interactivity you want to create.
  3. Title your Kahoot, add a description, and set up the visibility, language and audience type. Feel free to add a cover image to customize your Kahoot and invite engagement.
  4. Now you can start to work on your questions.

Let’s take Quiz Kahoot as an example, first, input the question to the “Question” area (here, we recommend you to prepare with the questions in another document, that will fasten your Kahoot creation process. Then, set up the time limit for the question, and feel free to add awards points to the question if you are doing a quiz. After this, input the answers and click on the checkmark next to the correct answer(s). Remember to give credit to the resources that you have used/ referred to in your questions.

  1. Now it’s time to save and share your Kahoot!

How to get access:

  1. Go to a web browser
  2. Go to kahoot.it
  3. Enter the game pin that showed on the shared screen
  4. Enter a nickname and start to answer the questions

Kahoot Instructions One Page Handout


videopng-360x61.png


1 Comment

Filed under Not Subject Specific, Resources

Augment: designing and customizing your own augmented reality

whatisit.png

Using Augment in Education – It’s all free!

Augment is a tool to design and integrate Augmented Reality (AR) into your classroom. There are three components included: the Augment app, the Augment Manager and the Augment Desktop. The Augment app allow you to visualize 3D Models via the camera on your mobile devices. The Augment Manager is used to upload and manage various models. Lastly, Augment Desktop makes it simple to design and animate models before publishing them (click here for a tutorial to get started with your design!)


Why-is-it-relevant-360x82.png

Augment is one of the top AR apps on the market and is an effective tool that can be used to enhance your lessons and activities. Its visuals can help present your designs and captivate your students with 3D interactive experiences. In addition, it allows you to update course content without wasting paper.
In fact, Augment can specifically help you:
  • Engage students by drawing their attention with interactive presentations, posters and text book enhancement
  • Clarify complex concepts that would be hard to understand with a 2D handout. For example, educators use Augment to help students see the difference in the movement of gas molecules and liquid molecules in containers through animated 3D models
  • Empower your lessons by updating content and models for classes without printing

how-to-get-started-360x80.png

There are a few steps to get started with using Augment in your classroom:
  1. Create an account on manager.augment.com.
  2. Click on upgrade Now and choose Education Plan.
  3. Download the Augment App free on IOS or Android and log into your account.
  4. Upload 2D images of your model, or you can choose to find 3D models to use from the following sources:

videopng-360x61.png

Want to know what other educators did with Augment? check this video out !

https://youtu.be/89nvotfDCgk

Leave a Comment

Filed under AppliedDesignSkillsTechnologies, AR & VR, Not Subject Specific, Resources

Poll Everywhere: engage your class in real time

whatisit.png

Poll Everywhere is a web-based and mobile app that you can use to engage your audience and to support classroom assessment. You can use your mobile device or log in with a web-based version to start a question and your audience can respond to your question with their own device by scanning your QR code, texting or finding you via the shared URL. Once students respond, you can see their real-time responses and present the results in your PowerPoint, Google slides, keynote, or on your website.

Depending on your needs, you can choose from a free educator plan or various paid plans. The K-12 Basic plan is Free (teacher account/sign-up needed; no student account or login required) and you get:

  • Responses per poll: 40 (explain)
  • Allows to present via Powerpoint, Full-screen web presentations, Many question types, Live word clouds, Text walls, Customize look & styles
  • Support: FAQ online

Why-is-it-relevant-360x82.png

Using Poll Everywhere in your classroom, you will be able to collect students’ answers and feedback in the moment. It can also be used as a great tool to engage your students and probe their understanding in a certain concept as an activity strategy or closure. This formative feedback can support teachers in planning and scaffolding instruction.


how-to-get-started-360x80.png

To get started with Poll Everywhere, there are a few steps:

1. Teacher signs up/Login to Poll Everywhere

2. Create your questions on your laptop/desktop in the browser.

Using Poll Everywhere, you can choose from a large variety of poll activities, including multiple choice, open response, live word clouds, clickable images, up- and down-voting for Q&A, and rank order. Plus, you can write your questions in different languages as well!

3. Invite your students to respond.

They can go to a customizable web address on their mobile devices or computers (by scanning your QR code or inputting the address into their browsers ) or send a text message to participate. As a teacher, you’re encouraged to use a premium moderation feature, that will allow you to filter the response before they are presented on the shared screen.

3. Collect the results and share with your students.

You can simply use a live chart to present the results, and also change the color, font or images as you want. To display it, you can use a web browser or embed your results in your Powerpoint or Google Slides as well.


videopng-360x61.png

3 Comments

Filed under Not Subject Specific, Resources

Drag and Drop Programming: Scratch

whatisit.png
scratch


Scratch Logo by MIT Media Lab, modified (CC BY-SA)

Scratch is a simple drag and drop programming language for kids of all ages to learn the basics of coding. It is free and available both as a web and desktop application. ScratchJr for ages 5-7 is available on Android and iOS tablets. With Scratch you can create anything: animations, stories, narratives and games to which hardware such as the MakeyMakey can then be connected.

Features of the latest 2.0 Scratch version:

  • Student and teacher accounts
  • Cloud data
  • Drag and drop coding blocks
  • Upload files from computer
  • Draw your own elements
  • Custom blocks
  • Video sensing
  • Vector, Bitmap and Paint editors
  • Sound editor
  • Record project video
  • Project sharing

Why-is-it-relevant-360x82.png

Scratch is a simple and fun way for kids to learn about the basics of programming/coding and to practice computational participation. Using custom blocks that one can drag and drop, you can build a sequence of events and essentially code the actions to be performed by a certain element. You can add elements from the Scratch library, upload from your computer or draw your own. With ScratchJr kids even as young as 5 years old can learn to code! Visual programming, like that used in Scratch is relevant to the BC revised curriculum, in particular, the ADST curriculum.

ScratchEd provides teachers with an online space where they can view teaching resources for Scratch, engage with other educators and share their own stories. There, teachers can find examples of how they can apply Scratch to engage students in their subject matter and get inspired.

Check out this Co-Creative Activities for the 21st Century Kids guide to explore some ideas on how coding activities, both unplugged and plugged (using Scratch) can be integrated into the classroom.

Also take a look at the Creative Computing guide created by member of the ScratchEd research team at Harvard.


how-to-get-started-360x80.png

1. Go to the Scratch website or download the desktop program.

  • If you go to the website, you can either just try it out  (which won’t save any of your work) or first join Scratch and then create (this way you can save and share your work).

To join, click on the blue “Join Scratch” button and fill out all the required information. You will also have to confirm your email.

After signing in, from the toolbar on the top of the page click “Create” start a new project or “Explore” if you first want to look for some inspiration.

  • If you decide to download the software to your computer, click here and then choose for which platform you are downloading.

Open the file that you downloaded and install it.

2. The interface of the web based and desktop application are the same.

  • Drag and drop code blocks from the “Scripts” menu (outlined red) to the building space on the right. Connect blocks to define a series of actions.
  • Add a stage backdrop and new characters/objects called sprites (outlined orange) from the Scratch library, upload from computer or draw your own.
  • As you create new sprites click on them to program their actions.
  • View you final project on the project display screen (outlined blue). Click on the green flag to activate your project and the red stop sign to stop it.


videopng-360x61.png

Curious about creating a simple animation from scratch (no pun intended)? Below is a video demonstration using Scratch to build a solar system. The “remix” template is provided by the UBC Physics and Astronomy Outreach team. For detailed instructions, please check out their physics-at-home activity, with new challenges introduced throughout the summer. From adding comets to altering the Sun’s mass, there are many opportunities to unleash your creativity and make the project customized.

Leave a Comment

Filed under AppliedDesignSkillsTechnologies, Resources

Anatomy 4D : using AR to teach human body structure

PLEASE NOTE: Anatomy 4D is no longer available, but you may still be able to use the app if you downloaded it prior to May 2018. You can explore the other AR/VR technologies in our collection of resources to see newer alternatives to Anatomy 4D.

whatisit.png

Anatomy 4D is an iOS and Android-based, Augmented Reality app to help your students explore the human body and human heart structure with the cutting edge technology. It can help you simplify the complex concepts and help your students better understand the content!

Why-is-it-relevant-360x82.png

Based on instructors’ testimonials, Anatomy 4D has developed an interactive and amazing tool to engage students with important biology concepts allowing them to learn and explore the human anatomy. In fact, the 4D images and resources available on Anatomy 4D allow users to delve into the body through augmented reality and is currently used by students, teachers and medical professionals.

“Anatomy 4D is a fantastic app. It helps to understand human body structure to great extent to a layman like me.”( Purushottam Kunte)


how-to-get-started-360x80.png

  1. Download and print out the the posters (card stock paper is recommended).
  2. Note: posters must be colored.
  3. Download the Anatomy 4D app from iTunes or Google Play.
  4. Open the app and use your camera to scan the colored poster; use the filters to change what has been presented in front of you!

videopng-360x61.png

Have a quick look at how Anatomy 4D works:
Heart Target:

Body Target:

2 Comments

Filed under AR & VR, Resources

Green Screen for Storytelling


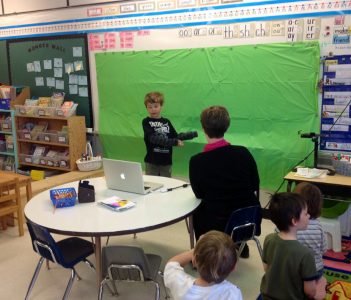
2016-10-06_10-50-33


Creative Commons licensed image courtesy of Kathy Cassidy (flickr)

whatisit.png

Create your own narrative using green screen technologies. Using a Green Screen (sheet of fabric or paper or even a chalkboard) and a video editing application, you can filter out the background of any image or video so that you can overlay your central image on any background – real or imagined!

Green Screen by Do Ink is a paid app available for use on iPads and iPhones. It is relatively inexpensive and has a simple and friendly interface that allows one to create green screen videos and photos effortlessly and in a matter of minutes. Features include:

  • Live recording and media upload
  • Combine up to 3 media sources
  • Scrollable timeline
  • Basic video editing
  • Color picker tool
  • Crop and mask tools
  • Saving and exporting

While the Do Ink app makes it fairly straightforward to utilize the green screen effect, there are other ways to achieve it:

  • Camtasia is a more powerful video editing and screen capture software that is available to UBC students, faculty and staff as a free download through UBC IT. One of the many functions of Camtasia is that you can filter out a chroma key color and make a green screen video or image. In effect, erasing the existing background and adding your own.
  • Many other video editing softwares will allow you to filter chroma key colour.
  • There are several free and paid iOS and Android apps on the market but, so far, I haven’t found one I like more than the Do Ink version.

Why-is-it-relevant-360x82.png

Green screen technologies can be incorporated into the classroom in all kinds of ways, the possibilities are endless and include student weather forecasts, time travel and fictional character interviews! Teachers can create media to engage students in a topic, showcase examples and record video lectures or tutorials. An astronomy teacher might be virtually transported into space as they give a ‘tour’ of the stars to their students. Green screen technologies allow you to transport to any place in the world or any time period! Especially now when students and teachers are spending so much time online, green screen technologies offer exciting varieties to one’s video background and are very effective for storytelling. Students can do video blogging, shoot their own movie with special effects or do a video presentation that appears to be taking place in any number of unique settings. For more inspiration on how to use green screen click here.

how-to-get-started-360x80.png

Green Screen Instructions

 1. Download Green Screen by Do Ink from the App Store and open it on your device.
image1
2. Click on “+” sign in the top right corner to create a new project.
image-003
3. Select a source for your project:
      – You could use the camera on your device to capture a picture or video or;
      – Upload existing media
Tip: If the object or person is in front of a plain background, the program can automatically filter it out (green and blue work best).
4. Select the rainbow wheel and turn on “Chroma Enabled”.
5. Select the colour of your background from the wheel and regulate the sensitivity to filter out the background.
Tip: If your background is not all of the same colour, try editing manually for best results:
      – Click on the mask symbol and then the eraser symbol and erase parts that are not automatically filtered.
 image-009
6. When you are done filtering out the background, under the current image or video select a source for the new background.
7. You can then drag and adjust the position and size of your sources by first selecting them from the timeline.
8. When you are ready you can choose if you want your media to display as a video or an image then select save.
image-00f
9. You can choose how you would like to export your media.
image-011
Now start creating and have fun! For more detailed use of the app, check out the Do Ink website.

videopng-360x61.png

Green Screen Videos Bring Content to Life

Green Screen by DoInk App Enables Creation ot Green Screen Effects on iPad & iPhone

Leave a Comment

Filed under AR & VR, multimedia creation, Not Subject Specific, Resources

iPad possibilities – preparing for practicum!

UBCSandbox

Technology use for technology’s sake is not what we are striving for in education today. Transforming learning by providing opportunities that would not otherwise be afforded is a goal that, with emerging technologies and increased access, may be achievable. This transformation can be as simple as allowing for as-needed differentiation, as is the case when providing a student with the option to audio record, video record or ‘screen capture’ record his/her ideas or can include such opportunities as sharing their ideas and creations with a larger audience online.

Explore some ways to connect with students and provide for interactivity – my top 5 apps for student engagement and expression (including some that are cross platform!). Download the Handout for more information (links to research and practice)

Sandbox_iPad Possibilities_Oct 2015

Always explore with a critical eye and ask yourself key questions such as:
• Is it intuitive?
• Is it interactive? Does it support content creation and collaboration?
• Can you edit once you’ve started?
• Can work be easily exported?


‘Whiteboard style’ applications are terrific for formative assessment, project work and digital storytelling (among other things). I like to offer students the opportunity to share their learning using ‘Explain Everything’ or ‘Showme’. Providing multimodal opportunities for expression and representation of learning supports Universal Design for Learning – remember to consider offering choice!

These apps allow students to create content on the iPad (rather than just ‘consuming’). Students are able to draw, text, upload images and narrate. This can provide the perfect platform for teachers to have the opportunity to recognize understandings and to catch misunderstandings. Using devices to support students creating (or co-creating) stories, presentations & projects moves the learning up the SAMR ladder!


Another opportunity to help a student construct and share their understanding might be a concept map. Mind mapping, or concept mapping, can be a powerful tool where students are encouraged to illustrate the connections between their ideas, concepts or content in meaningful ways.

“A concept map is a type of graphic organizer used to help students organize and represent knowledge of a subject. Concept maps begin with a main idea (or concept) and then branch out to show how that main idea can be broken down into specific topics”.  There are some excellent tutorials on this site and information for teachers about the ‘concept’ of ‘concept mapping’

mindmap
Try: Inspiration or Kidspiration  as iPad apps

*Many schools also have licensing for this application on their computers or laptops.

Digital Storytelling is another excellent use of the iPad for content creation… try Puppet pals, Showme or imovie (among others!)


Sketchnoting and Digital Storytelling offer many opportunities mobile content creation… try Puppet pals, Showme or imovie (among others!)

Feeling ambitious?? Consider this ‘App Smash’ sequence:

  • Storyboard your ideas using Kidspiration (or, better yet, markers and paper!).
  • Create a talking avatar (or narrator) using either Chatterpix (making an avatar with an image of your own) or Telegami (talking, moving avatars) and save the video to your camera roll. *Save a screen shot of the character if you want to embed it into your story at some point!
  • Draw a background using ‘Paper53’ and save it to your camera roll.
  • Now, create a story using either ‘PuppetPals’ or ‘Explain Everything’ (import your background and character into this app)
  • Finally, you can merge it all together using ‘iMovie’! You now have a personally constructed digital story!

Leave a Comment

Filed under Not Subject Specific, Resources